Using Group Policy to Set Clients to Update Automatically
|
| < Day Day Up > |
|
To take advantage of Software Update Services (see Chapter 6, “Completing the To Do List and Other Post-Installation Tasks ,” for more information), computers on the network must be configured. This is most conveniently done by creating a new Group Policy Object (GPO) with the appropriate settings and linking it to the desired container using Group Policy, as shown in the following steps:
-
Select Group Policy Management from the Administrative Tools menu.
-
In the console tree under the domain name, right-click MyBusiness and select Create And Link A GPO Here from the shortcut menu.
-
Type in the name for the GPO and click OK.
-
Right-click the new GPO and choose Edit from the shortcut menu to launch the Group Policy Object Editor.
-
Navigate to Computer Configuration, Administrative Templates, Windows Components, and double-click Windows Update.
-
In the details pane, double-click Configure Automatic Updates (Figure 10-30).
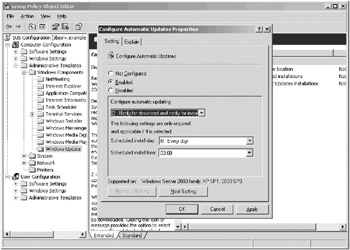
Figure 10-30: Configure Automatic Updates in the Group Policy Object Editor. -
Select Enabled, and then specify when and how Automatic Updates should run. The options are:
-
2 – Notify For Downloading And Notify For Install Presents a local notification message prompting a locally logged-on (or Remote Desktop) administrator to download and install the update.
-
3 – Auto Download And Notify For Install Automatically downloads new updates, and presents a local notification message allowing a locally logged-on (or Remote Desktop) administrator to install the update.
-
4 – Auto Download And Schedule The Install Automatically downloads new updates and installs them at the specified day and time.
-
-
Click Next Setting to continue. (Or click OK to finish.)
-
If you want clients to get updates from an intranet site instead of connecting to Windows Update over the Internet, select Enabled in the Specify Intranet Microsoft Update Service Location setting and type the address of the SUS server (http://sbssrv) in both boxes, and then click Next Setting.
-
In the Reschedule Automatic Updates Scheduled Installations setting, select Enabled to force clients to retry previously missed scheduled installations and specify how long after the next system startup the system should wait. Click Next Setting to continue.
-
In the No Auto-Restart For Scheduled Automatic Updates Installations setting, select Enabled to disable the automatic restart after an update. This allows the locally logged-on user to decide when to reboot after a scheduled installation that requires a restart. (The default behavior is to notify the user 5 minutes before the restart occurs automatically.)
-
Click OK when you’re finished.
Tip Steps 9–11 aren’t necessary to configure automatic updates. You must use Step 9 if updates are to be on an intranet, but Steps 10 and 11 are optional.
-
Type gpupdate at a command prompt to refresh Group Policy.
|
| < Day Day Up > |
|
EAN: 2147483647
Pages: 224