Configuring Fax Services
|
| < Day Day Up > |
|
Every organization has to cope with faxes—but you no longer have to cope with a fax machine and the daily stack of junk faxes (what we used to complain about before we complained about spam). Windows Small Business Server will send, receive, and route faxes. Faxes can be printed, sent to an e-mail address, stored in a folder (shared or not), or stored in a document library on your intranet Web site. Or you can install multiple modems and set routing differently on each one.
To set up the fax service, complete the following steps:
-
Click Start next to Configure Fax on the To Do List to launch the Fax Configuration Wizard. Click Next on the Welcome page.
-
The Provide Company Information page should show the name, the telephone and fax numbers, and the address that you provided during installation of Windows Small Business Server. Enter any missing information and click Next.
-
The Outbound Fax Device page lists the fax modems installed on the server. If you have more than one, use the arrows to set the order in which the devices are used. Click Next.
-
On the Inbound Fax Device page, select which modems will receive faxes. Check the option for all devices using the same routing information, or choose to have each device route independently.
-
On the Inbound Fax Routing page, select the routing methods. As you check an option, a Configure link prompts you for the e-mail address, folder, document library, or printer to use (Figure 6-12).
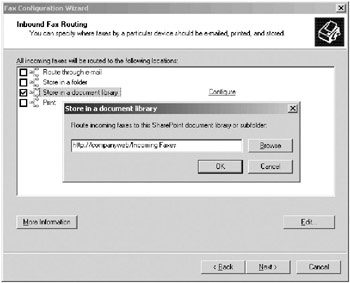
Figure 6-12: Selecting methods of fax routing. -
On the final page of the wizard is a summary of all the settings made. Click the link at the bottom of the page to save this information.
| More Info | For information about connecting to the Shared Fax Service from client systems, see Chapter 12. |
| Planning | Windows Small Business Server 2003 supports up to four fax modems to increase the number of simultaneous faxes the server can send and receive. |
Changing Fax Sending and Receiving
To change how faxes are sent and received, complete the following steps:
-
In the Server Management console, expand the Fax container, expand Devices And Providers, and then select Devices to view a list of fax modems installed on your system.
-
To change the attributes for a device, right-click the device and choose Properties from the shortcut menu. Use the Properties dialog box to configure the device’s send and receive settings:
-
Select the Send Faxes and Receive Faxes check boxes to enable the device to send and receive faxes.
-
If you chose to enable the receipt of faxes, choose how many rings to allow before the fax modem answers the line and attempts to receive the fax.
-
Type the sender ID text (usually your company name and telephone number) that you want to appear on outgoing faxes in the Transmitting Subscriber ID (TSID) box.
-
Type the ID text you want to provide to callers who send you faxes in the Called Subscriber ID (CSID) box (this is usually the same text).
-
-
Select Outgoing Routing in the console tree and then use the Groups and Rules containers to optionally route outgoing faxes to different fax devices based on the recipient’s fax number. (This can be useful to send all international faxes using a specific telephone line, for example.)
-
To work with cover pages, select Cover Pages in the console tree. Double-click a cover sheet to edit it in the Fax Cover Page Editor.
Setting Fax Service Properties
To change fax service properties such as delivery receipts, archiving, permissions, and logging, right-click Fax in the Server Management console, choose Properties from the shortcut menu, and then use the Fax Properties dialog box to change the server settings:
-
Select the Receipts tab to specify how to notify clients when faxes are sent successfully.
-
The Event Reports and Activity Logging tabs control what will be reported in Event Viewer.
-
Select the Outbox tab (Figure 6-13) to make settings for the outgoing fax queue.
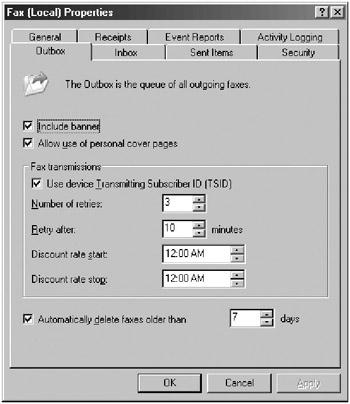
Figure 6-13: The Outbox tab of the Fax Properties dialog box. -
Use the Inbox and Sent Items tabs to control how faxes are archived (archiving is done separately from the normal delivery of faxes).
-
Select the Security tab to set fax server management permissions so that only the users and groups you select can send faxes, manage the fax service, or manage fax documents. (If you’re going to mess about with default fax permissions, do so either here or in the Printers And Faxes folder in Control Panel—not in both places). Click OK when you’re finished.
|
| < Day Day Up > |
|
EAN: 2147483647
Pages: 224