Appendix A: Partially Automating Installation
|
| < Day Day Up > |
|
Those who install Microsoft Windows Small Business Server 2003 often can save a good deal of time by automating Setup. There are two significant ways to automate Windows Small Business Server 2003 Setup: using answer files, and using the System Preparation Tool (Sysprep) in conjunction with a disk imaging program to make a copy of Windows Small Business Server 2003 halfway through Setup.
| Note | You can automate only the installation of the underlying operating system—you can’t automate the Microsoft Windows Small Business Server Setup Wizard, which is run in the second major phase of Windows Small Business Server Setup. (See Chapter 4, “Installing Windows Small Business Server 2003.”) |
Automating CD-Based Installations
During a normal installation of Windows Small Business Server, Setup stops a number of times to prompt the user for information. This process can be automated by using an answer file, which is a text file with answers to the questions Setup asks. You can create answer files manually using any text editor, or by using the handy Setup Manager tool, as described in the following steps:
-
From any Windows computer, insert Windows Small Business Server 2003 CD 1, or download updated Support Tools from the Microsoft Web site. Support Tools are usually upgraded with each Service Pack. Navigate to the \Support\Tools folder and extract the contents of the Deploy.cab file to a location on the hard drive.
-
Launch the Setupmgr.exe file from the location on the hard drive to which you copied the contents of the Deploy.cab file. The Setup Manager Wizard appears.
-
Click Next to begin using the wizard.
-
On the New Or Existing Answer File page, choose Create New and then click Next.
-
On the Type Of Setup page, choose Unattended Setup and then click Next.
-
On the Product page (Figure A-1), choose Windows Server 2003, Standard Edition, and then click Next.
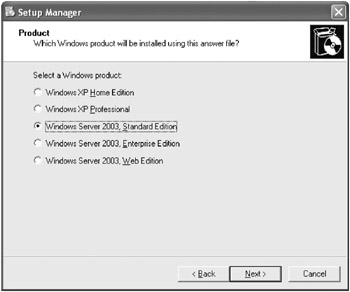
Figure A-1: The Setup Manager Product page. -
On the User Interaction page, choose the level of interaction that will be available during Setup (Figure A-2), and then click Next.
More Info For more information about determining user interaction during Setup, see the Real World sidebar “Choosing an Interaction Level” later in this appendix.
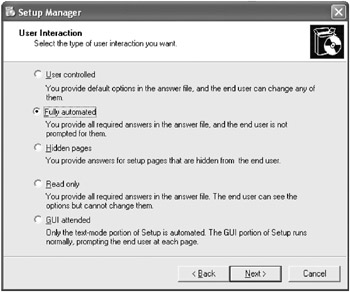
Figure A-2: The Setup Manager User Interaction page. -
On the Distribution Share page, select Set Up From A CD and then click Next.
More Info Windows Small Business Server 2003 can be installed from a network distribution share, but this requires the client to have network connectivity before running Setup, which often is impractical for Windows Small Business Server 2003 installations. For information about distribution shares, refer to Microsoft Windows Server 2003 Administrator’s Companion (Microsoft Press).
-
If you chose to fully automate the first phase of Windows Small Business Server Setup, on the License Agreement page, accept the terms of the End User License Agreement (EULA), and then click Next. OEMs aren’t permitted to use this step, and must use the OEM Preinstallation Kit (OPK) instead of Setup Manager.
-
On the Name And Organization page, supply the name and organization you want to use, and then click Next. A name and organization are required for a fully automated answer file.
-
On the Display Settings page, select the display settings for the computer, as shown in Figure A-3, and then click Next.
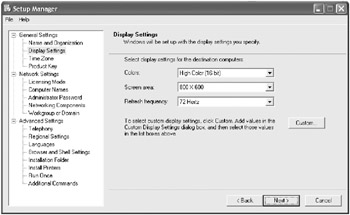
Figure A-3: Specifying display settings.Caution Although the Windows default display, which is 640 × 480, 60 Hz, and 16 colors, is dated, use extreme caution here. A usable setting that is mostly safe is 800 × 600, 72 Hz, and High Color (16-bit). If the screen area (resolution), colors, or refresh frequency is too high for the monitor plugged into the computer, the monitor could be damaged; at the very least you’ll be forced to reboot using the Safe Mode or Enable VGA Mode boot options and adjust the display settings to something safer.
-
On the Time Zone page, specify the time zone in which the servers will be placed and then click Next.
-
On the Product Key page, type the product key and then click Next. You’ll have to edit the answer file for each installation to update the product key, unless you have a Volume License version of Windows Small Business Server 2003.
-
On the Licensing Mode page, click Next to accept licensing Per Server with 5 CALs. (Windows Small Business Server 2003 licensing is configured after Setup, as discussed in Chapter 4.)
-
On the Computer Names page, create a list of computer names to use for the systems on which you will be installing Windows Small Business Server, as shown in Figure A-4. Type a computer name in the Computer Name text box, and then click Add. Setup Manager takes the names (if you have two or more) and creates a Uniqueness Database File (.UDF) that Setup then queries for computer names, using each name only once. Click Next to continue.
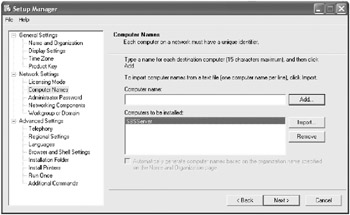
Figure A-4: The Setup Manager Computer Names page. -
On the Administrator Password page, you can specify an administrator account password for the systems and other settings. If you choose to specify a password now, select the Encrypt The Administrator Password In The Answer File check box, as shown in Figure A-5. If you don’t select this check box, the password is stored in plain text for anyone with Microsoft Notepad to read. Click Next to continue.
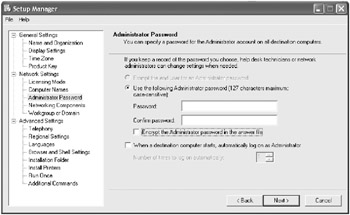
Figure A-5: Setting the Administrator password. -
Click Next on the Networking Components page, and then click Next again on the Workgroup Or Domain page. (Typical settings will be used for Networking Components and the computer will belong to a Workgroup.)
-
Use the rest of the pages to customize other settings such as Telephone, Regional, and Internet Explorer settings. On the Additional Commands page, click Finish.
-
In the Setup Manager dialog box, type the folder path in which you want to store the answer file, and name the answer file Winnt.sif (or Unattend.txt if you want to use the answer file with a distribution folder). Click OK and then click Cancel to exit Setup Manager.
-
Copy the Winnt.sif and Winnt.udb files to a floppy disk. (The Winnt.udb file exists only if you enter more than one computer name.) To use the disk, insert it immediately after the computer boots from the Windows Small Business Server 2003 CD-ROM, before Setup prompts you to press F2 to start the Automated System Recovery process.
| More Info | For detailed information about the parameters in the answer file, see the Microsoft Windows Corporate Deployment Tools User’s Guide help file, Deploy.chm, which is located in the \Support\Tools\Deploy.cab file on Windows Small Business Server 2003 CD 1. |
Choosing an Interaction Level
The level of user interaction determines how much the person running the installation needs to attend to the process. Here’s a more detailed explanation of the interaction levels:
-
User Controlled Uses the information in the answer file as default answers during the Windows installation. The user still has to confirm the defaults or make changes as the installation progresses.
-
Fully Automated Completely automates Setup by using the answer file. This option is best for quickly setting up multiple systems with identical configurations. If any settings don’t work properly (such as might happen when the product key is wrong), Setup will prompt for the correct information.
-
Hidden Pages Automates the parts of Setup for which you provide information, and prompts the user to supply any information not included in the answer file. The user sees only the parts of Setup that aren’t covered in the answer file. Use this option to standardize some aspects of installation but not others (such as the product key, the computer name, and user information).
-
Read Only Hides the parts of Setup for which you provide information, just like the Hidden Pages option. However, if a window with only partial answers is supplied in the answer file (and therefore not hidden from the user), the user can complete only the unanswered portion of the window. Settings provided by the answer file can’t be changed during installation.
-
GUI Attended Automates the text-based portion of Setup. The person running Setup supplies answers for the Windows Setup Wizard. Use this level when you want to automate the text-based portion of Setup and allow the person running the installation to provide the settings during the graphical user interface (GUI) portion.
|
| < Day Day Up > |
|
EAN: 2147483647
Pages: 224