Administration
|
| < Day Day Up > |
|
Microsoft SQL Server 2000 administration is not integrated into the Server Management console, but instead uses its own MMC snap-in, the SQL Server Enterprise Manager console (SQL Server Enterprise Manager.MSC). You can open this console from All Programs, Microsoft SQL Server, Enterprise Manager. In addition to the Enterprise Manager, there are individual management utilities for other tasks, including:
-
Client Network Utility (Cliconfg.exe) Creates the network protocol connections for SQL Server
-
Configure SQL XML Support in IIS (SQL IIS Admin.MSC) Configures a virtual directory that allows HTTP access to SQL Server 2000
-
Import and Export Data (Dtswiz.exe) The Data Transformation Services Import/Export Wizard is used to move data to and from other database formats
-
Profiler (Profiler.exe) Allows administrators to monitor the events in a SQL Server 2000 database instance
-
Query Analyzer (Isqlw.exe) Used to run interactive queries against the database and also to analyze the execution plan of the query
-
Server Network Utility (Svrnetcn.exe) Manages the server’s network properties, including protocols, encryption, and proxies
-
Service Manager (Sqlmangr.exe) Controls SQL Server 2000 related services
Start, Stop, and Pause
Although it’s easy enough to start or stop instances on your local machine using the Server Management console or even the Net Start and Net Stop commands from a command line, using the SQL Server Service Manager shown in Figure 19-1 enables you to start, stop, or pause a database on a remote server as well. You can also set a service to automatically start by selecting the Auto-Start Service When OS Starts check box.
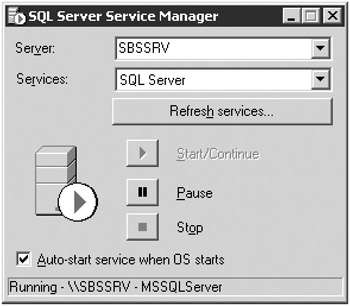
Figure 19-1: The SQL Server Service Manager lets you start, stop, and pause the services for both local and remote databases.
Backup
Backing up your SQL Server databases should be done on a regular schedule as part of a comprehensive backup and disaster recovery program. The SQL Server 2000 database backup is not integrated into the Windows Small Business Server Backup utility and so must be run separately. SQL Server 2000 supports both standard tape and file backups, and logical backups using the export utility covered in the section titled “Import and Export Data,” later in this chapter.
| More Info | For more information about backups in general, see Chapter 13, “Backing Up and Restoring Data.” For detailed information about off-site backups and disaster recovery scenarios, see Chapter 21, “Disaster Planning and Fault Tolerance.” |
Defining a Backup Device
To simplify backing up a database, and to allow you to create the backup from within TransactSQL, the SQL Server interactive query application, you can first define one or more backup devices. Both tape drives and file backups are supported, but you should back up to a tape drive whenever possible to enable you to store critical backups off site.
| Tip | Backing up to a CD or DVD burner directly is not supported, but using third-party software that makes the CD or DVD drive appear as a normal file system allows SQL Server backups to write directly to the CD or DVD. |
| Caution | Writeable and rewriteable CDs and DVDs are not considered a suitable medium for long-term archival storage and should not be used for reference archival storage. They can be appropriate for providing a fast and cost-effective short-term backup medium, however. |
To add a backup device, complete the following steps:
-
Open the SQL Server Enterprise Manager if it isn’t already open.
-
In the console tree, expand Microsoft SQL Servers, SQL Server Group, (local) (Windows NT), Management, and then select Backup, as shown in Figure 19-2.
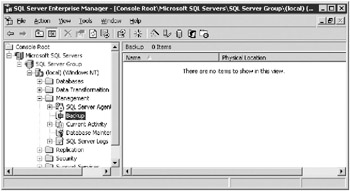
Figure 19-2: The Backup utility of the SQL Server Enterprise Manager. -
Right-click Backup and select New Backup Device. If you select a Tape device, this device must be physically connected to the Windows Small Business Server machine—remote tape devices are not supported. If the device is a File device, as shown in Figure 19-3, you must give it both a logical name (“Default” in the figure) and a physical file name (“R:\SQL Server\Default Backup.bkf” in the figure).
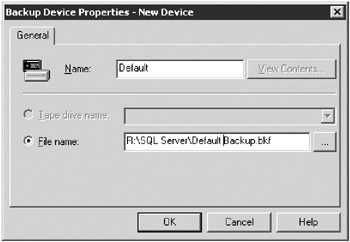
Figure 19-3: Assigning both a logical and a physical name to the backup file. -
Click OK to complete the device definition. Future backups can be directed to the logical device or the physical file.
Backing Up a Database
Even if you haven’t yet defined a backup device, you can add a backup device as part of the backup process when you are doing your backup from the SQL Server Enterprise Manager. When you back up using the SQL Server Enterprise Manager, you can use existing backup devices or specify new ones.
To back up a database from SQL Server Enterprise Manager, complete the following steps:
-
Open the SQL Server Enterprise Manager if it isn’t already open.
-
Expand the (local) SQL Server Group, expand Management, and then select Backup.
-
Right-click Backup and select Backup A Database to open the SQL Server Backup dialog box shown in Figure 19-4.
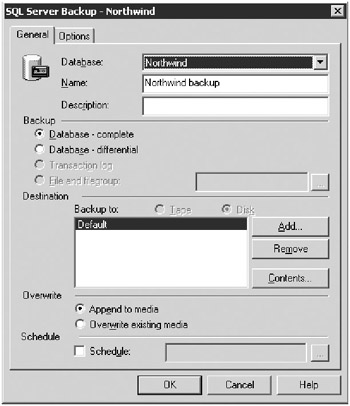
Figure 19-4: The SQL Server Backup dialog box. -
Select the database to back up from the drop-down list.
Note The database tempdb appears in the drop-down list but cannot be backed up.
-
Type a name for the database backup in the Name field.
-
Type a description for the backup in the Description field.
-
Select the type of backup to be performed. The available choices will vary depending on the database being backed up. For most databases, the choices are either Database–Complete or Database–Differential.
-
Select the backup destination. If the destination you want to use is not shown, click Add to add an additional destination to the list.
-
Select Append To Media to append to an existing tape or disk backup. Select Overwrite Existing Media to erase the previous contents of the backup destination and create a new backup.
-
Select the Schedule check box and then click the ellipsis button (…) to create a schedule for the backup using the Edit Schedule dialog box, as shown in Figure 19-5.
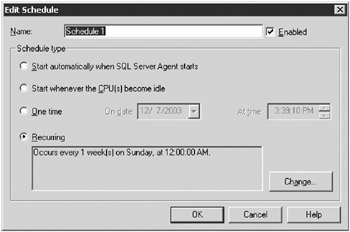
Figure 19-5: The Edit Schedule dialog box. -
Click OK to schedule the backup job if you created a schedule or to start the backup immediately if you didn’t.
Viewing the Contents of a Backup Device
Because a backup device might contain more than one backup, it is useful to be able to see what the contents of the device are. To view the contents of a backup device, do the following:
-
Open the SQL Server Enterprise Manager if it isn’t already open.
-
Expand the (local) SQL Server Group, expand Management, and then select Backup.
-
Double-click the backup device to open the Backup Device Properties dialog box shown in Figure 19-6.
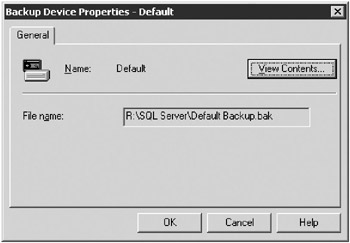
Figure 19-6: The Backup Device Properties of the Default device, a file system backup. -
Click View Contents to open up the View Backup Media Contents dialog box shown in Figure 19-7.
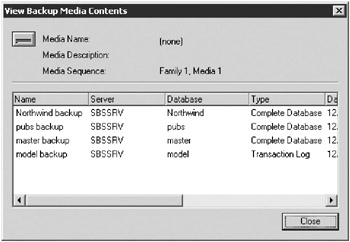
Figure 19-7: The contents of the Default backup device on SBSSRV.
Import and Export Data
You can use the Data Transformation Services (DTS) Import/Export Wizard to make or restore a logical backup of a database and to transfer data between databases. The databases can be SQL Server databases or other databases for which there are drivers.
| More Info | There are several other methods that can be used to import or export data from a SQL Server database. For more information about Import and Export methods and SQL Server in general, see the Microsoft SQL Server 2000 Administrator’s Companion (Microsoft Press) or one of the many other books available on SQL Server 2000. |
As shipped, the supported formats for Import and Export are:
-
dBase (several versions)
-
Microsoft Access
-
SQL Server
-
Microsoft Excel
-
Microsoft Exchange
-
Oracle
-
Microsoft Visual FoxPro
-
Paradox (several versions)
-
Text files
Also, any OLE DB or ODBC driver you have can be used with DTS.
Exporting Data from SQL Server
To export data from SQL Server, complete the following steps:
-
Open the Data Transformation Services Import/Export Wizard by clicking Start, All Programs, Microsoft SQL Server, and then Import And Export Data. Click Next.
-
On the Choose A Data Source page, shown in Figure 19-8, select Microsoft OLE DB Provider For SQL Server from the Data Source drop-down list.
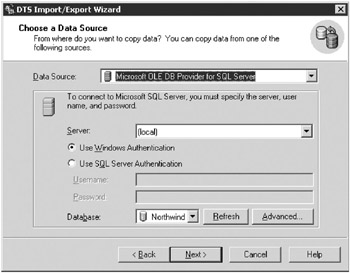
Figure 19-8: The Choose A Data Source page of the DTS Import/Export Wizard. -
Select (local) from the Server drop-down list.
-
Select Use Windows Authentication unless you need to specify specific credentials for the database you are exporting.
-
Select the database you want to export data from using the Database drop-down list. Click Next.
-
On the Choose A Destination page shown in Figure 19-9, select a destination format. The destination options will vary depending on the output format you select. Click Next.
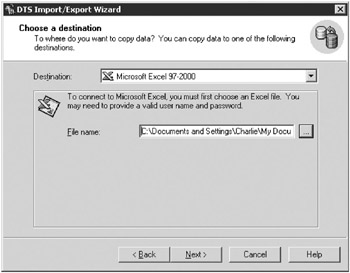
Figure 19-9: The Choose A Destination page of the DTS Import/Export Wizard. -
On the Specify Table Copy Or Query page shown in Figure 19-10, you can choose whether to copy whole tables and views or to use a SQL query to filter the data. Click Next.
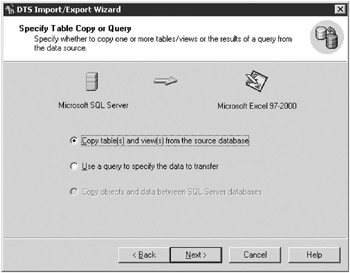
Figure 19-10: The Specify Table Copy Or Query page of the DTS Import/ Export Wizard. -
If you selected Copy Tables And Views From The Source Database, you’ll see a list of the available tables and views in the source database. Select the check boxes next to the tables or views you want to export, as shown in Figure 19-11. If you selected a query, you get a page that lets you enter a SQL query, or you can use the Query Builder to build the query interactively.

Figure 19-11: The Source Tables And Views page of the DTS Import/Export Wizard. -
Select a row in the list of tables and click Preview to see the data in the source table that will be exported. Click OK to close the View Data dialog box and then click Next in the wizard.
-
On the Save, Schedule, And Replicate Package page shown in Figure 19-12, select the Run Immediately check box to run the export immediately.
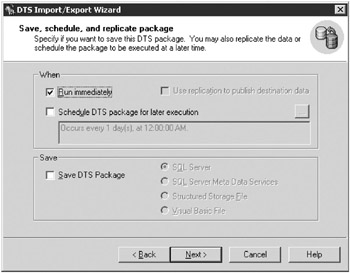
Figure 19-12: The Save, Schedule, And Replicate Package page of the DTS Import/Export Wizard. -
Select the Schedule DTS Package For Later Execution check box if you want to run this export later or on a regular schedule. Click the ellipsis button (…) to adjust the schedule—the default is once a day.
-
Select the Save DTS Package check box and choose a format to save your DTS selections for later reuse. You’ll see an additional Save DTS Package dialog box. Click Next.
-
On the Save DTS Package page are settings for saving packages. The settings for storing packages in SQL Server are shown in Figure 19-13. If you choose to save your package in a different storage format, the page will have options appropriate to your choice. If you didn’t select either a schedule or a save option, you’ll skip past this page entirely. Click Next.
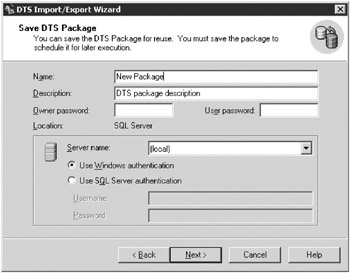
Figure 19-13: The Save DTS Package page, which appears if you’ve selected SQL Server as your storage mechanism. -
On the final summary and confirmation page, if everything looks right, click Finish and the export will be executed or stored as selected.
Importing Data into SQL Server
To import data into SQL Server, complete the following steps:
-
Open the Data Transformation Services Import/Export Wizard by clicking Start, All Programs, Microsoft SQL Server, and then Import And Export Data. Click Next.
-
On the Choose A Data Source page, select a data source from the Data Source drop-down list. The available options will be different depending on the data source chosen. Figure 19-14 shows the options for an Oracle ODBC source. Click Next.
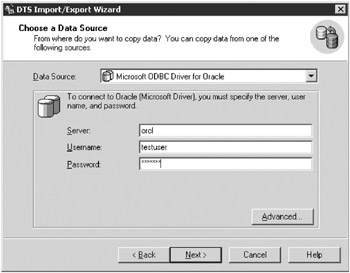
Figure 19-14: The Choose A Data Source page with an Oracle ODBC source. -
On the Choose A Destination page, select Microsoft OLE DB Provider For SQL Server to import into SQL Server 2000. Set the rest of the options for the SQL Server database connection. You can choose to create a new database, or import into an existing one. Click Next.
-
On the Specify Table Copy Or Query page, you can choose whether to copy whole tables and views or to use a SQL query to filter the data. Click Next.
-
If you selected Copy Tables And Views From The Source Database, you’ll see a list of the available tables and views in the source database. Click Preview to see the data in the source table that will be imported. If you selected a query, you get a page that lets you enter a SQL query, or you can use the Query Builder to build the query interactively. Click Next.
-
On the Save, Schedule, And Replicate Package page, shown previously in Figure 19-12, select the Run Immediately check box to run the export immediately.
-
Select the Schedule DTS Package For Later Execution check box if you want to run this export later or on a regular schedule. Use the ellipsis button (…) to adjust the schedule—the default is once a day.
-
Select the Save DTS Package check box and choose a format to save your DTS selections for later reuse. You’ll see an additional Save DTS Package page. Click Next.
-
On the Save DTS Package page are the settings for storing packages in SQL Server (shown earlier in Figure 19-13). If you choose to save your package in a different location, the page will have options appropriate to your choice. If you didn’t select either a schedule or a save option, you’ll skip past this page entirely. Click Next.
-
On the final summary and confirmation page, verify that the information is correct and then click Finish. The export will be executed or stored as selected.
The DTS Tool
The Data Transformation Services (DTS) tool that is included with SQL Server 2000 is really useful even if you have no need to import or export to SQL Server. Because it understands a wide variety of database formats, you can easily use the tool to create and store transformations between different data formats. This gives you a lot of flexibility when dealing with data from a wide variety of sources.
SQL Query Analyzer
The SQL Query Analyzer is a useful tool for both creating quick queries of the database and conducting more in-depth analysis of the best way to structure a particular query to improve execution speed. The SQL Query Analyzer application is shown in Figure 19-15.
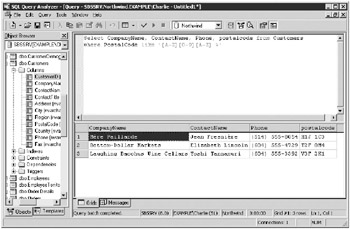
Figure 19-15: The SQL Query Analyzer.
The left pane of the SQL Query Analyzer is an Object Browser that lets you browse through the databases that are registered on your server. You can use the browser to find the tables, indexes, procedures, or any other objects in the available databases. A useful tool just for that portion.
The right pane of the object browser will change appearance and content depending on what is being done. Figure 19-15 shows a simple query against the Northwind sample database that ships with SQL Server. Here we’ve queried the Customers table to find all the Canadian customers, taking advantage of the fact that we know the format of the PostalCode field for a Canadian address. Probably not the most effective way to get there, since the database includes a Country field, but an example of the flexibility of the SQL language.
The upper half of the right pane shows the actual query that was executed, whereas the lower half shows a grid view of the results. You can send the results of your query to a file by selecting Results To File from the Query menu, or analyze the efficiency of the query by selecting Show Execution Plan from the Query menu.
The SQL Query Analyzer has a wealth of additional features that make it an invaluable tool for the database administrator (DBA) or developer who needs to tune an application or database for maximum performance.
|
| < Day Day Up > |
|
EAN: 2147483647
Pages: 224