9.5 The cSpriteIcon class The author did a lot of coding and encapsulating in order to come up with a cSprite child class called cSpriteIcon . cSpriteIcon has a constructor cSpriteIcon(int resourceID) which takes the ID of a bitmap resource as its argument. To make things nicer, the cSpriteIcon will automatically make the background of the image transparent. To give a critter a transparent-background sprite based on a resource bitmap with an ID like, say, IDB_EARTH , we only need to add a single line to the critter's constructor. setSprite(new cSpriteIcon(IDB_EARTH)); We also have the option of not having a transparent background at all. The full prototype of the cSpriteIcon constructor looks like this. cSpriteIcon(int resourceID, BOOL transparent = TRUE, BOOL presetaspect = FALSE); If we put a FALSE in the second argument to the constructor, we get a solid bitmap. The third cSpriteIcon constructor argument isn't often used. This presetaspect field of cSpriteIcon relates primarily to the cSpriteIconBackground , which sets it to TRUE . The purpose of cSpriteIconBackground is to make a solid big icon suitable for use as a background in a game. Its constructor is of the form cSpriteIconBackground(int resourceID, const cRealBox2 &borderrect) , where the borderrect is ordinarily going to be a wall of the 3D cRealBox that your game lives inside. When presetaspect has the normal cSpriteIcon default value of FALSE , the sprite is proportioned to match the shape of the resource bitmap specified by resourceID . When presetaspect is TRUE we want to cover some definite fixed shape like a border rectangle with our bitmap. Some transparent background bitmaps in an OpenGL Pop display. Note that OpenGL can rotate bitmaps to match the critter orientation. The Windows display doesn't rotate them 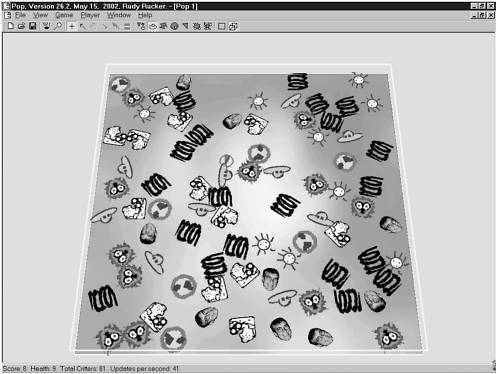 When you want to make a new bitmap of yours into a cSpriteIcon you need to be aware of the following points. -
First you have to save the bitmap in the * .bmp format. Most things you pull off the Web will be * .gif or * .jpg . In order to convert to the * .bmp format, you need to open the file in some reasonably powerful graphics tool such as a photo editor, and then save it in the * .bmp format. -
Before saving the * .bmp , you should resize the image so that it is not much larger than you expect it to be onscreen. It's pointless to save a screen-sized image of a face that you intend to use for a fingernail- sized icon. Not only is it a waste of memory to use a big source bitmap for a small target, if you leave it up to your system to dynamically squash your big bitmap down to a postage stamp, you have no control of the exact way in which the squashing is done. In the worst cases, the appearance of the small bitmap will seem to flicker and change as the critter moves about. Take the time to cleanly convert your bitmap into a size close to what you'll be viewing it in. If some important feature doesn't show up in the small size, edit the image to make it look right. -
In order to make OpenGL handle your bitmaps smoothly, it is important to adjust the pixel size of each source bitmap so that each each edge is a power of two, such as 16, 32, 64, 128, 256, 512, etc. The bitmap can be rectangular, that is, the edges don't need to be the same, but both edges should be a power of two. You can resize the bitmap in your image editor. In the case where resizing would distort the bitmap, as with a face, you simply need to add blank filler pixels along two edges; you can do this by copying the area you want to keep, making a new bitmap with the desired edge lengths and then pasting in the image area. -
There is one peculiarity of the cSpriteIcon constructor that you need to be aware of. When you make a transparent-background icon, the constructor will pick one color found in the resource bitmap and treat this color as if it is transparent. Which color should it use? You might say 'white,' but it might very well be that you want to have some white pixels inside your bitmap icon. The rule which cSpriteIcon uses is to look at the color of the pixel in the upper left corner of the bitmap resource and treat this color as transparent. Thus, if you want to have white in your bitmap, fill in the background that you don't care about with some other color, say purple, and make sure that the upper left hand corner pixel of your bitmap is purple. If you are using a complicated photo-based bitmap you need to make doubly sure that the upper left pixel is indeed the color which you want to have be transparent. -
In saving to the * .bmp format, you have the option of saving in '256 color mode' which is also known as '8 bit mode.' This is as opposed to a 'millions of color mode' or a 'true color mode.' The 256 color/8 bit mode will sometimes make your image look less good, but it has the virtue of making the image file smaller and allowing it to be put on the screen more rapidly . This is an issue either if you have a lot of bitmap images or if you have a bitmap image which is large (such as a background bitmap). Always try 256 color/8 bit first. -
Once you have the * .bmp , move it to the res subdirectory of the directory where your game's code lives. Now you can import this bitmap into your project as a new bitmap resource. Use Project Add Resource... Import... and then navigate to find your * .bmp file. The Resource Editor will open your imported bitmap. [With Version 6.0, import a bitmap by using Insert Resource Bitmap Import... In Version 6.0, some bitmaps will not be viewable within the Resource Editor, but this doesn't mean they can't be added to the project.] It's helpful to give your bitmap an easy-to-remember resource ID name like IDB_HAPPYDOG instead of the machine-generated ID (like IDB_BITMAP1 ) it will have received. To call up the Bitmap Properties dialog you can Alt+Enter while the bitmap is open in the editor. -
Once you've done this, you can use the resource ID to make a new sprite with a line like new cSpriteIcon(IDB_HAPPYDOG) . -
It is perfectly all right to have several different critters use the same bitmap and the same IDB_HAPPYDOG resource. But you must make a fresh cSpriteIcon for each of them. (If two critters share the same sprite, there will be trouble when the program ends, as the sprite will get deleted twice, which will cause a crash.) If you write your code properly and create and install the sprite inside the critter constructor this happens automatically. -
Don't worry about having lots and lots of critters with cSpriteIcon images, as our cGraphics implementations share resources among the cSpriteIcon objects in a memory-efficient way. -
In OpenGL , if you have a large view of a small CSpriteIcon , the speed drops . The CSpriteIcon is a texture pattern of squares derived from the bitmap pixels. Projecting large images of those squares is costly.  |