Chapter 45: Sending and Receiving Faxes
Once you have a computer set up and working fine, you need to go out and purchase a fax machine to make your home office complete, to fax legal documents that require signatures, or to have the ability to fax a take-out order to the local pizza place. Or, you could just use your computer to act as a fax machine.
Whether your computer connects to a phone line directly through an internal modem or via the Internet, you can both send and receive faxes through your PC. This capability is integrated directly into most of the major word processors, letting you send a fax as easily as selecting a menu command.
This chapter covers the details to enable your computer to act like a fax machine.
Creating a Fax in Windows
Before you start sending faxes using Windows, you first need to install the fax component. This requires that you install an internal modem that supports faxing on your system. After the fax component is installed, you can configure it to work with your computer.
| Note | The fax component isn't installed by default. |
Installing the fax component
Before installing the fax component, you can check your system to see if the component is already installed. Open the Start ![]() All Programs
All Programs ![]() Accessories
Accessories ![]() Communications menu and look for the Fax Console option. If the component isn't there, you need to install it from the Windows Setup CD.
Communications menu and look for the Fax Console option. If the component isn't there, you need to install it from the Windows Setup CD.
To install the Fax Console component from the Windows Setup CD, follow these steps:
-
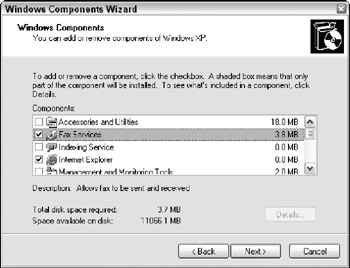
Open the Control Panel and click the Add/Remove Windows Components button. This opens the Windows Component Wizard, shown in Figure 45.1.

Figure 45.1: The Windows Component Wizard lets you install additional components to Windows. -
Select the Fax Services button and click Next.
-
Some files copy from the Windows directory, but you need to insert the Windows Setup CD to complete the installation. If you can't find the correct components, browse to the D:\I386 directory.
-
When the installation is complete, click Finish to close the wizard.
Configuring the Fax Console
After you've installed the fax component, you can open and configure the Fax Console using the Start ![]() All Programs
All Programs ![]() Accessories
Accessories ![]() Communications
Communications ![]() Fax
Fax ![]() Fax Console menu. If this is the first time you've accessed the Fax Console, the Fax Configuration Wizard appears, but if you've already configured your computer for faxes, then this option opens the Fax Console. If you need to change the fax settings, you can revisit them in the Printers and Faxes option in the Control Panel.
Fax Console menu. If this is the first time you've accessed the Fax Console, the Fax Configuration Wizard appears, but if you've already configured your computer for faxes, then this option opens the Fax Console. If you need to change the fax settings, you can revisit them in the Printers and Faxes option in the Control Panel.
| Note | As the Fax Configuration Wizard opens, it searches your system for a modem installation. If the Fax Configuration Wizard doesn't find a modem installed on your system, you need to install one or run the troubleshooter to make sure the modem is working properly. |
| CROSS-REF | You can learn more about working with modems in Chapter 44. |
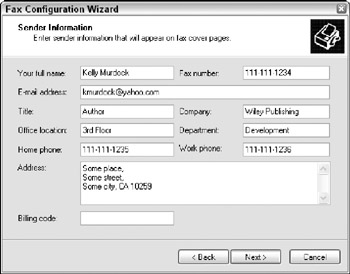
The first page of the Fax Configuration Wizard, shown in Figure 45.2, lets you enter personal information that is used to automatically create fax cover pages. The wizard then completes the configuration and closes. You can revisit the personal information entered in the wizard by selecting the Tools ![]() Sender Information menu in the Fax Console.
Sender Information menu in the Fax Console.

Figure 45.2: The Fax Configuration Wizard lets you enter personal information for creating fax cover pages.
The next step of the Fax Configuration Wizard lets you select the modem that you use to send and receive faxes. If you check the Enable receive box, the modem automatically answers the telephone when faxes are received if the line is available. Sending and receiving faxes requires that the line be available. If someone is using the phone line, then the status for the fax is set to Line Unavailable and faxes cannot be sent or received until the line is cleared.
| Note | Most modems include the ability to handle faxes, but some older modems do not. |
The next step of the Fax Configuration Wizard requires that you enter a Transmitting Subscriber Identification (TSID) string. This ID is used to track faxes if any abuse is detected, so you know who to contact when you receive unwanted faxes. It is common to enter some characters to identify the computer followed by your phone number. The TSID also appears on the fax machine of the location where you are sending the fax. If your name is Johnson, then the TSID could be Johnsons followed by your phone number. The receiving fax identifier value can be the same as the TSID.
The final step of the Fax Configuration Wizard lets you specify a folder where the incoming faxes are stored and a printer where the faxes can print.
Changing the fax settings
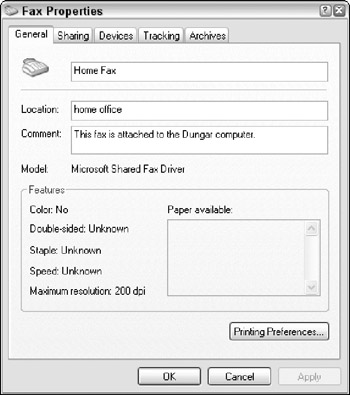
If you need to revisit any of the configuration settings, you can view all the configured fax devices using the Printers and Faxes option in the Control Panel. If you select a fax device and choose the File ![]() Properties menu, the Fax Properties dialog box appears, as shown in Figure 45.3.
Properties menu, the Fax Properties dialog box appears, as shown in Figure 45.3.

Figure 45.3: The Fax Properties dialog box includes all the settings for the configured fax device.
You can change the TSID value in the Devices panel. The Tracking panel includes options for notifying you and opening the Fax Monitor when faxes are sent or received. It can also configure the sounds that are played when these events take place, so you'll be able to hear from the other room when the outgoing fax is completed. The Archives panel includes settings for specifying where the incoming and successful outgoing faxes are stored.
EAN: 2147483647
Pages: 372