Task: Dragging with Trails

I l @ ve RuBoard

In this next example, we'll store a series of locations in an array. As the mouse moves, we'll push the current location onto the array and shift the oldest location off of the array. That way, we'll maintain a list of the 10 most recent positions of the cursor.

We'll use this information to set the locations of 10 movie clips. The result will be a trail of movie clips that follow the cursor around.

  1. Start with a new movie.

  2. Create a small movie clip that will be an element of the tail. It can be just a very small circle. Leave this movie clip in the Library, but delete it from the screen. Set its Linkage properties so that it exports with the movie and uses the linkage name Cursor.

  3. Create an Actions movie clip to hold the scripts, as in the previous task. Place it off the visible area of the workspace.

  4. Attach this script to the Actions movie clip. It starts by creating 10 instances of the Cursor movie clip. Then it makes an array named trail .

     onClipEvent(load) {     // create 10 cursor followers     for(var i=0;i<10;i++) {         _root.attachMovie("cursor","cursor"+i,i);     }    // start the array     trail = new Array(); } 

    With every frame that passes , the new location of the mouse will be put into a simple custom object. This object will have x and y properties with values that correspond to the _root._xmouse and _root._ymouse properties of the movie.

    This new object will be pushed onto the array. This means that the value goes on the end of the array. If more than 10 items are in the array, the first and oldest item is removed.

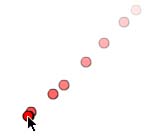
    The array now holds the last 10 locations of the mouse, in order from oldest to most recent. It sets each one of the 10 movie clips to one of these locations. The _alpha of each movie clip also changes to reflect the age of the location. Its oldest location will be at 10 percent, whereas the most recent will be at 100 percent.

     onClipEvent(enterFrame) {     // mark the mouse location     cursorLoc = {x:_root._xmouse, y:_root._ymouse};     // add the new location to the array     trail.push(cursorLoc);     // delete the oldest location     if (trail.length > 10) trail.shift();     // change the positions of all cursor followers     for(var i=0;i<trail.length;i++) {         _root["cursor"+i]._x = trail[i].x;         _root["cursor"+i]._y = trail[i].y;         _root["cursor"+i]._alpha = i*10; // change blend too     } } 
  5. Test the movie, or try 11cursortrail.fla to see it in action. As you move the cursor around, you will see the little movie clips follow it. Figure 12.2 shows what this should look like. You can make the trail closer by increasing the frame rate of the movie. You can also try to see what happens when you use 20, or even 100 movie clips rather than 10.

    Figure 12.2. These small movie clips follow the cursor around.

    graphics/12fig02.jpg

I l @ ve RuBoard


Sams Teach Yourself Flash MX ActionScript in 24 Hours
ISBN: 0672323850
EAN: 2147483647
Year: 2002
Pages: 272

flylib.com © 2008-2017.
If you may any questions please contact us: flylib@qtcs.net