Viewing and Adjusting
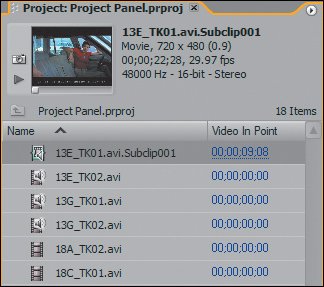
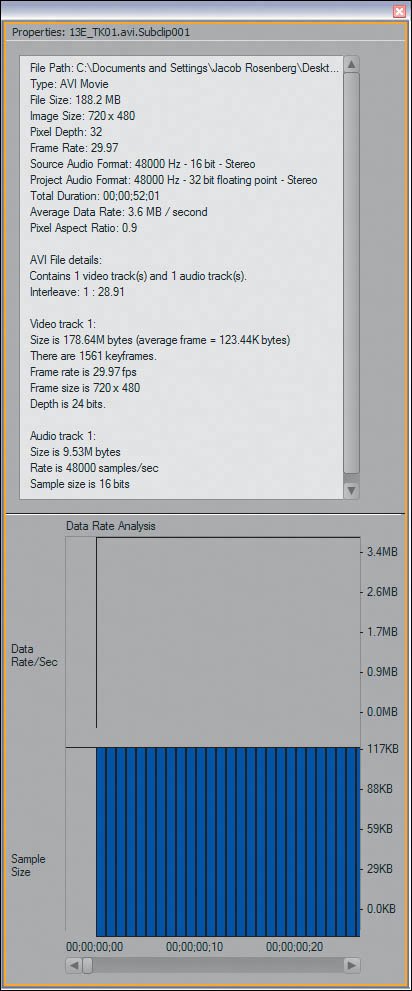
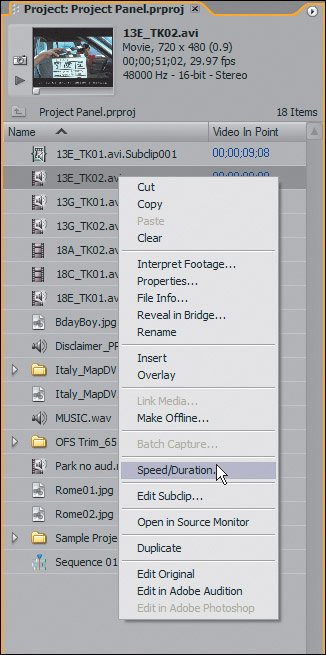
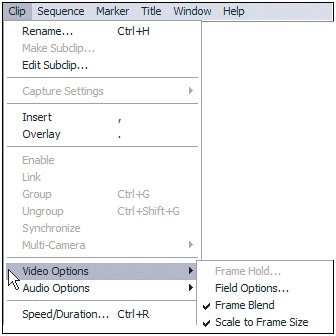
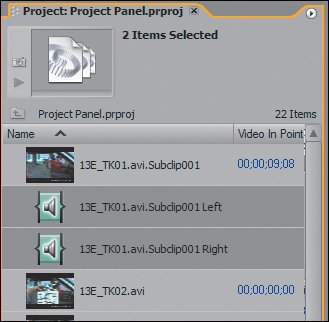
| After you import files into your project, you can extract a lot of information from them and make a number of adjustments to the files before you edit with them. You know the List view contains a ton of columns that reveal all the data associated with each file. Now I want to show you some additional functions and features that make working with the files a bit easier. Thumbnail Preview AreaIn the top left corner of the Project panel, the Thumbnail Preview area provides a preview of and some information about the selected item in your Project panel (Figures 3.19). If you click once on an audio, video, or sequence file, you will get the associated thumbnail and a little transport control to play that file. If you are editing DV files in DV mode, they will play on your FireWire device as well as in the Thumbnail Preview area. I love the fact that you can play back a sequence in this area without having to open it in the Timeline panel. Figure 3.19. With any clip selected in the Project panel, the Thumbnail Preview area (top-left corner) displays a preview with some additional details about the file. Not only can you turn off this area to give more space to the contents of your project, you can also play back and assign poster frames for any of the selected media. With the List view set to thumbnails off, you can always click on a file and see the thumbnail for it in the Thumbnail Preview area PropertiesYou can view properties for the selected file in two different places. Although you will get a brief bit of information in the Thumbnail Preview area, if you right-click on a file in the Project panel and choose Properties, you will get a lot more. In addition, you can access this function by choosing File > Get Properties for > File/Selection. Viewing your properties is the way to verify certain settings and parameters associated with your file (Figures 3.20). If you are unclear which compressor is used with an imported video clip, for example, the compressor will be revealed when you get properties for the clip. Figure 3.20. The Properties dialog not only gives you details of the selected file's audio, video, and timecode attributes, but also a graphic analysis of the data rate Project SettingsTo access your Project Settings once your project is open, go to Project > Project Settings and then choose the area you want to adjust or change. Because the project has already been created and is open, certain parameters will be locked. Clip SettingsYou can adjust and access a few settings for certain selected media in your Project panel. For example, if you want to switch the incorrect field order of a video clip, you can access the field order from the Clip menu once you have your video clip selected in the Project panel. Adjusting your clips within the Project panel keeps you one step ahead of your edit. If you have a clip that you want to use in slow motion only, you don't have to always adjust its speed in the Timeline panel; you can preset the speed to the master clip directly in the Project panel (Figures 3.21). Figure 3.21. Right-clicking on any file in the Project panel reveals a context menu of options for that file. For example, you can adjust the speed of a clip within the Project panel before it is added to your sequence Video Clip MenuWith a video clip selected, the Clip menu reveals a handful of functions that you can apply to the clip (Figures 3.22). Rename allows you to change the alias for the file in the Project panel. It does not modify the linked file on disk, but just the displayed file in the project. You can edit your clip directly to the Timeline panel by using Insert and Overlay. Choose Clip > Video Options > Field Options. From the resulting Field Options dialog, you can change any of the field settings associated with your clip. The last Clip menu choice is to modify the speed or duration of the file. Figure 3.22. If a selected clip contains audio and video, you gain access to the Video Options and Audio Options submenus in the Clip menu. The Video Options submenu is where you'll find the menu item for turning off the default scaling for a video or still file that was imported with Scaling turned on If you modify a master clip in the Project panel, it affects all edited instances from that modification point forward. If you previously edited five instances from one master clip, then changed its speed to 50%, those five instances would not change to 50%. Audio Clip MenuWith audio files selected, a number of very important features are available in the Clip > Audio Options submenu: Audio Gain, Source Channel Mappings, and Extract. Breakout To is still in there too, but it's not as important as it used to be. Audio Gain and Normalizing Your AudioWhen you import an audio file, it has a set volume level associated with it. Once you edit the audio file into your timeline, its volume can be increased or decreased a number of ways. An incredibly powerful feature that is somewhat hidden, Audio Gain allows you to perfect the audio level of your master clip so that you do not need to make constant adjustments of the edited subclips. Adjusting your Audio Gain setting allows you adjust your audio level based on an increase or decrease in decibels (dBs). If you have an audio clip selected or a video clip with audio, go to Clip > Audio Options > Audio Gain. The Gain dialog allows you to either increase or decrease the dB of your selected clip. The Normalize button takes this one step further (Figures 3.23). Figure 3.23. From the Clip menu, you can access the Clip Gain dialog, which allows you to normalize your clip gain level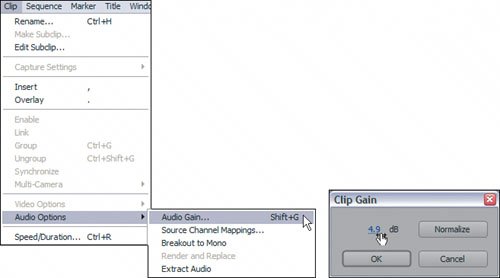 Within the range of audio volume levels, there are some decibel ratings that don't register any sound at all (low) and others that register sounds too loud (high). If sound levels register too high, you will usually get pops, crackles, or distortions. If your original recording has pops, crackles, and distortions, there is not too much you can do to remove those sounds as you cannot undo the audio that was recorded. If the volume for the audio file you import is too low or too high once it arrives in Premiere Pro, however, you can make a uniform adjustment to compensate for that. Normalize is an intelligent, automated function that looks at your entire audio file, at the peaks and valleys (highs and lows), then recommends the gain setting that will give you the best volume adjustment value without exceeding the proper ceiling of 0dB during playback. Normalize gives you a positive or negative dB value that will bring your volume to a safe overall level where there is no distortion. Normalize saves a ton of your time tinkering to find the right level. Normalizing in the Project window on the master file ensures that all of the master clip's associated subclips will honor that level adjustment. I recommend that when you import audio clips and audio/video clips you first normalize their levels to get them to the best dB setting. You can worry about specific instances where you want to make minor adjustments later. Source Channel MappingsIt's funny how a small feature can demand such enthusiasm, but the arrival of Source Channel Mappings in 2.0 has generated a great deal of excitement. Choosing Clip > Audio Options > Source Channel Mappings enables you, for example, to remap the stereo audio of a DV clip so that two mono audio files are attached to the video instead. Although the clip appears exactly the same in the Project panel, when you edit with it in the Timeline panel, the video is linked to two separate mono files, each reflecting the left and right channels of the source stereo file. The Source Channel Mappings dialog is very straightforward. Here you can turn off channels, swap channels, and remap stereo, mono, and 5.1 audio files into any of the three formats (Figures 3.24a and b). Additionally, if you wanted to break a stereo clip into a pair of mono tracks, but keep them recognized as stereo, you can select Mono as Stereo. Mono as Stereo breaks the Left and Right channels of a stereo clip into two separate Stereo channels; each individual channel is then filled with a stereo version of the Left or Right channel. Figures 3.24a and b. This long overdue audio feature enables Premiere Pro editors to edit stereo audio clips as a linked pair of mono clips. While the feature Breakout to Mono creates a physical pair of new mono files in your Project panel, the Source Channel Mappings dialog (a) allows you to remap a stereo clip as mono without adding any extra clutter to your Project panel. Additionally, when you open a stereo audio clip that has been remapped as mono in the Source Monitor, you can toggle between the two channels via a drop-down menu at the bottom of the viewing area (b)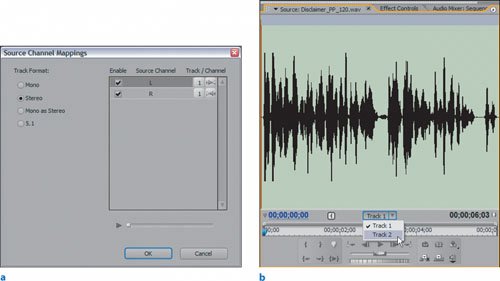 A previous (1.5) feature, Treat as Stereo, has been replaced by Source Channel Mappings as well. If you want to make a mono file appear and play as stereo, you just select the file and go to Clip > Audio Options > Source Channel Mappings. In the resulting dialog, click Stereo, and then OK. Breakout ToWith the introduction of Source Channel Mappings, the Breakout To feature is no longer as significant, especially because Breakout To tends to clutter your Project panel with additional files that don't have the same linked property as source channel mapped files. Just as Source Channel Mappings allows you to remap a stereo file as a mono pair using the same single clip in Project panel, Breakout To allows you physically break a stereo file (or 5.1) into two individual mono clips that appear as separate mono audio files in the Project panel (Figures 3.25). Figure 3.25. When you select Clip > Audio Options > Breakout to Mono Clips for a video clip with a stereo track, Premiere Pro duplicates the source audio and creates left and right mono audio clips that have the same timecode value as the master video clip In my eyes, Breakout To was a workaround for the absence of Source Channel Mappings. Now that we have the new feature, Breakout To is not as practical as it once was. ExtractHave you ever had an audio/video clip and wanted to just use the audio only? Have you ever had a DV file and wanted to edit its audio in Adobe Audition? If the answer to either of these questions is yes, then you will be happy about the new Extract audio feature. Extract quite simply enables you to select a clip that contains audio and video and extract only the audio, whether it be stereo, mono, or 5.1. The extracted audio clip displays as a single file in the Project panel using its current audio format. Using Extract is simple; you select the file you want to extract audio from in the Project panel, then choose Clip > Audio Options > Extract. If you want to change to the extracted clip's format, you can remap it using, you guessed it, Source Channel Mappings. If you want to re-edit the file directly in Adobe Audition, select the extracted file in your Project panel and choose Edit > Edit in Audition. |
EAN: 2147483647
Pages: 200