Selecting, Resizing, and Rearranging
| When it comes to organizing your workspaces, a picture is worth more than a thousand words. This section illustrates how to rearrange and resize your panels. In all cases, the first step is selecting a panel. A selected panel has an orange outline around its edges inside its frame. In all the figures to come, when I reference the "selected" panel, I mean the panel with the orange outline. When a panel is selected, all corresponding menu items and keyboard shortcuts that are assigned to the panel become active. For instance, if you select the Effect Controls panel, the Clip > Audio Options menu is not available. If your Source Monitor is selected with an audio clip open in it, however, Clip > Audio Options becomes active and available. Notes To view a short video tutorial on navigating and rearranging your workspace, see the Workspace_Workout.wmv clip in the Video Tutorials folder on the book's DVD. Rearranging Your PanelsNow dig in so you can start understanding how to manipulate panels. Figures 1.17 through 1.19 focus on three different methods of re-arranging the panels in your desktop. Figure 1.20 shows how you can move a panel and reposition it as its own "floating" panel on top of the desktop. Figures 1.17a and b. You can pull the tab for a panel, such as the Audio Mixer, from the current frame (a). Figure 1.17bshows the Project panel frame with the Audio Mixer docked into it. Notice how there is a scroll bar at the top of the frame to scroll between the Project panel tab and the Audio Mixer tab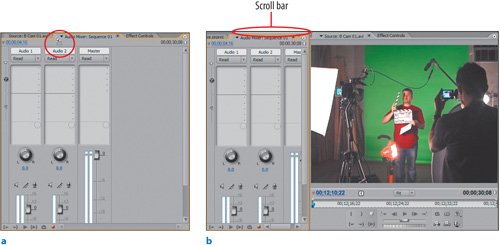 Figures 1.18a and b. In these figures, I am moving the Audio Mixer into the frame of the Project panel and trying to make a new frame for it in the existing Project panel frame. When you drop a panel into a new frame, the portion of the grid that darkens is where the panel will be split to create the new frame. Notice how once you drop the panel at the bottom of the Project panel frame, the overall size of the original frame is exactly the same. Once you drop the panel into a new frame, you can manually resize it. (To see how to resize this workspace, check out Figure 1.21)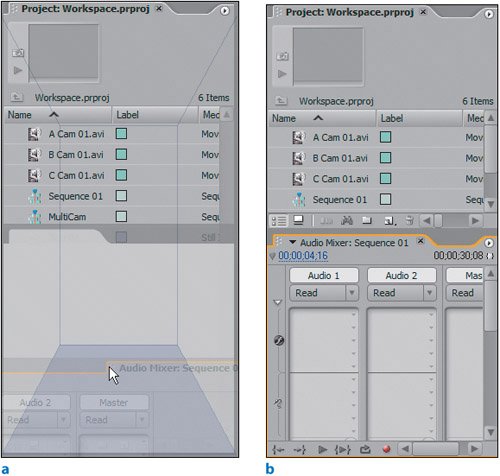 Figure 1.19. Anytime you drag beyond the edges of an outer frame so that you are on the very edge of the desktop, you can create a new frame that spans the entire height or width of the desktop. Here the Audio Mixer is dropped to the far left of the desktop and can easily be resized and expanded to its full height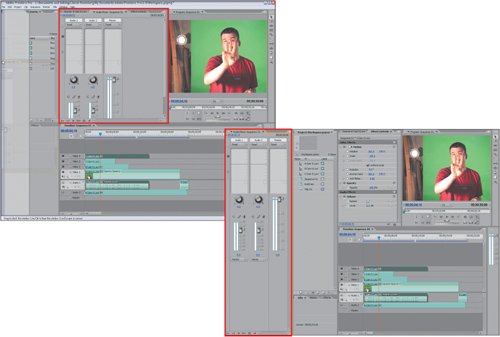 Figure 1.20. When you press the Ctrl key, the panel becomes a transparent preview of what it will ultimately look like (left). When you release the Ctrl key you have a floating panel to which you can add additional panels (right)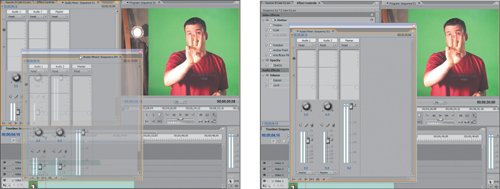 To move a panel from its current frame, simply grab the panel's tab portion and drag the panel to another region of the desktop. If you position it inside another existing frame, you can dock it into the current frame (Figures 1.17a and b). If you pull your panel from its current frame and then decide not to move the panel, simply press the Esc key while still holding down the mouse to deactivate your selection of the panel. If you want your panel to exist as a "floating" panel on top of the application window and desktop, hold down the Ctrl key when you release the mouse button and drop the panel on top of the interface (Figure 1.20). Resizing Your PanelsYou can select and rearrange, now try resizing. Once again, images do the best job of explaining here. Figures 1.21a through c assume that you want to increase the overall size of the Project panel frame from the Editing workspace (Windows > Workspace > Editing). Figures 1.21a through c. Consider the Editing workspace at various stages:the right edge of the Project panel frame being dragged right to make it wider (a), the bottom of the Project panel frame being dragged downwards (b) to make it taller, and the corner of the Project panel frame being selected (notice the tool updates to have four arrows) and dragged diagonally downwards and to the right to increase the height and width simultaneously (c)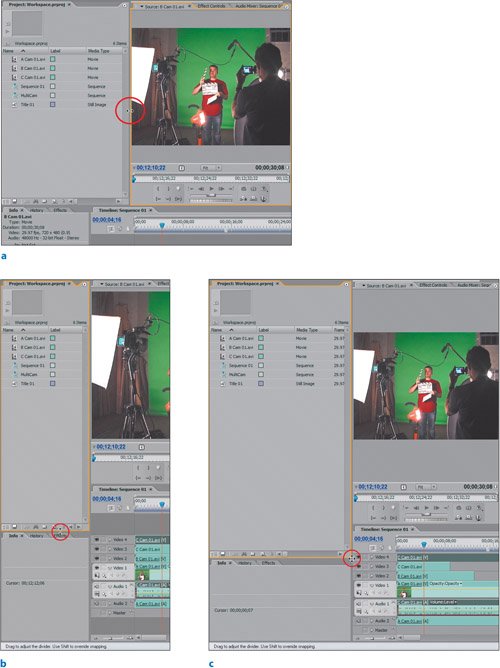 To resize a frame, drag any of its inner edges away from the center of the frame. As you make a size adjustment, the adjacent frames reduce in size accordingly. Frames have snapping points for their horizontal and vertical alignment. When you try to resize a frame, by default you can get only so close to the snapping point before you snap into perfect alignment. If you want to resize a frame and not have it snap to the alignment of adjacent frames, hold down the Shift key while you adjust the frame so that you override the snapping behavior. It takes a little while to get the rhythm down with resizing. Keep in mind that every size adjustment of one frame affects the current size on another adjacent frame. When creating new frames, also take into account that many of the surrounding frames need to be resized to accommodate the spatial distribution of the frames and their preferred sizes. |
EAN: 2147483647
Pages: 200