Premiere s Audio Hardware Preferences
Premiere's Audio Hardware PreferencesOnce you get inside of Premiere Pro, you need to assign some additional audio hardware settings to map output channels and customize your ASIO device. Even if you are using your default audio device, it is helpful to understand what these controls do and how to adjust them. Premiere Pro 2.0 offers two Audio Hardware specific preferences: Audio Hardware and Audio Output Mapping. Audio Hardware and ASIO SettingsTo designate your input and output device, head over to your Audio Hardware Preferences (Edit > Preferences > Audio Hardware). This preference dictates which audio device is used to drive sound playback (Figure 17.11). The default device setting, Premiere Pro Windows Sound, uses your internal audio hardware. If you have any additional ASIO-supported devices installed, you'll also see listings for each device. Click the ASIO button for a listing to see its specific ASIO settings. Figure 17.11. The Audio Hardware preference allows you to choose exactly which audio device to transmit your audio through when running Premiere Pro 2.0. If you are editing and transmitting DV or HDV or using external video hardware, these settings are overridden by the project's hardware settings. You can default back to these settings by changing your playback settings to the Desktop Only for Audio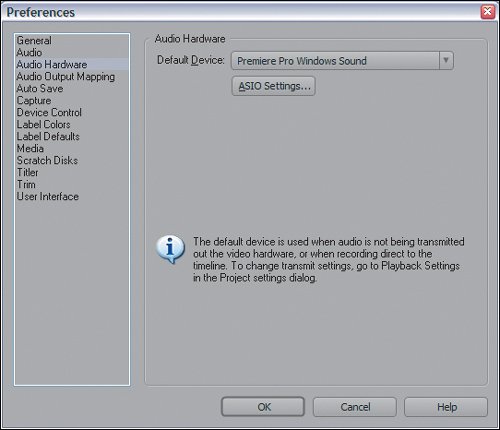 For example, Figures 17.12 and b shows the dialog for my Emagic device. The Driver Latency setting increases or decreases the latency period for playback with the device. The latency value is milliseconds over the assigned sample rate. Here the card is assigned to play at 44.1kHz. Increasing Driver Latency produces improved performance, because it allows the device a bit more time for processing. Decreasing the setting demands more from the device. The remaining fields toggle the card's playback and recording bit depths: 16 or 24 bits. Increasing the bit depth for input enhances the quality of audio being recorded. Figures 17.12a and b. When you have a secondary interface installed, you can select it as your default device (a). With the device loaded, clicking the ASIO Settings button brings up a dialog that will be specific to the installed device (b) and will dictate its playback and recording parameters. In this case, this is the ASIO dialog is for an Emagic A26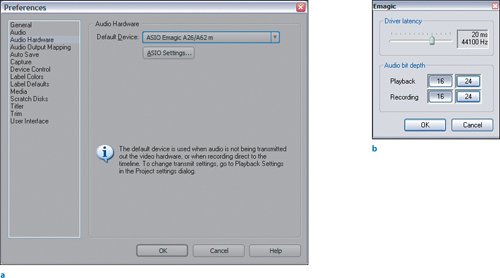 Audio Output MappingThe Audio Output Mapping preference (Edit > Preferences > Audio Output Mapping) reveals all the output channels associated with the available output devices, some of which (such as DV) are not listed in the Audio Hardware preferences. The Audio Output Mapping preference allows you to manually modify the routing of your audio channels. For example, for the Premiere Pro Windows Sound device, the mapping will list the channels associated with the device selected in Audio Hardware. The mapping now shows the two Sigma Tel channels for re-mapping. Dragging the left and right speaker icons from one channel to the other swaps which channel plays the left and which channel plays the right. When you select a six-channel ASIO device for output, the ist gets more crowded. Figure 17.13 shows the output mapping of the two stereo sigma channels. To route the channels for my 5.1 surround system, it is just a matter of matching the icons for the channels to where the speakers are plugged in (Figure 17.14). For example, the LFE is plugged into output port number 6, so the LFE icon in the output channel mappings should be in output 6. Figure 17.13. In the Audio Output Mapping preference, drag the speaker icons to assign them to an output channel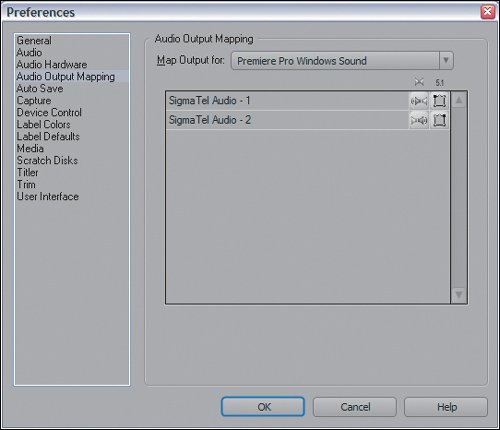 Figure 17.14. The Audio Output Mapping for an interface with six output channels contains icons for every speaker of a 5.1 surround system. The icon with the ear and the colon is for the LFE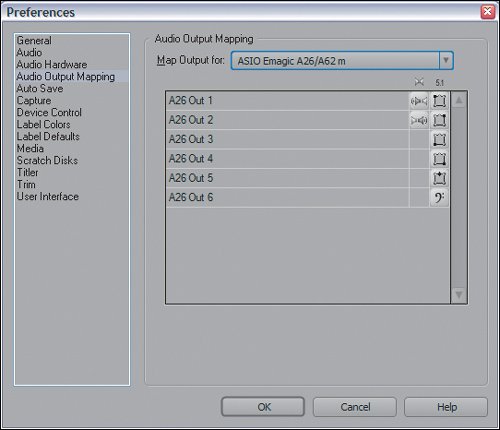 |
EAN: 2147483647
Pages: 200