Group Policy Loopback Processing
| | ||
| | ||
| | ||
As you know, the normal course of Group Policy scope is local computer, site, domain, and then each nested OU. But sometimes it's necessary to deviate from the normal routine. For instance, you might want all users, whoever they are, to be able to walk up and log on to a specific machine and get the same user node settings. For example, this can be handy in public computing environments such as libraries, nurses' stations , kiosks , and manufacturing and production assembly environments. This is also critically necessary for terminal server environments, as discussed in the "Group Policy LoopbackReplace Mode for Terminal Services" section later in this chapter.
Wouldn't it be keen if you could round up all the special computers on which users need the same settings for an OU and force them to use these settings? Whoever logs on to those computers would get the same Internet Explorer settings (such as a special proxy), logon scripts, or certain Control Panel restrictionsjust for those workstations.
Reviewing Normal Group Policy Processing
Recall that sometimes computers and users can each be relegated into different OUs. Indeed, a user from any other portion of the domain, say the Domain Administrator (or anyone else), could log on to XPProl located under the Human Resources Computers OU. When this happens (for example, the computer and user accounts affected by GPOs are located in different processing locations), the normal behavior is to process the computer GPOs based on the normal hierarchy and then the process the user GPOs based on the normal hierarchy. This is true just by the rules of time: computers start up, their GPOs are processed, users log on, and their GPOs are processed .
| Note | Even when Windows XP's default of Fast Boot is turned off, that's generally the way things happen. |
So, if the Domain Administrator were to sit down at the XPProl machine in the Human Resources Computers OU, the normal course of events would apply the policy settings in the Computers node from the Default-First-Site, then the Corp.com domain, and then, finally, the Human Resources Computers OU. Next, the policy settings in GPOs linked to the user account would apply; first from the Default-First-Site and then only from the Corp.com domain (as the administrator account is not sitting under any OU in our examples).
With Group Policy Loopback processing, the rules change. There are two Group Policy Loopback modes: Merge and Replace. In both, the computer is tricked into forgetting that it's really a computer. It temporarily puts on a hat that says "I'm a user" and processes the site, domain, and organizational unit GPOs as if it were a user. Kooky, huh? Let's take a look at the Merge and Replace modes.
Group Policy LoopbackMerge Mode
When computers are subject to Group Policy LoopbackMerge Mode, GPOs process in the normal way at startup (and at background refresh time): Computer node for site, for domain, and then for each nested OU. The user then logs on, and policy settings meant for that user are applied in the normal way: all GPOs are processed from the site, the domain, and then each nested OU.
But when computers are affected by Group Policy LoopbackMerge mode, the system determines where the computer account is and applies another round of user node settingsthose contained in all GPOs that lead to that computer (yes, user node settings). This means that the logged-on user gets whacked with two different sets of User node policy settings. Here's the timeline:
-
The computer starts up and gets the appropriate Computer node policy settings.
-
The user logs on and gets the appropriate User node policy settings.
-
The computer then puts on a hat that says, "I'm a user." Then all user node policy settings apply to the computer . Again, this happens because the computer is wearing the "I'm a user" hat.
The net result is that the user settings from the user's account and the user settings from the computer (which temporarily thinks it's a user) are on par and equal to each other; neither is more important than the other, except when they overlap. In that case, the computer settings win, as usual.
The Group Policy LoopbackMerge Mode is rarely used unless you need to modify a property in the user profile, but do it per computer.
Group Policy LoopbackReplace Mode
When computers are subject to Group Policy LoopbackReplace Mode, Group Policy processes in the normal way at startup (and at background refresh time): Computer node for site, domain, and then each nested OU. The user then logs on, and GPOs meant for the user are totally ignored down the food chain for the logged-on user. Instead, the computer puts on an "I'm a user" hat, and the system determines where the computer account is, but applies the User node settings contained in all GPOs that lead to that computer. Therefore, you change the balance of power so all users are forced to heed the User settings based on what is geared for the computer. Confused? Let's generate an example to "unconfuse" you.
By and large, Group Policy LoopbackReplace Mode is more useful than Merge mode and works well in public computing environments such as labs. So let's work though an example to solidify our understanding of Replace mode. In this example, we'll perform a variety of steps:
-
Create a new OU called Public Kiosk .
-
Move a Windows XP machine into the Public Kiosk OU.
-
Create a new GPO for the Public Kiosk OU that performs two functions:
-
Disables the Display Properties dialog box.
-
Performs Group Policy Loopback Replace Mode processing so that all users logging on to the computers in the Public Kiosk OU will be unable to use the Display Properties dialog box.
-
| |
You might want to use the Group Policy LoopbackMerge Mode to create a printer and apply it to anyone who uses a particular machine. For instance, you might want anyone who logs on to a machine on the 4th floor to automatically connect to the printer on the 4th floor. One way to do this is to run around to every machine on the 4th floor, log on as the user, and manually connect to the printer on the 4th floor.
If you've ever attempted this feat, you might have also tried to create a Group Policy startup script for a computer to try to connect everyone to a printer on the network; but it won't work. There is no user environment in which to house this newly created printer. So you have a paradox: how do you run a computer startup script for every user who sits down at a machine, but run this startup script after the user is logged on? Group Policy LoopbackMerge Mode comes to the rescue.
In both loopback processing modes, the computer doesn't think it's a computer. It temporarily puts on a user hat and processes the site, domain, and organizational unit GPOs as if it were a user.
With that in mind, you'll need to do several things:
-
Create a VB script that connects you to the printer you want. (Later in this sidebar, you'll see and example, ASSIGNHP4.VBS .)
-
Create an OU, say "4th Floor Computers," and move the computers on the 4th floor into it.
-
Create a new GPO on that OU, and name it, say, "All computers get HPLJ4 Printer."
-
Drill down into the new GPO to Computer Configuration ˜ Administrative Templates ˜ System ˜ Group Policy ˜ User Group Policy Loopback Processing Mode, and specify that it be in Merge mode.
-
Drill down into User Configuration ˜ Windows ˜ Scripts ˜ Logon. Click "Add" to add a new file, click "Browse" to open the File Requester, copy the ASSIGNHP4. VBS script, and add it to the list to run.
Remember, in Loopback Processing mode, the computer thinks it's a user, so use User/Logon scripts, not Computer/Startup script.
Now, whenever you log on as any user to a computer in the 4th Floor Computers OU, the GPOs meant for the user will be evaluated and run. The computer will then put on a user hat and run its own logon script, and you will get the printer assigned for every user on a computer.
Here is the ASSIGNHP4.VBS vbscript you can use for the above example:
Set wshNetwork = CreateObject("WScript.Network") PrinterPath = "\server1\HPLJ4" PrinterDriver = "HP LaserJet 4" WshNetwork.AddwindowsPrinterConnection PrinterPath, PrinterDriver WshNetwork.SetDefaultPrinter "\server1\HPLJ4" Wscript.Echo "Default Printer Created" Thanks to Richard Zimmerman of ABC Computers for the inspiration for this tip.
| |
Creating a New OU
To create a new OU called Public Kiosk , follow these steps:
-
Log on to the Domain Controller WINDC01 as Domain Administrator.
-
Choose Start ˜ Programs ˜ Administrative Tools and select Active Directory Users And Computers.
-
Right-click the domain name, and choose New ˜ Organizational Unit. Enter Public Kiosk as the name in the "New Object - New Organizational Unit" dialog box.
| Warning | You are creating this new OU on the same level as Human Resources . Do not create this new OU underneath Human Resources. |
Moving a Client into the Public Kiosk OU
In this case, we'll move a different computer, say XPPro2, into the Public Kiosk OU. Follow these steps:
-
In Active Directory Users And Computers, right-click the domain and choose Find to open the "Find Users, Contacts and Groups" dialog box.
-
In the Find drop-down, select Computers. In the Name field, type XPPro2 (or the name of some other computer) to find the computer account of the same name. Once you've found it, right-click the account, and choose Move. Move the account to the Public Kiosk OU.
Repeat these steps for all other computers you want to move to the Public Kiosk OU.
Creating a Group Policy Object with Group Policy LoopbackReplace Mode
We want the Display Properties dialog box disabled for all users who log on to XPPro2. To do this, we need to set two policy settings within a single GPO: Disable Display in Control Panel and User Group Policy Loopback Processing Mode . Follow these steps using the GPMC:
-
Right-click the Public Kiosk OU, and choose "Create and link a GPO here."
-
In the "New GPO" dialog box name the GPO something descriptive, such as "No Display Applet -- Loopback Replace."
-
Highlight the GPO and click Edit to open the Group Policy Object Editor.
-
To hide the Settings tab, drill down to User Configuration ˜ Administrative Templates ˜ Control Panel ˜ Display and double-click the Remove Display in Control Panel policy setting. Change the policy setting from "Not Configured" to "Enabled," and click OK.
-
To enable loopback processing, drill down to Computer Configuration ˜ Administrative Templates ˜ System ˜ Group Policy and double-click the User Group Policy Loopback Processing Mode policy setting. Change the setting from "Not Configured" to "Enabled," select "Replace" from the drop-down box, as shown in Figure 3.4, and click OK.
-
Close the Group Policy Object Editor.
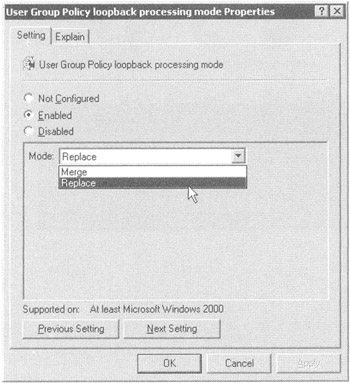
Figure 3.4: Choose the Loopback Processing mode desired, in this case, "Replace."
Verifying that Group Policy LoopbackReplace Mode is Working
You'll want to log on to XPPro2, but you'll want to restart it because you just moved it from one OU to another. (This will quickly re-jumpstart the policy processing; otherwise , you might have to wait 120150 minutes for it to kick in after a move.) Since we're using Loopback Policy processing in Replace mode, you can choose any user you have defineda mere mortal or even the Administrator of the domain.
Choose Start ˜ Control Panel ˜ Display, and note that no one can access the Display Properties dialog box, as shown in Figure 3.5.
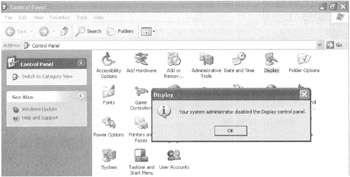
Figure 3.5: With Group Policy LoopbackReplace Mode processing enabled, all users are affected by a computer's setting.
Group Policy LoopbackReplace Mode policy processing is powerful, but really is only useful for specialty machines. Additionally, you'll need to use it sparingly, because loopback processing is a bit more CPU intensive for the client and servers and quite difficult to troubleshoot should things go wrong.
Group Policy LoopbackReplace Mode for Terminal Services
Group Policy LoopbackReplace Mode has one other major use: Terminal Services. If you have lots of servers and lots of users logging on to them, chances are, you want everyone who logs on to your Terminal Services machines to have precisely the same settings, regardless of who they are.
The process of establishing these settings is straightforward:
-
Create an OU for your Terminal Services computers and give it an appropriate name, such as Terminal Services Computers OU.
-
Set Loopback Replace mode to apply to that OU
-
Stuff your Terminal Services computer objects into the OU and reboot them
Now any user policy settings within GPOs set upon the Terminal Services computers OU and everyone logging on to the Terminal Services computers will get the exact same settings.
Windows 2000 servers and Windows 2003 Terminal Services respond just fine to Loop-back Replace mode. So be sure to stuff your Windows 2000 Terminal Services computer objects into your designated OU too and then manually configure the policy settings on those computers as desired.
| Tip | As an administrator, you might want to log on to Terminal Services machines, but you don't want the same settings as everyone else. To configure this, simply use the techniques found in Chapter 2, and filter the GPO containing the Loopback policy for, say, Domain Administrators. |
| |
I don't know about you, but I just hate it when I walk up to a server and log on. Usually, I have no idea what the server's name, function, IP address, and so on could possibly be. In the NT 4 days, I used the following trick:
-
Fire up Windows Paint.
-
Create a .bmp file that detailed the name, function, and IP address and save it as, say, c:\winnt\background.bmp .
-
Modify the .default user profile so that when no one was logged on at the console, the .bmp file was displayed.To do this, open the Registry of the local server and change HKEY_USERS\.DEFAULT\Control Panel\Desktop\Wallpaper to path of c:\winnt\background.bmp .
But there was one major problemas soon as I logged on to the server, the background went away (because my local profile took over), and 20 seconds later, I forgot what the machine's name, function, and IP address were. With Windows 2003 and the Group Policy LoopbackReplace Mode policy, I've discovered a cool trick; you can now force the same background .bmp for every user who physically logs on to any given machine.
The idea is simple:
-
Create the .bmp file as explained earlier, and store it once again, locally, as c:\windows\background.bmp .
-
Create a new GPO on the Domain Controllers OU or on your own OU for your servers. Call the policy "Forced Background WallpaperLoopback Replace."
-
Modify the User node of the policy as follows :
-
Drill down through User Configuration ˜ AdministrativeTemplates ˜ Desktop ˜ Active Desktop ˜ EnableActive Desktop , and set "Enabled."
-
Drill down through User Configuration ˜ Administrative Templates ˜ Desktop ˜ Active Desktop ˜ Active Desktop Wallpaper , and set "Enabled." Set the wallpaper name to c:\windows\background.bmp.
-
Drill down through User Node ˜ AdministrativeTemplates ˜ Desktop ˜ Active Desktop ˜ Allow Only Bitmapped Wallpaper , and set "Enabled."
-
To modify the Computer node of the policy, drill down through Computer Configuration AdministrativeTemplates ˜ System ˜ Group Policy ˜ and enable User Group Policy Loop-back Processing Mode . Set to LoopbackReplace.
-
Now, whenever anyone logs on to that server, they will get the exact same background .bmp! This is still true even if they usually get a background dictated via some other Group Policy for their own personal account!
There is one more accompanying tip to seal the deal. If you've enabled Terminal Services Administration mode, by default you cannot see the wallpaper when coming in over Terminal Services. Change the default behavior of Terminal Services by using the Terminal Services Configuration application, right-clicking the RDP protocol, and selecting the Environment tab. Choose to view the wallpaper by deselecting the "Disable the Wallpaper" check box.
A similar ability is available from the BGINFO tool, which you can download from www.sysinternals.com . And it's dynamic, so if something changes on the server, the back ground changes with it. However, this tip is here as a useful example of how to use the Group Policy LoopbackReplace Mode.
| |
As a little side note, additionally, if your Terminal Services are Windows Server 2003, at your disposal is an arsenal of policy settings designed to manage Windows 2003 Terminal Services. You'll find two sets of Terminal Services policy settings for Windows 2003: one for users and one for computers:
-
To manipulate Terminal Services computers, drill down through Computer Configuration ˜ Administrative Templates ˜ Windows Components ˜ Terminal Services.
-
To manipulate Terminal Services clients , drill down through User Configuration ˜ , Administrative Templates ˜ Windows Components ˜ Terminal Services.
Including information on how best to use the policy settings that configure Windows 2003 Terminal Services is beyond the scope of this book. To that end, I recommend Christa Anderson's Windows IT Pro Magazine article "Using GPOs to Configure Terminal Services." You can find it at www.winnetmag.com . InstantDoc ID: 38284 .
| | ||
| | ||
| | ||
EAN: 2147483647
Pages: 110