The Vanilla Example Repeated Using ICONIX Modeling and TDD
The “Vanilla” Example Repeated Using ICONIX Modeling and TDD
Let’s pause and rewind, then, back to the start of the example that we began in the previous chapter. To match the example, we’re going to need a system for travel agent operatives to place hotel bookings on behalf of customers.
To recap, the following serves as our list of requirements for this initial release:
-
Create a new customer.
-
Create a hotel booking for a customer.
-
Retrieve a customer (so that we can place the booking).
-
Place the booking.
As luck would have it, we can derive exactly one use case from each of these requirements (making a total of four use cases). Because we explain the process in a lot more detail here than in Chapter 11, we’ll only actually cover the first use case. This will allow us to describe the motivations behind each step in more depth.
You would normally do the high-level analysis and preliminary design work up front (or as much of it as possible) before delving into the more detailed design work for each use case. In many cases, this ends up as a system overview diagram. There’s a lot to be said for putting this diagram on a big chart someplace where everyone can see it, so that everyone can also see when it changes.
Following ICONIX Process, the high-level analysis and preliminary design work means drawing all the robustness diagrams first; we can then design and implement one use case at a time. Let’s start by creating a domain model that contains the various elements we need to work with, as shown in Figure 12-1. As you can see, it’s pretty minimal at this stage. As we go through analysis, we discover new objects to add to the domain model, and we possibly also refine the objects currently there. Then, as the design process kicks in, the domain model swiftly evolves into one or more detailed class diagrams.
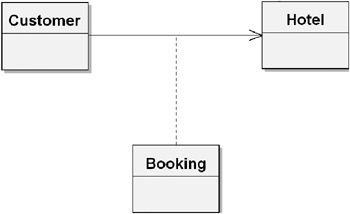
Figure 12-1: Domain model for the hotel booking example
The objects shown in Figure 12-1 are derived simply by reading through our four requirements and extracting all the nouns. The relationships are similarly derived from the requirements. “Create a hotel booking for a customer,” for example, strongly suggests that there needs to be a Customer object that contains Booking objects. (In a real project, it might not be that simple—defining the domain model can be a highly iterative process involving discovery of objects through various means, including in-depth conversations with the customer, users, and other domain experts. Defining and refining the domain model is also a continuous process throughout the project’s life cycle.)
If some aspect of the domain model turns out to be wrong, we change it as soon as we find out, but for now, it gives us a solid enough foundation upon which to write our use cases.
| Use Case: “Create a New Customer” | Basic Course: The user (travel agent) clicks the Create New Customer button and the system responds with the Customer Details page, with a few default parameters filled in. The user enters the details and clicks the Create button, and the system adds the new customer to the database and then returns the user to the Customer List page. Alternative Course: The customer already exists in the system (i.e., someone with the same name and address). Alternative Course: A different customer with the same name already exists in the system. The user asks the customer for something extra to help identify them (e.g., a middle initial) and then tries again with the modified name. |
| Use Case: “Search for a Customer” | Basic Course: The user clicks the Search for a Customer link, and the system responds with a search form. The user enters some search parameters (e.g.,“Crane”, “41 Sleepy Hollow”). The system locates the customer details and displays the Customer Details page.Among other things, this page shows the number of bookings the customer has placed using this system. Alternative Course: The customer exists in the system but couldn’t be found using these search parameters. The user tries again with a different search. Alternative Course: The customer doesn’t exist in the system. The user creates a new customer record (see the “Create a New Customer” use case). |
| Use Case: “Create a Hotel Booking for a Customer” | Basic Course: The user finds the customer details (see the “Search for a Customer” use case), and then clicks the Create Booking link. On the Create a Booking page, the user chooses a hotel, enters the start and end dates, plus options such as nonsmoking, double occupancy, and so on, and then clicks Confirm Booking. The system books the room for the customer and responds with a confirmation page (with an option to print the confirmation details). Alternative Course: The selected dates aren’t available. The user may either enter some different dates or try a different hotel. |
Notice that already this process is forcing us to think in terms of how the user will be interacting with the system. For example, when creating a hotel booking, the user first finds the customer details, then goes to the Create a Booking page, and then finds the hotel details. The order of events could be changed (e.g., the user finds the hotel details first, and then goes to the Create a Booking page). This is where interaction design comes in handy, as we can optimize the UI flow around what the user is trying to achieve.
Notice also that our use case descriptions show a certain bias toward a web front-end with words such as “page” and “link.” However, such terms can be safely treated as an abstraction. In other words, if the customer suddenly decided that he actually wanted the entire UI to be written using Macromedia Flash, Spring Rich Client, or even a 20-year-old green-screen terminal, the fact that we used words like “button” and “page” shouldn’t cause a problem.
While it’s not absolutely necessary, we’ve created a use case diagram to show these use cases grouped together (see Figure 12-2). Modeling the use cases visually, while not essential, can sometimes help because it eases the brain gently into “conceptual pattern” mode, ready for creating the robustness diagrams.
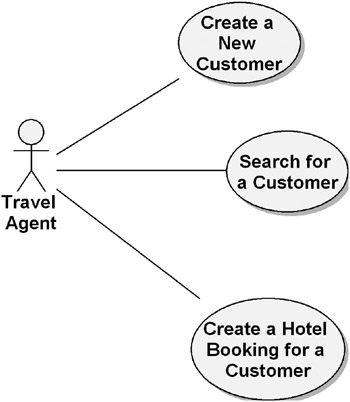
Figure 12-2: Use case diagram for the hotel booking example
Ideally, the modeling should take place on a whiteboard in front of the team, rather than on a PC screen with the finished diagram being filed away in the bowels of a server somewhere where nobody ever sees it. Or, here’s a slightly different concept: how about doing the model in a visual modeling tool that’s hooked up to a projector if it’s a whole-team brainstorming exercise? Also, if the diagram is on public display (“public” in the sense that it’s displayed in the office), it’s more likely to be updated if the use case ever changes, and it can be deleted (i.e., taken down) when it’s no longer needed.
Implementing the “Create a New Customer” Use Case
In this section, we’ll walk through the implementation of the “Create a New Customer” use case using a combination of ICONIX and TDD (hereafter referred to as ICONIX+TDD), all the way from the use case itself to the source code.
Robustness Diagram for “Create a New Customer”
Let’s start by creating the robustness diagram for “Create a New Customer” (see Figure 12-3).
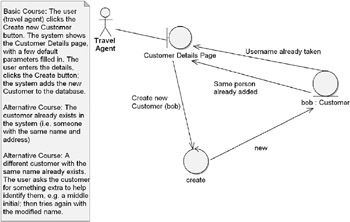
Figure 12-3: First attempt at a robustness diagram for the “Create a New Customer” use case
In the early stages of modeling, the first few diagrams are bound to need work, and this first robustness diagram is no exception. Let’s dissect it for modeling errors, and then we’ll show the new cleaned-up version. Picture a collaborative modeling session with you and your colleagues using a whiteboard to compare the first version of this diagram with the use case text, and then erasing parts of it, and drawing new lines and controllers as, between you, you identify the following issues in the diagram:
-
The first part of the use case, “The user (travel agent) clicks the Create New Customer button,” isn’t shown in the diagram. This is probably because this part of the use case is actually outside the use case’s “natural” scope, so modeling it in the robustness diagram proved difficult. This is a good indication that the use case itself needs to be revisited.
-
The line from the Customer Details page to the first controller should be labeled “Click Create”.
-
The two controllers that check the customer against the database also need to be connected to Customer and an object called Database.
-
Who is “bob”?
-
The diagram shows a Boundary object talking to an Entity. However, noun-noun communication is a no-no, and it’s a useful warning sign that something on the diagram isn’t hanging together quite right. You can find more detail on why this is a no-no in Use Case Driven Object Modeling with UML: A Practical Approach (specifically Figure 4-3, “Robustness Diagram Rules”):
Boundary and entity objects on robustness diagrams are nouns, controllers are verbs. When two nouns are connected on a robustness diagram, it means there’s a verb (controller) missing. Since the controllers are the “logical functions,” that means there’s a software function that we haven’t accounted for on our diagram (and probably in our use case text), which means that our use case and our robustness diagram are ambiguous. So we make a more explicit statement of the behavior by adding in the missing controller(s).[2.]
-
The diagram is very light on controllers. For example, the diagram doesn’t show controllers for any of the UI behavior.
-
Probably the reason the diagram is missing the controllers is that the use case text doesn’t discuss any validations (e.g., “the system validates that the username is unique”). However, the use case magically assumes that these validations happen. This part of the use case needs to be disambiguated.
-
The two alternative courses are very similar; we can see from the robustness diagram that trying to separate them out doesn’t really work, as they’re essentially the result of the same or similar validation. It makes sense to combine these in the use case text.
As you can see, most of the issues we’ve identified in the robustness diagram actually are the result of errors in the use case, because the robustness diagram is an “object picture” of the use case. The way to improve the robustness diagram is to correct the use case text and then redraw the diagram based on the new version.
Here’s the new version of the “Create a New Customer” use case.
| Use Case: “Create a New Customer” | Basic Course: The system shows the Customer Details page, with a few default parameters filled in. The user enters the details and clicks the Create button; the system validates that all the required fields have been filled in; and the system validates that the customer name is unique and then adds the new Customer to the database. The system then returns the user to the Customer List page. Alternative Course: Not all the required fields were filled in. The system informs the user of this and redisplays the Customer Details form with the missing fields highlighted in red, so that the user can fill them in. Alternative Course: A customer with the same name already exists. The system informs the user and gives them the option to edit their customer details or cancel. |
We can now use this revised use case to redraw the robustness diagram (see Figure 12-4).
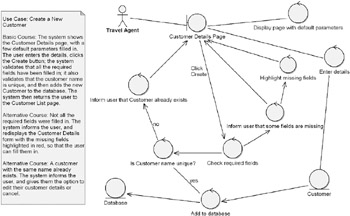
Figure 12-4: Corrected robustness diagram for the “Create a New Customer” use case
If we had identified any new entities at this point, we would revisit the domain model to update it; however, all the new elements appear to be controllers (this means we hadn’t described the system behavior in enough detail in the use case), so it should be safe to move on.
Because A&D modeling (particularly ICONIX modeling) is such a dynamic process, you need to be able to update and correct diagrams at a rapid pace, without being held back by concerns over other diagrams becoming out of sync.
If your diagrams are all on a whiteboard or were hand-scribbled on some sticky notes, then it shouldn’t take long to manually update them. If you’re using a CASE tool, then (depending on the tool’s abilities, of course) the situation is even better (e.g., EA allows you to link use case text to notes on other diagrams). For example, Figure 12-4 shows the “Create a New Customer” use case text pasted directly into a note in the diagram. If we change the text, then the note will also need to be updated—unless there’s a “live” link between the two.
Setting this up in EA is straightforward, if a little convoluted to explain. First, drag the use case “bubble” onto the robustness or sequence diagram. Then create an empty Note, add a Note Link (the dotted-line icon on the toolbar) between the two elements, right-click the new Note Link dotted line, and choose Link This Note to an Element Feature. The linkup is now “live,” and you can delete the use case bubble from the diagram. Now anytime the use case text is updated, the note on the diagram will also be updated.
While we’re on the subject of EA (see the previous sidebar), in EA a test case is a use case with a stereotype of <<test case>>.Test cases show up with an “X” in the use case bubble.
You can find them on the “custom” toolbar. You can drop one of these onto a robustness diagram and connect it to a controller (for example) with a <<realize>> arrow. You can find more information on this in the section “Stop the Presses: Model-Driven Testing” near the end of this chapter.
Sequence Diagram for “Create a New Customer”
Now that we’ve disambiguated our robustness diagram (and therefore also our use case text), let’s move on to the sequence diagram (see Figure 12-5).
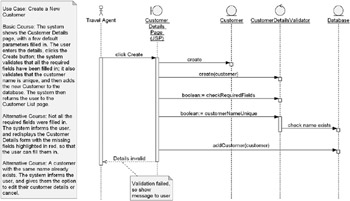
Figure 12-5: Sequence diagram for the “Create a New Customer” use case
Notice how the sequence diagram shows both the basic course and alternative courses. (Currently, both alternative courses are handled by the “Details invalid” message to be displayed to the user. As we show later on, more detail was needed in this area, so we’ll need to revisit the sequence diagram.)
We’ve added a controller class, CustomerDetailsValidator, to handle the specifics of checking the user’s input form and providing feedback to the user if any of the fields are invalid or missing. It’s questionable whether this validation code should be a part of the Customer class itself (although that might be mixing responsibilities, as the Customer is an entity and validating an input form is more of a controller thing). However, as you’ll see later, CustomerDetailsValidator disappears altogether and is replaced with something else.
More Design Feedback: Mixing It with TDD
The next stage is where the ICONIX+TDD process differs slightly from vanilla ICONIX Process. Normally, we would now move on to the class diagram, and add in the newly discovered classes and operations. We could probably get a tool to do this part for us, but sometimes the act of manually drawing the class diagram from the sequence diagrams helps to identify further design errors or ways to improve the design; it’s implicitly yet another form of review.
We don’t want to lose the benefits of this part of the process, so to incorporate TDD into the mix, we’ll write the test skeletons as we’re drawing the class diagram. In effect, TDD becomes another design review stage, validating the design that we’ve modeled so far. We can think of it as the last checkpoint before writing the code (with the added benefit that we end up with an automated test suite).
| Tip | If you’re lucky enough to be using a twin display (i.e., two monitors attached to one PC), this is one of those times when this type of setup really comes into its own. There’s something sublime about copying classes and methods from UML diagrams on one screen straight into source code on the other screen! |
So, if you’re using a CASE tool, start by creating a new class diagram (by far the best way to do this is to copy the existing domain model into a new diagram). Then, as you flesh out the diagram with attributes and operations, simultaneously write test skeletons for the same operations.
Here’s the important part: the tests are driven by the controllers and written from the perspective of the Boundary objects.
If there’s one thing that you should walk away from this chapter with, then that’s definitely it! The controllers are doing the processing—the grunt work—so they’re the parts that most need to be tested (i.e., validated that they are processing correctly). Restated: the controllers represent the software behavior that takes place within the use case, so they need to be tested.
However, the unit tests we’re writing are black-box tests (aka closed-box tests)—that is, each test passes an input into a controller and asserts that the output from the controller is what was expected. We also want to be able to keep a lid on the number of tests that get written; there’s little point in writing hundreds of undirected, aimless tests, hoping that we’re covering all of the failure modes that the software will enter when it goes live. The Boundary objects give a very good indication of the various states that the software will enter, because the controllers are only ever accessed by the Boundary objects. Therefore, writing tests from the perspective of the Boundary objects is a very good way of testing for all reasonable permutations that the software may enter (including all the alternative courses). Additionally, a good source of individual test cases is the alternative courses in the use cases. (In fact, we regard testing the alternative courses as an essential way of making sure all the “rainy-day” code is implemented.)
Okay, with that out of the way, let’s write a unit test. To drive the tests from the Control objects and write them from the perspective of the Boundary objects, simply walk through each sequence diagram step by step, and systematically write a test for each controller. Create a test class for each controller and one or more test methods for each operation being passed into the controller from the Boundary object.
| Note | If you want to make your unit tests really fine-grained (a good thing), create a test class for each operation and several test methods to test various permutations on the operation. |
Looking at the sequence diagram in Figure 12-5, we should start by creating a test class called CustomerDetailsValidatorTest, with two test methods, testCheckRequiredFields() and testCustomerNameUnique():
package iconix; import junit.framework.*; public class CustomerDetailsValidatorTest extends TestCase { public CustomerDetailsValidatorTest(String testName) { super(testName); } public static Test suite() { TestSuite suite = new TestSuite(CustomerDetailsValidatorTest.class); return suite; } public void testCheckRequiredFields() throws Exception { } public void testCustomerNameUnique() throws Exception { } } At this stage, we can also draw our new class diagram (starting with the domain model as a base) and begin to add in the details from the sequence diagram/unit test (see Figure 12-6).
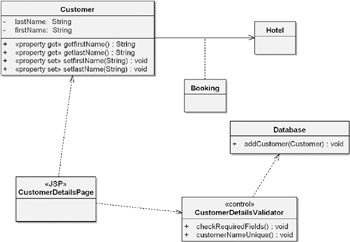
Figure 12-6: Beginnings of the detailed class diagram
As you can see in Figure 12-6, we’ve filled in only the details that we’ve identified so far using the diagrams and unit tests. We’ll add more details as we identify them, but we need to make sure that we don’t guess at any details or make intuitive leaps and add details just because it seems like a good idea to do so at the time.
| Tip | Be ruthlessly systematic about the details you add (and don’t add) to the design. |
In the class diagram in Figure 12-6, we’ve indicated that CustomerDetailsValidator is a <<control>> stereotype. This isn’t essential for a class diagram, but it does help to tag the control classes so that we can tell at a glance which ones have (or require) unit tests.
In the Customer class, we’ve added lastName and firstName properties; these are the beginnings of the details the user will fill in when creating a new customer. The individual fields will probably already have been identified for you by various project stakeholders.
| Note | Our CASE tool has automatically put in the property accessor methods (the get and set methods in Figure 12-6), though this feature can be switched off if preferred. It’s a matter of personal taste whether to show this level of detail; our feeling is that showing the properties in this way uses a lot of text to show a small amount of information. So a more efficient way (as long as it’s followed consistently) is to show just the private fields (lastName, firstName) as public attributes. As long as we follow “proper” Java naming conventions, it should be obvious that these are really private fields accessed via public accessor methods. We’ll show this when we return to the class diagram later on. |
Next, we want to write the actual test methods. Remember, these are being driven by the controllers, but they are written from the perspective of the Boundary objects and in a sense are directly validating the design we’ve created using the sequence diagram, before we get to the “real” coding stage. In the course of writing the test methods, we may identify further operations that might have been missed during sequence diagramming.
Our first stab at the testCheckRequiredFields() method looks like this:
public void testCheckRequiredFields() throws Exception { List fields = new ArrayList(); Customer customer = new Customer (fields); boolean allFieldsPresent = customer.checkRequiredFields(); assertTrue("All required fields should be present", allFieldsPresent); } Naturally enough, trying to compile this initially fails, because we don’t yet have a CustomerDetailsValidator class (let alone a checkRequiredFields() method). These are easy enough to add, though:
public class CustomerDetailsValidator { public CustomerDetailsValidator (List fields) { } public boolean checkRequiredFields() { return false; // make the test fail initially. } } Let’s now compile and run the test. Understandably, we get a failure, because checkRequiredFields() is returning false (indicating that the fields didn’t contain all the required fields):
CustomerDetailsValidatorTest .F. Time: 0.016 There was 1 failure: 1) testCheckRequiredFields(CustomerDetailsValidatorTest) junit.framework.AssertionFailedError: All required fields should be present at CustomerDetailsValidatorTest.testCheckRequiredFields( CustomerDetailsValidatorTest.java:21) FAILURES!!! Tests run: 2, Failures: 1, Errors: 0
However, where did this ArrayList of fields come from, and what should it contain? In the testCheckRequiredFields() method, we’ve created it as a blank ArrayList, but it has spontaneously sprung into existence—an instant warning sign that we must have skipped a design step. Checking back, this happened because we didn’t properly address the question of what the Customer fields are (and how they’re created) in the sequence diagram (see Figure 12-5). Let’s hit the brakes and sort that out right now (see Figure 12-7).
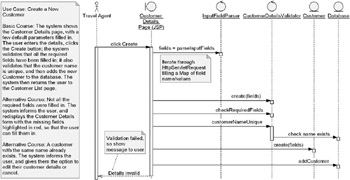
Figure 12-7: Revisiting the sequence diagram to add more detail
Revisiting the sequence diagram identified that we really need a Map (a list of name/value pairs that can be looked up individually by name) and not a sequential List.
As you can see, we’ve added a new controller, InputFieldParser (it does exactly what it says on the tin; as with class design in general, it’s good practice to call things by literally what they do and then there’s no room for confusion). Rather than trying to model the iterative process in some horribly convoluted advanced UML fashion, we’ve simply added a short note describing what the parseInputFields operation does: it iterates through the HTML form that was submitted to CustomerDetailsPage and returns a Map of field name/value pairs.
At this stage, we’re thinking in terms of HTML forms, POST requests, and so forth, and in particular we’re thinking about HttpServletRequests (part of the Java Servlet API) because we’ve decided to use JSP for the front-end. Making this decision during sequence diagramming is absolutely fine, because sequence diagrams (and unit tests, for that matter) are about the nitty-gritty aspects of design. If we weren’t thinking at this level of detail at this stage, then we’d be storing up problems (and potential guesswork) for later—which we very nearly did by missing the InputFieldParser controller on the original sequence diagram.
Because our sequence diagram now has a new controller on it, we also need a new unit test class (InputFieldParserTest). However, this is starting to take us outside the scope of the example (the vanilla TDD example in Chapter 11 didn’t cover UI or web framework details, so we’ll do the same here). For the purposes of the example, we’ll take it as read that InputFieldParser gets us a HashMap crammed full of name/value pairs containing the user’s form fields for creating a new Customer.
Now that we’ve averted that potential design mishap, let’s get back to the CustomerDetailsValidator test. As you may recall, the test was failing, so let’s add some code to test for our required fields:
public void testCheckRequiredFields() throws Exception { Map fields = new HashMap(); fields.put("userName", "bob"); fields.put("firstName", "Robert"); fields.put("lastName", "Smith"); Customer customer = new Customer(fields); boolean allFieldsPresent = customer.checkRequiredFields(); assertTrue("All required fields should be present", allFieldsPresent); } A quick run-through of this test shows that it’s still failing (as we’d expect). So now let’s add something to CustomerDetailsValidator to make the test pass:
public class CustomerDetailsValidator { private Map fields; public CustomerDetailsValidator (Map fields) { this.fields = fields; } public boolean checkRequiredFields() { return fields.containsKey("userName") && fields.containsKey("firstName") && fields.containsKey("lastName"); } } Let’s now feed this through our voracious unit tester:
CustomerDetailsValidatorTest .. Time: 0.016 OK (2 tests)
Warm glow all around. But wait, there’s trouble brewing …
In writing this test, something that sprang to mind was that checkRequiredFields() probably shouldn’t be indicating a validation failure by returning a boolean. In this OO day and age, we like to use exceptions for doing that sort of thing (specifically, a ValidationException), not forgetting that our use case stated that the web page should indicate to the user which fields are missing. We can’t get that sort of information from a single Boolean, so let’s do something about that now (really, this should have been identified earlier; if you’re modeling in a group, it’s precisely the sort of design detail that tends to be caught early on and dealt with before too much code gets written).
In fact, in this particular case a Java Exception might not be the best way to handle a validation error, because we don’t want to drip-feed the user one small error at a time. It would be preferable to run the user’s input form through some validation code that accumulates a list of all the input field errors, so that we can tell the user about them all at once. This prevents the annoying kind of UI behavior where the user has to correct one small error, resubmit the form, wait a few seconds, correct another small error, resubmit the form, and so on.
Looking back at the sequence diagram in Figure 12-7, we’re asking quite a lot of the CustomerDetailsPage JSP page: it’s having to do much of the processing itself, which is generally considered bad form. We need to move some of this processing out of the page and into a delegate class. While we’re at it, we want to add more detail to the sequence diagram concerning how to populate the page with feedback on the validation errors. This is quite a lot to do directly in the code, so let’s revisit the sequence diagram and give it another going over with the new insight we gained from having delved tentatively into the unit test code. The updated sequence diagram is shown in Figure 12-8.
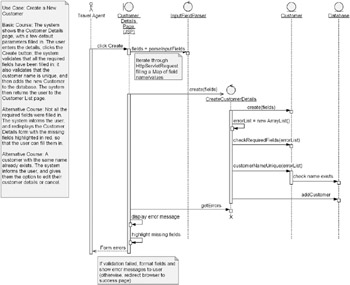
Figure 12-8: Revisiting the sequence diagram form processing
Although the “flavor” of the design is basically the same, some of the details have changed considerably. We’ve gotten rid of the CustomerDetailsValidator class entirely, and we’ve moved the validation responsibility into Customer itself. However, to bind all of this form processing together, we’ve also added a new controller class, CreateCustomerDetails. This has the responsibility of controlling the process to create a new Customer object, validating it, and (assuming validation was okay) creating it in the Database.
| Note | The decision was 50:50 on whether to create a dedicated class for CreateCustomerDetails or simply add it as a method on the Customer class. Normally, controllers do tend to end up as methods on other classes; however, in this case our primary concern was to move the controller logic out of the JSP page and into a “real” Java class. In addition, Customer was already starting to look a little crowded. As design decisions go, it probably could have gone either way, though. |
As we now have a new controller (CreateCustomerDetails), we need to create a unit test for it. Let’s do that now:
public class CreateCustomerDetailsTest extends TestCase { public CreateCustomerDetailsTest(java.lang.String testName) { super(testName); } public static Test suite() { TestSuite suite = new TestSuite(CreateCustomerDetailsTest.class); return suite; } public void testNoErrors() throws Exception { Map fields = new HashMap(); fields.put("userName", "bob"); fields.put("firstName", "Robert"); fields.put("lastName", "Smith"); CreateCustomerDetails createCustomerDetails = new CreateCustomerDetails(fields); List errors = createCustomerDetails.getErrors(); assertEquals("There should be no validation errors", 0, errors.size()); } } As you can see, this code replicates what used to be in CustomerDetailsValidatorTest. In fact, CustomerDetailsValidatorTest and CustomerDetailsValidator are no longer needed, so can both be deleted.
Initially, our new code doesn’t compile because we don’t yet have a CreateCustomerDetails class to process the user’s form and create the customer. Let’s add that now:
public class CreateCustomerDetails { private Map fields; public CreateCustomerDetails(Map fields) { this.fields = fields; } public List getErrors() { return new ArrayList(0); } } Our first test is checking that if we create a “perfect” set of user input fields, there are no validation errors. Sure enough, this passes the test, but mainly because we don’t yet have any code to create the validation errors! A passing test of this sort is a bad thing, so it would really be better if we begin with a test that fails if there aren’t any validation errors. This will give us our initial test failure, which we can then build upon.
public void testRequiredFieldMissing() throws Exception { Map fields = new HashMap(); fields.put("firstName", "Robert"); fields.put("lastName", "Smith"); CreateCustomerDetails createCustomerDetails = new CreateCustomerDetails(fields); List errors = createCustomerDetails.getErrors(); assertEquals("There should be one validation error", 1, errors.size()); } This test creates a field map with one required field missing (the user name). Notice how these unit tests correspond exactly with the alternative courses for the “Create a New Customer” use case. The testRequiredFieldMissing() test is testing for the “Not all the required fields were filled in” alternative course.
If we run the test case now, we get our failure:
CreateCustomerDetailsTest ..F Time: 0.015 There was 1 failure: 1) testRequiredFieldMissing(CreateCustomerDetailsTest) junit.framework.AssertionFailedError: There should be one validation error expected:<1> but was:<0> at CreateCustomerDetailsTest.testRequiredFieldMissing( CreateCustomerDetailsTest.java:39) FAILURES!!! Tests run: 2, Failures: 1, Errors: 0
Now we can add some code into CreateCustomerDetails to make the tests pass:
public class CreateCustomerDetails { private Map fields; private List errorList; private Customer customer; public CreateCustomerDetails(Map fields) { this.fields = fields; this.errorList = new ArrayList(); this.customer = new Customer(fields); customer.checkRequiredFields(errorList); customer.customerNameUnique(errorList); } public List getErrors() { return errorList; } } This class currently doesn’t compile because we haven’t yet updated Customer to accept errorList. So we do that now:
public void checkRequiredFields(List errorList) { } public void checkCustomerNameUnique(List errorList) { } This gets the code compiling, and running the tests returns the same error as before, which validates that the tests are working. Now we write some code to make the failing test pass:
public void checkRequiredFields(List errorList) { if (!fields.containsKey("userName")) { errorList.add("The user name field is missing."); } if (!fields.containsKey("firstName")) { errorList.add("The first name field is missing."); } if (!fields.containsKey("lastName")) { errorList.add("The last name field is missing."); } } and do a quick run-through of the unit tests:
CreateCustomerDetailsTest .. Time: 0.016 OK (2 tests)
Now we’re talking!
The code in checkRequiredFields() seems a bit “scrufty,” though—there’s some repetition there. Now that we have a passing test, we can do a quick bit of refactoring (this is the sort of internal-to-a-method refactoring that occasionally goes beneath the sequence diagram’s radar; it’s one of the reasons that sequence diagrams and unit tests work well together):
public void checkRequiredFields(List errorList) { checkFieldExists("userName", "The user name field is missing.", errorList); checkFieldExists("firstName", "The first name field is missing.", errorList); checkFieldExists("lastName", "The last name field is missing.", errorList); } private void checkFieldExists(String fieldName, String errorMsg, List errorList) { if (!fields.containsKey(fieldName)) { errorList.add(errorMsg); } } If we compile this and rerun the tests, it all still passes, so we can be reasonably confident that our refactoring hasn’t broken anything.
So, what’s next? Checking back to the use case text (visible in the sequence diagram in Figure 12-8), we still have an alternative course that’s neither tested nor implemented. Now seems like a good time to do that. Once we’ve tested and implemented the alternative course, we’ll pause to update the class diagram (a useful design review process).
To refresh your memory, here’s the alternative course:
-
Alternative Course: A customer with the same name already exists. The system informs the user and gives them the option to edit their customer details or cancel.
We can see this particular scenario mapped out in the sequence diagram in Figure 12-8, so the next step, as usual, is to create the skeleton test cases, followed by the skeleton classes, followed by an updated class diagram, followed by the unit test code, followed by the “real” implementation code (punctuating each step with the appropriate design validation/compilation/testing feedback).
CreateCustomerDetailsTest already has an empty test method called testCustomerAlreadyExists(), so let’s fill in the detail now:
public void testCustomerAlreadyExists() throws Exception { Map fields = new HashMap(); fields.put("userName", "bob"); fields.put("firstName", "Robert"); fields.put("lastName", "Smith"); CreateCustomerDetails createCustomerDetails1 = new CreateCustomerDetails(fields); CreateCustomerDetails createCustomerDetails2= new CreateCustomerDetails(fields); List errors = createCustomerDetails2.getErrors(); assertEquals("There should be one validation error", 1, errors.size()); } This simply creates two identical Customers (by creating two CreateCustomerDetails controllers) and checks the second one for validation errors. Running this, we get our expected test failure:
CreateCustomerDetailsTest ...F Time: 0.015 There was 1 failure: 1) testCustomerAlreadyExists(CreateCustomerDetailsTest) junit.framework.AssertionFailedError: There should be one validation error expected:<1> but was:<0> at CreateCustomerDetailsTest.testCustomerAlreadyExists( CreateCustomerDetailsTest.java:51) FAILURES!!! Tests run: 3, Failures: 1, Errors: 0
Obviously, we now need to add some database code to actually create the customer, and then test whether the customer already exists.
Before we do that, though, we’ve been neglecting the class diagram for a while, so let’s update it now. We’ll use the latest version of the sequence diagram (see Figure 12-8) to allocate the operations to each class. The result is shown in Figure 12-9.
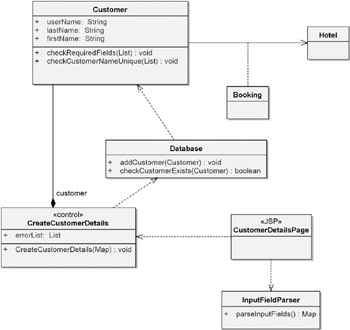
Figure 12-9: Class diagram updated with new classes, attributes, and operations
As you can see, we still haven’t even touched on the detail in Hotel or Booking yet, because we haven’t visited these use cases; so they remain empty, untested, and unimplemented, as they should be at this stage.
To finish off, we’ll add the database access code to make the latest unit test pass. Checking the sequence diagram, we see that we need to modify CreateCustomerDetails to add a new customer if all the validation tests passed (the new code is shown in bold):
public CreateCustomerDetails(Map fields) { this.fields = fields; this.errorList = new ArrayList(); this.customer = new Customer(fields); customer.checkRequiredFields(errorList); customer.checkCustomerNameUnique(errorList); if (errorList.size() == 0) { new Database().addCustomer(customer); } } We also need to implement the checkCustomerNameUnique() method on Customer to check the Database:
public void checkCustomerNameUnique(List errorList) { if (new Database().checkCustomerExists(this)) { errorList.add("That user name has already been taken."); } } And finally, we need the Database class itself (or at least the beginnings of it):
public class Database { public Database() { } public void addCustomer(Customer customer) { } public boolean checkCustomerExists(Customer customer) { return true; } } Running the tests at this stage caused a couple of test failures:
CreateCustomerDetailsTest .F.F. Time: 0.015 There were 2 failures: 1) testNoErrors(CreateCustomerDetailsTest)junit.framework.AssertionFailedError: There should be no validation errors expected:<0> but was:<1> at CreateCustomerDetailsTest.testNoErrors(CreateCustomerDetailsTest.java:29) 2) testRequiredFieldMissing(CreateCustomerDetailsTest) junit.framework.AssertionFailedError: There should be one validation error expected:<1> but was:<2> at CreateCustomerDetailsTest.testRequiredFieldMissing( CreateCustomerDetailsTest.java:39) FAILURES!!! Tests run: 3, Failures: 2, Errors: 0
Though it should have been obvious, it took a moment to work out that it was the new check (Database.checkCustomerExists() returning true) that was causing both of the existing validation checks to fail. Clearly, we need a better way of isolating validation errors, as currently any validation error will cause any test to fail, regardless of which validation error it’s meant to be checking for.
To do this, we could add some constants into the Customer class where the validation is taking place, where each constant represents one type of validation error. We could also add a method for querying a list of errors; our assert statements can then use this to assert that the list contains the particular kind of error it’s checking for. In fact, it would make a lot of sense to create a CustomerValidationError class that gets put into the errorList instead of simply putting in the error message. (We’ll leave this as an exercise for the reader, though, as we’re sure you get the general idea by now!)
So, to finish off, here’s the Database class all implemented and done:
public class Database { public Database() { } public void addCustomer(Customer customer) throws DatabaseException { try { runStatement("INSERT INTO Customers VALUES (‘" + customer.getUserName() + ", " + customer.getLastName() + ", " + customer.getFirstName() + "’)"); } catch (Exception e) { throw new DatabaseException("Error saving Customer " + customer.getUserName(), e); } } public boolean checkCustomerExists(Customer customer) throws DatabaseException { ResultSet customerSet = null; try { customerSet = runQuery( "SELECT CustomerName " + "FROM Customers " + "WHERE UserName='" + customer.getUserName() + "'"); return customerSet.next(); } catch (Exception e) { throw new DatabaseException( "Error checking to see if Customer username '" + customer.getUserName() + "' exists.", e); } finally { if (customerSet != null) { try { customerSet.close(); } catch (SQLException e) {} } } } private static void runStatement(String sql) throws ClassNotFoundException, SQLException { java.sql.Connection conn; Class.forName( "com.microsoft.jdbc.sqlserver.SQLServerDriver"); conn = DriverManager.getConnection( "jdbc:microsoft:sqlserver://localhost:1433", "database_username", "database_password"); Statement statement = conn.createStatement(); statement.executeUpdate(sql); } private static ResultSet runQuery(String sql) throws ClassNotFoundException, SQLException { java.sql.Connection conn; Class.forName( "com.microsoft.jdbc.sqlserver.SQLServerDriver"); conn = DriverManager.getConnection( "jdbc:microsoft:sqlserver://localhost:1433", "matt", // username "pass"); // password Statement statement = conn.createStatement(); return statement.executeQuery(sql); } } | Note | Obviously, in a production environment you’d use an appropriate data object framework, not least to enable connection pooling (Spring Framework, EJB, JDO, Hibernate, etc.), but this code should give you a good idea of what’s needed to implement the last parts of the “Create a New Customer” use case. |
Running this through JUnit gives us some nice test passes. However, running it a second time, the tests fail. How can this be so? Put simply, the code is creating new Customers in the database each time the tests are run, but it’s also testing for uniqueness of each Customer. So we also need to add a clearCustomers() method to Database:
public void clearCustomers() throws DatabaseException { try { runStatement("DELETE * FROM Customers"); } catch (Exception e) { throw new DatabaseException("Error clearing Customer Database.", e); } } and then call this in the setUp() method in CreateCustomerDetailsTest:
public void setUp() throws Exception { new Database().clearCustomers(); } This does raise the question of database testing in a multideveloper project. If everyone on the team is reading and writing to the same test database, then running all these automated tests that create and delete swaths of Customer data will soon land the team in quite a pickle. One answer is to make heavy use of mock objects (see the upcoming sidebar titled “Mock Objects”), but this isn’t always desirable. Of course, the real answer is to give each person on the team his own database schema to work with. Not so long ago this notion would have been snorted at, but these days it’s considered essential for each developer to have his own database sandbox to play in.
As we implement further use cases, we would almost certainly want to rename the Database class to something less generic (e.g., CustomerDatabase). This code has also identified for the first time the need to add the username, lastName, and firstName properties to Customer. We suspected we might need these earlier, but we didn’t add them until we knew for sure that we were going to need them.
And that about wraps it up. Running this through JUnit gives us some nice test passes. For every controller class on the sequence diagram, we’ve gone through each operation and created a test for it. We’ve also ensured that each alternative course gets at least one automated test.
As mentioned earlier, we won’t repeat the example for the other two use cases, as that would belabor the point somewhat, but hopefully this chapter has given you some good insight into how to mix an up-front A&D modeling process with a test-driven development process.
We haven’t covered mock objects[3.] in this or the previous chapter, but the ICONIX+TDD process is, broadly speaking, the same if you incorporate mock objects into the mix. A mock object is simply a class that stands in for “real” functionality but doesn’t perform any significant processing itself.
Mock objects are often used to speed up unit tests (e.g., to avoid accessing the database). A mock object will simply create and return the same data object each time it’s invoked. This can even reduce the overall time spent running a suite of tests from minutes down to seconds. However, it should be noted that when you use mock objects in this way, you’re not testing your application’s database code at all; you’re simply testing the application logic.
In our combined ICONIX+TDD process, you’d use mock objects to avoid having to implement classes too early. This reduces the issue where you need to implement code before the iteration when it’s due for release just to get some of the tests working.
For example, if we’re implementing a “Create Customer” use case, we’d want a test that proves the customer was indeed created. To do this, we would need to retrieve the customer we just created and assert that it’s the same customer (and not null, for example). But this functionality would really be covered by the “Retrieve Customer” use case, which might not be due until a later iteration. Using mock objects to provide stand-in functionality in the meantime (e.g., always returning the same Customer object without accessing the database at all) gets around this problem.
Again, however, it should be stressed that you’re not testing the database code at all using this technique, so you’d still want to at least manually check the database every now and again to make sure the customer record is in there (at least until the real Customer-retrieval functionality has been written).
[2.]Doug Rosenberg and Kendall Scott, Use Case Driven Object Modeling with UML: A Practical Approach (New York: Addison-Wesley, 1999), p. 69.
[3.]See www.mockobjects.com.
EAN: 2147483647
Pages: 97
- Chapter III Two Models of Online Patronage: Why Do Consumers Shop on the Internet?
- Chapter XI User Satisfaction with Web Portals: An Empirical Study
- Chapter XIV Product Catalog and Shopping Cart Effective Design
- Chapter XV Customer Trust in Online Commerce
- Chapter XVI Turning Web Surfers into Loyal Customers: Cognitive Lock-In Through Interface Design and Web Site Usability