Using Automation Operations
So far you ve applied Actions to images manually. Hmmmm manual automation? Sounds like an oxymoron, doesn t it? Wouldn t it be really cool if you could apply Actions automatically while you were away from the computer, maybe strolling in the park or dining out? Why would he mention it if it couldn t be done? you might be asking yourself right now. Yes, it can be done. And there are several ways to do it.
Batch Processing
You can apply Actions to multiple files within a folder by choosing File ’ Automate ’ Batch; the Batch dialog box is shown in Figure 23.12. This formidable-looking interface lets you apply a set, a group of Actions, or a single Action. You can batch-process a group of images within a folder, or from an external source such as a digital camera or scanner with a document feeder. (But note that your scanner or digital camera might need an Acquire plug-in to support batch processing.) You can then automatically save the images within the folder, or save them to new folders, leaving the originals unchanged.

Figure 23.12: The Batch dialog box
| Note | For better performance when batch-processing images, open the History palette. Turn off Automatically Create First Snapshot. In the General Preferences dialog box, decrease the number of saved History states. |
To batch-process a group of images, choose File ’ Automate ’ Batch. Under Play, choose the Set and Action that you want to run from the pop-up lists. Then choose your input method from the Source list:
-
Import applies the images on a scanner or digital camera.
-
Opened Files plays the Action on open files.
-
Folder runs the Action on all of the images within a selected folder. Click Choose to locate and select the folder, and then select the following check-box options as desired. (You can also apply the Action within the File Browser.)
-
Override Action Open Commands ignores any Open commands that are part of the Action, to ensure that the images are opened from the specified folder. Select this option when you want Open commands in the Action to refer to the batched files, rather than to the filenames specified in the Action. If you enable this option, the Action must contain an Open command because the Batch command will not automatically open the source files.
-
Include All Subfolders affects the contents of any folders within the selected folder.
-
Suppress File Open Options Dialogs surpresses the display of the Open dialog box when opening a file.
-
Suppress Color Profile Warnings turns off the color policy and profile mismatch messages.
-
For the Destination, choose from these options for the batch- processed files from the Destination pop-up list:
-
None leaves the files open without saving changes (unless the Action included a Save command).
-
Save And Close saves the files in the source folder.
-
Folder lets you specify a new location for the batch-processed files. Click Choose to locate and select the folder, and enable the following check-box option if desired.
-
Override Action Save As Commands ignores any Save As commands that are part of the Action, to ensure that the specified files are saved to the destination folder. Select this option when you want the Save As commands in the Action to refer to the batched files, rather than to the filenames and locations specified in the Action. If you enable this option, the Action must contain a Save As command because the Batch command will not automatically save to the destination file.
-
| Note | The Batch command always saves the files in the same format as the original. To create a batch-processing operation that saves files in a new format, record the Save As or Save A Copy command. Designate a location within the Action, followed by the Close command. In the Batch dialog box, choose None for the Destination. |
File Naming
File naming is available if you selected a folder as the destination. You can determine how batch-processed files will be named, as well as their platform compatibility.
Choose from pop-up lists or type into the fields to create file-naming conventions. Determine the naming convention for the document name , identification number or letter, date, and filename extension. The fields let you change the order and formatting of the filenames. For filename Compatibility, choose Windows, Mac OS, and/or Unix.
Error Processing
You can choose an option for error processing from the Errors pop-up list. Stop For Errors pauses the operation until you OK the error message. Log Errors To File records any errors in a separate log file. The error message appears after the process is complete. Click Save As and name the error file.
Creating and Using Droplets
A Droplet is a mini application that can play an Action. You can apply a single Action or series of Actions by dragging a file or folder onto the Droplet s icon. This way you don t even have to open the program to apply the Action ”the Droplet will automatically do that for you.
The Create Droplet dialog box is quite similar to the Batch dialog box. To create a Droplet from an Action, choose File ’ Automate ’ Create Droplet (see Figure 23.13).

Figure 23.13: The Create Droplet dialog box
Under Save Droplet In, click the Choose button. Determine a location for the Droplet. Choose a Set and an Action from pop-up lists. Set the Play and Destination options for the Droplet as described for the Source and Destination options in the earlier section Batch Processing .
Using a Droplet to Apply an Action
Now you ll make a Droplet from the Becky Action that you recorded in the previous section, Recording an Action, and apply it to an image:
-
Choose File ’ Automate ’ Create Droplet.
-
In the Create Droplet dialog box, do the following: For the Save Droplet In option, click Choose and choose the Desktop of your computer. For Set, choose Yearbook Photos; for Action, choose Becky.
-
In the Play section, clear the check boxes for Override Action Open Commands, Include All Subfolders, and Suppress Color Profile Warnings.
-
For Destination, choose Folder. Click Choose and determine a location for the Droplet s icon.
-
Leave the default filenames, and the Stop For Errors default.
-
Click OK, and the Droplet appears in the specified location.

-
On your desktop, open the ch23 folder on the CD. Drag the icon of the Vicky.psd image onto the Droplet icon.
-
The adjustments for this photograph will be different from the ones recorded in the Action. As the Levels, Gaussian Blur, and Unsharp Mask dialog boxes appear, make adjustments to improve the image.
-
Open the image in the destination folder to observe the changes to the image. Your image should look better, perhaps something like Figure 23.14.
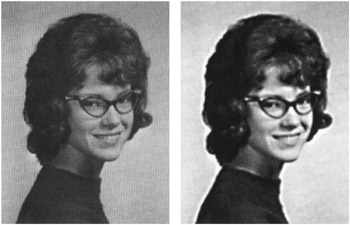
Figure 23.14: Vicky before (left) and after (right) being dragged to the Droplet
EAN: 2147483647
Pages: 355