Replacing the Shoulder
A severely torn area like the right shoulder can be replaced and modified by using other parts of the image. To replace the shoulder, follow these steps:
-
Choose the Magic Wand tool
 . In the Options bar, enter a Tolerance value of 80. Click inside the white tear to select it.
 -
Choose Select ’ Modify ’ Expand ’ 6 pixels.
-
Choose Select ’ Feather ’ 4 pixels.
-
Choose Select ’ Transform Selection. Then choose Edit Transform ’ Flip Horizontal. Click the Commit icon to implement the transformation.
-
Drag the selection outline and place it on the opposite shoulder, as shown in Figure H7.12.
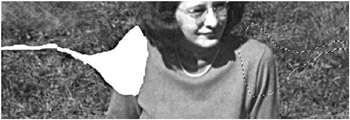
Figure H7.12: Using the selection on the opposite shoulder -
Choose Layer ’ New ’ Layer Via Copy. Double-click the layer name, name the layer Shoulder , and hit Return/Enter.
-
Choose Edit Transform ’ Flip Horizontal to flip the shoulder.
-
Choose the Move tool. Click and drag the shoulder and position it on the left shoulder, as shown in Figure H7.13. Deselect.

Figure H7.13: The replacement shoulder in place -
Target the Background. Choose the Clone Stamp tool. Clone the uncovered areas of the tear.
-
Check the Use All Layers box in the Options bar. Place the cursor on the forearm, press the Option/Alt key, and click the mouse to sample it. Clone out some of the folds near the shoulder to alter its appearance and make it look more natural, as in Figure H7.14.

Figure H7.14: The finished shoulder -
From the Layer Options palette, choose Merge Visible.
-
Save.
EAN: 2147483647
Pages: 355