Editing 16-Bit Images
In all versions of Photoshop prior to CS, the manipulation of high-bit-depth images (more than 8 bits per channel) was problematic . Although the acquisition and handling of images from devices capable of capturing 16-bit images was simple, the variety of controls available was extremely limited.
| New | In Photoshop CS, the list of image adjustments has been expanded to include more than Levels and Curves. Image filters, like the artistic functions of Watercolor, Chalk, Pastels, and others, are still not available for these high-bit images. |
Some scanners will generate 16-bit images, and several professional digital cameras will also generate these images on capture, ensuring a smooth tonality and tremendous gradation quality from these devices.
In general, the tools used to manage high-bit-depth images are Levels, Curves, and Unsharp Mask, each of which can be applied to original images without requiring a conversion to the coarser 8-bit mode (see Figure 14.5). Each of these functions behaves the same with 16-bit images as it does with 8-bit images. And today s fast computers enable Photoshop to process 16-bit images without significant delays. (Remember when it took 10 minutes to perform Unsharp Mask on a 50 MB file?)
Figure 14.5: In Photoshop CS, the available Image Adjustments have been expanded to include all of those available to 8-bit images, allowing color correction, selective color , and others to be applied to these high-bit-depth images.
Changing between 16-Bit and 8-Bit
After you have made necessary adjustments to your 16-bit image, you must convert to 8-bit to print to most printers and output devices. The change is made by choosing Image ’ Mode ’ 8-bits/Channel control. Be sure to save the resulting file as a copy of the original to prevent permanent harm to your 16-bit files.
Although no obvious benefit exists in converting 8-bit images into 16-bit, there are a few good reasons to do so. One practical reason is to expand the tonality of an image in the process of restoring the image ”useful when working with old or faded images. If you convert to 16-bit before making severe tonal changes (Levels, Curves, Shadow/Highlight), there will be more tonal steps in the image to redistribute, and thus more available to the image after the adjustment (see Figures 14.6 through 14.8). Converting back to 8-bit after this procedure will result in an image with a more complete histogram (more complete tone scale), and thus fewer or no missing tonal steps.
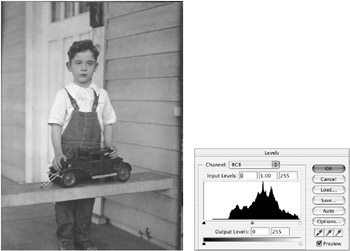
Figure 14.6: This old photo has faded over time; its histogram shows it needs some work in the shadows.
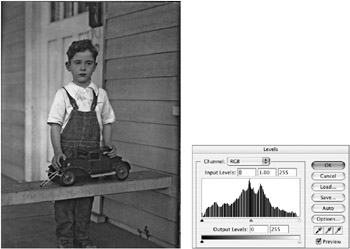
Figure 14.7: The same photo, after tonal adjustments ”the histogram shows that gaps now exist in the tone scale of the image.
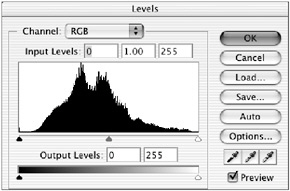
Figure 14.8: By converting the image from 8-bit to 16-bit in advance of tonal correction, the resulting histogram shows no gaps in the tone scale of the photograph. This image will be slightly better looking than its 8-bit counterpart .
If you are serious about image restoration, this procedure will result in the best-quality conversion after tonal adjustment. Prints from these files on high-quality ink-jet printers and photographic printers will show no posterization, and the faces of people in such images will generally be free of visible tonal steps.
EAN: 2147483647
Pages: 355
- ERP System Acquisition: A Process Model and Results From an Austrian Survey
- The Effects of an Enterprise Resource Planning System (ERP) Implementation on Job Characteristics – A Study using the Hackman and Oldham Job Characteristics Model
- Context Management of ERP Processes in Virtual Communities
- Intrinsic and Contextual Data Quality: The Effect of Media and Personal Involvement
- Development of Interactive Web Sites to Enhance Police/Community Relations