Determining Resolution
As noted earlier the physical size of an image is its height and width when printed. Its resolution is the number of pixels that occupy a linear inch of a digital image, measured in pixels per inch (ppi). You determine this resolution when you scan an image or shoot a digital photo at a given setting.
To acquire sufficient information to produce good-quality images from your high-resolution imagesetter or laser printer, scan your images at 1.5 to 2 times the screen frequency of the halftone screen you will use for printing (again, see Table 13.1 for common halftone screen frequencies). That means if your image is going to be printed in a newspaper or in a newsletter, scan it anywhere from 128 to 170 pixels per inch (1.5 or 2 — 85 lines per inch). If your image will be printed in a glossy magazine, scan your image at 225 to 300 ppi (1.5 or 2 — 150 lpi). The image size should be scanned at 100% of the size it will be printed.
| Note | Should you use 1.5 or 2? Whether to use the higher or lower setting depends on the content of the image. If you are scanning images of big puffy clouds, for example, where the content is intrinsically soft, use the lower setting to decrease file size. If sharpness is critical to your image, then scan at the higher setting. |
If you re going to print only to desktop ink-jet printers,, I recommend that you scan your images at a minimum of one-third the desired print resolution. For example, for a print resolution of 720 dpi, set the scan resolution to 240 ppi or higher. If you are going to increase the size of the printed image, then you should scan at a higher resolution. This equates to common scan resolutions of 120 ppi, 240 ppi, and 480 ppi ”although anything over 360 ppi is probably overkill. If you scan a picture at 600 ppi and print it at 300 dpi, you can increase its physical size by a factor of two without compromising its quality.
| Note | When scanning for output to high resolution inkjet, large format gicl e or RGB printers, always consult the documentation or the service provider for the desired resolution. |
Line art or bitmap content is different. Ideally, scan at the same resolution as the printer s dpi resolution or in evenly divisible units of the printer s resolution. For example, you would scan at 360 ppi for a 1440 dpi print.
| Note | Exceeding the optical resolution of a scanner is essentially the same as resampling up in Photoshop. It will produce less than desirable results. For best results, don t exceed the scanner s optical resolution. |
Resampling Image Resolution
The image resolution and the physical size of an image are interchangeable values. For example, an image that is 4 ² —5 ² at 72 ppi has the same amount of information as an image that is 2 ² —2.5 ² at 144 ppi. Therefore, you can enlarge the physical size of an image with no loss of quality if you reduce its resolution. To perform this operation, follow these steps:
-
Open the file little_monkey.psd in the Chapter 13 folder on the CD.
-
Choose Image ’ Image Size. The Image Size dialog box appears (see Figure 13.5). The image is 3 ² wide and 4.18 ² high, and has a resolution of 300 ppi.
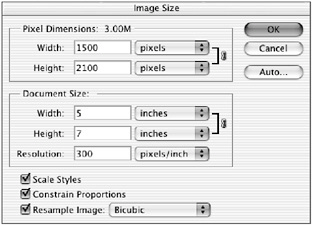
Figure 13.5: The Image Size dialog box -
Clear the Resample Image check box, which also clears the Constrain Proportions check box and grays out the option.
-
Enter a new value into the Resolution field. In this example, change the resolution from 300 ppi to 150 ppi, decreasing the resolution of the image by half but doubling its physical size to 6 ² — 8.36 ² .
-
Click OK to apply the changes.
When you clear the Resample Image option and change the resolution, your image retains the same quantity of pixels and its height and width change proportionally to accommodate the new resolution.
In contrast, resampling changes the image resolution and/or physical size by adding or deleting pixels. When you resample down, you discard pixels. When you resample up, you create new pixels.
To use this feature, check the Resample Image box in the Image ’ Image Size dialog and pick from one of the five predefined interpolation sizing algorithms. In previous versions of Photoshop, the first three algorithms ”Nearest Neighbor, Bilinear, or Bicubic ”produced a loss of sharpness and dulling of color when an image was resampled up (that is, enlarged; see Figure 13.6). Although it is always better to scan an image at the size and resolution that the image will be output, two new interpolation algorithms ”Bicubic Smoother and Bicubic Sharper ”have been added to the Image Size dialog that help reduce the diminished quality of enlargements (see Figure 13.7). Each of these choices determines how Photoshop adds or removes pixels from your image:
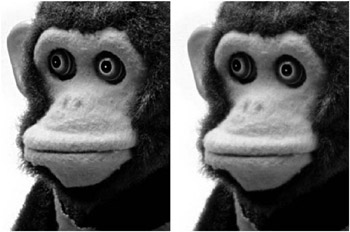
Figure 13.6: A comparison of an image scanned at 288 ppi (left) and one scanned at 72 ppi and resampled up to 288 ppi (right) by using the standard Bilinear interpolation algorithm. Note the loss of detail and the softening of edges.
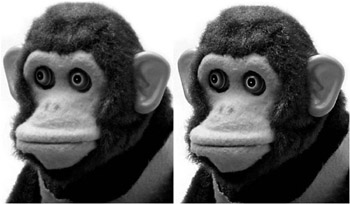
Figure 13.7: A close-up of the same image scanned at 72 ppi and resampled up to 288 ppi by using the Bilinear Smoother (left) and Bilinear Sharper (right) algorithms
-
Nearest Neighbor evaluates an adjacent pixel. Use this option for line art, desktop icons, software interface screen captures, or any time that anti-aliasing creates artifacts.
-
Bilinear averages the four surrounding pixels, immediately above, below, and on either side for smoother transitions.
-
Bicubic averages the eight closest neighbors and adds a sharpening effect to increase the contrast.
| New |
|
| Note | A third-party plug-in called Genuine Fractals also does a decent job of resampling images up with a minimum loss of quality. Developed by Altamira and now available through LizardTech, www.lizardtech.com/products, it comes in several versions for different purposes. |
The default interpolation settings are found under Edit ’ Preferences ’ General. The default interpolation is also active when using transformation commands such as Edit ’ Free Transform or Edit ’ Transform ’ Distort And Perspective, several of the distortion filters such as Spherize or Pinch, and the Crop tool when cropping to size.
Constraining Proportions
When you enable the Resample Image feature, you have the option to constrain the image s proportions. When selected, the Constrain Proportions check box ensures that image height will vary proportionately with the width. If you change one dimension, the other will automatically update to preserve the dimensional relationship. When you deselect this option, the link between height and width disappears, and you can increase the height or width independently. Your image, in this case, will stretch disproportionately vertically or horizontally.
You can turn off Constrain Proportions only when the Resample Image box is checked. Without resampling, proportions remain automatically constrained, as shown by the link icon.
Scaling Styles
| New | This new feature enables you to choose whether or not to scale layer styles. When you have the Scale Styles option checked, layer styles that are assigned to the image will be resized proportionately. Unchecking this box results in the layer styles maintaining their original dimensions. |
Applying Auto Resolution
You can automatically size an image for output to a specific halftone screen. Click the Auto button in the Image Size dialog box to display the Auto Resolution dialog box (Figure 13.8). Type a screen value. (see Table 13.1 to determine which halftone screen is most suitable). Choose a quality. Draft resamples an image at the same resolution as the halftone screen. Good resamples at 1.5 times the halftone screen and Best resamples at 2 times the halftone screen. This feature does not affect the height and width of the image.
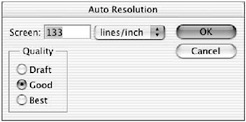
Figure 13.8: The Auto Resolution dialog box
EAN: 2147483647
Pages: 355