Using Quick Mask Mode
As you become more proficient in Photoshop, the speed of performing tasks will become more crucial to your particular style of work. As you understand the mechanics of the tool functions and begin to recognize the logic and similarity of the various windows , palettes, and toolbars , you ll want to explore shortcuts that accelerate your work. Selecting areas on a Photoshop image can be the most time-consuming part of the image-editing process; Quick Mask mode can accelerate the selection-making process and enhance its precision.
Quick Mask mode is an efficient method of making a temporary mask by using the painting tools. Quick Masks can quickly be converted into selections or stored as mask channels in the Channels palette for later use. By default, the Quick Mask interface is similar to the channels interface in that Photoshop displays a colored overlay to represent the masked areas. You can toggle directly into Quick Mask mode on the Tool palette by pressing the letter Q or clicking the Quick Mask icon ![]() .
.
| Note | Quick Mask provides a versatile way of making or editing selections by using many of Photoshop s painting tools, filters, and editing tools. You can even use the selection tools to define areas of the Quick Mask to edit. |
When you choose Quick Mask mode from the Tool palette, a temporary thumbnail labeled Quick Mask, in italics, appears in the Channels palette. The thumbnail will change appearance as you apply color to the Quick Mask.
Quick Mask Options
The Quick Mask Options dialog box (see Figure 12.7) is almost identical to the Channels Options dialog, and can be accessed by double-clicking the Quick Mask icon.
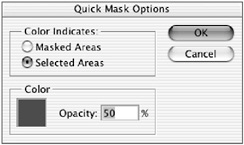
Figure 12.7: Quick Mask Options dialog box
To practice creating a mask in Quick Mask mode, follow these steps:
-
Open the file big_bug.psd from the ch12 folder on the CD.
-
Click the Quick Mask icon
 in the Tool palette. Notice that the foreground and background swatch colors in the Tool palette become white and black respectively. Press the X key on the keyboard or click the arrow next to the foreground and background colors on the Tool palette to invert the colors.
 -
Choose the Brush tool from the Tool palette. Choose a brush from the Brush menu and paint over the body of the bug. I started with a 35-point Hard Round brush and chose smaller brushes to fill in the corners. Painting on a Quick Mask is similar to painting on an alpha channel with the composite channel visible. By default, as you paint, if the foreground color is black, the painting tool will deposit a red color. If the foreground color is white, the painting tool will erase the mask color.
-
Carefully paint around the edge of the bug s body. If you make a mistake, choose white as a foreground color and erase it.
-
When you have completed painting the bug, click the Edit In Standard Mode icon on the Tool palette. By default, the areas that were painted are now outlined by a selection outline as in Figure 12.8.
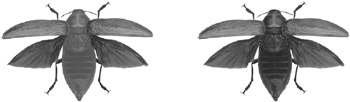
Figure 12.8: The Quick Mask left) and the selection that results when you click on the Standard Mode icon (right). -
After all that work, you should save the selection as an alpha channel. Click the Save Selection As Alpha Channel icon at the bottom of the Channels palette.
| Note | If you want to be sure that the area is completely masked, set the Opacity slider in the Brush Options bar to 100%. Setting the opacity to 50%, for example, will paint with translucent color; the result will be that the painted area will be only partially masked. |
After a Quick Mask has been made, I recommend that you carefully examine it for missed areas and pinholes. It is quite easy to make mistakes because it can be difficult to see omissions and errors on the image. The best way to examine the Quick Mask is to view it as a grayscale image. You can see the Quick Mask as a grayscale by turning off the visibility icon on all the channels in the Channels palette except for the one to the left of the Quick Mask. Examine it carefully to ensure that the masked areas are solid and opaque . If necessary, apply more paint to deficient areas. (See the Hands On 4 section that follows this chapter for a demonstration.)
Quick Mask is ideal for cleaning up selections that you have made with one of the selection or marquee tools. You can paint a few pixels at a time with a small brush or with the Pencil tool, greatly enhancing the precision of making selections.
EAN: 2147483647
Pages: 355