Making and Applying Gradients
In nature, we see countless variations of color that subtly blend into one another as light and shadow intermingle into dimensional forms. The ability to gradually blend colors is essential to the credibility of any realistic image. Photoshop gradients blend multiple colors into each other, or into transparency, over a specified distance.
Choosing Gradients
Choose the Gradient tool ![]() from the Tool palette and notice how the Options bar configures itself. At the far left is a preview bar, or gradient swatch, with a down arrow. Clicking in this swatch calls up the Gradient Editor, and clicking the arrow pops up a simpler Gradient Picker. Both display all saved gradients, beginning with the several preinstalled gradients. The default gradient creates a fill that blends from the foreground color to the background color. Another gradient, called Foreground To Transparent, fills from the current foreground color to transparency. Use it to gradually fade a single color or multiple colors. You can choose from the gradients on the default list that comes with Photoshop, and you can create new ones.
from the Tool palette and notice how the Options bar configures itself. At the far left is a preview bar, or gradient swatch, with a down arrow. Clicking in this swatch calls up the Gradient Editor, and clicking the arrow pops up a simpler Gradient Picker. Both display all saved gradients, beginning with the several preinstalled gradients. The default gradient creates a fill that blends from the foreground color to the background color. Another gradient, called Foreground To Transparent, fills from the current foreground color to transparency. Use it to gradually fade a single color or multiple colors. You can choose from the gradients on the default list that comes with Photoshop, and you can create new ones.
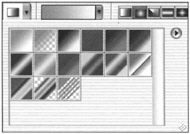
If you click the arrow at the upper-right of the Gradient Picker pop-up panel, you will display the Gradient Options pull-down menu. The first group of commands on this menu lets you reset, load, save, or replace gradients. The second group displays different ways of viewing the gradients in the menu, either by thumbnail or by name . At the bottom of the menu is a list of additional premade Photoshop gradients.
On the Options bar, to the right of the gradient swatch, are icons for the five gradient types, which blend the color in unique ways (as demonstrated in Figure 10.23). Choose one to indicate the direction in which you want your gradient built:
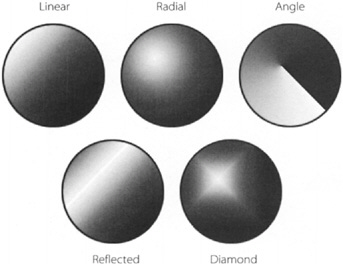
Figure 10.23: The gradient types
| Linear | Applies a continual gradient over a specified distance from beginning point to end point |
| Radial | Radiates around a center point to its end point |
| Angle | Radiates clockwise around a center point |
| Reflected | Creates two linear gradients on each side of a center point |
| Diamond | Radiates from a center point into a diamond blend |
Making Custom Gradients
The Gradient Editor is used to edit existing gradients, or to make new custom gradients and add them to the list. You can also save and load entire gradient palettes from the Gradient Editor or from the Preset Manager.
You can call up the Gradient Editor by clicking the gradient swatch in the Options bar (see Figure 10.24). Click a gradient in the Presets list to select it. The gradient preview bar shows the gradient s colors, their proportional distribution, and the position of any transparency. These characteristics can be edited.
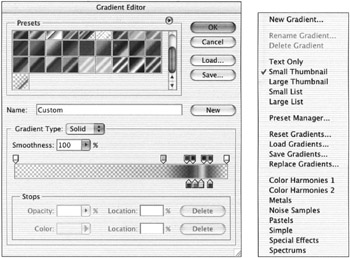
Figure 10.24: The Gradient Editor
Editing Gradient Color
The house-shaped markers along the bottom of the color bar are color stops, which determine where a solid color ends and where a gradient begins. You can assign a color to a color stop by clicking it to highlight it. Move the cursor off the Gradient Editor and onto the image, the Color palette, or the Swatches palette to sample a color. Another method of choosing a color is to double-click the color swatch in the Stops area to display the Color Picker. To redefine a stop s location, drag it left or right, or set a value in the Location field as a percentage of the gradient s length.
The small diamond under the preview bar marks the midpoint of the transition between the two colors that are being blended. Move it to redistribute the relative color proportions of the gradient.
To add a color to a gradient, click underneath the preview bar and a new color stop will appear. Determine a color for the color stop, drag the stop into position, and adjust the color s midpoint. To delete a color, drag its color stop off the Gradient Editor.
Editing Gradient Transparency
The house-shaped markers along the top of the gradient preview bar determine where transparency ends and where it begins. To blend transparency into the gradient, click a transparency stop and enter a percentage value in the Opacity field. Drag a stop to determine its location, or enter a number in the Stops area.
If transparency is set anywhere along the gradient, a diamond on top of the preview bar marks the center point of the transparency range. Move the midpoint to redistribute the proportion of transparency in the gradient.
To add a transparent area to a gradient, click above the color bar. Determine an opacity value in the Opacity field, move the stop into position, and adjust its midpoint. To delete a transparency, drag the transparency stop off the Gradient Editor.
Editing an Existing Gradient
You can edit existing gradients by adding, subtracting, or redistributing their colors:
-
Choose the Gradient tool and click the gradient swatch on the Options bar to display the Gradient Editor.
-
At the top of the Editor is a list of presets ”the gradients that have already been saved. Double-click the gradient you want to edit. The Gradient Name dialog box appears. If desired, enter a new name and click OK.
-
On the preview bar in the Gradient Editor, you see the configuration of color and transparency of the selected gradient as determined by the number and position of the color and transparency stops and the midpoint diamonds. Slide the stops to the left or right to adjust the color or transparency proportions. Slide the midpoint diamonds to adjust the centers of the blend.
-
Add a color by clicking under the preview bar to create a new stop.
-
Double-click the stop to display the Color Picker. Choose a color for the stop and click OK.
-
When satisfied with the edited gradient, click OK to leave the Gradient Editor. The edited gradient now appears in the Options bar.
-
Choose a Gradient tool, click in the image, and drag. Release the mouse to apply the gradient.
Making a Noise Gradient
The Noise option under Gradient Type in the Gradient Editor adds random colors to a gradient depending on the predefined colors you choose. The results can be somewhat unpredictable, so experiment to achieve the best results.
To create a noise gradient:
-
In the Gradient Editor, under Gradient Type, choose Noise, as shown in Figure 10.25.
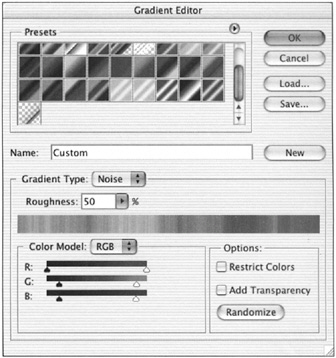
Figure 10.25: Choosing the Noise type in the Gradient Editor -
For Roughness, choose or enter a percentage. This will determine the strength of the noise.
-
Choose a color mode or model ”RGB, HSB, or Lab. The effect will vary significantly with each system.
-
Select the Restrict Colors check box to prevent oversaturation.
-
Select the Add Transparency check box to create a transparent gradient.
-
Click the Randomize button to preview variations of the effect.
Creating a New Gradient
Follow these steps to make your own gradient:
-
Click the gradient swatch on the Options bar to display the Gradient Editor.
-
Click the New button. The Name field displays the name of the currently selected gradient, and the preview bar displays its properties.
-
Enter a name for the new gradient. It s easy to be thrown by the fact that the name and properties of the new gradient are the same as the current gradient. It s important to change the name immediately to avoid confusion.
-
Target each of the color or transparency stops and change their colors and locations as described under Editing an Existing Gradient, earlier in this chapter.
-
Click below the color bar to add color, or above to add transparency.
-
Click OK to finalize the gradient and to select it into the gradient swatch.
Applying Gradients
All gradients are applied over a specified distance (see Figure 10.26). You choose the Gradient tool, click the image where you want the gradient to start, and drag in the desired direction. Release the mouse where you want the gradient to end. You will fill a selection if one is active, or the entire Background or layer if no selection is active. The distribution of the gradient depends on its color content and the positions of the stops, but just as important are the placement of the cursor and the length and direction you drag on the image.

Figure 10.26: Applying a gradient includes choosing its direction.
| Note | Press Shift while dragging to constrain the gradient to a vertical, horizontal, or 45-degree angle. |
EAN: 2147483647
Pages: 355