Remote, Terminal, and Assisted Computing for Linux Hosts
| | ||
| | ||
| | ||
Remote, Terminal, and Assisted Computing for Linux Hosts
Like Windows , Linux hosts have built-in support for assisted computing and remote computing.
The traditional answer to the remote computing question is to use an X server on the guest machine. While that is certainly a viable solution, we feel VNC is a better answer when the guest machine runs Windows. See the sidebar "Why VNC Instead of an X Server?" for the reasons we made this choice.
For terminal computing, Linux servers can embrace a wonderful free tool that makes them act as Terminal Servers. We'll briefly explore this download called the LTSP project.
Additionally, we'll come back to VNC to explore assisted computing. We'll demonstrate how to use a VNC guest application on a Windows guest machine to provide assistance to a Linux user .
| |
As explained in Chapter 7, X server software is available for Windows, and the X Window System was originally designed with remote computing in mind. So why did we choose to use VNC instead of the X Window System? We were persuaded by the following advantages:
-
VNC guest applications are freely available and easy to install on Windows workstations. Compare this with the relatively complex installation procedure for the free Cygwin X Server software.
-
VNC places minimal demands on the guest computer.
-
VNC works much better over slow links. The X Window System protocol was designed for use on local area networks and does not perform as well over long-distance links. VNC is well-optimized for slow links and also performs quite well on local area networks.
-
Actually, when we use VNC to access Linux hosts, we are benefiting from the X Window System. Under the hood, the VNC host application on Linux is a specialized X server program called Xvnc , which maintains a "virtual screen" and translates activity on that screen to the VNC protocol.
Running an X server on the guest does have one advantage: since the server does not have to maintain a virtual screen for each user, the per-user impact on the server is somewhat reduced. The virtual screen for each guest user requires approximately 2MB of memory. We feel this is an acceptable price to pay for a straightforward remote computing solution with excellent low-bandwidth performance, especially given the memory capacity of modern Linux servers.
| |
Remote Computing for Linux Hosts
In this section, the idea is that we have linserv1.corp.com , which lives in the server room. Whenever we (the administrators) want to connect to it, we'll simply remotely connect to it.
Actually, what we'll set up here is good for more than just remote computing. It also covers the needs of terminal computing. With Linux, there are no per-user licensing issues to address. All we have to do is set things up right the first time. So first, we'll configure the system to accommodate remote and terminal computing. Then we'll demonstrate remote computing. Following that, we'll talk briefly about various aspects of terminal computing for Linux hosts.
A bit later, we'll move on to assisted computing. That is, if we want to connect to a Linux desktop system to remotely control an active session, we can do that too. Unlike remote and terminal computing for Linux hosts, which are essentially the same thing, assisted computing is quite a bit different on the host side. So we'll configure it separately when we come to that.
Let's set things up so that xppro1.ad.corp.com (or any other Windows client) can remotely log on and interact with a virtual desktop on the host, linserv1.corp.com , a Linux server.
Requirements for Remote Computing on Linux Hosts
Here are the pieces we must put in place before we can make a VNC remote computing connection to a Linux host from a Windows guest:
-
The TightVNC guest or "viewer" software must be installed on xppro1.ad.corp.com . If you completed the exercises in the "Assisted Computing for Windows Hosts" section, you will already have this software installed on xppro1.ad.corp.com . If not, refer to "Installing and Configuring TightVNC on the Windows Host." If you are not interested in allowing Linux guests to access the Windows host via VNC, you may leave the "Server" option unchecked on the "Select Components" screen discussed in step 12.
-
The Linux VNC host software for remote computing, vncserver , must be installed. This has already been taken care of as part of our installation of Fedora Linux in Chapter 1. vncserver is the name of a front end that starts a special X server for VNC known as Xvnc . Xvnc maintains a virtual screen and describes changes on that screen to the VNC guest it is connected to. Assisted computing is handled a bit differently, which we'll describe in an upcoming section.
-
Normally, the Linux VNC host application displays the same shared desktop to all connected guests. This is handy for assisted computing and training situations, but it's not what we want for remote computing. Instead, we'll configure Fedora to accept incoming VNC guest connections on port 5900 and start a separate vncserver process, with its own virtual desktop, to talk to each one. We'll do this using a standard Linux daemon called xinetd . xinetd 's purpose is to accept connections on a variety of ports and start appropriate programs to handle each of those connections in an orderly and controlled manner.
-
A Fedora Linux server, such as linserv1.corp.com , is perfectly capable of accepting logons from more than one X server, not just the one that drives the console of the server itself. That includes the special Xvnc X server for VNC users. The same logon prompt that you see when you sit down right at the console can also be accessed via VNC. However, for security reasons, this is not turned on out of the box. On Fedora, the logon prompt is displayed by a program called gdm , the GNOME Display Manager. We'll reconfigure gdm to accept requests to display the logon prompt on VNC guest displays as well as the console. To do that, we'll have to make a few changes to /etc/X11/gdm/gdm.conf , the main configuration file for gdm . Then we'll restart gdm to make those changes take effect.
-
Optionally, we can encrypt the VNC connection. Unlike RDP, freely available VNC host and guest applications do not support encryption. Fortunately, the ssh "secure shell" protocol that Linux users use to log on securely at a plain-text terminal prompt has a remarkable feature. In addition to providing a terminal window, ssh can be used to forward traffic on any TCP port, encrypting that traffic as it travels over the ssh connection . That means we can encrypt our VNC connection by routing it through a freely available ssh client for Windows, even though the TightVNC guest application knows nothing about encryption. As mentioned earlier, encrypted VNC can also be achieved using nonfree, closed-source VNC host and guest software from RealVNC ( www.realvnc.com ), which some may find more convenient if price is not a concern. And routing all of your workstation's traffic over a VPN (Virtual Private Network), as described in Chapter 9, is also an option.
-
We must allow traffic on TCP port 5900, the VNC port, through the firewall on linserv1.corp.com .
Configuring xinetd to Accept VNC Connections and Launch VNC Sessions
Linux has a great VNC host application called Xvnc . It is very powerful on its own, with the ability to accept connections over the network, verify the guest's password, and so on. For remote computing alone, that might be acceptable. That is, if you don't mind having yet another password to take care of.
But Xvnc all on its own isn't quite right for terminal computing. To accommodate both remote and terminal computing, Xvnc needs a little help. That's because the built-in, standalone network capabilities of Xvnc are only suited to single-user remote computing. It's easy to start up a copy of Xvnc that accepts connections to a specific user's desktop for very simple remote computing. However, any additional connections, if allowed, see that same desktop in an assisted computing-like fashion, and to achieve remote computing in a way that scales right up to terminal computing, we need separate desktops for everyone.
So how do we get out of this pickle ? We need a program that can accept connections on Xvnc 's behalf and start up a separate copy of Xvnc for every logon session. That program is called xinetd .
xinetd is a standard Unix/Linux daemon that accepts connections on a variety of ports and takes care of launching applications to do the actual "talking" on those connections. The applications in question can be simple programs that simply read from standard output and write to standard output, like any shell command does. xinetd does all the tricky network stuff, freeing the application to focus on its core competency. Just another example of the Unix philosophy: simple, single-purpose applications working together. In our case, xinetd will be responsible for accepting VNC guest connections on port 5900 and launching the Xvnc host application to handle that connection appropriately. Even though Xvnc offers its own networking capabilities, it also has a -inetd command-line option to integrate with xinetd instead and let xinetd "do the driving" on the network.
Sure, it's a bit confusing, but a good hard look at Figure 8.14 should set you straight in no time.
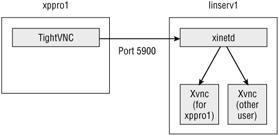
Figure 8.14: VNC traffic from xppro1 travels over the network to TCP port 5900 on linserv1. xinetd accepts the traffic and routes it to the correct Xvnc session for that particular user.
| Note | Experienced Unix users may be wondering about the relationship between xinetd and the older inetd software. xinetd is a modern, vastly more flexible replacement for inetd . |
But how will we configure xinetd ? Handily for us, a Webmin module is available for xinetd . We'll install the official xinetd module for Webmin and use it to configure xinetd to do what we need it to do. Under the hood, Webmin will create a file for our new VNC service in /etc/xinetd.d . You can learn more about the gory details by reading the official documentation. Just use the man xinetd and man xinetd.conf commands.
Here are the steps to add the Xvnc module to Webmin:
-
Log into Webmin as usual at the URL https ://linserv1.corp.com:10000/ .
-
Click "Webmin Configuration."
-
Click "Webmin Modules."
-
Click the radio button to the left of "Standard module from www.webmin.com " and enter xinetd in the text field to the right. Alternatively, you may click the " " browsing link at the far right and select xinetd from a list.
-
Click "Install Module."
Now that xinetd support has been added to Webmin, we're ready to configure xinetd to accept connections from VNC guests. We'll need to give xinetd the following information:
-
A name for the xinetd "service" we are creating.
-
The port number on which connections should be accepted, which will be 5900, the standard VNC port.
-
The type of network protocol we are using. VNC is a TCP-based protocol, so we'll select TCP.
-
Whether to wait for the service to finish before allowing further connections to it. We want to allow multiple remote users (terminal computing), so we'll choose not to wait.
-
The correct command line to start a VNC host session for the guest to talk to. We'll launch /usr/bin/Xvnc . As we've mentioned earlier, Xvnc is a special X server that is specifically designed to maintain a virtual screen and communicate with a VNC guest. We'll need to pass several options to Xvnc . We've done the heavy-duty work to discover the required options; you can learn more yourself with the man Xvnc command. We'll launch /usr/bin/Xvnc , but also add the following command-line switches:
-
-inetd Signals that Xvnc has been launched from xinetd (or another inetd -like program) and should not attempt to listen for network connections itself. Instead, it can simply "talk" to its standard input and output. xinetd provides the "plumbing" to connect this to the actual guest's network connection.
-
-query localhost Tells Xvnc to ask the gdm display manager for a logon prompt. Xvnc queries for a logon prompt using a protocol called XDMCP (X Display Manager Control Protocol). This way, our guests will see the standard graphical gdm logon prompt we see every time we log onto the console.
-
-SecurityTypes None Prevents VNC from demanding a separate, redundant password of its own. Normally Xvnc would expect the guest to supply a password much as the Windows VNC host software does, but that doesn't provide a way to log on as the user of your choice. So we shut off this feature in favor of a gdm logon prompt as explained previously.
-
-once Configures Xvnc to shut down any programs left running by the user when the user breaks the connection. Ordinarily, VNC host sessions stick around and can be connected to again. That's a convenient feature for some purposes, but not for a terminal computing situation. When a user disconnects, we want to reclaim the memory and other resources they were using right away.
-
-geometry 800x600 Specifies that we want an 800—600-pixel virtual desktop. You don't have to stick with this setting. It suited our purposes while writing the book, but you could also specify 1024—768 or an even higher resolution. It is also possible set up multiple Xvnc services with different names and listening on different port numbers , which pass different settings for the -geometry option. (VNC guest applications support connections to any port, not just the default port 5900.)
-
-depth 16 Specifies that the virtual desktop should support 16-bit color (65,536 colors). It is possible to save some memory and bandwidth by specifying -depth 8 (256 colors), but the reduction in the quality of the user experience is dramatic. It is also possible to specify 24- or 32-bit color, but the improvement is not great and the cost in memory and network bandwidth is considerable.
-
Using Webmin, follow these steps to configure xinetd for VNC:
-
Log into Webmin as usual at the URL https://linserv1.corp.com:10000/ .
-
Click "Networking."
-
Click "Extended Internet Services."
-
On the "Extended Internet Services" page, click "Create a new Internet service."
-
The "Create Internet Service" page appears, as shown in Figure 8.15.
-
In the "Service name" field, enter vnc .
-
For "Service enabled?" select the "Yes" option.
-
"Bind to address" should already be set to "All." For "Port number," select the second radio button and enter 5900 in the text field.
-
"Socket type" should already be set to "Stream." For "Protocol," select "TCP (Transmission Control Protocol)."
-
"Service handled by" should already be set to "Server program." To the right of "Server program," enter the following command line:
/usr/bin/Xvnc -inetd -query localhost -SecurityTypes None -once -geometry 800x600 -depth 16
-
In the "Run as user" field, enter root .
-
You may accept the defaults for the remaining options on the "Service program options" portion of the page. But don't close the page yetthere's more to do!
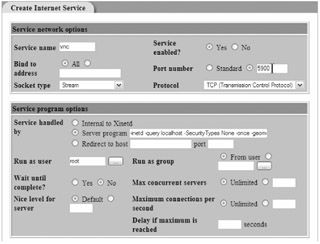
Figure 8.15: Configuring the VNC service in the Webmin Extended Internet Services ( xinetd ) module
We're almost done configuring the VNC service for xinetd . There's one task remaining: deciding who is allowed to connect. We'll configure xinetd to accept connections from the server itself (127.0.0.1, as we've mentioned before) and from the local network. All addresses beginning with 192.168.2. are part of the local network. When configuring xinetd , we specify that we want to include the entire 192.168.2 subnet by specifying 0 (a zero) for the final part of the address. So, you'll enter 192.168.2.0 .
Why do we need to allow connections from the server itself? Later in this chapter we'll discuss how to encrypt a VNC connection from a Windows guest. Such connections are forwarded using an ssh secure shell connection. Then the ssh server program ( sshd ) on linserv1.corp.com makes the final unencrypted connection to xinetd , also on linserv1.corp.com . This is secure because the connection never leaves the server. As a result, the "last mile" of the connection appears to be coming from the server itself, which is always the address 127.0.0.1. Those who plan to allow only connections secured in this way may choose to leave out the subnet address, 192.168.2.0, but we recommend leaving it in at least to complete these exercises.
Using Webmin, continue with these steps to limit access to VNC, save your work, and put the new xinetd changes into effect:
-
Scroll down to the "Service access control" portion of the page, as shown in Figure 8.16.
-
Select the "Only listed hosts" option to the right of "Allow access from."
-
Leave "Allow access at times" set to "Any time."
-
Click "Create" to add the new service and return to the "Extended Internet Services" page.
-
Click "Apply Changes" to put these settings into effect.
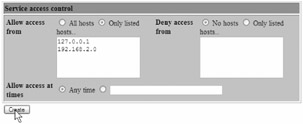
Figure 8.16: Completing the configuration of the VNC service in the Webmin xinetd module by restricting access to the local subnet and securely forwarded connections
Configuring gdm to Accept Remote Logons
We have the pieces in place to create a new VNC host session each time a guest connects on port 5900, and the Xvnc X server that we launch for this purpose is all set to display the usual logon prompt.
Are we done? Almost! Xvnc is asking nicely for a logon prompt using the XDMCP protocol, but the gdm display manager refuses such requests by default. We'll need to adjust that setting.
Also, when remote logons are allowed, gdm displays a less glamorous logon prompt than usual to save network bandwidth. In our tests, that really isn't necessary on a local network or even over a broadband or DSL connection. So we'll also configure gdm to display the "normal" Fedora logon screen in all cases.
Finally, there's the question of how many connections to allow. 50 connections will require a bare minimum of 100MB of RAM and a practical minimum of 500MB with interesting applications in use, because of the demands of the applications themselves . The memory requirements could quite possibly be even higher, depending on the applications being used (web browsers and OpenOffice can use quite a bit of memory). We used a setting of 50 users, but you might prefer to set a lower limit. In addition, gdm sets an upper limit on the number of connections from a single host (IP address). If you plan to follow along later and secure your VNC connections with ssh , It is crucial to disable the limit on connections from a single host by setting it the same as the upper limit on all connections. That's because connections forwarded via ssh appear to come from the server itself. By default, only two would be allowed at a time.
Follow these steps on linserv1.corp.com to configure gdm to accept a significant number of remote connections and present the standard Fedora logon prompt:
-
Applications
 System Settings
  Login Screen. The "General" tab of the "Login Screen Setup" tool will appear, which we will configure to match Figure 8.17.
 -
Beneath "Greeter," change the setting for "Remote:" to "Graphical greeter" and click the "XDMCP" tab, which we will configure to match Figure 8.18.
-
Check the "Enable XDMCP" box.
-
Set "Maximum remote sessions" to 50.
-
Be sure to also set "Displays per host" to 50.
-
Click "Close." Your changes will be applied immediately.
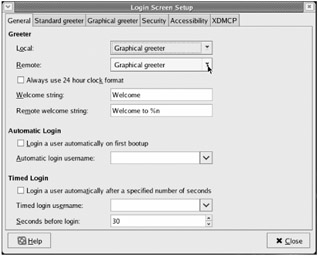
Figure 8.17: Configuring gdm to display the standard Fedora logon prompt to VNC guests
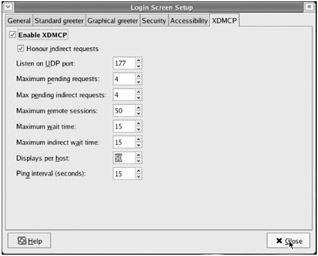
Figure 8.18: Configuring gdm to allow remote display of the logon prompt and to allow a sufficient number of simultaneous users on secure connections that appear to come from the server itself
You have completed the configuration steps necessary to permit remote VNC logons. Now we'll demonstrate how to log on to Fedora Linux from a Windows workstation using a VNC guest application.
Configuring the Fedora Firewall to Allow VNC Traffic
The Fedora firewall blocks VNC traffic by default. Guests can't communicate with the host if their traffic is blocked. We'll open up TCP port 5900 using Fedora's familiar "Security Level" tool which we have used several times in this book. Just follow these steps to open up TCP port 5900 in the Fedora firewall:
-
Select Applications
 System Settings
  Security Level.
 -
In the text field labeled "Other ports:" you will see a comma-separated list of ports and port types (UDP or TCP). Add 5900:tcp to the end of the list.
-
Click "OK" to complete the adjustment. When asked to confirm, click "Yes."
Remotely Connecting to Linux from a Linux Workstation via VNC
For our first test, we want to make sure a Linux client can connect to our Linux host machine. That's easy to do, because we have already installed the Terminal Services Client and vncviewer guest applications on adlincli1.ad.corp.com . To access a remote desktop on the host linserv1.corp.com from the guest adlincli1.ad.corp.com , follow these steps:
-
Log into adlincli1.ad.corp.com as salesperson1 .
-
On adlincli1.ad.corp.com , select Applications
 Internet
  Terminal Server Client.
 -
The "General" tab of the "Terminal Server Client" dialog box appears as shown previously in Figure 8.11. In the "Computer" field, enter linserv1.corp.com .
-
Set the "Protocol" pull-down menu to "VNC.". Leave the "User Name," "Password" and "Domain" fields blank. Also leave the "Client Hostname" and "Protocol File" fields blank.
-
Click "Connect."
-
The standard gdm logon prompt appears. Log on as nurse1 with the password p@ssw0rd . The Linux desktop of nurse1 appears in a VNC window.
Okay, so logging on from Linux to Linux is easy enough. But what about Windows-to-Linux remote computing?
Remotely Connecting to Linux from a Windows Workstation via VNC
We're ready to log on! All we need to do now is fire up the VNC guest application on xppro1.ad.corp.com and make a connection.
| Warning | The TightVNC guest or "viewer" software must be installed on xppro1.ad.corp.com . If you completed the exercises in the "Assisted Computing for Windows Hosts" section, you will already have this software installed on xppro1 . If not, refer to "Installing and Configuring TightVNC on the Windows Host." |
Follow these steps to make a VNC connection from the guest xppro1.ad.corp.com to the host linserv1.corp.com :
-
Log on to xppro1.ad.corp.com as salesperson1 .
-
Select Start
 All Programs."
 -
Select the "TightVNC" group .
-
Select "TightVNC Viewer (Fast Compression)." If connecting over a slow link you may prefer to select "(Best Compression)."
-
The "Connection details" prompt will appear. Enter linserv1.corp.com in the "VNC server" field, as shown in Figure 8.19. Click "OK."
-
After a few moments, the Linux desktop will appear in a window within your Windows desktop, displaying the standard Fedora logon prompt, as shown in Figure 8.20. Log in as the user nurse1 with the password p@ssw0rd .
-
Shortly thereafter, the desktop of nurse1 will appear, as shown in Figure 8.21. You may interact normally with the Linux desktop as long as the mouse remains within the window. When you are through working with Linux, log out in the usual fashion or just close the VNC window.
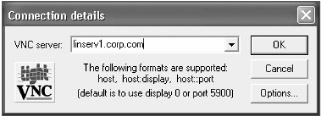
Figure 8.19: Opening a VNC connection to linserv1.corp.com from xppro1.ad.corp.com using the TightVNC Viewer VNC guest application
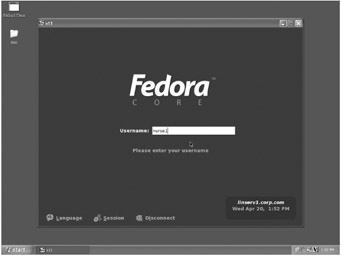
Figure 8.20: Logging on to linserv1.corp.com from xppro1.ad.corp.com using the TightVNC Viewer VNC guest application
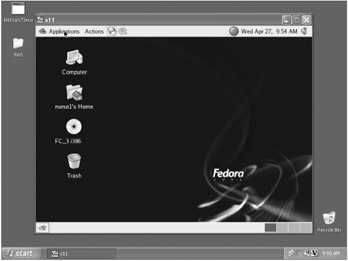
Figure 8.21: nurse1's Fedora Linux desktop on linserv1.corp.com , as shown via VNC guest application on xppro1.ad.corp.com
Going the Extra Mile: Securing Windows-To-Linux VNC Connections with ssh
As we've mentioned, VNC traffic isn't automatically encrypted. The built-in VNC password prompt, at least, does not transmit the password in cleartext, but we lose this benefit when we use gdm and the standard Fedora logon prompt instead. That's because when we use gdm , we're remotely displaying the standard Fedora logon program itself just as we would remotely display any another application, and it suffers from the same lack of encryption as everything else. Fortunately, there's a way we can regain network security for the logon process and encrypt the entire session into the bargain. This brings VNC's security into the same ballpark with that offered by RDP. The two main ways to encrypt VNC traffic are
-
Creating a VPN. The beauty of VPNs is that they encrypt all of your traffic. With a VPN in place, there is no need to worry about encryption of individual programs' traffic (like our VNC host and guest applications). We'll show how to create VPNs in the next chapter.
-
ssh the same secure shell protocol that Linux administrators often use to log on remotely with a plain-text terminal window. We'll use this here. We'll also use PuTTY, a free, open-source ssh client for Windows, to pull off this trick.
Like most ssh clients , PuTTY provides more than simple plain-text terminal capabilities. In addition, PuTTY can be configured to forward or "tunnel" any TCP port number on the machine running PuTTY to any port on the machine to which the user has logged on with PuTTY, encrypting the forwarded traffic much as a VPN would.
However, ssh port tunneling isn't as elegant or all-encompassing as a full-fledged VPN because the process is not transparent. To make an ssh -encrypted VNC connection from xppro1.ad.corp.com to linserv1.corp.com , we first need to configure PuTTY on xppro1 to forward connections from port 5950 on xppro1 to port 5900 (the VNC port) on the host and log onto linserv1 with PuTTY. Then we launch the TightVNC guest application as we normally would, except that we connect to port 5950 on localhost (a hostname which always means "the computer we're working on") instead of connecting directly to linserv1.corp.com .
Confused? In short, we're routing our VNC viewer's traffic through a preprocessor (PuTTY) which encrypts the data via ssh . Then, as the traffic is shot across the wire, it's decrypted on the Linux server by sshd , which then passes the data to xinetd and finally Xvnc . See Figure 8.22 for a helpful diagram.
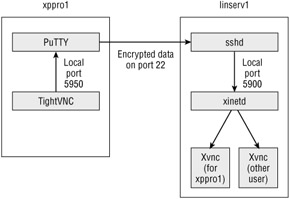
Figure 8.22: Traffic from the TightVNC guest application is handed off to PuTTY, which is listening on port 5950 on xppro1 . The traffic is then encrypted, forwarded to the ssh daemon on linserv1 , unencrypted, and finally forwarded on to the VNC port (5900) on linserv1 .
| Note | We chose port 5950 rather than the usual port 5900 to forward our outgoing VNC traffic to because this leaves open the option of running a VNC host application on port 5900 on xppro1 . Indeed, we've done that in this chapter. |
There's one major hassle with this setup: you have to log on twice, once with PuTTY and then again when the Fedora logon prompt appears in the TightVNC guest application. Unfortunately, this problem currently cannot be avoided without resorting to inadvisable solutions such as keeping passwords saved permanently on the workstation. We're hoping a future version of the TightVNC guest application will integrate more tightly with PuTTY, removing the need to log on more than once. Since both are open source projects, this is a project an Enterprising Linux Guru may take on by the time you read this.
| Tip | Again, RealVNC offers commercial VNC software for both Windows and Linux with built-in support for encryption. These tools are certainly worth your consideration. Visit www.realvnc.com for more information about them. |
Before we can proceed, we'll need to install PuTTY. We recommend obtaining PuTTY from the website of its author Simon Tatham, as in the following steps. Follow these steps to install the PuTTY ssh client on xppro1.ad.corp.com :
-
Log on to xppro1.ad.corp.com as the Administrator.
-
Access the PuTTY home page: http://www.chiark.greenend.org.uk/~sgtatham/putty/ .
-
Click the "Download" link.
-
On the PuTTY Download Page, scroll down until you locate the heading "A Windows-style installer (x86 only) for everything except PuTTYtel."
-
Click the download link under the heading for the installation program for the current version of PuTTY. As of this writing, the filename is putty-0.58-installer.exe , but this can be expected to change.
-
Save the PuTTY installation program to disk.
-
Launch the PuTTY installation program.
-
The "Setup" window appears. Click "Next" to move on from the introductory screen.
-
The "Select Destination Location" screen appears. Click "Next" to accept the default location.
-
The "Select Start Menu Folder" screen appears. Click "Next" to accept the default setting.
-
Click "Next" to accept the defaults for the "Select Additional Tasks " screen.
-
The "Ready to Install" screen appears. Click "Next" to complete the installation of PuTTY.
-
The "Completing the PuTTY Setup Wizard" screen appears. Click "Finish" to exit the installation program.
Now that we have PuTTY, our ssh client, we're ready to forward VNC connections securely with it. Follow these steps on xppro1.ad.corp.com to configure an ssh connection that forwards VNC traffic:
-
Select Start
 All Programs.
 -
Select the "PuTTY" group.
-
Select the "PuTTY" application.
-
The "PuTTY Configuration" dialog appears, with the subheading "Basic options for your PuTTY session." We will configure it to match Figure 8.23. In the "Host Name (or IP address)" field, enter linserv1.corp.com .
-
The "Port" field should already be set to 22, and the "Protocol" field should already be set to " SSH ." Find the "Connection" heading in the tree control at left. Beneath it is an " SSH " subheading, and beneath this you will find "Tunnels." Click "Tunnels" to begin configuring secure tunneling for VNC.
-
"Options controlling SSH port forwarding" appears at the top of the right-hand portion of the dialog. We will configure these options to match Figure 8.24. For "Source Port," enter 5950 .
-
For "Destination," we must enter both a host and a port number, separated by a colon : linserv1.corp.com:5900 .
-
The remaining options should be left at their defaults. Click "Session" at the top of the tree control at left. "Basic options for your PuTTY session" reappears.
-
In the text field beneath "Saved Sessions," enter linserv1.corp.com (VNC) .
-
Click "Save" to retain these settings for convenient future reuse.
-
Close the window. (Alternatively, we could click "Open" at this point to immediately open our first connection.)
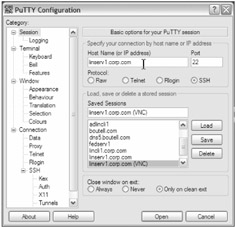
Figure 8.23: Configuring the PuTTY ssh client application on the Windows PC xppro1.ad.corp.com to connect to linserv1.corp.com
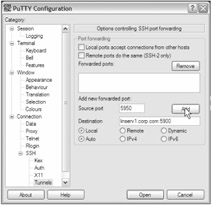
Figure 8.24: Configuring the PuTTY ssh client application to "tunnel" VNC connections from the local port 5950 to port 5900 on linserv1.corp.com
Once you have configured PuTTY, you can launch a secure shell connection at any time, creating a tunnel for VNC traffic. First, however, we'll need to adjust the firewall on linserv1.corp.com to make sure that ssh traffic is being allowed in. (You may have already done this if you are using ssh for administrative tasks.) VNC traffic normally enters the system on port 5900, but when tunneled via ssh it arrives on the ssh port, which is port 22. If the ssh connection can't be established on port 22, nothing can be tunneled through it.
Follow these steps to allow ssh traffic through the Fedora firewall on linserv1.corp.com :
-
Select Applications
 System Settings
  Security Level.
 -
Check the " ssh " box beneath "Trusted Services."
-
Click "OK" to complete the adjustment. When asked to confirm, click "Yes."
We're finally ready to go! To open a secure VNC connection, follow these steps on xppro1.ad.corp.com :
-
Select Start
 All Programs.
 -
Select the "PuTTY" group.
-
Select the "PuTTY" application.
-
Double-click " linserv1.corp.com (VNC)" in the list box beneath the words "Saved Sessions."
-
The PuTTY terminal window appears, displaying a login: prompt. Log on as nurse1 with the password p@ssw0rd .
-
A Linux shell prompt appears. You may now minimize (not close) the PuTTY terminal window.
-
Select Start
 All Programs.
 -
Select the "TightVNC" group.
-
Select "TightVNC Viewer (Fast Compression)." If connecting over a slow link you may prefer to select "(Best Compression)."
-
The "Connection details" prompt will appear. Enter localhost::5950 in the "VNC Server" field. Note how the nomenclature is two colons between localhost and the port number.
-
Click "OK." After a few moments, the Linux desktop will appear in a window within your Windows desktop, displaying the standard Fedora logon prompt, exactly as shown earlier in Figure 8.20. The difference, of course, is that your Fedora logon will be securely encrypted, as will all of your VNC activities.
Terminal Computing for Linux Hosts via LTSP
Do you want to allow a roomful of users sitting at Windows workstations to log on and access remote desktops on a Linux terminal server? We're already there! The steps we followed earlier to set up remote computing on the Linux host linserv1.corp.com were carefully chosen to accommodate multiple users. And under Linux, there is no per-user licensing to worry about. Just fire up VNC connections from multiple workstations. The number of simultaneous desktops is limited only by the memory available on the server.
There are alternative approaches, though, which can further reduce the power needed on the client side. They can be worthwhile if the cost of client hardware is an extremely important issue for you. One of these is the Linux Terminal Server Project (LTSP), which we'll address only briefly because this is a Windows-and-Linux interoperability book.
LTSP is all about getting diskless machines (that is, no hard drive, booting stripped-down Linux over the network ) talking to Linux hosts. There's not a lot of Windows action there. We're also not going to spend a lot of time talking about Linux guests talking to Linux hosts. We will, however, give you some pointers toward ways to make LTSP work with Windows hosts.
LTSP, despite its name, is not the Linux equivalent of Windows Terminal Services. We already set that up in the "Remote Computing for Linux Hosts" section, purely using software included with Fedora Linux. LTSP provides remote logon capabilities too, but LTSP's real claim to fame is the power to boot diskless, low-power machines over the network, load a minimal Linux kernel and system on the fly, and do all the computing on the server.
Of course, under normal circumstances, LTSP is a Linux-specific animal on both the guest and the host side. That is, the server runs Linux plus LTSP. The clients, when turned on, use a simple program in a "boot ROM" chip on the Ethernet card to download a Linux kernel.
However, it is also possible for LTSP thin clients to use rdesktop to access Windows terminal servers. It is not a standard and fully supported configuration, but it is theoretically possible to boot LTSP thin client workstations from a Windows server.
Why would anyone want to do this? Well, LTSP's memory requirements on the client are very low and the disk space requirement, of course, is zero.
On the negative side, configuring a Windows host to remotely boot LTSP thin clients, while possible, is far from straightforward. Also, rdesktop is not currently a standard part of the LTSP package and must be added separately using third-party patches that are not in sync with the latest versions of LTSP as of this writing. In addition, the network boot process trusts that the Linux kernel it is downloading to the thin client is legitimate , so the local network must be trustworthy. In this book, we have emphasized solutions in which encryption for better security and authentication is at least a possibility. That's why, for instance, we advocate SSL-encrypted LDAP instead of the familiar but insecure NIS in Chapter 2.
Finally, bear in mind that "low requirements" is a very relative phrase! Those five-year-old Pentium III systems your employer is throwing out are perfectly capable of acting as thin clients based on Fedora Linux, and we'll tell you exactly how to do that without LTSP in a note called "Fedora as a Thin Client" which we'll make available on www.WinLinAnswers.com . So LTSP's advantages are questionable unless you are desperate to wring some use out of 486-era hardware.
For more information about LTSP, see the following resources:
-
The LTSP home page, which will get you up and running with LTSP initially in a pure Linux environment and offers links to Linux-to-Windows tips for LTSP: www.ltsp.org/
-
The "Configuring Windows 2000/2003 For Etherboot" page, which discusses the fine points of convincing your LTSP thin clients to boot over the network from a Windows server rather than from a Linux server: http://diet-pc. sourceforge .net/windows/etherboot-w2k.html
-
LTSP patches for Windows support: www.wilisystem.com/
| |
We've mentioned that on WinLinAnswers.com, we'll provide instructions on how to set up a simple Fedora Linux client as a thin client of a Windows terminal computing host. We've also written another document which explains how to do the opposite : set up a simple Windows client as a thin client of a Linux terminal computing host.
It's done using a VNC client configured to start as soon as Windows finishes booting up. You can find that in the online downloads for this chapter at www.WinLinAnswers.com .
| |
Assisted Computing for Linux Hosts
You've seen how to log on to a Linux host remotely via VNC, using a Windows guest workstation as a graphical terminal.
You've also seen remote computing where the guest user logs on to their own desktop session.
But how do we set up assisted computing on a Linux workstation so that one employee can help another to resolve a problem? Having a user log on via gdm logon prompt isn't right for this purpose. We want to share the current user's session at the console, not log on separately. Fortunately, Fedora includes a very straightforward assisted computing feature akin to Windows Remote Assistance but based on VNC. That feature is called Remote Desktop, and Windows guests can easily connect to it.
Earlier, we presented how salesperson1 (on the Linux workstation adlincli1.ad.corp.com ) could assist salesperson2 (on the Windows workstation xppro1.ad.corp.com ).
Now it's time for salesperson2 (on Windows) to return the favor by assisting salesperson1 with her Linux workstation.
| Warning | The following experiments will likely not work when the target Linux machine is really contained within VMware. In our tests, Fedora's Remote Desktop was incompatible with virtual machines running the VMware 4 tools for Linux. Fedora Remote Desktop computing relies on a special extension to the standard Fedora X server. When VMware's tools are loaded, VMware replaces the X server with a special VMware-friendly version. Remote computing works fine on "real" machines, and on VMware machines on which the Linux tools have not yet been installed. |
Requirements for Assisted Computing on Linux Hosts
Again, we want to have our Windows machines make contact with our Linux machines and offer help. We need to set up our Linux machines so they can accept the help from a Windows user.
-
The TightVNC guest or "viewer" software must be installed on xppro1.ad.corp.com . If you completed the exercises in the "Assisted Computing for Windows Hosts" section, you will already have this software installed on xppro1 . If not, refer to "Installing and Configuring TightVNC on the Windows Host."
-
As described in the previous section, traffic on the VNC port (port 5900) must be allowed through the Fedora firewall on linserv1.corp.com . If you did not do this already, refer to "Configuring the Fedora Firewall to Allow VNC Traffic."
-
The host in question must not already be configured as a remote computing host according to the directions in the preceding section. The reason is that we configured linserv1.corp.com to accept VNC remote computing connections on port 5900, for convenience because port 5900 is the default. Unfortunately, Fedora Remote Desktop insists on responding on port 5900. So if we want to do both, remote computing needs to change ports. See the sidebar, "Fedora Remote Desktop and Remote Computing on the Same Host" for information about how to make that happen.
| |
In the "Remote Computing for Linux Hosts" section, we chose to listen for remote computing connections on port 5900 because 5900 is the default port for VNC, and terminal computing should be as easy to log into as possible. Typing alternate port numbers is a pain.
Unfortunately, Fedora Remote Desktop can only respond on port 5900. Which means the two come into conflict. Normally this is not a problem, because assisted computing is rarely needed on a server.
However, those who wish to support both at once can do so by moving remote computing to an alternative port number. To do so, you need only do two things:
-
Replace port 5900 with port 5901 when following the configuration instructions in the "Remote Computing for Linux Hosts" section.
-
When connecting from the Windows guest, specify the alternate port number as well as the hostname. Note the unique double-colon syntax:
linserv1.corp.com::5901
Again, though, there is usually little reason to use assisted rather than remote computing on a server.
| |
Enabling Fedora Remote Desktop on adlincli1.ad.corp.com
To accept salesperson1 's help, salesperson2 first needs to set up Fedora's Remote Desktop feature. To set up Fedora Remote Desktop on adlincli1.ad.corp.com , follow these steps:
-
Log into adllincli1.ad.corp.com as salesperson2 .
-
Select
 Applications Preferences
  Remote Desktop.
 -
The "Remote Desktop Preferences" dialog appears. We will configure it as shown in Figure 8.25. First, check the "Allow other users to view your desktop" box.
-
Check the "Allow other users to control your desktop" box.
-
Keep the "Ask you for confirmation" box checked. Optionally, you may also require a password.
-
Click "Close" to allow your settings to take effect.
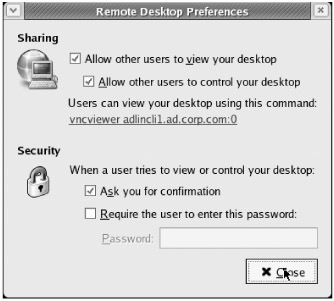
Figure 8.25: Configuring Fedora's Remote Desktop feature to accept VNC assisted computing connections
Connecting to Fedora Remote Desktop from a Windows Workstation
We're almost there. All we have left to do is open a connection with the TightVNC guest application on xppro1.ad.corp.com . An ssh -encrypted connection may be used, following the instructions in the "Going the Extra Mile: Securing Windows-to-Linux VNC Connections with ssh " section and simply substituting adlincli1.ad.corp.com for linserv1.corp.com in each case. Or a simple unencrypted VNC connection may be made.
Follow these steps to open a VNC connection from xppro1.ad.corp.com to adlincli1.ad.corp.com :
-
Log on to xppro1.ad.corp.com as salesperson1 .
-
Select Start
 All Programs.
 -
Select the "TightVNC" group.
-
Select "TightVNC Viewer (Fast Compression)." If connecting over a slow link you may prefer to select "(Best Compression)."
-
The "Connection details" prompt will appear. Enter adlincli1.ad.corp.com in the "VNC Server:" field. Click "OK."
-
At the console of adlincli1.ad.corp.com , salesperson2 will see a dialog asking whether they wish to allow the remote connection, as shown in Figure 8.26. She can accept the connection by clicking "Allow."

Figure 8.26: Accepting an assisted computing connection with Fedora's Remote Desktop on adlincli1.ad.corp.com
After a few moments, salesperson2 's Linux desktop will appear in a VNC window on salesperson1 's screen. salesperson1 can now assist her with the task in question, and both users will have access to the keyboard and mouse until salesperson1 disconnects or salesperson2 logs out of adlincli1.ad.corp.com .
| | ||
| | ||
| | ||
EAN: N/A
Pages: 71