Installing Linux
| | ||
| | ||
| | ||
Linux installation is a process that causes anxiety for many. Negative experiences installing earlier versions of Linux have led to a conventional belief that Linux installation is always difficult. But it doesn't have to be. Installing a well-known Linux distribution on common hardware can be nearly as smooth as a typical Windows installation. Of course, it does pay to select compatible hardware. There are several websites that provide hardware compatibility information for Linux. These include:
-
Linuxquestions.org, which offers a non-distribution-specific Linux hardware compatibility list at www.linuxquestions.org/hcl/index.php .
-
The Linux Hardware Compatibility HOWTO, which is slightly dated but offers a good overview with links to sites about specific types of hardware at www.tldp.org/HOWTO/Hardware-HOWTO/ .
-
The Red Hat Enterprise Linux Hardware Compatibility List. Because of the close relationship between Fedora and Red Hat, most information here is also relevant for Fedora. See http://bugzilla.redhat.com/hwcert/.
Ease of installation is not the only criteria for selecting the flavor of Linux to use, but it is an important one. Fedora Linux offers a reasonable balance between installation convenience and the feature set we're looking to demonstrate in this book.
Fedora Core 3: The Distribution We're Suggesting for This Book
There are many fine Linux distributions. For purposes of this book, we needed to draw a line somewhere and simply make a choice, so we chose to use Fedora Linux. The Fedora distribution of Linux is the freely downloadable successor to the original Red Hat Linux system. The good news is that it remains closely related to the commercial version (read: pay version) of Red Hat Linux, now known as Red Hat Enterprise Linux. Indeed, many Red Hat employees are involved in the ongoing development, care, and feeding of Fedora.
In fact, new features in Red Hat Enterprise Linux often get their sea legs in Fedora first. Of course, the best part of the deal is that Fedora is 100 percent freely downloadable , with an active, independent support community.
Fedora Linux makes the best choice for this book because the skills you learn on this free distribution can be easily transferred to just about any Linux distribution. Fedora's features are generally well tested , and an active user community exists to support it.
| |
Of course, Fedora is not the only Linux distribution available. As an open -source system released under a free software license, Linux invites the creation of different distributions specialized for different needs.
Walking down the aisles of your local computer store or surfing online, you'll locate distributions of Linux such as Red Hat Enterprise, SuSE, Slackware, Debian, Gentoo, and more. Some distributions are more popular and more distinctive than others. For instance, Slackware was one of the first Linux distributions. Debian is noteworthy because of its lack of a single parent company involved in its origin; the Debian project is and always has been run on a strictly non-profit basis. Several commercial distributions, such as Xandros, were based on Debian. Red Hat Enterprise is a commercially supported relative of Fedora.
One of my favorite distributions is called Knoppix. Not just because it has a Katchy, er, catchy name , but because it requires no installation whatsoever. It's simply a CD-ROM ISO image which, once burned as a CD-ROM, can just be booted and off you go! Nothing to install and nothing to commit to. While not an ideal choice for the production environments described in book, it does provide a nice demonstration to those who have never seen Linux before. The official Knoppix website is www.knopper.net/knoppix/index-en.html .
| |
Installing Fedora Linux
The installation process can be broken down into several steps. First, you must determine that your system meets the requirements to run Fedora Linux in a practical fashion. Second, you must obtain the Fedora Linux distribution CDs. Third, you carry out the "official" installation process provided by the Fedora Linux installer. Fourth, you take care of the post-installation steps, especially updating the system with the latest critical security fixes and other upgrades to the packages you have installed.
To take full advantage of this book, you will want to carry out the last two steps twice. First, to create a typical Linux server system with Windows interoperability features. Second, to create a typical client or workstation system. We'll refer to the server system as LinServ1 and to the client system as LinCli1. In later chapters, you'll create additional client and server systems specifically configured to participate in a Windows Active Directory domain in various ways.
System Requirements
First, you must ensure that the system meets the minimum installation requirements. For our purposes, assume that Linux is the only operating system to be installed on each computer. Dual-boot setups are not usual in a practical business computing environment, though you may find them useful for personal testing.
If you do decide on a dual-boot environment, be sure to take the disk space requirements of the other operating system into account. In general there must already be free, unpartitioned disk space if you wish Linux to share a single hard drive with another operating system. Tools such as Symantec's Partition Magic can be used to adjust the size of existing partitions, creating free space for a Linux installation. Again, in general, however, we don't recommend a dual-boot configuration. If testing without purchasing new hardware is your goal, consider using VMware or a similar virtualization product, as described in Chapter 7.
| Resource | Minimum | Recommended for Production Use | Will Work for This Book |
|---|---|---|---|
| Disk Space | 8GB | 8GB (client), 20GB (server) | 5GB (client or server) |
| Memory | 128MB | 512MB or more | 256MB |
| CPU | Pentium III | 1Ghz Pentium 4, Athlon, or equivalent | 600Mhz Pentium III, Athlon, or equivalent |
| Network | 10/100Base-T Ethernet | 10/100Base-T Ethernet | 10/100Base-T Ethernet |
| Video | 800—600 or better display | 1024—768 or better display | 800—600 or better display |
| Note | While nothing prevents a Linux server system from running most of the exercises in this book with 5GB or less of disk space, allotting 20GB provides more room for real work in a production environment. |
Maximum Capabilities
In a previous section we presented the maximum memory size, number of physical CPUs, and so forth for various versions of Windows. Fedora Linux is available free of charge, with complete source code, so the maximum capabilities of Fedora Linux are the current limitations of Linux in general. But it's fair to say that the capabilities built into the currently shipping Linux operating system kernel in Fedora Core 3 are worth mentioning specifically. We'll also mention the maximum capabilities for those who are willing to consider recompiling the Linux kernel (which we will not be doing in this book). For simplicity, we assume a 32-bit architecture. However, note that 64-bit versions of Fedora Linux also exist for various hardware platforms.
| Resource | Maximum, as shipped | Maximum, with a Custom Kernel Build |
|---|---|---|
| Memory | 8GB | 64GB |
| Physical CPUs | 4 | 64 |
| File System Size | 2TB (terabytes) | 2PB (petabytes), if hardware permits |
| Single File Size | 1TB | 2PB |
Obtaining Fedora Linux
You can get Fedora Core 3 in a number of ways. If your friends have it, they can legally burn you a copy on CD or DVD. Or if no one has it handy, it's available for download from fedora.linux.com as ISO files which you can burn to the appropriate media.
You can also buy a copy from various sources. One of my faves is www.cheapbytes.com , where you can pick up the DVD for $8.99.
Beginning the Installation Process
To start, you'll need to make sure your computer's BIOS is set to boot from the CD-ROM drive. Once you do, insert Fedora CD #1 (or the Fedora DVD) into the CD-ROM drive and turn the computer on.
| Warning | Is there already an operating system on this computer that you want to keep? Are there files on this computer that you want to keep? Back up any important files before installing an additional operating system! You should also have unpartitioned free disk space on your hard drive or a second drive with unpartitioned space in order to install a second operating system in a dual-boot configuration. As noted earlier, however, we recommend using VMware or a similar virtualization product instead. See Chapter 7 for more information. |
The Welcome Screen
The "Welcome" screen with the giant Fedora Core should appear, as shown in Figure 1.8.
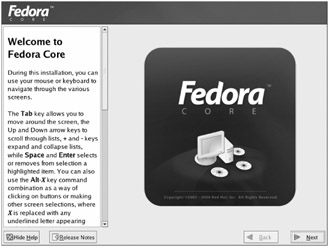
Figure 1.8: Initial Fedora installation screen
Press "Enter" to begin the installation process with a user-friendly interface. Experienced users may prefer to choose the text-based installation option, but there is no particular benefit to doing so, unless the video driver for your hardware is not included on the boot CD or DVD. We recommend simply pressing "Enter" to follow the same steps that are shown in this chapter.
The Media Test Screen
After a few moments, you will be asked whether you wish to test the CD-ROM media before continuing with installation. All sorts of nastiness could happen when you download ISO files of several hundred megabytes, so press Enter to be safe and allow the CD or DVD to be tested. Better to know now than halfway through the installation that you've got a bad disk. It's time well spent.
| Note | Depending on your system's configuration, the mouse may or may not be available at this early stage of the installation process. That should change when the graphical user interface takes over. |
The Graphical Portion of Setup
At this point you should be able to see graphics and use your mouse. If you're having trouble doing that, you might want to restart your computer and select text-based setup. It's a little clunkier, but it gets the job done. If, however, you're in good shape with the graphical part, continue onward.
Welcome Screen
The screen shown in Figure 1.8 will welcome you to the Fedora installation process with a fully graphical interface and complete mouse support. The installation process uses a wizard-style interface with "Back" and "Next" buttons allowing you to freely move backward and forward if you make a mistake or change your mind during the process. As expected, click "Next" to move to the next page of the installation wizard.
The Language Selection and Keyboard Configuration Screens
The next screen, entitled "Language Selection," offers the opportunity to select the language of your choice for the remainder of the installation process. Select your preferred language and click "Next."
The following screen, entitled "Keyboard Configuration" allows you to select your computer's keyboard type. Click "Next" after making your selection.
The Installation Type Screen
The next screen is entitled "Installation Type," as shown in Figure 1.9.
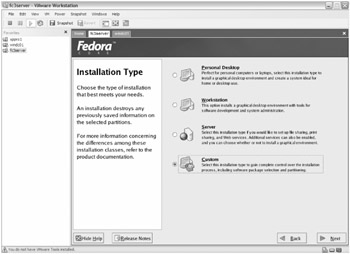
Figure 1.9: Installation Type screen
Fedora Linux is suitable for many purposes, from personal desktop systems to development workstations to web servers. To simplify installation, save disk space, and improve performance, Fedora installs only the options that make sense for the computer's intended purpose. For purposes of this book, we strongly recommend that you select the "Custom" option as shown in Figure 1.9 and then click "Next." This will allow you to select the package groups you'll need to follow the examples in this book. If, however, you're in a rush, you can get away with selecting Server for the server and Workstation for the workstation.
Disk Partitioning
Installing a Unix-like operating system usually requires that the hard drive be partitioned in order to assign disk space to various portions of the Linux file system. Linux and Unix do not use driveletters to reference partitions. Instead, each partition is represented by a mount point within the file system. The picture is made somewhat more complex by Fedora's use of the Logical Volume Manager (LVM), which allows partition-like chunks of space to be managed in a more flexible way. See the sidebar for a more detailed discussion of partitions and logical volumes .
Disk partitioning, multibooting , RAID drives , and other disk stuff on Linux can take up a whole book in and of itself. None of that stuff is the goal of this book, so we'll work with the easiest case and have you leverage the Fedora installer's automatic partitioning. Once you've made your selection, click "Next," as shown in Figure 1.10.
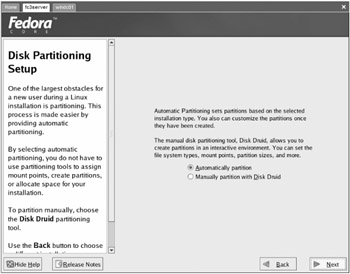
Figure 1.10: Disk Partitioning Setup screen
If your hard drive is new or the partition table has been erased, you will be prompted with a final "Warning" dialog. Click "Yes" to proceed with the creation of a new partition table.
You will next be presented with the "Automatic Partitioning" screen, as shown in Figure 1.11. Here you will be asked whether you want to remove all existing partitions on the hard drive, remove all existing Linux partitions on the hard drive, or use only free, unpartitioned space in the partition table. Again, assuming that Linux is to be the only operating system on the computer and you have no files on the hard drive that you wish to keep, select "Remove all Linux partitions on this system." If you wish to install Linux only on a single hard drive in a multiple-drive system, clear the check boxes for any hard drives you do not wish to use, then click "Next."
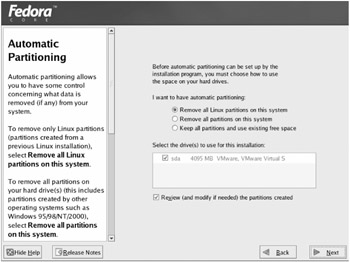
Figure 1.11: Automatic Partitioning screen
Since this operation can remove existing information from the hard drive, you will be prompted (one last time) to confirm your choice. Take a deep breath , then when you are ready, click "Yes."
A final disk partitioning-related screen, the "Disk Setup" screen, appears next and is used to adjust the automatically selected partitions. In this case, there is no need to change them, so click "Next" to move on.
| |
We recommend that you go with the automatic partitioning scheme offered by Fedora Linux. But what if you want to understand matters a bit more deeply? In this sidebar, we'll explain how Linux labels drives and partitions within drives. We'll also talk about the Logical Volume Manager (LVM) and common partitioning choices for Linux systems.
As in Windows, there are two key types of hard drives on Linux systems: IDE and SCSI.
Hard drives in Linux always have corresponding device names. These device names appear as special "files" in the /dev directory, or in a subdirectory of /dev . IDE hard drives appear as /dev/hda (think " h ard d rive A "), /dev/hdb, /dev/hdc , and so on. Note that the two connectors on the first IDE interface are always /dev/hda and /dev/hdb , even if one of the connectors is unused. /dev/hdc and /dev/hdd are the two connectors on the second IDE interface, and so on.
SCSI hard drives appear as /dev/sda (think " S CSI d evice A "), /dev/sdb, /dev/sdc , and so forth.
What about partitions within a single drive? The partitions within /dev/sda have the device names /dev/sda1, /dev/sda2, /dev/sda3 , and so on. However, Fedora Linux complicates the picture a bit through the use of the Logical Volume Manager (LVM), which manages space in a higher-level way. In the past, you might have created /dev/sda1 for bootstrap booting purposes. You might also have made /dev/sda2 for the root file system, that is, everything beneath that isn't explicitly part of a separate file system. And /dev/sda3 could have been the /home file system, to keep Joe Smith's personal MP3 downloads from filling up the root file system, with /dev/sda4 assigned to virtual memory, known in Unix as "swap space."
But partitions can't be easily resized, and the preceding arrangement would forever fix the size of each of these file systems. Traditional solutions to this problem typically involved moving half the user accounts in /home to another partition. LVM improves on this situation by allowing the operating system to see virtual partitions that can actually be enlarged later if the system administrator chooses. These logical volumes can also span multiple physical hard drives. In Linux, logical volumes are named /dev/VolGroup00/LogVol00, /dev/VolGroup00/LogVol01 , and so on.
On an automatically partitioned Fedora Linux system with a single drive, two physical partitions are created: /dev/sda1 is a bootstrap partition at the start of the drive for booting purposes, and /dev/sda2 is given over to LVM. LVM then subdivides it into /dev/VoLGroup00/LogVol00 , which is the root file system, and /dev/VolGroup00/LogVol01 , which is used for virtual memory. Since no separate file system is explicitly created for /home , home directories are kept in the root file system in this design.
| |
Boot Loader Configuration
What follows is the "Boot Loader Configuration" screen, shown in Figure 1.12, which allows you to decide how the booting process should be handled. When your computer starts up, the grub bootloader program is used to launch Linux and any other operating system you may have chosen to install. By default, grub will launch Linux after a very brief delay designed to give you an opportunity to interrupt the boot process and specify any special boot options. Since you aren't creating a dual-boot system, we recommend that you accept the default configuration of the boot loader by clicking "Next." If you want to create a dual-boot system with multiple operating systems, you will need to carefully inspect this screen to ensure that your second operating system was recognized and included in the boot list.
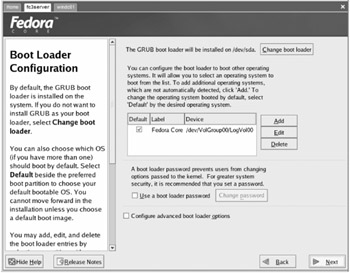
Figure 1.12: Boot Loader Configuration screen
Network Configuration
You will now see the "Network Configuration" screen, as shown in Figure 1.13. Here is where you will be invited to select your networking options. When configuring a server, it is appropriate to give it a static IP address, especially if it will be a DNS and/or DHCP server.
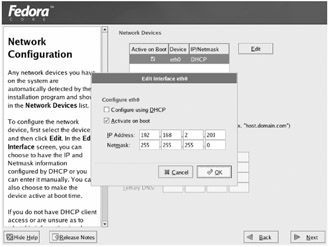
Figure 1.13: Network Configuration screen Edit Interface eth0
While most client systems in the wild use DHCP to automatically obtain an IP address, you'll assign static IPs for the purposes of this chapter. To assign a static IP address, make sure eth0 is highlighted in the list box at the top of the screen, then click the "Edit" button to open the static IP address configuration dialog.
Clear the DHCP check box. Here's what to enter for your LinServ1 server:
-
IP address: 192.168.2.202
-
Subnet Mask: 255.255.255.0
-
Default Gateway: 192.168.2.1
Here's what to enter for your LinCli1 client:
-
IP address: 192.168.2.203
-
Subnet Mask: 255.255.255.0
-
Default Gateway: 192.168.2.1
Be sure to keep the "Activate at Boot" check box checked for each machine.
Figure 1.13 shows the correct settings for LinCli1.
Since you are not relying on DHCP for this example, in addition to configuring IP addresses, you must also configure the hostname and DNS server settings for the client and server systems. After completing the Edit Interface dialog, enter the hostname of the new system, the IP address of the gateway to the Internet, and the IP address of the primary DNS server.
The settings for LinServ1 and LinCli1 are similar. The main difference comes in the DNS server setting, which should be the router's IP address (192.168.2.1) for the server and the server's IP address (192.168.2.202) for the client.
Here's what to enter for your LinServ1 server:
-
Hostname: linserv1.corp.com
-
DNS server: 192.168.2.1
-
Gateway: 192.168.2.1
Here's what to enter for your LinCli1 client:
-
Hostname: lincli1.corp.com
-
DNS server: 192.168.2.202
-
Gateway: 192.168.2.1
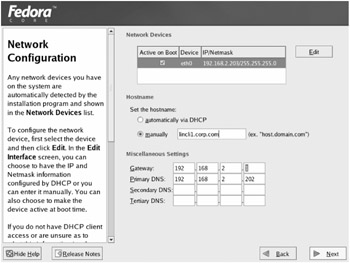
Figure 1.14: Network Configuration screen Hostname and Miscellaneous Settings
Firewall Configuration
Any administrator who connects a computer to a network should be concerned with securitydoubly so if the computer is connected to the Internet. Like Microsoft Windows XP and Windows 2003, Fedora Linux offers a firewall as a standard part of the operating system. In Figure 1.15, you are provided the option to enable the firewall.
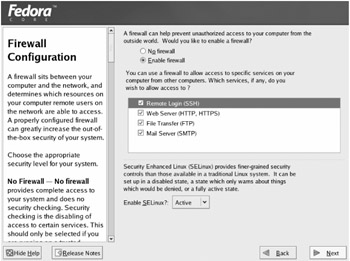
Figure 1.15: Firewall Configuration screen with choices appropriate for linserv1
By default, the firewall will prevent access to a variety of services that we intend to make accessible to other users on the same network, since it is our goal to demonstrate ways that Linux and Windows systems can interoperate . A tough security policy is a good default for an operating system, but it does not suit our purposes to block the services we'll discuss in this book.
When configuring a server system, be sure to check the Remote Login, Web Server, File Server, and Mail Server boxes on the firewall screen before clicking "Next" to continue.
If you're configuring a client system, leave all the boxes unchecked.
You will make additional adjustments to the firewall configuration in later chapters.
Whether you're building your Fedora client or server, check the SELinux option. SELinux provides fine-grained security checks that further reduce the risk that a misbehaving process will be able to subvert your system.
| |
SELinux is a recent innovation, originally generated under the auspices of the National Security Agency (NSA). Traditionally, Linux processes run under an all-or-nothing security model in which a process such as the web server process had access to any and all resources available to the user ID under which it was run. In the case of the root user ID, this translated to complete control of the system. SELinux introduces a means of fine-grained control over exactly which features of the Linux kernel are available to a given process. The goal is to limit the harm that can be done by a single program in the event of a security compromise. For more information, see the Fedora Linux SELinux FAQ at http://fedora.redhat.com/docs/selinux-faq-fc3/ .
| |
Additional Options and Root Password
The next screen you'll see is entitled "Additional Language Support." This allows for multiple languages to be displayed in the user interface once the operating system has been successfully installed. Select any preferred language(s) and click "Next" to move on.
The next screen you'll see is entitled "Time Zone Selection." Select your desired time zone and click "Next" to proceed. Later, we'll address the issue of keeping the system time accurate through the use of a Network Time Protocol (NTP) server.
The next screen is called "Set Root Password." Linux, like other Unix operating systems, always has a "root" account with full administrative access to the system. This is not unlike the "administrator" account on many Windows systems, although the administrative account of a Windows system could be renamed to just about anything.
In a real-world installation, a sound choice of root password involving letters , numbers , and no recognizable words is essential. Strictly for purposes of the examples in this book, however, use the password p@ssw0rd . (That's an "at sign" as the second character and a zero for the letter O .) This password is strong enough for the default strength requirements for both Windows and Linux.
Package Selection
The "Package Group Selection" screen, shown in Figure 1.16, allows you to customize just how much of Fedora Linux you want to install. Since you chose a custom installation rather than one of the prearranged types such as "Personal Desktop" or "Server," you have the opportunity to select all of the packages to meet the needs addressed in this book.
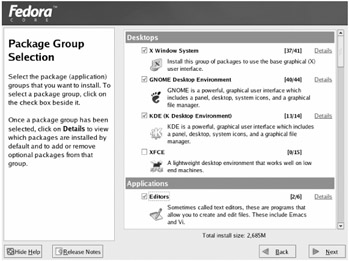
Figure 1.16: Package Group Selection screen
Only the first page of the "Package Group Selection" screen is shown in the figure. You will need to scroll through the package list and select all packages for your client and also for your server configuration, as listed below. Certain packages, such as the development packages and, in the case of a server, the graphical desktop packages, may be unnecessary in your environment, but all are useful for at least one purpose in this book.
| Note | You'll note that we chose the GNOME desktop environment over the K Desktop Environment (KDE). We did so because GNOME is the default desktop in Fedora Linux. We have nothing against KDE but wanted to be consistent throughout the book in our choice of a single graphical user interface wherever possible. When specific KDE applications are useful, you can still run them on the GNOME desktop. |
| Selected Option | Fedora Server | Fedora Client | Purpose | Chapter |
|---|---|---|---|---|
| Desktops: X Window System | Y | Y | Foundation of all GUI operations in Linux | All |
| Desktops: GNOME Desktop | Y | Y | Standard Fedora desktop | All |
| Applications: Editors | Y | Y | Editing Text | All |
| Applications: Graphical Internet | Y | Y | Web browser (Firefox) | All, especially 10 |
| Applications: Text-based Internet | Y | Y | wget , other Internet utilities | All ("under the hood" in other tools) |
| Applications: Office / Productivity | N | Y | Microsoft Office-compatible document handling | 9 |
| Servers: Server Configuration Tools | Y | N | Configuring printing, DHCP, other services | All |
| Servers: Web Server | Y | N | Serving HTTP content | 10 |
| Servers: Mail Server (Postfix/ IMAP) | Y | N | Delivering e-mail | 6 |
| Servers: Windows File Server | Y | N | Windows-compatible file and printer sharing | 2, 4, 5 |
| Servers: DNS Name Server | Y | N | DNS resolution for the corp.com domain | All, especially 1 |
| Servers: MySQL Database | Y | N | Data storage and retrieval for websites and collaboration | 6, 10 |
| Development: Development Tools | Y | Y | Compiling software from source, developing new software | All ("under the hood" when installing Perl modules and similar), especially 10 |
| Development: X Software Development | N | Y | Compiling software with a GUI | 4 (for optional sidebars), 10 |
| Development: GNOME Software Development | N | Y | Compiling software with a GNOME GUI | 10 |
| System: Administration Tools | Y | Y | Control Panelike features of the System Settings menu such as Network Settings, Authentication Settings, etc. | All, especially 2, 3, 4 |
| System: System Tools | Y | Y | ||
| System: Printing Support | Y | Y | Printing, both local and remote | 5, 9 |
From the appropriate column in the preceding table, select each of the necessary packages in the "Package Selection" screen, then click "Next" to continue.
The "About to Install" screen follows. This screen informs you that the installation process is about to begin copying files to your hard drive. Click "Next" to proceed.
The "Required Install Media" dialog lists the CDs that are required to successfully install your Fedora Linux installation. If you followed the preceding steps exactly and you are using Fedora Core 3 CDs burned to CD-R, you will only require the first three CDs. The first CD should already be in the drive at this point. You may require additional CDs if you chose to install packages not listed above. At the "Required Install Media" dialog, click "Continue" to begin the copying.
The installation process is finally under way! The Fedora installation system will first format the various Linux file systems, then copy packages to disk from CD, and finally configure those packages and bring the system up for your use. This process will take some time, and you will be prompted to insert the second and third CDs at appropriate points.
When all packages have been copied to disk, the "Congratulations" screen as seen in Figure 1.17 will appear, confirming that the basic installation process has succeeded. Remove the last CD from the CD-ROM drive and click "Reboot" to continue.
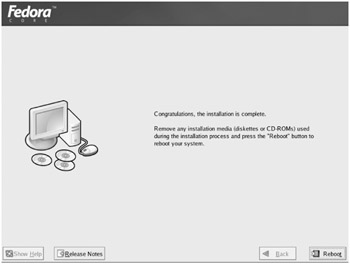
Figure 1.17: The Congratulations screen
| |
If you are installing Fedora on typical hardware that meets the requirements given in this chapter, it is reasonable to assume that you will reach this point without incident. However, it is always possible that something will go wrong.
The most common cause of Fedora Linux installation failure is a lack of Linux drivers for critical hardware. Perhaps you have a wireless Ethernet port or SATA (Serial ATA, where ATA stands for "AT Attachment," dating back to the IBM AT days) hard drive interface that is not properly recognized by Linux. At this point, the cleanest way to work around these problems is to avoid the hardware in question, at least until your system is fully installed and you are able to run the update agent and obtain a newer kernel which supports your hardware. In the case of Wi-Fi, you can most easily work around this by using a wired Ethernet connection. Wired Ethernet ports not supported by Linux are very rare at this point.
In the case of SATA, there is typically a first hard drive in the system that is not on a SATA interface. Consult the hardware compatibility lists mentioned earlier in this chapter before buying, especially with regard to SATA chipsets. And, of course, if Fedora Core 4 has been released by the time you read this, start with that version. You are much more likely to find that drivers for your newer hardware are included.
If your graphics card is partially recognized but you do not find the graphics resolution displayed to be satisfactory, it may be simpler to continue with the installation process and experiment with the system configuration tools after fetching updated packages. If a serious problem that causes your system to lock up or fail to recognize your network card persists, consider simplifying your system by removing hardware that you do not actually require, such as nonstandard audio cards.
Most of the remaining cases of installation failure are caused by overly creative option selections from screens such as the Disk Partitioning screen. If you have deviated from the steps suggested in this chapter, we recommend that you begin the installation process from scratch and follow the text precisely.
In rare cases, installation failure may be caused by defective hardware. The installation of a new operating system does occasionally reveal a damaged processor or damaged RAM; failing parts that manage not to reveal their problems while carrying out one well-worn series of tasks may suddenly reveal their defects when new tasks are attempted. We recommend installing Linux on relatively new hardware when possible, especially if your goal is to build a production server.
| |
Post-Installation Configuration
Upon a successful reboot, Fedora will display the "Welcome" screen seen in Figure 1.18, explaining that a few post-installation questions must be answered to complete configuration of the system.
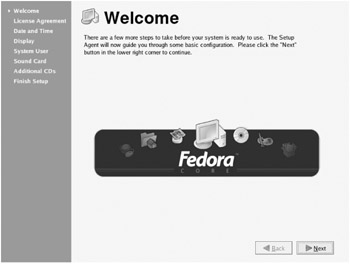
Figure 1.18: The Welcome screen
Specifically, you'll have to buzz through the following screens:
-
License Agreement
-
Date and Time
-
Display
-
System User
-
Sound Card
-
Additional CDs
-
Finish Setup
Click "Next" to proceed.
License Agreement
The next screen, entitled "License Agreement," will display the Fedora Linux license agreement. When you have finished reading the license agreement, click "Yes, I agree to the License Agreement" and then click "Next" to continue.
Date and Time
The next screen is "Date and Time." These may already be correct if your system clock is set properly. The default is 24- hour military style time (13:00 for 1:00pm). Correct the date and time if necessary, then click "Next" to go on.
| |
Every component of Fedora Linux can be freely copied and redistributed. This is in sharp contrast to traditional closed-source software. This is also in contrast to other Linux distributions that contain commercial software along with open source software (OSS). For example, SuSE and Mandrake have license agreements that state they cannot be freely copied and redistributed.
The Linux operating system "kernel" at the heart of Fedora is distributed under the terms of the GPL (GNU General Public License), one of many open source licenses. GNU is a recursive acronym for "GNU's Not UNIX" and is found at www.gnu.org .
This license expressly permits you to make as many copies of the kernel as you wish, grants you full access to the source code, and requires you to share the source code to any changes you make if you choose to share your changes in any form. Of course, this does not mean that every document or program you create on a Fedora system must be released under the terms of the GPL. The GPL does not require you to freely share work products made with the licensed software, only changes to the software itself.
Many parts of Fedora are released under licenses more permissive than the GPL with regard to keeping your changes private. For instance, applications linked with the GNOME libraries can be sold commercially as closed-source software without violating the terms of the LGPL (Lesser General Public License), which allows such activities provided that any changes to the libraries themselves are shared freely with the public in accordance with the GLPL.
Although the software that makes up Fedora is open source, there are trademarked graphics present in the system. With those images removed, though, the entire Fedora system could be redistributed under a new name without violating the software licenses involved. We mention this to illustrate just how thoroughly open the licensing of Fedora Linux is.
Open source licensing ensures that the hard work of free software developers remains free and continues to grow and improve to the benefit of the entire Linux community. For more information about the GPL and open source licensing, visit www.fsf.org .
| |
Display
The next screen, titled "Display," asks you to select your monitor type, indicate how many colors should be simultaneously displayed, and select a screen resolution. If your video card was properly recognized, you should be able to select 1024—768 or a higher resolution and millions of colors. It is not uncommon or cause for concern to see "Unknown Monitor" listed as the monitor type. If your video card was not immediately recognized, you should still be able to select a lower resolution such as 640—480. In some cases, the Fedora hardware detection system may be overly optimistic about the maximum resolution of your graphics card. Compare the claimed resolution to what you actually know about your hardware's capabilities. If possible, pick a resolution that is already known to work with the same video hardware in Windows. Then click "Next" to continue.
If your display does not appear normally after a few seconds, it may be that the Fedora hardware detection system did not correctly sense the limits of your graphics card. Unfortunately, you will probably have to reboot at this point and repeat the installation to this stage. When you reach this point again, we recommend selecting a lower screen resolution, which often avoids the problem.
| Warning | If you're performing your tests with VMware, you'll need to load the VMware tools for optimal viewing. See Chapter 7 for more on VMware and a sidebar on how to install the VMware tools within Linux. |
Using the System User Screen to Create an Unprivileged User Account
While it is possible to operate a Linux system exclusively while logged in as the root user, this is usually not a wise choice. The use of the root account for all activities means that an accidental misstep while deleting files can lead to the loss of crucial system files, like the contents of the /bin or /etc directories. Linux uses file permissions and ownership to ensure that the root password must be presented in order to perform various hazardous activities. Similarly, Windows 2003 and Windows XP enforce security permissions for a variety of crucial files in C:\Windows , certain critical registry keys, and so on.
Fedora Linux user account names should be 32 characters or less and must not contain uppercase letters or spaces. Use the Full Name field to enter the proper name of the user, such as Thomas Boutell .
In a production environment, you should select a password made up of both letters and numbers and containing no recognizable words. Your password must be at least six characters long. Strictly for purposes of this book, however, we have used the user account name homestar and the password p@ssw0rd . (That's an "at sign" as the second character and a zero for the letter O .)
As shown in Figure 1.19, enter the user account name, full user name, and password that you prefer, and click "Next" to move on.
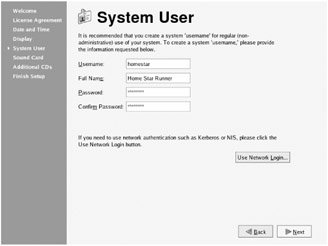
Figure 1.19: System User screen
Sound Card
At the "Sound Card" screen, you will be prompted to test your sound hardware by listening to a test sound. (Older versions of Linux were very hit-or- miss when it came to sound production, so we think the Linux installation guys just want to prove now that they "do" sound by giving it its very own screen.)
If you wish to have sound capabilities, click "Play test sound," then click "Yes" when asked to confirm that you were able to hear the sound. If sound does not play, you may have better luck later after updating the kernel. However, sound is not used in any of the examples in this book, so there's no immediate cause for concern. Now click "Next" to continue.
You will be prompted at this time to supply any additional CDs of third-party Red Hat Linux-compatible software installation programs that you wish to use. For purposes of this book, and for most users in general, this will not be necessary; additional software is usually installed later via the up2date and rpm package managers discussed later in this chapter. Click "Next" to proceed.
First Login
You've finally make it to the "Finish Setup" screen. You can now use your Fedora Linux system. However, before your system is ready for serious use, you still need to fetch software updates via the Internet in order to address any security problems discovered after the release of the current version of Fedora Linux. The updates you'll receive also include bug fixes in general; not all fixes available are for security holes. Click "Next" to move on.
The Fedora Linux login prompt will now appear. In the "Fedora Core" logon screen, as shown in Figure 1.20, enter the name of your user account (yes, your nonroot account).
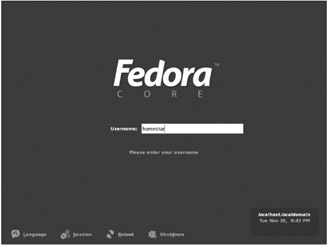
Figure 1.20: Username screen
Log into the homestar account you created in Figure 1.19. After entering the username, press Enter to move on to the Password screen. Again, the password for the example is p@ssw0rd .
Fedora Linux will now launch the GNOME desktop.
| |
The Microsoft Windows platform has a single user interface standard; every user knows what a dialog box will look like, or should look like, on any given version of Windows.
The Linux platform does not currently have a single dominant user interface. At present, there are two competing standards, GNOME (GNU Network Object Model Environment) and KDE (the K Desktop Environment). Both are open source projects, although there are significant licensing differences between the two:
-
GNOME licensing
-
As mentioned earlier, software linked with the GNOME libraries can be sold commercially as closed-source software without violating the terms of the LGPL (Lesser General Public License). The LGPL allows such activities provided that any changes to the libraries themselves are shared freely with the public in accordance with the GLPL.
-
-
KDE licensing
-
Those developing software for KDE must choose between license fees for the underlying Qt user interface toolkit and releasing their own product as open source under the GPL. Before you ask, the name Qt was chosen because it didn't conflict with existing toolkits, and the Q looked good in the developer's favorite terminal window font!
-
This dual licensing is not unreasonable, but it does make the GNOME desktop more attractive to some developers. Still, the general excellence of each system continues to drive healthy competition between them.
For purposes of this book, we will use the GNOME desktop; most Linux-Windows interoperability concerns are not significantly affected by the choice of GNOME or KDE, and applications written for GNOME can operate correctly under the KDE desktop, and vice versa.
| |
Fetching Updates
At this point, it may appear that you are done; the operating system and the desktop user interface are up and running. If you click the Applications menu next to the Fedora icon in the upper-left corner, which is analogous to the Microsoft Windows Start menu, you will discover that a variety of applications are available. However, just as with Microsoft Windows, it is crucial to obtain updated versions of system software via the Internet to avoid security and stability problems.
While unpatched Fedora Linux systems are not typically compromised immediately once introduced onto the Internet, it is still crucial to take security seriously, and the automatic updating of other applications that are part of the system is a cool additional benefit.
As seen in Figure 1.21, you will note the appearance of a white exclamation point in a red circle in the upper-right corner of the display.
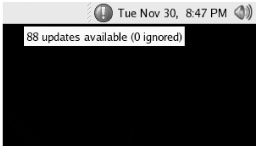
Figure 1.21: Desktop with up2date icon
This is an invitation to use the built-in up2date tool to fetch operating system updates. Much like Microsoft Windows Update (which you'll use later), the Fedora up2date tool makes it possible to painlessly apply important security and bug fixes to software on your system, as well as offering the opportunity to install new software. When the exclamation point is animated, this is an indication that new updates are available. Click the exclamation point to begin the update process for the first time and install fixes for flaws discovered after Fedora Core 3 was originally released.
When you click the exclamation point, the Red Hat Network Alert Notification Tool will appear, listing the packages that have been updated. To actually install these updates, you will need to click the "launch up2date" button. Do so to continue.
You'll be prompted to provide the root password. This is required because up2date can be used to add or remove any software package from the system, a privilege reserved for the root user. Enter the root password, which is p@ssw0rd in the examples, and click "OK."
The next dialog box gives you an opportunity to select the Red Hat Network Server you wish to fetch updates from. We recommend clicking OK to select the default, which should be reasonable for all typical installations. This will be followed by a message explaining, somewhat obscurely, that all Fedora packages are cryptographically "signed" with a secure key to verify their identity. Click "Yes" to accept this key as your indication that packages have not been modified by third parties.
The Red Hat Update Agent will now launch. Click "Forward" to move past the initial welcome screen. On the "Channels" screen that follows, you will note that files from the fedora-core-3 and updates-released-fc3 channels are available; you want both of these and they are selected by default, so click "Forward" again to move on.
The next screen, "Packages Flagged to be Skipped ," does require some action on your part. By default, Fedora is configured not to fetch new operating system kernels, but there have in fact been significant security flaws found in Linux kernels in the past few years , so we strongly recommend that you check the box next to the kernel package before clicking "Forward," as shown in Figure 1.22. Yes indeed, you do need to check the check box, though it might appear that you should do the opposite . It's a badly formed dialog box, to say the least. In any event, ensure it is checked as seen in Figure 1.22 and continue.
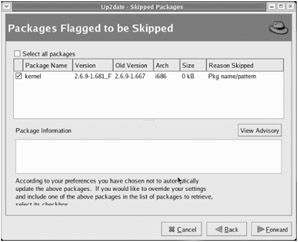
Figure 1.22: Packages flagged to be skipped
Similarly, on the "Available Package Updates" screen that follows, you should update every package you have installed. Be sure to check the "Select all packages" box before clicking "Forward."
Once you have completed these steps, the actual process of retrieving updated packages from the Internet can begin. Your system may take some time to download all of the updates, especially if you choose to do so during business hours or right after a hot patch comes out. The downloading and installation steps are presented separately, with all downloads taking place before any packages are installed. Just click "Forward" when each step completes; when both stages are finished you will be rewarded an up2date Finish page.
| Warning | Unfortunately, up2date will occasionally stall for long periods and fail to complete the update. Since the up2date servers for Fedora are free, they do sometimes become overwhelmed. If up2date stalls for an extended period of time, it may be necessary to use the "Cancel" button and start the process again at an off-peak time. |
Congratulations! Your system is now protected against any security exploits currently known to the Fedora package maintainers.
Leveraging Webmin
For Linux administration, the command line is king. However, a GUI interface can be added to do a huge percentage of the administration duties . One such tool is called Webmin. Webmin provides a web browser-based interface to administer most aspects of a Unix/Linux server. Webmin provides useful capabilities that in some cases go beyond what is supported by Fedora's GUIbased configuration tools. Since Webmin is browser-based, it can also offer the additional advantages of convenient remote administration.
Generally speaking, Webmin excels at configuring the features that most Unix systems include, such as printer administration, file sharing, and so on. To that end, we will use it for such tasks in subsequent chapters. An additional bonus of using Webmin is that if you decide to use another Linux distributionsay, SuSE or Mandrakethe skills you learn in Webmin are portable across nearly all Linux platforms. This makes it especially attractive.
There are times when you won't be able to use Webmin to perform a task. For instance, some cutting-edge features such as Linux to Active Directory authentication (discussed in Chapter 3) and less frequently used features are less likely to be thoroughly supported by Webmin. We have chosen not to install Webmin on client systems where Fedora's graphical administration tools are sufficient to do most jobs.
Accordingly, we rely on the built-in Fedora GUI or command line when required and appropriate.
Installing Webmin
We have already discussed the up2date package manager. Programs that are a standard part of Fedora can be easily installed via up2date . Unfortunately, Webmin is not yet among these.
However, the authors of Webmin have made an RPM package available.
| |
RPM (Red Hat Package Manager) is a system that goes back to the very first days of the Red Hat Linux distribution. RPM files provide not just a way to store application files, but also the scripts to correctly install and initially configure them. RPMs also contain version control and dependency information that the system can use to determine whether required prerequisites are also installed; if not, the rpm command refrains from installing the software until the administrator installs the prerequisites.
The friendly up2date interface is layered on top of the yum package manager, which is layered on top of rpm . yum provides ways of locating the RPMs you need to achieve a particular goal automatically. However, not every program that is available in RPM format is part of the official Fedora Core 3 repository or an alternative repository that provides similar services, so it is not uncommon to manually download RPM files and install them with the rpm command.
| |
To download the Webmin software to LinServ1, visit the Webmin website with the Firefox browser, easily launched via the Applications menu or by clicking the web browser icon to the right of the Applications and Actions menus . The URL of the site is www.webmin.com .
Click "Downloading and Installing" to reach the download page. Finally, click the "RPM suitable for Redhat" link. Or perhaps by the time you read this, the website may be updated to offer a download specifically for Fedora. Note that you do not want to download the source RPM. You will save time and effort by using already-compiled software. Select a nearby download mirror server on the page that follows.
Firefox will display a dialog box offering to open the RPM file with the "Install Packages" tool. In our experience, this approach was not successful and did not provide meaningful feedback, so we recommend that you check the "Save to Disk" box instead and click OK as shown in Figure 1.23.
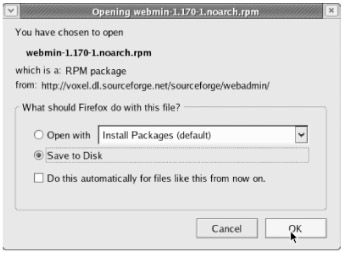
Figure 1.23: Downloading Webmin
Once the download operation is complete, you're ready to install the rpm package. To do so, you will need to make your first use of the command-line shell prompt, otherwise known as the Bash shell. To access the command line, click the Fedora icon in the upper-left corner, select System Tools, and finally, select Terminal.
| |
The Linux terminal window and Windows' cmd.exe command prompt are analogous. Unlike the Windows command prompt, however, the Bash shell is still very much an integral and respectable part of the operating system. While the design of Windows allows essentially all operations to be performed without the use of the command shell even at the lowest level, many operations in Linux are still performed via Bash shell scripts analogous to batch files in the DOS and Windows environments. Of course, it is perfectly possible to wrap a graphical interface around these scripts, and this is how user-friendly administration tools for Linux often work under the hood.
Basic Bash shell commands include ls , which lists the contents of the current or another directory; rm , which removes files; mv , which renames files; nano , a simple text file editor; and man , which can be used to read documentation of any command available on the system. Another noteworthy shell command is apropos , which fetches a list of manpages (documents that can be read with the man command) that relate to a particular topic. For instance, apropos nano lists all manual pages that are relevant to the nano text editor. To learn more about any of these commands, just type man command to read the relevant documentation. Press q to close the man page and return to the shell.
| |
As it stands, you're currently logged in as homestar , your mere mortal user. But you want to update your system, and mere mortals cannot do this on their own. Therefore, elevate your privileges and temporarily log on as root. Do this with the su - command, which stands for Super User. The dash following su specifies that you should log in fully as root, which gives you the benefit of root's settings for things such as the PATH environment variable. That means that commands like service and chkconfig that root uses can often be found automatically in /sbin or /usr/sbin .
Once you type su - at the command prompt, you'll be prompted for the root password, which you set to p@ssw0rd .
Once you log in as root, the terminal prompt changes to the # symbol, a useful indication that you are acting with root's full authority.
| Warning | If you receive "command not found" errors when running some commands as root, make sure you used su - and not just su to switch to the root account. |
You're ready to install the RPM package. At the terminal prompt, enter the following command, changing the name of the RPM file to match its current version as shown on the Webmin site.
Note that the following command assumes that you accepted the default download location when downloading the file with the Firefox browser. By default, Firefox saves downloaded files to the home directory of the user running Firefox, homestar in this case. When you gave the su - command, you assumed root's identity, but the current working directory remained set to /home/homestar . If you saved the file in an alternate location, you'll need to substitute the path where you saved the file.
rpm -i webmin-1.170-1.noarch.rpm
| Note | The word noarch , in this case, means "no architecture." In other words, this RPM is not specific to a particular binary platform such as the Intel architecture. Be sure not to pick the source RPM, which won't do what you expect when you use the simple installation command given. |
The -i (install) option instructs the rpm package manager to install the specified package on your system.
The preceding command should produce output similar to the following:
warning: webmin-1.170-1.noarch.rpm: V3 DSA signature: NOKEY, key ID 11f63c51 Operating system is Redhat Linux Fedora 3 Webmin install complete. You can now login to http://linserv1.corp.com:10000/ as root with your root password.
Accessing Webmin for the First Time
Return to the Firefox browser and access this URL:
-
http://localhost:10000/
Complete the login prompt shown in Figure 1.24 with root as the username and p@ssw0rd (in our example) as the password. Then click the "Login" button to continue.
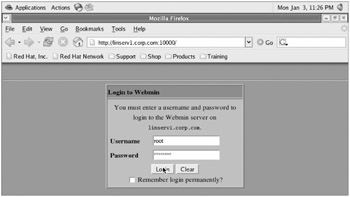
Figure 1.24: Logging in to Webmin
Note that you are entering your root password into a web form. What's morethat form does not use SSL encryption for security. Does this sound like a safe thing to do? Turns out, yes!but only if you enabled Fedora's firewall at installation time. By default, port 10000 is not open to connections from other machines in Fedora's firewall configuration, so Webmin can so far only be accessed from the server itself. A bit later, you'll enable secure remote access to Webmin.
Once you complete the login prompt, Webmin will display its web-based interface, as shown in Figure 1.25.
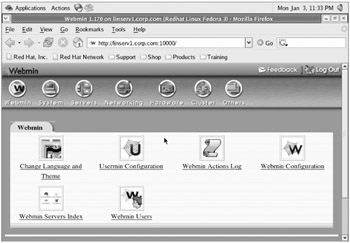
Figure 1.25: Webmin user interface
Securing Webmin for Remote Access
One of Webmin's greatest features is remote administration, but how do you make that operation safe? By enabling SSL encryption, the technology used by all secure websites, that's how.
First, click "Webmin Configuration." On the page that follows, click "SSL encryption."
The next page will display bad news: Webmin is written in the Perl programming language, and Fedora Core 3 does not ship support for SSL with Perl, so you'll need to install that support. But this is where you get your first taste of Webmin's system administration power: Webmin offers to install the required modules for Perl by itself!
Click the "download and install the required Net::SSLeay module for you" link to begin the process.
The progress display page will keep you updated as the required files are downloaded, then present you with a list of "Perl module install options." The key word here is options ! You don't want to pass any additional parameters to Perl's module configuration process. Just click "Continue With Install" to move ahead.
As Webmin must configure, compile, and install Perl modules behind the scenes using your system's development tools, the next page will take longer to complete. Don't interrupt your browser; just be patient. When the process completes, scroll down to the end of the page, and you should see a display similar to Figure 1.26.
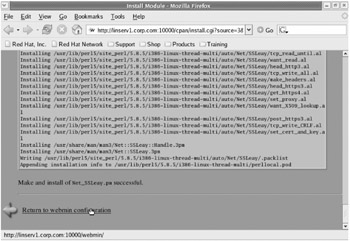
Figure 1.26: Webmin after successful Net_SSLeay.pm installation
To finish the job, click "Return to Webmin configuration." On the page that follows, click SSL Encryption again. This time, you will see a different screen, one which announces that your system does have support for SSL in Perl programs. As part of configuring Webmin itself, you have completed your first successful system administration task via Webmin.
Just one step to go! Scroll part way down the page to reveal the form shown in Figure 1.27 and complete it as shown, then click the "Save" button. You are instructing Webmin to accept only secure logins.
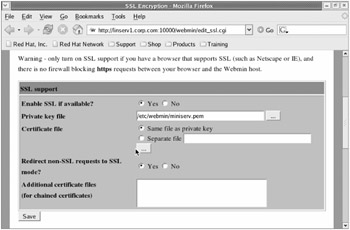
Figure 1.27: Webmin SSL support form
When you click Save, Webmin will redirect you to a secure URL, and Firefox will display a dialog box warning you that the identity of the website cannot be verified . This is not cause for great concern. The encryption key provided with Webmin is simply not signed by one of the major certificate authorities (like Verisign), because this would involve needless expense for each and every Webmin installation. But you already know that you are talking to the system you intended to talk to. You simply want the conversation to be secured using a certificate you trust (even if it doesn't come from a company like Verisign). We suggest clicking either "accept this certificate for this session" or "accept this certificate permanently."
If you are not immediately redirected, you may receive a warning message instead suggesting that you change http:// to https :// in the URL you are accessing. Edit the URL shown in the address bar at the top of the Firefox window and press Enter to load the secure version of the page.
| Note | There is one real security concern hereif you are concerned about IP address and DNS spoofing attacks. While difficult, these attacks are possible if you are accessing Webmin remotely from outside your company's network and your routers are in some way compromised. If you're concerned, you may prefer to generate your own secure key for Webmin. This ensures that you can tell the difference if a completely bogus linserv1.corp.com is substituted by an extremely clever hacker in a man-in-the-middle attack. If you are keen to pursue this issue, simply scroll further down the SSL Encryption page and explore the possibilities of the key generation form. |
After a moment, Firefox will be redirected to a slightly different URL:
-
https://linserv1.corp.com:10000/
That extra s in https makes all the difference! Now that your copy of Webmin requires a secure connection, you can allow system administration from remote desktops. And when your server is a box in a rack, that's a good thing.
Allowing Webmin through the Firewall
In order to remotely administer your system via Webmin, you'll need to relax Fedora's firewall rules to allow connections on port 10000. Click Applications ![]() System Settings
System Settings ![]() Security Level. Enter the root password when prompted.
Security Level. Enter the root password when prompted.
In the Security Level application shown in Figure 1.28, add the port 10000:tcp to the comma-separated list of ports to be allowed through the firewall, as shown in the figure. Then click "OK."
Finally, try accessing https://192.168.2.202:10000/ from lincli1.corp.com or another desktop on the network. Congratulations! You can now perform many system administration tasks remotely and in many cases with considerably greater flexibility than that provided by the Fedora tools.
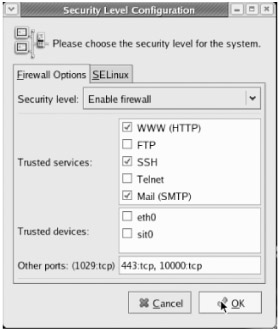
Figure 1.28: Security level configuration
| | ||
| | ||
| | ||
EAN: N/A
Pages: 71