Installing Windows
| | ||
| | ||
| | ||
Installing Windows
The whole reason that Windows has taken over 95 percent of the desktop (and is all over the server room) is because of its swell GUI, or graphical user interface. Users like it, admins like it. Heck, my grandma likes it. And this swell interface gives the appearance that Windows networking is easy. It's not. It just looks easy. Ask anyone who's left a career as a plumber, a tennis pro, or a cab driver to become a Windows networking expert and make the fabled bajillion dollars a year. Turns out, it's not easy it's deceptively hard.
Windows Server 2003 + SP1 and Windows XP + SP2: The Right Windows (at Least for This Book)
There are lots of Windows flavors in use in the world, from Small Business Server to Windows Embedded. Most organizations are walking away from Windows NT 4 and looking onward and upward. Most corporate and educational installations are now Windows 2000 or Windows 2003.
To that end, we had to pick which Windows will most likely get the most use in the upcoming years , and the winner is Windows Server 2003 + SP1 for the server and Windows XP + SP2 on the client. As of now these are the most up-to-date versions. Additionally, there's not that much difference between Windows 2000 Server (the next most popular version of Windows' server OS) and Windows 2003, so even if your organization is using Windows 2000, you'll be in good shape. However, where things are different between Windows 2003 and Windows 2000, we'll try to bring them to your attention. Specifically , file sharing can react differently between the two, and we bring you this information in Chapter 4. And, additionally, we'll demonstrate how Windows Server 2003 / R2 shakes things up. Check out the Web Appendix for that information.
In this first part of the book, we'll zip through installing Windows 2003. We'll install Windows XP a little later.
Windows 2003 Editions and Capabilities
As we said, Windows 2003 has multiple varieties. By my count, there are nine varieties, as listed next. Don't panic or feel inferior if you haven't had a chance to play with all of these. In my travels , I've only actually seen four (and I get around a lot).
| Windows 2003 Server Edition | Where Used | Number of Processors Supported | Amount of RAM Supported |
|---|---|---|---|
| Small Business Server | Small businesses with 75 client systems or fewer. This setup takes an "everything in the box" approach to networking. | 2 | 4GB |
| Web Edition | Web server only. Not meant to be used as a file server or Active Directory server | 2 | 2GB |
| Standard Edition | General purpose. A perfect choice for this book. Makes a great book. Makes a great Active Directory Domain Controller or file, print, or VPN server. | 4 | 4GB |
| Enterprise Edition | General purpose (see the list after this table for the enhanced feature set beyond Standard Edition). Has increased fault tolerant clustering capabilities. | 8 | 32GB |
| Datacenter Server Edition | Huge high-availability environments. | 32 | 64GB |
| Windows Server 2003 Standard for 64-bit Itanium-based Systems | If you can afford an Itanium, this is for you. | 4 | 4GB |
| Windows Server 2003 Enterprise for 64-bit Itanium-based Systems | Adds the Enterprise features listed after this table. | 8 | 64GB |
| Windows Server 2003 Datacenter Edition for 64-bit Itanium-based Systems | Massively scalable. | 32 (64 in some OEM versions) | 512GB |
| Windows Server 2003 Standard x64 Edition (for 64/32-bit processors like the AMD Opteron and Intel Xeon EM64T) | If you get an Opteron or Xeon EM64T, this is for you. | 4 | 4GB |
| Windows Server 2003 Enterprise x64 Edition (for 64/32-bit processors like the AMD Opteron and Intel Xeon EM64T) | If you get an Opteron or Xeon EM64T and need the Enterprise features listed after this table, this is for you. | 8 | 32GB |
The two realistic choices are Windows 2003 Standard Edition and Windows 2003 Enterprise Edition. Either is an acceptable choice for use in the lab and for most of the exercises in this book, though there are some reasons you might want to get your hands on a Windows 2003 Enterprise Edition copy (or an evaluation edition).
To help you decide what to use in production and for this book, here's a handful of ways where the two are different (note not all differences are listed here.)
-
Enterprise Edition supports shared-disk clustering of up to eight nodes; Standard Edition does not support shared-disk clustering
-
Microsoft Identity Integration Server (MIIS) 2003 is an add-on that helps you synchronize passwords (and more) between disparate directories. It runs only on Enterprise Edition. We touch upon MIIS 2003 in Chapter 3.
-
If your hardware supports it, you can hot-add memory to Enterprise Edition. That is, you can add memory to a server while it's running and allocate that memory to the rest of the server. Sexxxxy.
You can locate more of the differences between the server editions at Microsoft's website: www.microsoft.com/windowsserver2003/default.mspx . Specifically, there's a super-duper chart you can spy at www.microsoft.com/windowsserver2003/evaluation/features/compareeditions.mspx .
Lastly, if you cannot get your hands on a production copy of Windows 2003, you can order a free evaluation kit. It costs only a couple of bucks to have it shipped. The evaluation lasts 180 days for each server you build, and you can build as many test machines as you like, knock 'em down, and start your 180 countdown all over again. Order it at www.microsoft.com/windowsserver2003/evaluation/trial/evalkit.mspx .
Windows 2003 Requirements
Before you get crackin' with installation, make sure the hardware you're using fits the bill. Here are Microsoft's published minimums, and our suggested realistic use recommendations:
| Minimum Standard | Minimum Enterprise | Recommended Standard | Recommended Enterprise | Will Work for This Book | |
|---|---|---|---|---|---|
| CPU Type | Pentium II | Pentium II | Pentium III, 4, or M | Pentium III, 4, or M | Pentium III,C 4, or M |
| Speed | 133Mhz | 133Mhz | 1Ghz4Ghz | 1Ghz4Ghz | 800Mhz |
| RAM | 128MB | 128MB | 196MB-1GB | 256-1GB | 256MB |
| Disk | 1.5GB | 1.5GB | 4GB6GB for C; more for applications, data, etc. | 4GB6GB for C; more for applications, data, etc. | 4GB6GB for C; more for applications, data, etc. |
Windows XP Editions
Like its bigger, badder Windows 2003 brother, Windows XP also has several editions. At last count, there were five editions:
| Windows XP Edition | Where Used | Number of Processors Supported | Amount of RAM Supported |
|---|---|---|---|
| Home Edition | Home and networks without domains | 1 | 4GB |
| Professional Edition | Anywhere you want to authenticate to an Active Directory domain | 2 | 4GB |
| Media Center Edition | Bundled with specially enhanced media PCs (think TiVO-esque) | 1 | 4GB |
| Tablet Edition | Bundled with tablet-style laptops | 1 | 4GB |
There's a great overview of all the editions from Microsoft at www.microsoft.com/windowsxp/evaluation/compare.mspx .
For our purposes, there's really only one choice: Windows XP Professional. Windows XP Home cannot be a member of an Active Directory domain, nor get domain-based Group Policythe essential nutrients of a Windows 2003 domain.
| |
A Windows service pack is a several-hundred-megabyte file full of fixes and updates. As of this writing, Windows XP Service Pack 2 is current, as is Windows 2003 Service Pack 1. To that end, make sure you've got each of those on your test machines as you work through the exercises.
Sure you can, if you want, just load the service pack on after the operating system is already loaded. Or you can be super-cool and "embed" the service pack right onto the installation media! This is called slipstreaming .
To create your own slipstreamed installation CD, take a look at www.winsupersite.com/showcase/windowsxp_sp2_slipstream.asp .
You'll want to repeat similar steps for Windows 2003 with its Service Pack 1. Another great resource on slipstreaming and burning your own CD-ROMs can be found at www.petri.co.il/windows_2000_xp_sp_slipstreaming.htm .
| |
Windows XP Professional Requirements
Before we get crackin' with installation, let's make sure the hardware you're about to use fits the bill. Here are Microsoft's published minimums, and our suggested realistic use recommendations:
| Minimum | Recommended | Will Work for this Book | |
|---|---|---|---|
| CPU Type | Pentium II | Pentium III, 4, or M | Pentium III, 4, or M |
| Speed | 133Mhz233Mhz | 500Mhz+ | 800Mhz |
| RAM | 128MB | 1GB+ | 256MB |
| Disk | 1.5GB | 4GB+ | 4GB20GB for C; more for applications, data, etc. |
Beginning the Windows 2003 Installation
We'll assume you have a blank hard drive to start. That is, you have no other OSes previously installed. To start, you'll need to make sure your computer's BIOS is set to boot from the CD-ROM drive. At this point, you'll be able to step through each installation screen. Note that while we'll briefly describe each installation screen you should encounter, we won't show them all.
Once the computer's BIOS is set to boot from the CD-ROM, insert your Windows 2003 CD-ROM into the CD-ROM drive and turn the computer on.
Text-Based Setup Screens
For all the GUI power that Windows 2003 wields, it still has to be kick-started with some text-based setup screens. You'll start your journey in what looks like DOS. It isn't DOS, though. It's just enough Windows Server to get Windows GUI mode bootstrapped.
Welcome to Setup Screen
The Welcome to Setup screen appears as shown in Figure 1.2. Since we're assuming you have an empty machine, you can get started by pressing Enter.
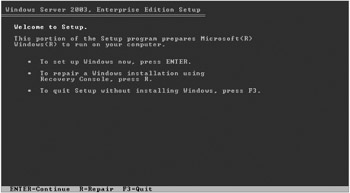
Figure 1.2: The Windows 2003 initial setup screen
Windows Licensing Agreement Screen
On this screen, you'll ever-so-quickly read the licensing agreement. (Yeah, right.) When ready, press F8 to continue. Why F8? Because after this screen, you're sealing your F8 (Fate, get it? Who says I'm not a conspiracy theorist?).
Partitioning Screen
In Figure 1.3, you can see where you can choose to utilize the entire first disk or partition it. Do what you will here; at the end of your dicing and slicing, though, be sure to have at least an 8GB partition for the C: drive.
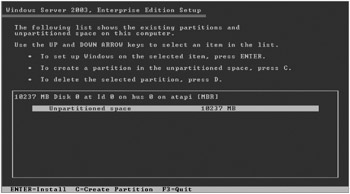
Figure 1.3: You can partition your hard drive here if desired.
| Note | For the purposes of this book, we won't concern ourselves with RAID, SAN, iSCSI, or other add-on hardware disk technologies. The point of this book is to demonstrate integration techniques, so we'll keep it simple with a simple disk configuration on a simple disk, like an IDE disk. |
Formatting Screen
Next, you'll see Windows 2003 format the partition. This can take several minutes to more than several minutes, depending on how large the disk is and how slow the hardware is.
Copying Screen
As you can see in Figure 1.4, Windows will start copying files to the hard drive to get enough Windows loaded to load "go GUI." This will be the last text-based setup screen you will see.
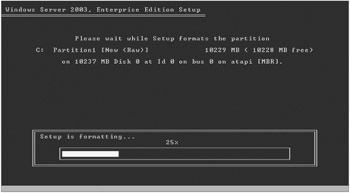
Figure 1.4: This is the last text-based setup screen.
Graphical-Based Setup Screens
At this point, you'll be presented with the remainder of the installation within a GUI, replete with mouse control.
Personalize Your Software Screen
On this screen you'll be able to type the "owner" of the software and the organization name . This has very little bearing on the operation of the OS. It's only displayed when you run a winver command to get some general statistics about the machine. These names don't have to match the name of your domain, or anything else for that matter. The name cannot be "Administrator," but everything else is fair game.
Your Product Key Screen
Ah the dreaded product key. For Microsoft, this is a necessary evil to prevent people from rampantly copying their software. Your key should be on the CD jacket that came with the software. Later in the process (once the server is fully installed), you'll have to activate your copy of Windows 2003. Indeed, you must even activate 180-day evaluation copies.
Licensing Mode
Depending on how you licensed Windows 2003, you can make your choice between "Per server" or "Per Device or Per User."
Per server mode In this mode, each inbound connection must have its own license (called a CAL, or Client Access License).
Per Device or Per User Each device or user that could possibly connect to the server must have its own license. Most organizations choose this mode because they have licensed Windows XP or Windows 2000 machines. If you're guessing which to use, use this mode.
Computer Name and Administrator Password
On this screen, shown in Figure 1.5, you'll be able to enter the computer name and a password. That password is for the explicitly named account of Administrator. In Windows, usernames aren't case sensitive. (In Linux, names are case sensitive.)
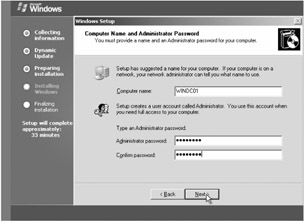
Figure 1.5: Enter the computer name and the Administrator password.
For the experiments presented in this book, call your Windows 2003 machine WINDC1 (though for readability, we'll type it as WinDC1). We also suggest that you set the password to p@ssw0rd . (That's an "at sign" as the second character and a zero for the letter O .) This password is strong enough for the default strength requirements for both Windows and Linux. When ready, click "Next."
Date and Time Settings
Make sure Windows sees the right time. Sometimes it doesn't pick up the computer's BIOS time correctly, or the BIOS clock is just plain wrong, so be sure the time zone settings are correct. You'll run some experiments later in the book which might not work if the time zone isn't correct. Additionally, a little later (when you perform some post-configuration settings), you'll ensure that the date and time stay in sync with some authoritative time source. Click "Next" when ready.
Networking Settings and TCP/IP Properties Page
At this point you'll be able to specify Typical Settings or Custom Settings. Typical settings mean that your server will try to request an IP address via DHCP. This isn't generally advised. Therefore, in this case, select Custom Settings, then proceed to change the TCP/IP settings to a static IP address. In our examples, you'll set WinDC1's IP address information as follows (as shown in Figure 1.6):
-
IP address: 192.168.2.226
-
Subnet Mask: 255.255.255.0
-
Default Gateway: 192.168.2.1
-
Preferred DNS Server: 192.168.2.226 (itself)
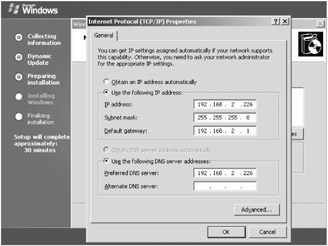
Figure 1.6: Enter the static IP information.
Yes, in this case, you're telling the Windows 2003 server to use itself as the "go to" place for DNS lookups. A little later, you'll set up the DNS service and tell that component to go out to the Internet for any queries that are outside your private DNS domains. But for now, this is fine.
When ready, click "OK", then click "Next" when back on the "Network Settings" page.
Workgroup or Computer Domain Screen
You'll next have the opportunity to join a domain or plunk yourself in a workgroup. For now, keep the machine in a workgroup. A little later (after the machine is fully up and running), you'll make this machine a domain controller. If you add subsequent workstations or servers to the domain later, you'll use this screen to join them to the domain you'll be creating.
Final Installation Screens
At this point, go get a cup of coffee. You've done the hard work and answered the barrage of questions Windows has pummeled you with. Windows takes a while to finish loading, and when it does, it prompts you to do what Windows does best: reboot!
Once rebooted, you'll be ready for post-installation tasks .
Post-Installation Tasks
At this point, you should be able to log on with the one account you createdthe Administrator. Again, case doesn't matter for the username, but it does for the password. Once entered and you're all logged in, you'll be able to complete several steps to set you on the right path for the rest of the book:
-
Install additional operating system components
-
Set up a DNS server
-
Form your Active Directory
-
Product activation
| Note | Once you log on for the first time, you might be presented with the Manage Your Server Roles Wizard. By and large, you won't use this wizard and will instead opt for the more traditional way of configuring our server. It's up to you if you want to check the check box that permanently tucks it away. |
Installing Additional Operating System Components
One of the first things you should do after your test server is up and running is set up the additional components. Heck, you may never use them, but they're good to have ready to go should you ever choose to partake. You'll do this via Window's Control Panel. Just go to Start ![]() Control Panel
Control Panel ![]() Add/Remove Programs. Once there, select "Add/Remove Windows Components." When you do, you'll see a list of available goodies as shown in Figure 1.7.
Add/Remove Programs. Once there, select "Add/Remove Windows Components." When you do, you'll see a list of available goodies as shown in Figure 1.7.
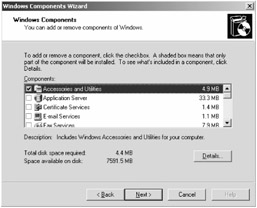
Figure 1.7: Here you can select the optional Windows components to use.
You are looking at the list of top-level options to select. In most of these top-level options, there are suboptions, too. Just double-click the words of the option (not the check box area)and you'll be able to dive in and see more stuff.
Here's what we recommend you select. You'll be using some, but not all, of the options in this book.
| Top-level Option | Default | Stuff to Choose within the Level | Why You Need It |
|---|---|---|---|
| Accessories and Utilities | Some on | As you wish. | Has calculator, Paint, other odds and ends. |
| Application Server | Off | Double-click inside and select Internet Information Services (IIS). Other options will automatically be selected once IIS is selected. | You'll use IIS in Chapter 10. |
| Certificate Services | Off | You'll install this in Chapter 3. Stay tuned . | You'll use this in Chapter 3 to secure your traffic to Active Directory. |
| E-mail Services | Off | None for this book. | Windows 2003 has a basic POP3 server. We'll talk about Exchange in Chapter 6. |
| Fax Services | Off | None for this book. | You can set Windows 2003 as a fax gateway. |
| Indexing Services | Off | None for this book. | Enables fast-find searches within Windows. |
| Internet Explorer Enhanced Security Configuration | On | De-select this. Yes, turn this off. | If left on, this component warns you each and every time you visit a new site. Might be useful in production environments, but not necessary for our purposes. |
| Management and Monitoring Tools | Off | None for this book. | Contains some networking services including a packet sniffer (Network Monitor). |
| Networking Services | Some on | Double-click inside and select the following services: Domain Name System (DNS) (this should have already been selected while creating your Active Directory), Dynamic Host Configuration Protocol (DHCP) (we'll talk about this in Chapter 10), Windows Internet Name Service. | Provides the basic services you need to provide plumbing on your Windows network. |
| Other File and Print Services | Off | Double-click inside and select Print Services for Unix. We'll talk about it in Chapter 4. | Will allow Unix printers to print via Windows. |
| Remote Installation Services | Off | None for this book. | Allows you to build a machine from bare metal via PxE boot. |
| Remote Storage | Off | None for this book. | Provides a mechanism to offload older files to, say, tapes or rewritable optical disks. |
| Security Configuration Wizard | Off | None for this book. | If you installed 2003 + SP1, this wizard helps secure your system. |
| Terminal Server (and Terminal Server Licensing) | Off (for now) | Don't select this now. | We'll talk about Terminal Services in Chapter 8. |
| UDDI Services | Off | None for this book. | An additional component for distributed web services |
| Update Root Certificates | On | None for this book. | Automatically downloads certificates for well-known certificate vendors (Verisign, etc.). |
| Windows Media Services | Off | None for this book. | Allows you to host streaming media using Windows 2003. |
Installing Windows 2003 + SP1
If you didn't perform a slipstreamed installation of Windows 2003 + SP1, now is an excellent time to load SP1. It provides a bajillion little bug fixes, plus it adds some security.
You can download the several-hundred-megabyte patch from www.microsoft.com . At last check it was at www.microsoft.com/windowsserver2003/downloads/servicepacks/sp1/default.mspx . If it changes, just search the Microsoft website for "Windows 2000 Service Pack 1." Installation is easy; just double-click the file to open it and follow the wizard along. It will force you to create an "uninstall" directory, which by itself will also create several hundred megabytes. In short, be sure your C drive has at least 2GB free space before you get started.
Once finished, you'll be forced to reboot. Do so and log back in.
| |
In my experience, installing Windows XP and Windows 2003 works pretty darn well, but I have seen Windows installations fail. Less often than going full belly-up, I've seen a certain portion of the computer not work properly. Here's how to start to troubleshoot Windows installations:
BIOS Upgrades Most modern computers have the ability to have the BIOS flash upgraded. That is, you simply download it from the manufacturer, pop it on a floppy, reboot, and voilupdated BIOS. If you have a failed Windows installation, go ahead and give it another shot.
ACPI Enabled or Disabled ACPI is the specification for how power management should be handled. Many computers' BIOSes have the option to turn ACPI on or off. If Windows fails to install, try flipping it: On to Off or Off to On.
Drivers Windows might load, but the wired or wireless network won't start. Or Windows will load, but the video drivers are all whacked out. The usual reason for Windows failing to load is almost always some driver incompatibility . Sometimes Windows will make a best guess at what the driver is and try it as the closest match. Better still, before you start, determine the specific brands of hardware you usenetwork, video, wireless, sound, etc.and have all the drivers ready to go on floppies so you can tell Windows what to use when the time comes or after Windows is fully installed.
System Tools Additionally, many computer manufacturers, such as Dell and HP, have add-on system tools specifically for Windows. Even motherboard manufacturersthe kinds that white-box system builders usemake chipset downloads available specifically for the operating system you are using. With the use of these system tools or chipset downloads, I've seen Windows go from dog s-l-o-w to downright awesome !
We hope you won't need any of these tipsWindows will just install, and you'll be ready to roll!
| |
| | ||
| | ||
| | ||
EAN: N/A
Pages: 71