Flylib.com

Books Software


10.2 Importing a protected servlet application

 < Day Day Up > 

10.2 Importing a protected servlet application

In this section, you will import a previously created Treasure servlet. This servlet will be the back-end secure resource you will access using Credential Vault. The servlet displays a simple image and is only accessible via HTTP basic authentication.

The Treasure servlet application is in c:\LabFiles\CredentialVault\SecureServlet\CredentialVault_TreasureWeb.war.

Note : The sample scenario included in this chapter requires that you download the sample code available as additional materials. See Appendix C, "Additional material" on page 543.

Follow these steps to import the secure servlet:

  1. If required, start WebSphere Studio Site Developer.

  2. Switch to the Web perspective.

  3. From the main menu, select File -> Import... .

  4. Select WAR file and click Next .

    Figure 10-5. Importing a WAR file

    graphics/10fig05.jpg

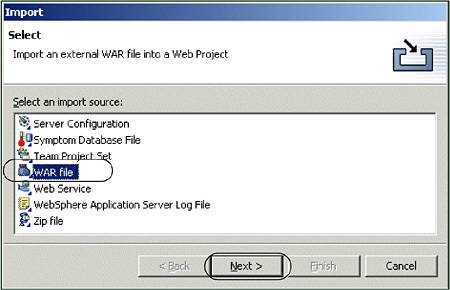
  5. Browse to the location of the TreasureWeb.war file in c:\LabFiles\CredentialVault\SecureServlet\CredentialVault_TreasureWeb.war.

    Note : The sample scenario included in this chapter requires that you download the sample code available as additional materials. See Appendix C, "Additional material" on page 543.

  6. Enter a new Web project name of TreasureWeb and a new enterprise project name of TreasureEAR .

    Figure 10-6. Import the Treasure WAR file

    graphics/10fig06.jpg

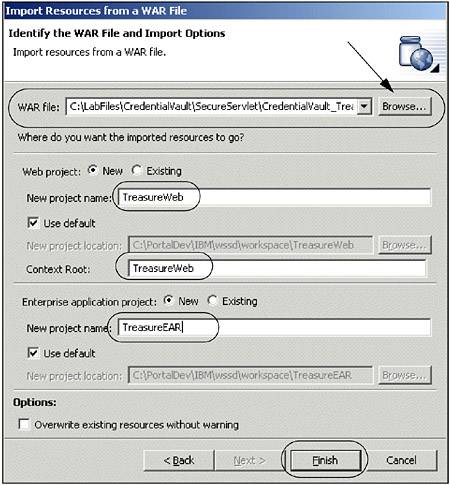
  7. Click Finish to import the application (secure servlet WAR file).

After importing the WAR file, a new Web and enterprise project exist in your project. Now you can test the servlet to check that it is running properly.

To test the servlet, proceed as follows :

  1. In the J2EE Navigator view, expand the TreasureWeb/Java Source/treasure package.

  2. Right-click TreasurePage.java and select Run on server ... from the context menu.

  3. Click OK to create a new server using Test Environment and wait for a few minutes until the portal starts for e-business and the servlet is executed.

    Note : If you are not prompted to create a new server, you can always create a new server as follows:

    1. In the Server Selection dialog, click Advanced... .

    2. In the Advanced Server Selection dialog, check Create a New Server and select WebSphere Version 5.0 Test Environment as the server type. Click Finish . This is illustrated in Figure 10-7.

      Figure 10-7. Select a WebSphere V5.0 Test Environment to run the servlet

      graphics/10fig07.gif

    Note : Because you are only using the Web container of the application server, you can also select a WebSphere Version 5.0 Express Test Environment if it is available.

  4. The internal Web browser opens. Because this servlet is secured, you have to enter a user name and password. Enter user1 as the user name and password1 as the password.

    Figure 10-8. Basic authentication

    graphics/10fig08.jpg

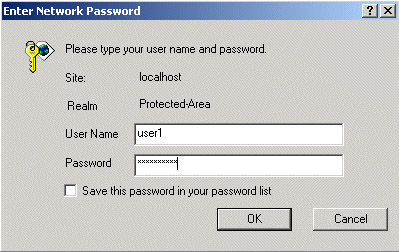
  5. Click OK . Now the browser should show the treasure servlet. See Figure 10-9.

    Figure 10-9. Running the secured servlet

    graphics/10fig09.jpg

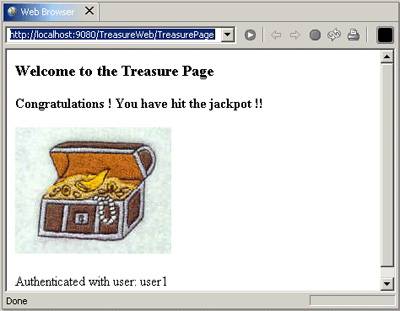
  6. From the Servers view on the bottom of WebSphere Studio, select the WebSphere V5 Test Environment server and click the red Stop button to stop the server.

 < Day Day Up > 
 < Day Day Up > 

10.3 Using active credentials

After importing and testing the protected servlet, you will build a portlet application accessing the Treasure servlet and using active credential objects.The portlet will be created based on the Basic portlet type and will demonstrate the use of credentials. Once the project is created, you will run it in the WebSphere Portal Test Environment to view it.

Creating the Credential Vault portlet application

To create the new portlet project, follow these steps:

  1. Switch to the Portlet perspective ( Window -> Open Perspective ).

  2. Select File -> New -> Other .

    Figure 10-10. Invoking New Project wizard

    graphics/10fig10.jpg

  3. Select Portlet development -> Portlet application project . Click Next .

    Figure 10-11. Creating a new portlet application

    graphics/10fig11.jpg

  4. In the Define the Portlet Project page, enter a project name of CredVaultBasicAuth and click Next .

    Figure 10-12. Define the Portlet Project

    graphics/10fig12.jpg

  5. In the J2EE Settings Page, leave the defaults and click Next .

  6. In Portlet Settings, accept all values. Click Next .

  7. In Event Handling, uncheck Add form sample so that only Add action listener is checked. Click Next .

    Figure 10-13. Event Handling page of New Portlet Application wizard

    graphics/10fig13.jpg

  8. In the Single Sign-On page, check Add credential vault handling and enter a slot name of TreasureCredentialSlot . Click Next .

    Figure 10-14. Single Sign-On page of the new portlet application wizard

    graphics/10fig14.jpg

  9. Since no additional markups and no additional modes will be supported in this scenario, click Finish to generate the portlet. After a few minutes, the portlet deployment descriptor of the new portlet application opens.

Reviewing the generated code

Before the portlet code is modified to access the secure portlet, let's examine the wizard generated code.

If you expand the credvaultbasicauth package in the Source folder of the new project, you can see a CredVaultBasicAuthSecurityManager class in addition to the portlet and bean classes. This class is responsible for initializing the Credential Vault service and administering the credentials.

Figure 10-15. Reviewing CredVaultBasicAuthSecurityManager class

graphics/10fig15.jpg

The following methods are provided in this class to handle Credential Vault issues:

  • The init method of this class initializes the vaultService data member.

  • getCredential returns the user name and password by using a string buffer.

  • setCredential sets the user name and password.

  • getSlotld returns the ID of the slot. Depending on the type of slot, this method uses PortletData or VaultService to get the ID.

  • New slots are created in the createNewSlot method.

  • getPrincipalFromSubject retrieves the specified Principal from the provided subject.

  • isWritable checks whether the password can be saved.

The wizard has also created an input form for a user ID and password in the CredVaultBasicAuthPortletEdit.jsp. As previously described, when clicking the Save button, the actionPerformed() method in the portlet class is called. This method retrieves the user ID and password from the form and uses the security manager class to set the credentials.

The current version of the doView method retrieves the user credentials from the security manager and displays them in the JSP. Because we want to include the content of the secured Treasure servlet, we will replace this method in the next section of this scenario.

10.3.1 Updating the generated portlet

Modify the portlet application as follows :

  1. Open CredVaultBasicAuthPortletSecretManager from the credvaultbasicauth package.

  2. Using the Java editor, add the method shown in Example 10-1 to the class. The method can be found in the c:\LabFiles\CredentialVault\Snippets folder.

    Note : The sample scenario included in this chapter requires that you download the sample code available as additional materials. See Appendix C, "Additional material" on page 543.

    You may want to use WordPad to edit getConnectionUsingActiveObject.java and then copy and paste.

    Note : The getConnectionUsingActiveObject method returns an http connection.

    Example 10-1. getConnectionUsingActiveObject method (active credentials)
    
    public static HttpURLConnection getConnectionUsingActiveObject(
    
    
    PortletRequest portletRequest,
    
    
    CredVaultBasicAuthPortletSessionBean sessionBean,
    
    
    String host, String port, String path) {
    
    
    HttpURLConnection connection=null
    
    ;
    
    try {
    
    
    URL urlSpec =
    
    
    new URL("http://" + host + ":" + port + path)
    
    ;
    
    String slotId = getSlotId(portletRequest, sessionBean, false)
    
    ;
    
    if (slotId != null) {
    
    
    HttpBasicAuthCredential credential =
    
    
    (HttpBasicAuthCredential) vaultService.getCredential(
    
    
    slotId,
    
    
    "HttpBasicAuth",
    
    
    new HashMap(),
    
    
    portletRequest)
    
    ;
    
    connection = credential.getAuthenticatedConnection(urlSpec)
    
    ;
    
    }
    
    
    } catch (Exception e) {
    
    
    e.printStackTrace()
    
    ;
    
    }
    
    
    return connection
    
    ;
    
    }
    
    
  3. Some code errors appear because the required import statements are missing. To fix these errors, right-click the Java editor and select Source -> Organize Imports .

  4. In the Organize Imports dialog, choose

    1. java.net.HttpURLConnection

    2. select java.net.URL

    Click Finish to close the Organize Imports dialog.

    Figure 10-16. Importing missing import statements using Organize Imports tool

    graphics/10fig16.gif

  5. Save and close the Java file.

  6. Open the class CredVaultBasicAuthPortlet from the credvaultbasicauth package.

  7. Replace the doView method so it looks as shown in Example 10-2 on page 337. You may want to copy and paste from c:\LabFiles\CredentialVault\Snippets\doView.java.

    Note : The sample scenario included in this chapter requires that you download the sample code available as additional materials. See Appendix C, "Additional material" on page 543.

    Example 10-2. The doView method uses a Http connection from the SecretManager class
    public void
    
    doView
    
    (PortletRequest request, PortletResponse response)
    
          throws PortletException, IOException {
    
          // Check if portlet session exists
    
          CredVaultBasicAuthPortletSessionBean sessionBean =
    
             getSessionBean(request);
    
          if (sessionBean == null) {
    
             response.getWriter().println("<b>NO PORTLET SESSION YET</b>");
    
             return;
    
          }
    
          // get output stream to write the results
    
          PrintWriter writer = response.getWriter();
    
          // get the CredentialVault PortletService
    
          PortletContext context = this.getPortletConfig().getContext();
    
          try {
    
             String host = request.getServerName();
    
             //String host = request.getRemoteHost();
    
             String port = String.valueOf(request.getServerPort());
    
             String path = "/TreasureWeb/TreasurePage";
    
             HttpURLConnection connection =
    
    CredVaultBasicAuthPortletSecretManager.getConnectionUsingActiveObject
    
    (
    
                    request, sessionBean, host, port, path );
    
             if (connection != null) {
    
                connection.connect();
    
                String responseMessage =  connection.getResponseMessage();
    
                int responseCode = connection.getResponseCode();
    
                // Were we successful?
    
                if (HttpURLConnection.HTTP_OK == responseCode) {
    
                   writer.println("<P>Successfully connected!</P>");
    
                } else {
    
                   writer.println(
    
                      "<P>Unable to successfully connect to back end."
    
                         + ", HTTP Response Code = " + responseCode
    
                         + ", HTTP Response Message = \"" + responseMessage
    
                         + "\"</P>");
    
              }
    
              BufferedReader br =
    
                 new BufferedReader(
    
                    new InputStreamReader(connection.getInputStream()));
    
              String line;
    
              while ((line = br.readLine()) != null)
    
                 writer.println(line + "\n");
    
           } else {
    
              writer.println(
    
              "<h2>Credential not found. Please set it in the edit mode!
    
    </h2>");
    
              return;
    
             }
    
           } catch (IOException exc) {
    
              writer.println(
    
                 "<h2>Single-sign-on error, login at back-end failed! </h2>");
    
              return;
    
           }
    
       }
    
  8. Organize the import statements as you did before.

  9. Save and close the Java file.

Important : If you get a message indicating that getConnectionUsingActiveObject() is undefined, try making a small modification to the file and enabling the save option. Save the file again. This procedure should resolve any pending undefined issues.

10.3.2 Running the portlet

In this section, you will run the portlet using active credentials to access the back-end resource, a protected servlet in this case.

  1. Close any open browser viewers .

  2. Switch to the Portlet perspective.

  3. In the Server Configuration view, right-click the Servers folder and choose New -> Server and Server Configuration .

    Figure 10-17. Creation of a new server

    graphics/10fig17.jpg

  4. In the Server Selection dialog, choose a server of the WebSphere Portal V5.0 Test Environment and enter a server name of WPS 5.0 . Click Finish to add the new server.

    Figure 10-18. Create a new WebSphere Portal Test Environment

    graphics/10fig18.jpg

  5. Add the Treasure servlet to the portal test environment, right-click the WPS5.0 server and choose Add -> TreasureEAR .

    Figure 10-19. Add Treasure servlet and CredVault portlet to portal test environment

    graphics/10fig19.jpg

  6. Repeat the previous step to add the DefaultEAR to the portal Test Environment. This will also add the CredVaultBasicAuth portlet to the server.

  7. In the J2EE Navigator view select CredVaultBasicAuth , choose Run on server and wait a few minutes for the Portal server to open for e-business. This will start the server and will also open a browser displaying the portlet.

    Figure 10-20. Selecting Run on Server... to test the portlet.

    graphics/10fig20.jpg

  8. The portlet will execute the initConcrete method to initialize the Credential Vault Service and the doView method. Since there are no credentials yet, a message is displayed.

  9. Switch to the Edit mode and enter the following information:

    - User ID: user1

    - Password: password1

  10. Submit the action. This will generate an action that will be checked by the actionPerformed method in the CredVaultBasicAuthPortlet class. The portlet returns to View mode, showing the contents of the Treasure Servlet.

  11. In the Servers view, stop the running portal server.

    Figure 10-21. The CredentialVault portlet in action

    graphics/10fig21.gif

 < Day Day Up >