Message Loop Examples
In this section I'll present three examples that illustrate the topics I've been discussing. One example will illustrate directly handling Windows messages in your code, while the other two examples are concerned with writing multithreaded applications using Control.BeginInvoke() to communicate with the main UI thread. The first of these two examples illustrates how to provide information about initialization of the application where this takes a while, and the second illustrates a long operation performed on a background thread which the user can abort at any time - both of these are common tasks which do require the use of multithreaded techniques in conjunction with the message loop in order to implement in a way that does not interfere with application responsiveness.
Directly Handling Messages
This example illustrates how you can write code that directly responds to Windows messages in the windows procedure for a control.
The usual technique for doing this is to override the protected method, Control.WndProc(). WndProc() (and various other methods that it in turn invokes) is the method that provides much of the processing for the control's windows procedure - it is the method that decides what to do with each message. It's not quite true to say that WndProc() is the windows procedure for the control, since the actual windows procedure has to be unmanaged code. But the real windows procedure quickly calls into WndProc() to do the processing, so we won't be far wrong if we informally think of WndProc() as the windows procedure. It takes an instance of the the System.Windows.Forms.Message valuetype as a parameter - Message directly wraps the C MSG struct.
The message our example is going to handle is WM_QUERYENDSESSION, and the example will be a short program that, depending on the user settings, might refuse to close itself down when the system is either shutting down or when the user is logging out, thus preventing the shutdown or logout. You might want an application to do this, for example, if it is coming to the end of some long processing or there is some reason why shutting down now might cause some important data to be lost or corrupted.
The example is called DontWantToClose, and when running it looks something like this.
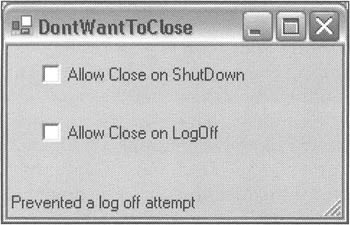
If the user explicitly closes the example (such as by clicking on the close button in the title bar) the example always closes normally. However, if the system attempts to shut down or log off the user, then the application will only close if the user has checked the appropriate check box. Otherwise, the application will refuse to close, and display a message in its status bar explaining what it's just done. The screenshot here shows the example immediately after I started it running then tried to log off.
To understand the action of the example, we need a bit of background about how windows applications are normally closed. If the application itself has chosen to close then it will normally post a WM_CLOSE message to its message queue. The usual handler for this sorts out the details of shutting the application down. On the other hand, if the system is logging out or shutting down, then there is no WM_CLOSE message: Instead, Windows will post a WM_QUERYENDSESSION message to every running application that has a message loop. (The lParam field of this message indicates whether the end of session is due to a shutdown or logoff. If the user is logging off, then the leftmost bit of the lParam field, the bit with hex value 0x80000000, will be set to one). The windows procedure should be implemented to return one if the application is happy to close, and zero if that's not OK. (In order to keep the earlier discussion simpler, I didn't talk about return values from the windows procedure earlier - in fact the windows procedure does return a value to Windows). A well-behaved application will of course, if it has any unsaved data, display a dialog asking the user what to do and will return zero if the user indicates that the application shouldn't be closed. If just one running application returns zero in response to WM_QUERYENDSESSION, then the system will abandon its shutdown/logoff attempt. However, if all the running applications indicate they are happy to shut down, then Windows will set about posting WM_ENDSESSION messages to them, informing them that it is going ahead and ending the session.
For Windows Forms applications, the normal way that you get to feed in any code into the process of closing is by handling the Closing and Closed events. The Closing event handler takes a CancelEventArgs parameter which you can use to cancel the process of closing the application:
private void Form1_Closing(object sender, CancelEventArgs e) { // Probably have code to display a dialog box here if (ItsNotOKtoCloseTheApp()) e.Cancel = true; } The trouble is that Closing is a high-level event provided by the Form class, and it is not able to distinguish between the different reasons why the form might be closing. This same Closing event will be raised whether the user is trying to close the application, the application has encountered an internal error, or the session is ending - there's no way to tell from the handler what the situation is. That's a sensible simplification the Control class has implemented because for most applications that information is not going to be relevant. However, if you do need to know the reason why the application is being asked to shut down (and take some custom action depending what the reason is) then you'll need to override the main form's Control.WndProc() method to look for the WM_QUERYENDSESSION message and take appropriate action.
After all that information, the actual coding we need to do for the example is relatively simple. We just create the example as a Windows Forms application and add the controls to it that you can see in the screenshot. I've named the checkboxes cbAllowCloseShutdown and cbAllowCloseLogOff.
We need to add a couple of constant member fields to the Form1 class.
public class Form1 : System.Windows.Forms.Form { const uint WM_QUERYENDSESSION = 0x011; const uint ENDSESSION_LOGOFF = 0x80000000; 0x11 is the value that identifies that a message is the WM_QUERYENDSESSION, while ENDSESSION_LOGOFF is the bitwise flag that identifies a logoff session in the lParam field of the message. These constants will allow us to refer to this data by name in the code. As we remarked earlier, these constants can all be found in the WinUser.h C++ header file, located in the VC7/PlatformSDK/include subfolder of your VS.NET installation folder. This file defines the values for all the common Windows messages - so this is where you'll need to look for these values if you find yourself needing to manipulate messages directly.
Next here's our override of WndProc():
protected override void WndProc(ref Message msg) { if (msg.Msg = = WM_QUERYENDSESSION) { if (((int)msg.LParam & ENDSESSION_LOGOFF) > 0) { if (!this.cbAllowCloseLogOff.Checked) { msg.Result = IntPtr.Zero; this.statusBar.Text = "Prevented a log off attempt"; return; } } else { if (! this.cbAllowCloseShutdown.Checked) { msg.Result = IntPtr.Zero; this.statusBar.Text = "Prevented a shutdown attempt"; return; } } } base.WndProc(ref msg); }
And that is all the code we need for the example. Our WndProc() override first tests to see if the message is WM_QUERYENDSESSION - this data is available as the Msg field of the Message structure. If so, then we need to check whether the end of session is due to a shutdown or a log off, and compare with the state of the check boxes to see if we permit the end of session request. If it's OK for the session to end then we don't need to do any custom actions - we call the base class's WndProc() method to allow the message to be handled normally, just as we do for any other message. On the other hand, if the code finds it does need to block the shutdown request, then it displays an appropriate message in the status bar, and sets the Result field of the Message structure to zero. The Result field is an artifact of .NET, and does not exist in the original message. It contains the return value the windows procedure should return. Recall that the true windows procedure returns an integer, but you'll notice Control.WndProc() is defined as returning void - Message.Result is the way that the Control class knows what to do with the "real" windows procedure.
If you download and run this example, you'll need to run it without VS.NET to get correct results. That's because, if you run it from VS.NET and attempt to shutdown or logoff, you're likely to find that VS.NET receives a WM_QUERYENDSESSION message before the running example does - and this may interfere with the operation of the example because VS.NET might itself decide to kill the example in response to the end of session, before the example ever receives any WM_QUERYENDSESSION.
BeginInvoke() Example - Initializing an Application
In this section we'll develop a short program that illustrates how you can use BeginInvoke() to have a method processed on the message loop. And this example actually illustrates a situation in which BeginInvoke() is a very useful technique. We suppose that there is some processing that the application needs to do at start up time. And we'll further suppose that because this processing takes a couple of seconds, we want to display progress information, so the user is reassured that something is happening. Where could you put the code that displays that information? You could display a dialog box before the main application starts up, similar to a splash screen - that's one solution. But you might feel that a separate, prior, dialog looks messy - in some cases you might feel it would be neater for the information to appear in the main form after it's appeared. If you do that then you'll ideally need to perform the initialization on a separate worker thread - because of tying up the UI. You might think that tying up the UI doesn't matter if the application is still initializing - but the problem is that the user might still want to do things like move or resize the main form. By using a background thread, we ensure that this is still possible. At the same time, by having the background thread use BeginInvoke() to update the UI to give progress reports, we ensure that all actual UI operations are performed from the main thread, and that we don't therefore run into thread synchronization issues associated with methods on Control not being thread safe.
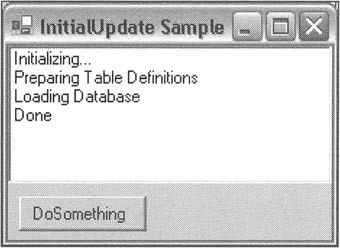
Our example is called InitialUpdate, and consists of a Windows form with a list box called lbInitData. When the application starts up, the following gradually appears in the list box over the first few seconds:
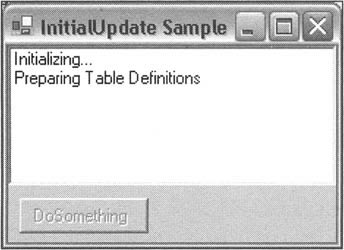
Notice that the DoSomething button is disabled - representing the fact that until the application is initialized, much of its functionality is going to be disabled. As soon as the initialization is complete, the button is enabled.
Of course, there are no database tables in the example. The example follows the same trick that I used frequently in Chapter 10, and will use in several other examples through this chapter: it uses Thread.Sleep() to simulate an operation that takes some time to complete. Note also that the DoSomething button is initially disabled from the Properties window.
The form's Load event handler is the ideal place from which to spawn the worker thread to perform the initialization, because the form actually appears as soon as this handler has executed:
private void Form1_Load(object sender, System.EventArgs e) { Thread initThread = new Thread(new ThreadStart(Initialize)); initThread.Start(); }
Here is the Initialize() method that performs the initialization on the worker thread:
private void Initialize() { this.BeginInvoke(new AddItemDelegate(AddItem), new object[] { "Initializing..." }); Thread.Sleep(1500); this.BeginInvoke(new AddItemDelegate(AddItem), new object[] { "Preparing Table Definitions" }); Thread.Sleep(1500); this.BeginInvoke(new AddItemDelegate(AddItem), new object[] { "Loading Database" }); Thread.Sleep(1500); this.BeginInvoke(new AddItemDelegate(AddItem), new object[] { "Done" }); this.BeginInvoke(new ReadyFormDelegate(Donelnitialize)); }
This method itself invokes (via delegates and Control.BeginInvoke()) two other methods, AddItem(), and DoneInitialize().These methods respectively update the progress report and do whatever final processing is necessary in order to make the application ready for use (enable the DoSomething button). AddItem() and its associated delegate look like this:
private delegate void AddItemDelegate(string item); private void AddItem(string item) { lbInitData.Items.Add(item); }
Notice that when calling BeginInvoke(), we have packed the string expected by AddItem() into an object[] array - BeginInvoke() will unpack this array. It might look inefficient but it means that BeginInvoke() can be used to invoke any method, no matter what parameters that method takes.
Now for the DoneInitialize() method:
private delegate void ReadyFormDelegate(); private void DoneInitialize() { this.button1.Enabled = true; }
Abort Dialog Example
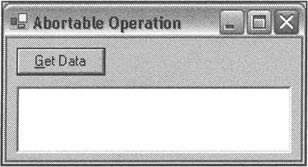
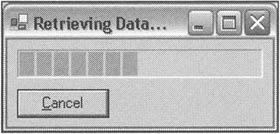
The example we develop here is similar to the last one to the extent that it involves spawning a background thread and having this background thread call BeginInvoke() to pass UI operations back to the main thread however, this example is considerably more complex. It simulates the situation in which the user has asked a Windows Forms application to perform some lengthy operation, and we want the user to have the option to cancel the operation if it takes too long. The example looks like this when it starts up:
When the user clicks on Get Data, the form starts up a background thread, which retrieves the data. A series of consecutive Thread.Sleep() calls means that this operation will take approximately 10 seconds. However, the user is informed of the progress of the operation by a dialog featuring a progress bar control, which is updated frequently:
When the operation has finished, the dialog disappears and the data appears in the text box of the main form. As in previous examples, I've just put in a hard-coded string as the result:

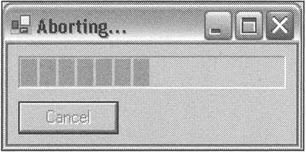
However, what is novel about this application is that while the asynchronous operation is in progress, the user can at any time abort it by hitting the Cancel button. And just to make it even more realistic, we assume that it's not possible to cleanly abort the operation instantaneously - perhaps database connections need to be closed. So another Sleep() statement forces a one-second delay before the asynchronous worker thread can terminate properly. The operation is aborted by using the Thread.Abort() method, which will - as we saw in Chapter 9 - cause a ThreadAbortException to be thrown on the worker thread, so that the thread cleans up data. While the thread is aborting, the dialog remains visible, but with the button now disabled, and with a different caption:
In a real application, you may or may not want the dialog to remain visible in this situation, depending on whether or not there is some reason (such as resources tied up by the aborting thread) that would make it difficult for the application to continue normally until the thread has terminated.
The great thing about this application is that because the worker thread uses events (delegate events, not thread synchronization events) and the Windows message loop to communicate with the main thread, I've been able to design the application in such a way that there are no member fields that are at risk of being accessed simultaneously by more than one thread. Hence we don't actually need to use any thread synchronization objects anywhere! The same was true of the previous example, but it's more remarkable for this example in view of the greater complexity of the interaction between the threads.
To create the application, I created a standard Windows Forms application and added the text box and button to the form. I also used the VS.NET wizards to add a second form, and added the progress bar control and button to it.
We'll deal with the code inside the second dialog, which I've called AbortDialog, first, since that's where the simplest code is. The dialog has a member field called mainForm that references the main application form, which is initialized in its constructor:
public AbortDialog(Form1 mainForm) { // // Required for Windows Form Designer support // InitializeComponent(); this.mainForm = mainForm; }
I've also added a public method called SetProgress() which sets the progress bar to indicate the required progress (as a percentage - the progress bar defaults to the usual values of 0=no progress, 100=maximum). This method will be called by the worker thread:
public void SetProgress(int progress) { int increment = progress - progressBar1.Value; Debug.Assert(increment >= 0); this.progressBar1.Increment(increment); }
Finally, here's the event handler called if the user clicks the Cancel button:
private void btnCancel_Click(object sender, System.EventArgs e) { btnCancel.Enabled = false; mainForm.CancelAsyncOperation(); }
CancelAsyncOperation() is a method I've implemented in the Form1 class, which - well - does what its name says. We'll look at this method in a moment. First, let's look at a couple of member fields:
public class Form1 : System.Windows.Forms.Form { private Thread backgroundThread; private AbortDialog abortDialog; private System.Windows.Forms.Button btnData; private System.Windows.Forms.TextBox tbData; I'm sure you can guess what these fields will be storing. This code also tells us the names I've given the button and textbox: btnData and tbData.
Now this is what happens on the main thread when the user clicks the button:
private void btnData_Click(object sender, System.EventArgs e) { this.tbData.Clear(); ThreadStart entryPoint = new ThreadStart(RetrieveData); workerThread = new Thread(entryPoint); workerThread.Start(); abortDialog = new AbortDialog(this); abortDialog.Show(); }
Basically, the main thread clears out the text box and starts up the new worker thread, indicating a method called RetrieveData() as the entry point. Then we show the AbortDialog as a modeless dialog. Notice that the dialog is shown on the main thread - this is important. The new dialog is being run not only on the same thread but through the same message loop as the main form, as normally happens for dialog boxes. The fact that we have a separate thread doing background work doesn't change any of that.
Now let's look at the method that the worker thread has set off to retrieve the data:
private void RetrieveData() { try { for (int i=5 ; i<=100 ; i+=5) { Thread.Sleep(500); SetProgressDelegate setProgress = new SetProgressDelegate(abortDialog.SetProgress); BeginInvoke(setProgress, new object[] {i}); } string [] results = new String[1]; results[0] = "Wrox Press is a book publisher"; ResultsReturnedDelegate resultsReturned = new ResultsReturnedDelegate(this.OnResultsReturned); BeginInvoke(resultsReturned, results); } finally { // Simulate it takes a short time to and clean up resources Thread.Sleep(1000); } }
The thread enters a try block, where a for loop ensures that the progress bar is updated every half a second (500 milliseconds). After 20 iterations, or 10 seconds, the result is here. We inform the main thread of both the progress updates and the final result by calling BeginInvoke(). Recall that internally this will cause a message to be posted to the message loop that is executing on the main thread, causing the main thread to pick up the method supplied as soon as the main thread can process another message. The method we ask to be called to display the final results is a method called OnResultsReturned(), which we'll examine soon. The delegates used to wrap this method and the AbortDialog.SetProgress() method are defined in the Form1 class like this:
private delegate void SetProgressDelegate(int i); public delegate void ResultsReturnedDelegate (string result);
Notice that we pass the string that represents the result into the EventArgs. This means that the string has been instantiated on the worker thread and will then be read on the main thread. However, we don't need to do any thread synchronization because string is immutable.
The finally block of this method contains the Sleep() call to simulate the time taken - for example - to destroy database connections.
Now there are two things that can happen: either the user can cancel the operation, or the operation can finish normally, causing the OnResultsReturned() method to be called. Let's examine what happens if the user cancels the operation first. Recall that the event handler for the Cancel button invokes the Form1.CancelAsyncOperation() method. Here's what happens in that method:
public void CancelAsyncOperation() { Debug.Assert(abortDialog != null); backgroundThread.Abort(); abortDialog.Text = "Aborting..."; backgroundThread.Join(); abortDialog.Close(); abortDialog.Dispose(); }
The first thing that the main thread (which will be the thread executing this method) does is to tell the worker thread to abort. Then it changes the text of the dialog box, and calls Thread.Join() to wait for the background thread to finish aborting. Once the background thread has cleaned up its resources and gone, the main thread closes the dialog box.
Now suppose the background thread runs to completion. In that case, the call it makes to Control.BeginInvoke() will cause this method to be executed from the message loop on the main thread:
public void OnResultsReturned(string result) { this.tbData.Text = result; this.abortDialog.Close(); this.abortDialog.Dispose(); }
As you can see, this method simply displays the result in the text box and closes the dialog box. Notice that in this case we don't use Thread.Join() to wait for the background thread since the background thread isn't doing any more lengthy work.
With that we have now completed our examination of the Windows message loop and how to use the message loop in conjunction with multithreading. The remainder of this chapter will now examine ways in which you can improve the visual appearance of your applications.
EAN: 2147483647
Pages: 124