2.1 Creating Classes
| < Day Day Up > |
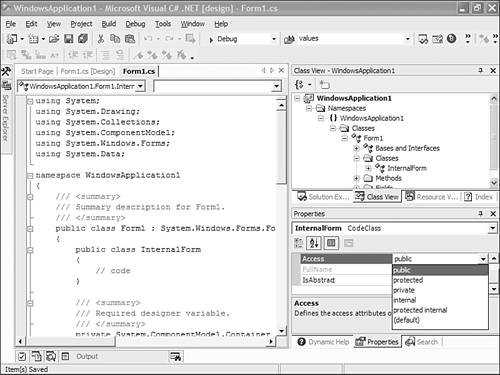
TechniqueTo create a new class using the Visual Studio .NET IDE, click select Project, Add Class (Alt+P,C). In the Name field, change the default filename, which is something similar to Class1.cs , to a more suitable name. The name you put in this field will be the name of the class you want to create. CommentsListing 2.1 shows the class that was generated for a Television object. Currently, the television is broken because we haven't added any type of behavioral aspects to it; that comes later. One of the first things you'll notice is that the wizard placed the class within the same namespace as the class that was generated for the entry point. For this example, you can leave the namespace as it is, but in the future, you might want to change it to accurately reflect the organizational structure of your project. Listing 2.1 Creating the C# Television Class using System; namespace _1_Classes { /// <summary> /// Summary description for Television. /// </summary> public class Television { public Television() { // // TODO: Add constructor logic here // } } } Following the declaration of the namespace your class belongs to are three lines used for automatic code-report generation, which is covered elsewhere in this book. Next you see the actual class declaration. A simple class definition consists of an access modifier, the class keyword, and the name given to the class by the programmer. Access modifiers control the accessibility of classes or who can use the class. In Listing 2.1, the Television class is a top-level type, which means that other than the namespace, it is not nested within another type. Therefore, the only access modifiers that are allowed are public and internal . Public access to a type means that any code that wants to access that type is free to do so, ignoring code security issues for now, of course. The code that uses this class can be within the same project or even within a different project or assembly. Note An assembly in the .NET Framework is a dynamic-link library or executable file that contains a related group of files packaged together for deployment. Each assembly also contains a manifest file, which lists the contents of the assembly. Whenever you build your project, the IDE creates a .NET assembly and its associated manifest file for you. Internal access to a class only allows projects contained within the same assembly to use that type. Because your entry-point method is contained within the same assembly, marking the class you just created as internal will still allow you to work with that class. Classes can be nested, which means that you are free to declare another class type within the body of your outer class declaration. Because this new class isn't a top-level type, you have many more choices to use for access modifiers. To determine which access modifiers are available for a given class, select the class in the Class View window. If you cannot find the Class View window, which by default is on the right side of the Visual Studio .NET IDE, select View, Class View from the main menu or by using the Ctrl+Shift+C keyboard shortcut. Once you click on the class name, you see a list of available access modifiers for this class by expanding the Access property drop-down box in the Properties window, as shown in Figure 2.1. Furthermore, Table 2.1 lists the available access modifiers as well as the level to which access is granted for a nested type. Figure 2.1. You can view and change any class properties by using the Properties window. Table 2.1. Accessibility Modifiers for Nested Types
|
| < Day Day Up > |
EAN: 2147483647
Pages: 440