Drawing Scrollable Windows
 | |||||||||||
| Chapter 19 - Graphics with GDI+ | |
| bySimon Robinsonet al. | |
| Wrox Press 2002 | |
Drawing Scrollable Windows
Our earlier DrawShapes sample worked very well, because everything we needed to draw fitted into the initial window size . In this section we're going to look at what we need to do if that's not the case.
We shall expand our DrawShapes sample to demonstrate scrolling. To make things a bit more realistic, we'll start by creating an example, BigShapes , in which we will make the rectangle and ellipse a bit bigger. Also, while we're at it we'll demonstrate how to use the Point , Size, and Rectangle structs by using them to assist in defining the drawing areas. With these changes, the relevant part of the Form1 class looks like this:
// member fields private Point rectangleTopLeft = new Point(0, 0); private Size rectangleSize = new Size(200,200); private Point ellipseTopLeft = new Point(50, 200); private Size ellipseSize = new Size(200, 150); private Pen bluePen = new Pen(Color.Blue, 3); private Pen redPen = new Pen(Color.Red, 2); protected override void OnPaint(PaintEventArgs e) { base.OnPaint(e); Graphics dc = e.Graphics; if (e.ClipRectangle.Top < 350 e.ClipRectangle.Left < 250) { Rectangle rectangleArea = new Rectangle (rectangleTopLeft, rectangleSize); Rectangle ellipseArea = new Rectangle (ellipseTopLeft, ellipseSize); dc.DrawRectangle(bluePen, rectangleArea); dc.DrawEllipse(redPen, ellipseArea); } }
Notice, that we've also turned the Pen , Size , and Point objects into member fields this is more efficient than creating a new Pen every time we need to draw anything, as we have been doing up to now.
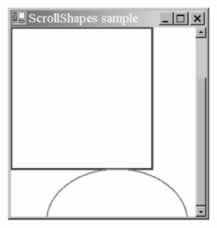
The result of running this example looks like this:

We can see a problem instantly. The shapes don't fit in our 300x300 pixel drawing area.
Normally, if a document is too large to display, an application will add scrollbars to let you scroll the window and look at a chosen part of it. This is another area in which, with the kind of user interface that we were dealing with in Chapter 7, we'd let the .NET runtime and the base classes handle everything. If your form has various controls attached to it then the Form instance will normally know where these controls are and it will therefore know if its window becomes so small that scrollbars become necessary. The Form instance will also automatically add the scrollbars for you, and not only that, but it's also able to correctly draw whichever portion of the screen you've scrolled to. In that case there is nothing you need to explicitly do in your code. In this chapter, however, we're taking responsibility for drawing to the screen; therefore, we're going to have to help the Form instance out when it comes to scrolling.
In the last paragraph we said "if a document is too large to display". This probably made you think in terms of something like a Word or Excel document. With drawing applications, however, it's better to think of the document as whatever data the application is manipulating that it needs to draw. For our current example, the rectangle and ellipse between them constitute the document.
Getting the scrollbars added is actually very easy. The Form can still handle all that for us the reason it hasn't in the above ScrollShapes sample is that Windows doesn't know they are needed because it doesn't know how big an area we will want to draw in. How big an area is that? More accurately, what we need to figure out is the size of a rectangle that stretches from the top left corner of the document (or equivalently, the top left corner of the client area before we've done any scrolling), and which is just big enough to contain the entire document. In this chapter, we'll refer to this area as the document area. Looking at the diagram of the 'document' we can see that for this example the document area is (250, 350) pixels.

It is easy to tell the form how big the document is. We use the relevant property, Form.AutoScrollMinSize . Therefore we can add this code to either the InitializeComponent() method or the Form1 constructor:
private void InitializeComponent() { this.components = new System.ComponentModel.Container(); this.Size = new System.Drawing.Size(300,300); this.Text = "Scroll Shapes"; this.BackColor = Color.White; this.AutoScrollMinSize = new Size(250, 350); } Alternatively the AutoScrollMinSize property can be set through the Visual Studio .NET properties window.
Setting the minimum size at application startup and leaving it thereafter is fine in this particular application, because we know that is how big the screen area will always be. Our "document" never changes size while this particular application is running. Bear in mind, however, that if your application does things like display contents of files or something else for which the area of the screen might change, you will need to set this property at other times (and in that case you'll have to sort out the code manually the Visual Studio .NET Properties window can only help you with the initial value that a property has when the form is constructed ).
Setting AutoScrollMinSize is a start, but it's not yet quite enough. To see that, let's look at what our sample which in this version is downloadable as the ScrollShapes sample looks like now. Initially we get the screen that correctly displays the shapes:

Notice that, not only has the form correctly set the scrollbars, but it's even correctly sized them to indicate what proportion of the document is currently displayed. You can try resizing the window while the sample is running you'll find the scrollbars respond correctly, and even disappear if we make the window big enough that they are no longer needed.
However, now look at what happens if we actually use one of the scrollbars and scroll down a bit:

Clearly something has gone wrong!
In fact, what's gone wrong is that we haven't taken into account the position of the scrollbars in the code in our OnPaint() override. We can see this very clearly if we force the window to completely repaint itself by minimizing and restoring it. The result looks like this:
The shapes have been painted , just as before, with the top left corner of the rectangle nestled into the top left corner of the client area just as if we hadn't moved the scrollbars at all.
Before we go over how to correct this problem, we'll take a closer look at precisely what is happening in these screenshots. Doing so is quite instructive, both because it'll help us to understand exactly how the drawing is done in the presence of scrollbars and because it'll be quite good practice. If you start using GDI+, I promise you that sooner or later, you'll find yourself presented with a strange drawing like one of those above, and having to try to figure out what has gone wrong.
We'll look at the last screenshot first since that one is easy to deal with. The ScrollShapes sample has just been restored so the entire window has just been repainted. Looking back at our code it instructs the graphics instance to draw a rectangle with top left coordinates (0,0) relative to the top left corner of the client area of the window which is what has been drawn. The problem is, that the graphics instance by default interprets coordinates as relative to the client window it doesn't know anything about the scrollbars. Our code as yet does not attempt to adjust the coordinates for the scrollbar positions . The same goes for the ellipse.
Now, we can tackle the earlier screenshot, from immediately after we'd scrolled down. We notice that here the top two- thirds or so of the window look fine. That's because these were drawn when the application first started up. When you scroll windows, Windows doesn't ask the application to redraw what was already on the screen. Windows is smart enough to figure out for itself which bits of what's currently being displayed on the screen can be smoothly moved around to match where the scrollbars now are. That's a much more efficient process, since it may be able to use some hardware acceleration to do that too. The bit in this screenshot that's wrong is the bottom third of the window. This part of the window didn't get drawn when the application first appeared, since before we started scrolling it was outside the client area. This means that Windows asks our ScrollShapes application to draw this area. It'll raise a Paint event passing in just this area as the clipping rectangle. And that's exactly what our OnPaint() override has done.
One way of looking at the problem is that we are at the moment expressing our coordinates relative to the top left corner of the start of the 'document' we need to convert them to express them relative to the top left corner of the client area instead. The following diagram should make this clear:

To make the diagram clearer we've actually extended the document further downwards and to the right, beyond the boundaries of the screen, but this doesn't change our reasoning. We've also assumed a small horizontal scroll as well as a vertical one.
In the diagram the thin rectangles mark the borders of the screen area and of the entire document. The thick lines mark the rectangle and ellipse that we are trying to draw. P marks some arbitrary point that we are drawing, which we're going to take as an example. When calling the drawing methods we've supplied the graphics instance with the vector from point B to (say) point P, expressed as a Point instance. We actually need to give it the vector from point A to point P.
The problem is that we don't know what the vector from A to P is. We know what B to P is that's just the coordinates of P relative to the top left corner of the document the position where we want to draw point P in the document. We also know what the vector from B to A is that's just the amount we've scrolled by; this is stored in a property of the Form class called AutoScrollPosition . However, we don't know the vector from A to P.
Now, if you were good at math at school, you might remember what the solution to this is you just have to subtract vectors. Say, for example, to get from B to P you move 150 pixels across and 200 pixels down, while to get from B to A you have to move 10 pixels across and 57 pixels down. That means to get from A to P you have to move 140 (=150 minus 10) pixels across and 143 (=200 minus 57) pixels down. The Graphics class actually implements a method that will do these calculations for us. It's called TranslateTransform() . You pass it the horizontal and vertical coordinates that say where the top left of the client area is relative to the top left corner of the document, (our AutoScrollPosition property, that is the vector from B to A in the diagram). Then the Graphics device will from then on work out all its coordinates taking into account where the client area is relative to the document.
After all that explanation, all we need to do is add this line to our drawing code:
dc.TranslateTransform(this.AutoScrollPosition.X, this.AutoScrollPosition.Y); In fact in our example, it's a little more complicated because we are also separately testing whether we need to do any drawing by looking at the clipping region. We need to adjust this test to take the scroll position into account too. When we've done that, the full drawing code for the sample (downloadable from the Wrox Press web site as ScrollShapes ) looks like this:
protected override void OnPaint(PaintEventArgs e) { base.OnPaint(e); Graphics dc = e.Graphics; Size scrollOffset = new Size(this.AutoScrollPosition); if (e.ClipRectangle.Top+scrollOffset.Width < 350 e.ClipRectangle.Left+scrollOffset.Height < 250) { Rectangle rectangleArea = new Rectangle (rectangleTopLeft+scrollOffset, rectangleSize); Rectangle ellipseArea = new Rectangle (ellipseTopLeft+scrollOffset, ellipseSize); dc.DrawRectangle(bluePen, rectangleArea); dc.DrawEllipse(redPen, ellipseArea); } }
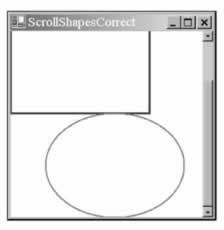
Now we have our scroll code working perfectly , we can at last obtain a correctly scrolled screenshot!
World, Page, and Device Coordinates
The distinction between measuring position relative to the top left corner of the document and measuring it relative to the top left corner of the screen (desktop), is so important that GDI+ has special names for these coordinate systems:
-
World coordinates are the position of a point measured in pixels from the top left corner of the document
-
Page coordinates are the position of a point measured in pixels from the top left corner of the client area
Developers familiar with GDI will note that world coordinates correspond to what in GDI were known as logical coordinates. Page coordinates correspond to what used to be known as device coordinates. Those developers should also note that the way you code up conversion between logical and device coordinates has changed in GDI+. In GDI, conversions took place via the device context, using the LPtoDP() and DPtoLP() Windows API functions. In GDI+, it's the Control class, from which both Form and all the various Windows Forms controls derive, that maintains the information needed to carry out the conversion.
GDI+ also distinguishes a third coordinate system, which is now known as device coordinates . Device coordinates are similar to page coordinates, except that we do not use pixels as the unit of measurement instead we use some other unit that can be specified by the user by calling the Graphics.PageUnit property. Possible units, besides the default of pixels, include inches and millimeters. Although we won't use the PageUnit property in this chapter, it can be useful as a way of getting around the different pixel densities of devices. For example, 100 pixels on most monitors will occupy something like an inch. However, laser printers can have anything up to thousands of dpi (dots per inch) which means that a shape specified to be 100 pixels wide will look a lot smaller when printed on it. By setting the units to, say, inches and specifying that the shape should be 1 inch wide, you can ensure that the shape will look the same size on the different devices.
EAN: 2147483647
Pages: 244