Web Services
 | |||||||||||
| Chapter 15 - Web Services | |
| bySimon Robinsonet al. | |
| Wrox Press 2002 | |
The discussion of Web Services falls into two categories:
-
Exposing Web Services, which concerns writing Web Services and placing them on web servers
-
Consuming Web Services, which concerns using the services you design on a client
We will look at these subjects in the two sections that follow.
Exposing Web Services
Web Services are exposed by placing code either directly into .asmx files or by referencing Web Service classes from these files. As with ASP.NET pages, creating a Web Service in VS .NET uses the latter method, and we will too for demonstration purposes.
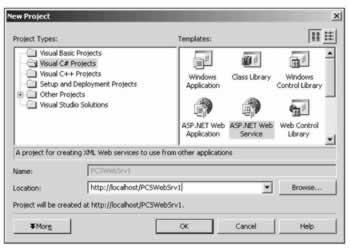
Creating a Web Service project called PCSWebSrv1 as shown above results in a similar set of files being generated to those for a web application project. In fact, the only difference is that instead of a file called WebForm1.aspx being generated, a file called Service1.asmx is created. The . vsdisco file generated is responsible for identifying the Web Service such that Visual Studio .NET can add a web reference to it, as we will see shortly.
The code in Service1.asmx isn't directly accessible through VS .NET, but inspection with Notepad reveals the following single line of code:
<%@ WebService Language="c#" Codebehind="Service1.asmx.cs" Class="PCSWebSrv1.Service1" %>
This references the code file that we can see in VS .NET, Service1.asmx.cs , accessible by right-clicking on Service1.asmx in the Solution Explorer and selecting View Code . The generated code, with comments removed for brevity, is shown below:
using System; using System.Collections; using System.ComponentModel; using System.Data; using System.Diagnostics; using System.Web; using System.Web.Services; namespace PCSWebSrv1 { public class Service1 : System.Web.Services.WebService { public Service1() { InitializeComponent(); } #region Component Designer generated code private IContainer components = null; private void InitializeComponent() { } protected override void Dispose( bool disposing ) { if(disposing && components != null) { components.Dispose(); } base.Dispose(disposing); } #endregion } }
This code contains several standard namespace references, and defines the PCSWebSrv1 namespace. The namespace contains the definition of the Web Service class Service1 (which we saw referenced above in Service1.asmx ), descended from System.Web.Services.WebService . It also contains similar code to that found in the ASP.NET page code-behind file, which we saw in the last chapter. This code is required in order to design Web Services in VS .NET, part of which is a private member to contain any components that can be added to the Web Service. In order for the Web Service class to free resources properly there is also a Dispose() method, which will clean up any components in this collection. It is now up to us to provide additional methods on this Web Service class.
Adding a method accessible through the Web Service simply requires defining the method as public and giving it the WebMethod attribute. This attribute simply labels the methods we want to be accessible. We'll look at the types we can use for the return type and parameters shortly, but for now add the following method:
[WebMethod] public String CanWeFixIt() { return "Yes we can!"; }
Now compile the project.
We can check things are working by pointing our web browser at Service1.asmx :
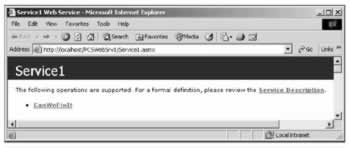
Clicking on the method name gives us information about the SOAP request and response, as well as examples of how the request and response will look via HTTP GET and HTTP POST methods. We can also test the method by clicking on the Invoke button provided. If the method requires simple parameters we can enter these on this form as well. If we do this we will see the XML returned by the method call:
<?xml version="1.0" encoding="utf-8"?> <string xmlns="http://tempuri.org/">Yes we can!</string>
This demonstrates that our method is working perfectly .
Following the Service Description link from the browser screen shown above allows us to view the WSDL description of the Web Service. The most important part as far as we are concerned is the description of the element types for requests and responses:
<types> <s:schema elementFormDefault="qualified" targetNamespace="http://tempuri.org/"> <s:element name="CanWeFixIt"> <s:complexType /> </s:element> <s:element name="CanWeFixItResponse"> <s:complexType> <s:sequence> <s:element minOccurs="0" maxOccurs="1" name="CanWeFixItResult" type="s:string" /> </s:sequence> </s:complexType> </s:element> <s:element name="string" nillable="true" type="s:string" /> </s:schema> </types>
The description also contains descriptions of the types required for requests and responses, as well as various bindings for the service, making it quite a long file.
Types Available for Web Services
Web Services can be used to exchange any of the following types:
| String | Char | Byte |
| Boolean | Int16 | Int32 |
| Int64 | UInt16 | UInt32 |
| UInt64 | Single | Double |
| Guid | Decimal | DateTime |
| XmlQualifiedName | Class | struct |
| XmlNode | DataSet | enum |
Arrays of all the above types are also allowed. Note also that only public properties and fields of Class and struct types are marshaled.
Consuming Web Services
Now we know how to create Web Services it's time to look at how we use them. To do this we need to generate a proxy class in our code that knows how to communicate with a given Web Service. Any calls from our code to the Web Service will go through this proxy, which looks identical to the Web Service, giving our code the illusion that we have a local copy of it. In actual fact there is a lot of HTTP communication going on, but we are shielded from the details. There are two ways of doing this. We can either use the WSDL.exe command-line tool or the Add Web Reference menu option in VS .NET.
Using WSDL.exe from the command line generates a .cs file containing a proxy class, based on the WSDL description of the Web Service. We specify this using the URL of the Web Service, for example:
WSDL http://localhost/PCSWebSrv1/Service1.asmx?WSDL
This will generate a proxy class for the example from the last section in a file called Service1.cs . The class will be named after the Web Service, in this case Service1 , and contain methods that call identically named methods of the service. To use this class we simply add the .cs file generated to a project and use code along the lines of:
Service1 myService = new Service1(); String result = myService.CanWeFixIt();
By default the class generated will be placed in the root namespace, so no using statement is necessary, but we can specify a different namespace to use with the /n: < namespace > WSDL.exe command-line option.
This technique works fine but can be a pain to continually redo if the service is being developed and changing continuously. Of course, it could be executed in the build options for a project in order to automatically update the generated proxy before each compile, but there is a better way.
We'll illustrate this better way by creating a client for the example in the last section, in a new web application called PCSWebClient1 . Create this project now and replace the existing form declaration in the .aspx page generated with the following code:
<form method="post" runat="server"> <asp:Label Runat="server" ID="resultLabel"/><br> <asp:Button Runat="server" ID="triggerButton" Text="Invoke CanWeFixIt()"/> </form>
In a moment we'll bind the button-click event handler to the Web Service. First we need to add a reference to the Web Service to our project. To do this, right-click on the new client project in the Solution Explorer and select the Add Web Reference... option. In the window that appears type in the URL of the Web Service Service1.asmx file:
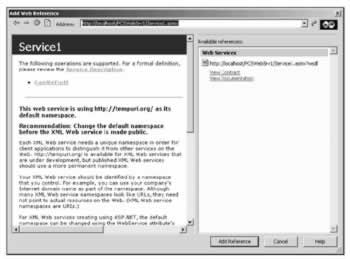
From here we can add a reference with the Add Reference button. Pressing this button now will result in three files being added to the Web References section of the project in Solution Explorer, Reference.map , Service1.disco , and Service1.wsdl :
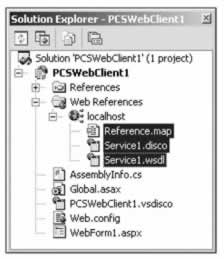
The folder containing our web reference is named after the server where the service is located, which is localhost here. This is also the namespace we need to reference to use the proxy class, so it makes sense to rename this, which we can do by right-clicking on it. Let's rename this folder as myWebService and add the using statement to our code:
using PCSWebClient1.myWebService; Now we can use the service in our class without fully qualifying its name.
Add an event handler to the button on the form (double-click on the button) with the following code:
private void triggerButton_Click(object sender, System.EventArgs e) { Service1 myService = new Service1(); resultLabel.Text = myService.CanWeFixIt(); } Running the application and clicking the button will now result in the result of CanWeFixIt() being displayed in the browser window.
This Web Service might change later, but with this method we can simply right-click on the web reference folder in the Server Explorer and select Update Web Reference . This will generate a new proxy class for us to use.
EAN: 2147483647
Pages: 244