Managing the File System
 | |||||||||||
| Chapter 12 - File and Registry Operations | |
| bySimon Robinsonet al. | |
| Wrox Press 2002 | |
The classes that are used to browse around the file system and perform operations, such as moving, copying, and deleting files, are shown in the following diagram. The namespace of each class is shown in brackets beneath the class name in the diagram:
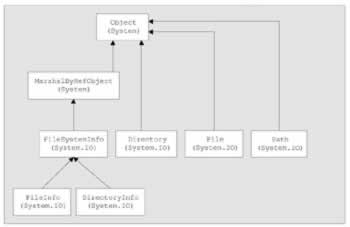
The purposes of these classes are:
-
System.MarshalByRefObject Base object class for .NET classes that are remotable; permits marshaling of data between application domains
-
FileSystemInfo Base class that represents any file system object
-
FileInfo and File These classes represent a file on the file system
-
DirectoryInfo and Directory These classes represent a folder on the file system
-
Path This class contains static members that you can use to manipulate pathnames
On Windows, the objects that contain files and are used to organize the file system are termed folders . For example, in the path C:\My Documents\ReadMe.txt , ReadMe.txt is a file and My Documents is a folder. Folder is a very Windows-specific term: On virtually every other operating system the term directory is used in place of folder, and in accordance with the Microsoft's desire for .NET to ultimately be platform-independent, the corresponding .NET base classes are called Directory and DirectoryInfo . However, due to the potential for confusion with LDAP directories (as discussed in Chapter 13), and because this is a Windows book, we'll stick to the term folder in this discussion.
.NET Classes that Represent Files and Folders
You will notice from the above list that there are two classes used to represent a folder and two classes for a file. Which one of these classes you use will depend largely on how many times you need to access that folder or file:
-
Directory and File contain only static methods and are never instantiated . You use these classes by supplying the path to the appropriate file system object whenever you call a member method. If you only want to do one operation on a folder or file then using these classes is more efficient, because it saves the overhead of instantiating a .NET class.
-
DirectoryInfo and FileInfo implement roughly the same public methods as Directory and File , as well as some public properties and constructors, but they are stateful and the members of these classes are not static. You need to actually instantiate these classes and then each instance is associated with a particular folder or file. This means that these classes are more efficient if you're performing multiple operations using the same object, because they will read in the authentication and other information for the appropriate file system object on construction, and then will not need to read that information again, no matter how many methods and so on you call against each object (class instance). In comparison, the corresponding stateless classes will need to check the details of the file or folder again with every method you call.
In this section, we will be mostly using the FileInfo and DirectoryInfo classes, but it happens that many (though not all) of the methods we call are also implemented by File and Directory (although in those cases these methods require an extra parameter the pathname of the file system object, and a couple of the methods have slightly different names ). For example:
FileInfo myFile = new FileInfo(@"C:\Program Files\My Program\ReadMe.txt"); myFile.CopyTo(@"D:\Copies\ReadMe.txt");
Has the same effect as:
File.Copy(@"C:\Program Files\My Program\ReadMe.txt", @"D:\Copies\ReadMe.txt"); The first code snippet above will take slightly longer to execute, because of the need to instantiate a FileInfo object, myFile , but it leaves myFile ready for you to perform further actions on the same file.
You instantiate a FileInfo or DirectoryInfo class by passing to the constructor a string containing the path to the corresponding file system. We've just illustrated the process for a file. For a folder the code looks similar:
DirectoryInfo myFolder = new DirectoryInfo(@"C:\Program Files"); If the path represents an object that does not exist, then an exception will not be thrown at construction, but will instead be thrown the first time that you call a method that actually requires the corresponding file system object to be there. You can find out whether the object exists and is of the appropriate type by checking the Exists property, which is implemented by both of these classes:
FileInfo test = new FileInfo(@"C:\Windows"); Console.WriteLine(test.Exists.ToString());
Note that for this property to return true , the corresponding file system object must be of the appropriate type. In other words, if you instantiate a FileInfo object supplying the path of a folder, or you instantiate a DirectoryInfo object, giving it the path of a file, Exists will have the value false . On the other hand, most of the properties and methods of these objects will return a value if at all possible they won't necessarily throw an exception just because the wrong type of object has been called, unless they are asked to do something that really is impossible . For example, the above code snippet will first display false (because C:\Windows is a folder at least on my computer!), but will still then correctly display the time the folder was created because a folder still has that information. On the other hand, if we then tried to open the folder as if it was a file, using the FileInfo.Open() method, we'd then get an exception.
After you have established whether the corresponding file system object exists, you can (if you are using the FileInfo or DirectoryInfo class) find out information about it using a number of properties, including:
| Name | Description |
|---|---|
| CreationTime | Time file or folder was created |
| DirectoryName (FileInfo) , Parent (DirectoryInfo) | Full pathname of the containing folder |
| Exists | Whether file or folder exists |
| Extension | Extension of the file; returns blank for folders |
| FullName | Full pathname of the file or folder |
| LastAccessTime | Time file or folder was last accessed |
| LastWriteTime | Time file or folder was last modified |
| Name | Name of the file or folder |
| Root | The root portion of the path ( DirectoryInfo only) |
| Length | The size of the file in bytes ( FileInfo only) |
You can also perform actions on the file system object using these methods:
| Name | Purpose |
|---|---|
| Create() | Creates a folder or empty file of the given name. For a FileInfo this also returns a stream object to let you write to the file. We cover streams later in the chapter. |
| Delete() | Deletes the file or folder. For folders there is an option for the Delete to be recursive. |
| MoveTo() | Moves and/or renames the file or folder. |
| CopyTo() | ( FileInfo only) Copies the file. Note that there is no copy method for folders. If copying complete directory trees you'll need to individually copy each file and create new folders corresponding to the old folders. |
| GetDirectories() | ( DirectoryInfo only) Returns an array of DirectoryInfo objects representing all folders contained in this folder. |
| GetFiles() | ( DirectoryInfo only) Returns an array of FileInfo objects representing all files contained in this folder. |
| GetFileSystemObjects() | ( DirectoryInfo only) Returns FileInfo and DirectoryInfo objects representing all objects contained in this folder, as an array of FileSystemInfo references. |
Note that the above tables give the main properties and methods, and are not intended to be exhaustive.
In the above tables we've not listed most of the properties or methods that allow you to write to or read the data in files. This is actually done using stream objects, which we'll cover later in the chapter. FileInfo also implements a number of methods Open() , OpenRead() , OpenText() , OpenWrite() , Create() , and CreateText() that return stream objects for this purpose.
Interestingly, the creation time, last access time, and last write time are all writable:
// displays the creation time of a file, then changes it and displays it // again FileInfo test = new FileInfo(@"C:\My Documents\MyFile.txt"); Console.WriteLine(test.Exists.ToString()); Console.WriteLine(test.CreationTime.ToString()); test.CreationTime = new DateTime(2001, 1, 1, 7, 30, 0); Console.WriteLine(test.CreationTime.ToString()); Being able to manually modify these properties might seem strange , but it can be quite useful. For example, if you have a program that effectively modifies a file by simply reading it in, then deleting it and creating new file with the new contents, then you'd probably want to modify the creation date to match the original creation date of the old file.
The Path Class
The Path class is not a class that you would instantiate. Rather, it exposes some static methods that make operations on pathnames easier. For example, suppose you want to display the full pathname for a file, ReadMe.txt in the folder C:\My Documents . You could find the path to the file with the following:
Console.WriteLine(Path.Combine(@"C:\My Documents", "ReadMe.txt")); Using the Path class is a lot easier than trying to fiddle about with separation symbols manually, especially because the Path class is aware of different formats for pathnames on different operating systems. At the time of writing, Windows is the only operating system supported by .NET, but if, for example, .NET was later ported to Unix, Path would be able to cope with Unix paths, in which /, rather than \, is used as a separator in pathnames. Path.Combine() is the method of this class that you are likely to use most often, but Path also implements other methods that supply information about the path or the required format for it.
In the following section we present an example that illustrates how to browse directories and view the properties of files.
Example: A File Browser
In this section we'll present a sample C# application called FileProperties , which presents a simple user interface that allows you to browse around the file system, and view the creation time, last access time, last write time, and size of files.
The FileProperties application looks like this. You type in the name of a folder or file in the main textbox at the top of the window and click the Display button. If you type in the path to a folder, its contents are listed in the listboxes. If you type in the path to a file, its details are displayed in the textboxes at the bottom of the form and the contents of its parent folder are displayed in the listboxes. The screenshot shows FileProperties being used to examine a folder:
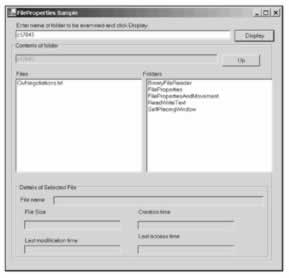
The user can very easily navigate around the file system by clicking on any of the folders in the right-hand listbox to move down to that folder, or by clicking the Up button to move up to the parent folder. In the above screenshot I typed in C:\7043 into the main textbox to get the contents of that folder then used the listbox to navigate down. The user can also select a file by clicking on its name in the listbox in which case its properties are displayed in the textboxes. The next screenshot shows this:
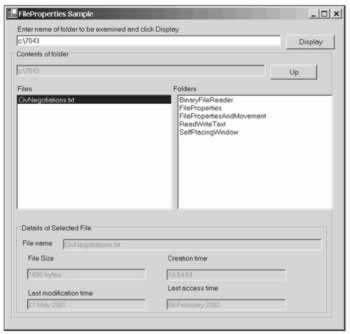
Note that if we'd wanted, we could also display the creation time, last access time, and last modification time for folders too DirectoryInfo does implement the appropriate properties. We are going to display these properties only for a selected file to keep things simple.
We create the project as a standard C# Windows application in Visual Studio.NET, and add the various textboxes and the listbox from the Windows Forms area of the toolbox. We've also renamed the controls with the more intuitive names of textBoxInput , textBoxFolder , buttonDisplay , buttonUp , listBoxFiles , listBoxFolders , textBoxFileName , txtBoxCreationTime , textBoxLastAccessTime , textBoxLastWriteTime , and txtBoxFileSize .
Then we need to add some code. Firstly, we need to indicate that we will be using the System.IO namespace:
using System; using System.Drawing; using System.Collections; using System.ComponentModel; using System.Windows.Forms; using System.Data; using System.IO; We need to do this for all the file system- related examples in this chapter, but we won't explicitly show this part of the code in the remaining examples. We then add a member field to the main form:
public class Form1 : System.Windows.Forms.Form { private string currentFolderPath; currentFolderPath will store the path of the folder whose contents are currently being shown in the listboxes.
Now we need to add event handlers for the user-generated events. The possible user inputs are:
-
User clicks the Display button: In this case we need to figure out whether what the user has typed in the main textbox is the path to a file or folder. If it's a folder we list the files and subfolders of this folder in the listboxes. If it is a file, we still do this for the folder containing that file, but we also display the file properties in the lower textboxes.
-
User clicks on a file name in the Files listbox: In this case we display the properties of this file in the lower textboxes.
-
User clicks on a folder name in the Folders listbox: In this case we clear all the controls and then display the contents of this subfolder in the listboxes.
-
User clicks on the Up button: In this case we clear all the controls and then display the contents of the parent of the folder being displayed in the listboxes.
Before we show the code for the event handlers, we'll list the code for the methods that will actually do all the work. First, we need to clear the contents of all the controls. This method is fairly self-explanatory:
protected void ClearAllFields() { listBoxFolders.Items.Clear(); listBoxFiles.Items.Clear(); textBoxFolder.Text = ""; textBoxFileName.Text = ""; textBoxCreationTime.Text = ""; textBoxLastAccessTime.Text = ""; textBoxLastWriteTime.Text = ""; textBoxFileSize.Text = ""; }
Secondly, we define a method, DisplayFileInfo() , which handles the process of displaying the information for a given file in the textboxes. This method takes one parameter, the full pathname of the file, and it works by creating a FileInfo object based on this path:
protected void DisplayFileInfo(string fileFullName) { FileInfo theFile = new FileInfo(fileFullName); if (!theFile.Exists) throw new FileNotFoundException("File not found: " + fileFullName); textBoxFileName.Text = theFile.Name; textBoxCreationTime.Text = theFile.CreationTime.ToLongTimeString(); textBoxLastAccessTime.Text = theFile.LastAccessTime.ToLongDateString(); textBoxLastWriteTime.Text = theFile.LastWriteTime.ToLongDateString(); textBoxFileSize.Text = theFile.Length.ToString() + " bytes"; }
Note that we take the precaution of throwing an exception if there are any problems locating a file here. The exception will be handled in the calling routine (one of the event handlers). Finally, we define a method, DisplayFolderList() , which displays the contents of a given folder in the two listboxes. The full pathname of the folder is passed in as a parameter to this method:
protected void DisplayFolderList(string folderFullName) { DirectoryInfo theFolder = new DirectoryInfo(folderFullName); if (!theFolder.Exists) throw new DirectoryNotFoundException("Folder not found: " + folderFullName); ClearAllFields(); textBoxFolder.Text = theFolder.FullName; currentFolderPath = theFolder.FullName; // list all subfolders in folder foreach(DirectoryInfo nextFolder in theFolder.GetDirectories()) listBoxFolders.Items.Add(nextFolder.Name); // list all files in folder foreach(FileInfo nextFile in theFolder.GetFiles()) listBoxFiles.Items.Add(nextFile.Name); }
Now we will examine the event handlers. The handler for the event of the user clicking the Display button is the most complex, since it needs to handle three different possibilities for the text the user typed in; it could be the pathname of a folder, the pathname of a file, or neither :
protected void OnDisplayButtonClick(object sender, EventArgs e) { try { string folderPath = textBoxInput.Text; DirectoryInfo theFolder = new DirectoryInfo(folderPath); if (theFolder.Exists) { DisplayFolderList(theFolder.FullName); return; } FileInfo theFile = new FileInfo(folderPath); if (theFile.Exists) { DisplayFolderList(theFile.Directory.FullName); int index = listBoxFiles.Items.IndexOf(theFile.Name); listBoxFiles.SetSelected(index, true); return; } throw new FileNotFoundException("There is no file or folder with " + "this name: " + textBoxInput.Text); } catch(Exception ex) { MessageBox.Show(ex.Message); } }
In the above code, we establish if the supplied text represents a folder or file by in turn instantiating DirectoryInfo and FileInfo instances and examining the Exists property of each object. If neither exists, then we throw an exception. If it's a folder, we call DisplayFolderList() to populate the listboxes. If it's a file, we need to populate the listboxes and sort out the textboxes that display the file properties. We handle this case by first populating the listboxes. We then programmatically select the appropriate file name in the Files listbox. This has exactly the same effect as if the user had selected that item it will raise the item-selected event. We can then simply exit the current event handler, knowing that the selected item event handler will immediately be called to display the file properties.
The following code is the event handler that gets called when an item in the files listbox is selected, either by the user or, as indicated above, programmatically. It simply constructs the full pathname of the selected file, and passes this to the DisplayFileInfo() method that we presented earlier:
protected void OnListBoxFilesSelected(object sender, EventArgs e) { try { string selectedString = listBoxFiles.SelectedItem.ToString(); string fullFileName = Path.Combine(currentFolderPath, selectedString); DisplayFileInfo(fullFileName); } catch(Exception ex) { MessageBox.Show(ex.Message); } }
The event handler for the selection of a folder in the Folders listbox is implemented in a very similar way, except that in this case we call DisplayFolderList() to update the contents of the listboxes:
protected void OnListBoxFoldersSelected(object sender, EventArgs e) { try { string selectedString = listBoxFolders.SelectedItem.ToString(); string fullPathName = Path.Combine(currentFolderPath, selectedString); DisplayFolderList(fullPathName); } catch(Exception ex) { MessageBox.Show(ex.Message); } }
Finally, when the Up button is clicked, DisplayFolderList() must also be called, except that this time we need to obtain the path of the parent of the folder currently being displayed. This is obtained through the FileInfo.DirectoryName property, which returns the parent folder path:
protected void OnUpButtonClick(object sender, EventArgs e) { try { string folderPath = new FileInfo(currentFolderPath).DirectoryName; DisplayFolderList(folderPath); } catch(Exception ex) { MessageBox.Show(ex.Message); } }
Note that for this project, we have not displayed the code that adds the event handlers to the relevant events for the controls. We do not need to add this code manually, since, as noted in Properties window in Visual Studio to associate each event handler with the event.
EAN: 2147483647
Pages: 244