Integrating Menus into Your Forms and Reports
Integrating Menus into Your Forms and Reports
Adding a toolbar or menu to your Access user interface requires no more than changing a few properties on your forms and reports. These properties are the Menu Bar, Toolbar, Shortcut Menu, and Shortcut Menu Bar, and they can be found in the Other tab of the Form properties dialog (shown in Figure 7-14). To add a custom menu or toolbar to a form, open the form in design view and show the form's Properties dialog. Now select the Other tab to add your custom menus to a form.
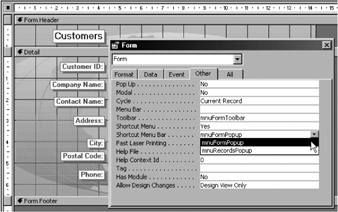
Figure 7-14: Adding custom menus and toolbars to your form.
To experiment with the examples in this section, you can use the toolbars and menus created earlier in the chapter, or you can import the menus from the demonstration database. I will use the toolbars called mnuFormToolbar and mnuFormPopup in the example, but you can easily change these by varying the constants at the top of the procedure. The steps to import those toolbars follow:
-
Open your copy of the Northwind database.
-
Choose File ˜ Get External Data ˜ Import.
-
Find the database ( grMap97.mdb , grMap2000.mdb , etc.), and click OK.
-
Click the Options button.
-
Select the Menus and Toolbars check box, clear the Relations check box, and click OK.
This procedure imports any custom toolbar from the demonstration database that doesn't have an equivalent name in your current database. No toolbars will be replaced , even if they are newer than the one in your database. To check what was imported, open the Customize dialog and look on the Toolbars tab for toolbars with names starting with mnu . To see the shortcut menus that were imported, remember to select the Shortcut Menus check box on the Toolbars tab.
| Tip | To select the properties of a form, you can click the little gray box in the top left corner of the form (see top left of Figure 7-14). This action adds a tiny black square to this box to signify that the properties displayed are for the form and not for one of the controls placed on it. |
When you select the menu bar, toolbar, or shortcut menu bar properties of a form, a drop-down list appears, showing you all the appropriate custom toolbars in your database. To hide the shortcut menu, set the Shortcut Menu property to No.
You will generally not add menus to individual forms but will instead rely on a menu defined by the startup properties described later in this chapter. Once the top menu bar is defined in the startup options, it will stay in place until you change the menu with your application.
Though the menu bar at the top of the form requires a change only to the startup options, the toolbar property does not have an equivalent startup option. Therefore, it is necessary that you allocate a safe custom toolbar to all the forms in the database. If you don't, then the forms will revert to the built-in toolbar, leaving the forms and the database vulnerable. The best way to avoid this loophole is to use the VBA code described in the next section.
Adding Custom Toolbars and Shortcut Menus to all the Forms
Writing a good Access system with toolbars and menus will require you to make changes to the toolbar and menu properties of all the forms and reports in your database. Though you will need to tailor your own approach to your application, you generally will follow the principles used in the sample in the frmSafeFormMenus form. This sample shows you how to cycle through all the forms to change the toolbar and shortcut menu properties.
To work through this sample, you will need to import the frmSafeFormMenus form and the toolbars from the demonstration database into the copy of the Northwind database. To do this:
-
Choose File ˜ Get External Data ˜ Import.
-
Choose the form frmSafeFormMenus .
-
Click the Options button.
-
Select the Menu and Toolbars check box, and start the import by clicking the Import button. I recommend that you first try this option on a copy of the Northwind database (or something similar).
-
Once the import is finished, use the Customize menu's dialog to verify that the two menus, mnuFormToolbar and mnuFormPopup , are in the database.
| Note | The demonstration database includes a form called frmSafeReportsMenus . This form will change the toolbars and shortcut menus for all the reports in your database. To support this form, I have included two other menus: mnuPreviewPrint and mnuReportPopup . These menus will also be imported into your database if you import menus from the demonstration databases. |
When you open the form frmSafeFormMenus , you will see one button. If you click the button, the software will first check whether all the modules in the database have been compiled. If they have not, then the form will attempt to compile them for you. Then a message will appear (shown in Figure 7-15). Click Yes to add the toolbar and shortcut menus to all the forms in your database or No to reverse the changes made. If a form already has a menu in the toolbar or shortcut menu properties, these entries will remain as is. Before you run the program for the first time, you should view the VBA code to make sure that it is using toolbars that actually exist in your database. The toolbar names used for the forms are defined by constants at the top of the code that follows .
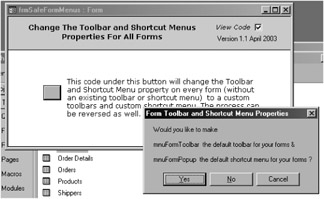
Figure 7-15: The frmSafeFormMenus form, which changes all form shortcut and toolbar properties.
The essence of this VBA code is that the DAO library obtains a collection of forms in the database. The code circulates through all the forms. If the form is open, the developer can choose to close the form and continue. The code then opens the form in design mode and the toolbar or shortcut menu bar properties are checked. If these are blank, then the code will modify the properties' values to equal the values as defined by the constants at the top of the procedure. The code can also undo the property changes that it makes.
Private Sub cmdSafeShortcuts_Click() ' Export all queries, forms, macros, and modules to text. ' Build a file to assist in recovering the saved objects ' into a clean database. ' This subroutine requires a reference to ' Microsoft DAO 3.6 or 3.51 library. On Error GoTo err_cmdSafeShortcuts Dim dbs As DAO.Database, Cnt As DAO.Container, doc As DAO.Document Dim mdl As Module, objName As String, strDocName As String Dim i As Integer, modifyMenus As Integer Dim FilePath As String Dim fileType As String Const CONDOCSTATECLOSED = 0 Const FORMTOOLBAR = "mnuFormToolbar" Const FORMPOPUP = "mnuFormPopup" Const SHOWPOPUPMENU = True ' Set to false to hide shortcut menus altogether. Const FORMSAVEMODE = acSave ' Use acSavePrompt if you want to confirm changes. If Not Application.IsCompiled Then MsgBox "This module is about to compile all the VBA code in your database", _ vbInformation RunCommand acCmdCompileAllModules End If If Application.IsCompiled Then modifyMenus = MsgBox("Would you like to make " & vbCrLf & vbCrLf & _ FORMTOOLBAR & " the default toolbar for your forms and " & _ vbCrLf & vbCrLf & FORMPOPUP & _ " the default shortcut menu for your forms ? ", _ vbYesNoCancel, "Form Toolbar and Shortcut Menu Properties") If modifyMenus = vbYes Or modifyMenus = vbNo Then Set dbs = CurrentDb() Set Cnt = dbs.Containers("Forms") For Each doc In Cnt.Documents strDocName = doc.Name If Me.Name <> strDocName Then ' Do not open this form with this code. ' Test whether the form is already open and close it with a prompt. If SysCmd(acSysCmdGetObjectState, acForm, strDocName) <> _ CONDOCSTATECLOSED Then DoCmd.Echo True, "Closing an open form" DoCmd.CLOSE acForm, strDocName, acSavePrompt End If DoCmd.OpenForm strDocName, acDesign ' Change the settings for the toolbar menu. If Len(Forms(strDocName).Toolbar) = 0 Or _ Forms(strDocName).Toolbar = FORMTOOLBAR Then ' Only change forms with no toolbar or our toolbar. If modifyMenus = vbYes Then ' Make this the default toolbar. Forms(strDocName).Toolbar = FORMTOOLBAR Else ' Clear the toolbar menu from the form. Forms(strDocName).Toolbar = "" End If End If ' Change the settings for the shortcut menu. If Len(Forms(strDocName).ShortcutMenuBar) = 0 Or _ Forms(strDocName).ShortcutMenuBar = FORMPOPUP Then ' Only change forms with no shortcut menu or ' our shortcut menu. If modifyMenus = vbYes Then ' Make this the default shortcut menu. Forms(strDocName).ShortcutMenu = SHOWPOPUPMENU Forms(strDocName).ShortcutMenuBar = FORMPOPUP Else ' Clear the new shortcut menu from the form. Forms(strDocName).ShortcutMenu = SHOWPOPUPMENU Forms(strDocName).ShortcutMenuBar = "" End If DoCmd.Echo True, "Closing the form that has had " & _ "its popup properties modified" DoCmd.CLOSE acForm, strDocName, FORMSAVEMODE Else ' No action to be taken on this form; close the form. DoCmd.CLOSE acForm, strDocName, acSaveNo End If End If Next doc End If Else MsgBox "This database needs to be compiled first for safety reasons", _ vbInformation, "Choose menu { Debug ... Compile All Modules} " & _ "from the VBA window" End If Exit_cmdSafeShortcuts: On Error Resume Next Set doc = Nothing Set Cnt = Nothing Set dbs = Nothing Exit Sub err_cmdSafeShortcuts: Select Case Err.Number ' Problems with unload process. Case vbObjectError + 999 ' To see line immediately after the error line, press CTRL+BREAK, ' drag yellow arrow to Resume Next, then press F8. Resume Next Case Else MsgBox "Error No. " & Err.Number & " -> " & Err.Description End Select Resume Exit_cmdSafeShortcuts End Sub You could make some easy extensions to this sample, such as adding report-specific toolbars, adding simpler toolbars when the form has no record source, or turning off the pesky Form Allows Design Changes property in Access 2000 and later. If you want to add toolbars and shortcut menus to your reports, use the frmSafeReportMenus form, which has very similar software, in the demonstration database. Now we will look at how to combine the startup options with menus to provide better database protection through menus.
The Menu and Toolbar Startup Options
In Chapter 2, I discussed in detail the ways in which you can manually and programmatically change the Access startup options. During those discussions, I refrained from detailed analysis of the five toolbar- related options because I felt it would be better to introduce some background on toolbars first. Now that you have the knowledge to build custom toolbars, you can use those toolbars with the startup options to protect your database.
Before starting, I suggest that you build a protection toolbar that will provide shortcuts to some of the protection forms and techniques illustrated in this book. This toolbar will help you as we work through the startup options by making it easy to undo the changes that we make. You may also want to build on this toolbar while you are working through this book so that you have easy access to the samples that you think are suited to your applications. So, to build the protection toolbar:
-
Open your copy of Northwind.mdb.
-
Open the Customize dialog and select the Toolbars tab.
-
Create a new toolbar called mnuProtection .
-
Select All Forms on the Commands tab.
-
Drag New Menu to the mnuProtection toolbar and rename it Protection.
-
Drag the following forms to the mnuProtection toolbar (you may need to import these from the demonstration database): frmStartupProperties , frmSafeFormMenus , frmSafeReportMenus , frmDisableMenuItems .
-
Put the toolbar on the same level as the current toolbar and place it on the right side, as shown in Figure 7-16.
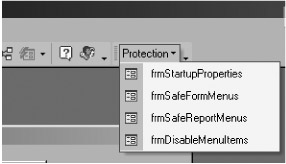
Figure 7-16: Adding the Protection menu, which includes forms from the demonstration database.
Now we are in a position to test the startup options without making our database difficult to open. So let's have a look at the ramifications of changing each of the five toolbar-related startup options (shown in Figure 7-17). When you decide which one of the options to adopt, remember to clear the Display Database Window check box, as these options provide little protection if you allow the Database window to appear.
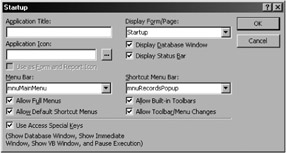
Figure 7-17: The startup properties, which include information on menus and toolbars.
| Tip | The easiest way to open and close a database to test the startup options is to choose Tools ˜ Database Utilities ˜ Compact Database. |
Remember when you try out any of these options that you can fall back on the AllowByPassKey property (press SHIFT when opening the database). I find that when I am experimenting with these menu-related startup options, it is easier to turn off one option at a time so that I fully understand what does what. In addition, remember that these changes apply only to the current database and, for greater clarity, you should only experiment with one of these startup options at a time.
Setting the Startup Menu Bar
When you click the Menu Bar drop-down list, you will see a list of all the custom menus in your database ( specifically a toolbar where the Type property equals Menu Bar). If you choose one like the mnuMainMenu menu bar and restart the database, the new menu will replace the built-in Access main menu bar (as shown in Figure 7-18). To return to the full menu, try pressing CTRL+F11. If that fails, click the frmStartupProperties command on the newly established Protection toolbar.
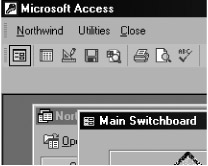
Figure 7-18: The menu bar at the top of the page, which now becomes your custom menu.
Now set the menu bar in the startup properties back to Default so that you can see the effect of the other menus.
Allowing Full Menus
Clearing the Allow Full Menus check box is a good way of protecting the database because it removes all the developer-related menus items from the built-in menus (as shown in Figure 7-19). This action removes the following:
-
Complete Tools menu (startup, options, security)
-
Complete View menu (design and toolbar customization)
-
Hide and Unhide columns on the Format menu
-
Get External Data command (import and link) on the File menu
-
Database properties command on the File menu
-
Hide and Unhide commands on the Windows menu
-
About Microsoft Access and Help on the Web on the Help menu
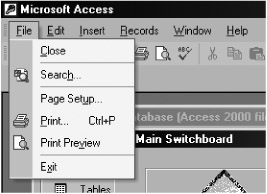
Figure 7-19: Fewer menu items available in the built-in menus.
Because this action will make your interface less cluttered for your users, it's a good option to select. Unfortunately, this option does not remove developer-related commands from your built-in toolbars or shortcut menus.
Allowing Built-In Toolbars
Selecting the Allow Built-In Toolbars check box hides the toolbars that Access applies when a form or report is open. Clearing this option is best when the toolbar property for the form or report has been set to a Custom toolbar (discussed earlier in the chapter). If you don't provide an alternative toolbar, you will probably need to ensure that your forms and menus adequately compensate for the missing toolbar menu. Clearing this option gives more window space to the Access interface because the space allocated to the toolbar will disappear.
Setting the Startup Shortcut Menu Bar
Selecting a menu from the Shortcut Menu Bar drop-down list allocates a custom shortcut menu as the startup shortcut menu that appears for all your forms, as well as for any reports shown in preview mode. You should tailor your custom menu to mimic most of the functionality of the built-in Form View shortcut menu, but without the Design View command.
Allowing Default Shortcut Menus
Selecting the Allow Default Shortcut Menus check box stops built-in shortcut menus from appearing when you open a form or a preview a report. If you clear this option, you should implement an alternative shortcut menu because users will expect something to happen when they right-click in your Access application. Clearing this check box does not override any custom shortcut menu bar defined in the Shortcut Menu Bar property of a form. As an aside, when you clear this option, you will not be able to right-click a menu or toolbar to make changes.
Allowing Toolbar/Menu Changes
If you clear the Allow Toolbar/Menu Changes check box, you will not be able to close a toolbar or right-click to customize or select a toolbar. Also, the View ˜ Toolbars ˜ Customize command will be disabled. This option applies to all the toolbars, including the built-in ones.
Some Easy VBA to Help You Manage Your Menus
Even though the toolbars and menus are fully programmable, here are some little tricks to help you manage your menus. In the Immediate window or with VBA code, you can:
-
Tell the built-in menu bar to go away:
Application.Commandbars("Menu Bar").Enabled = False -
Tell the Access application to use your menu bar instead:
Application.Menubar = MyMenuBarName
-
Tell Access to stop using your menu bar and return to the default Access menu bar by using an empty text string:
Application.Menubar = ""
-
Delete a shortcut menu (or any toolbar, for that matter):
Application.CommandBars("My Shorcut Menu").Delete
| Tip | You can switch between the application menu bars and your custom menu bar by pressing CTRL+F11. This option does not apply if you have cleared the Allow Special Keys check box in the Startup options dialog. |
Now we will take a stricter corporate approach to menu management by showing how you can disable certain built-in toolbar and menu items on a particular computer.
EAN: 2147483647
Pages: 176