Certificates and Signing
|
There’s nothing quite like packaged software. You walk into your local software mega-superstore, locate your favorite title—Microsoft Visual Basic .NET, for example—from an assortment of neatly arranged boxes, pull a box off the shelf and check out all the cool new features listed on it, take it to the counter, hand over your credit card, and it’s yours for the keeping. You lug the box home and install the software on your computer without a second thought. Why? Because you trust it. You have a good idea of what the software is going to do based on the slick marketing hype littering the box; you know who published the software—Microsoft, in this case; you assure yourself the hologram logo is legitimate and not conjured up by some hack artist; and you are reassured by the way the cardboard feels against your skin. OK, maybe that’s going too far. Even if you don’t entirely trust Microsoft to get the setup or other features entirely right, you know who to contact to seek reparations if something goes wrong.
Packaged software is great if you’re a customer, but it’s not so great if you’re a software publisher—especially a small software publisher. There is a great deal of cost associated with producing packaged software, including packaging, printing, disk fabrication, and distribution. The whole process can be enormously risky and expensive.
A good alternative is Internet distribution. Distributing your software on the Web is convenient, low risk, and low cost. It’s a fantastic means of distribution if you’re a software publisher who doesn’t have the volume or capital to justify creating and distributing packaged software. It levels the playing field for software distributors. However, Internet distribution lacks some of the qualities of packaged software, such as a box covered with cool graphics, your company logo, and a shiny hologram—qualities that give your software legitimacy and engender customer trust. Enter digital certificates and signing.
Digital Certificates
A digital certificate is much like other identity-proving certificates you receive throughout your life, such as your birth certificate. A digital certificate contains information such as:
-
The issuer’s name or organization A birth certificate is issued by the county where you were born.
-
Your name, and information pertaining to you relevant to the type of certificate A birth certificate contains your name and parents’ names.
Certificates such as a birth certificate are used to identify you as a person. If you apply for a passport, for example, you’ll be granted the passport only if you provide proof of your identity such as a birth certificate. The issuing party accepts your birth certificate as proof because it trusts the issuing organization to issue a valid certificate that contains legitimate information. If needed, the party who accepts your birth certificate as proof of identity could follow up with the issuing organization, such as the hospital, to cross-check its records and confirm that the certificate is valid.
X.509 Certificate
You can assign your application a digital certificate that, much like a birth certificate, serves as proof of identity. In life, you receive a variety of identity-proving certificates (such as a birth certificate, passport, or drivers license), but on a computer—namely a computer with a Microsoft Windows operating system—a single certificate type is all you’ll need to learn about. That single type is the X.509 certificate. It is the standard for certificate authentication on Windows. An X.509 certificate can be used in a variety of situations, all of which involve authenticating a user, application, or computer to another user, application, or computer. This chapter focuses on applying an X.509 certificate to your Visual Basic .NET application to identify you as the legitimate publisher of the application. An X.509 certificate, when applied to an Internet-downloadable installation package, takes the place of the company logo and hologram you would otherwise place on a box containing your software. An X.509 certificate contains information such as your company name and e-mail address, which your customer can view before installing your application. Figure 10-1 shows a typical X.509 certificate.
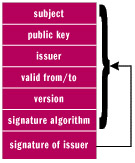
Figure 10-1: Elements of an X.509 certificate.
Obtain an X.509 Certificate from a Certificate Authority
To obtain an X.509 Certificate for your organization, sign up for a digital ID from a certificate provider such as VeriSign or Thawte. For example, you can go to https://digitalid.verisign.com/developer/ms_pick.htm or http://www.thawte.com/buy.html to sign up for your ID, which requires a fee. The certificate described here is a code-signing certificate. Chapter 5 describes how to obtain a different type of X.509 certificate from a certificate authority— namely, a Web server-side certificate—to secure a Web page using SSL.
A digital ID is composed of the following two parts:
-
X.509 certificate This certificate contains your organization’s name and contact information. The certificate comes in the form of a file named with a .SPC extension, such as MyCompany.SPC, formally known as a Software Publisher Certificate. The .SPC file itself contains one or more certificates having a .CER extension. The process of creating an X.509 certificate and an SPC file is explained later in this chapter, but you should only ever have to create a certificate for test purposes or if you play the role of the certificate authority.
Note A certificate authority can be either a commercial certificate provider such as VeriSign or Thawte or a service within your organization that automatically provides certificates. For more information on how to set up your own certificate authority service, go to the Microsoft TechNet Web site at http:// www.microsoft.com/technet and click the following link to the “Step-by-Step Guide to Setting up a Certificate Authority”: http://www.microsoft.com/technet/treeview/default.asp?url=/ technet/prodtechnol/windows2000serv/howto/casetup.asp
-
Public/private key pair At the time you apply for a certificate, you’ll be given a key file such as MyPrivateKey.PVK. This key, the private key portion in any case, is used in the Authenticode-signing process. The private key is used to encrypt the hash-digest value, which is the unique signature for your application.
Note The public-key portion of the public/private key pair is stored as part of the X.509 certificate. The public key is used to decrypt information encrypted with the private key, as explained in Chapter 1. During installation of the software over the Internet, the public key serves to validate that the application signature was indeed encrypted by the associated private key, which prevents anyone from tampering with the signature.
Keep Your Private Keys Safe
As with any private key, you need to store the key you receive in conjunction with your X.509 certificate in a secure location. For example, you could copy the key to two or more floppy (or CD-ROM) disks—the disks after the first floppy (or CD-ROM) serve as backups—store the floppies (or CD-ROMs) in separate lock boxes, and remove all other copies from the local hard drive of your computer. When you are ready to release the built application, you pull out a floppy (or CD-ROM) and apply the private key directly from the disk. If storing your private key on a floppy (or CD-ROM) disk is not practical, you can place the key in a key store. See Chapter 1 for more information on tactics for storing private keys.
Authenticode Signing
Authenticode signing is the process of embedding the X.509 certificate into your application binaries—.EXE and .DLL files—along with an encrypted hash- digest value of your application that uniquely identifies your application. Authenticode signing has been around since Internet Explorer 3.0 allowed for the download and installation of components such as ActiveX components over the Internet. If you use an Authenticode-enabled application such as Internet Explorer to download an Authenticode-signed application on the Web, Internet Explorer automatically does the work of verifying the X.509 certificate and that the application has not been tampered with. The combination of the X.509 certificate and Authenticode signing provide the following assurances:
-
Publisher identity Assurance that the name and address of the company that publishes the software is legitimate. This requires an independent party trusted by you and your customers (such as VeriSign or Thawte) as the provider of your X.509 certificate to vouch for your identity. If your customer trusts your certificate was issued by VeriSign and the customer trusts VeriSign confirmed your contact information to be legitimate, the customer should trust that any software signed with your X.509 certificate is published by you and no one else. If there was no way for customers to identify with a great deal of certainty the publisher for a piece of software, the customer would never know whether a piece of software was actually published by the company whose name is attached to the software. As you see, it would be quite easy for someone with bad intentions to publish faulty or malicious software in someone else’s name.
-
Application integrity Assurance is provided that your application has not been tampered with en route from server to client. This assurance is provided by a hash digest value that uniquely identifies your application—a digital signature, if you will.
Note Authenticode signing involves the use of an X.509 certificate, and you can also say Authenticode signing is dependent on X.509 certificates. However, the reverse is not true. You cannot say the X.509 certificates are dependent on Authenticode signing or applied only to Windows applications. X.509 certificates have many uses outside of Authenticode-signed applications. For example, X.509 certificates are useful for authenticating users logging on to a computer using a smart card. In addition, X.509 certificates can be used with Internet Information Services (IIS) to verify that a request is coming from a particular client and to notify an IIS server to trust that request. Another use would be for a Web-application client of an IIS server to validate the server based on the server’s X.509 certificate. See Chapter 5 for more information on using X.509 certificates to make a Web page available over a secure SSL connection.
An Authenticode signature can be applied to the application executable, application component .DLLs, and the installer package—.MSI or .CAB file— containing your application.
When to Use Authenticode Signing
You should Authenticode-sign the binaries that make up an application or the application’s setup package when the application will be deployed using a nonsecure distribution channel such as the Internet. This includes software you would distribute by other means, such as an attachment in e-mail. Types of applications and components that you should Authenticode-sign include:
-
All setup packages containing your Visual Basic .NET application that are made available over the Internet, such as Windows Installer .MSI and .CAB files. In this case, you don’t need to Authenticode- sign the binaries contained within the setup package; Authenticode signing the setup package itself ensures that none of the binaries contained inside of it can be tampered with—at least this is true in situations in which the signature is checked as described in a moment.
-
No-touch deployment Windows Forms applications where the application .EXE is made available to be run directly over the Internet. For example, the user of your application would run the application by clicking on a button on a Web page that runs http://MyCompany/MyVBNetApplication.EXE. All .DLLs that the application dynamically downloads from the Internet should also be Authenticode-signed.
-
Executable files or installation packages that are made available from an FTP site.
When the Authenticode Signature Is Checked
An interesting problem is that the Authenticode signature of an application is checked in the following limited situations:
-
The Authenticode signature of an ActiveX component contained on a Web page is automatically checked by Internet Explorer when the .CAB file the ActiveX component is contained in is downloaded and used as part of a Web page.
-
The Windows operating system checks the Authenticode signature of device drivers before installing them.
-
If you happen to use a Windows setup .EXE bootstrapper program (usually named SETUP.EXE) that in turn launches a Windows Installer (.MSI) package, the bootstrapper program will usually check the Authenticode signature of the .MSI file it’s launching.
With regard to the third situation, most software publishers do not use SETUP.EXE bootstrapper programs for applications and components distributed on the Internet. One problem with using a bootstrapper program is that the SETUP.EXE application itself could be compromised en route to the target computer where the software will be installed. For example, SETUP.EXE could be replaced by a different SETUP.EXE application en route to your computer, where the new SETUP.EXE could perform any destructive action it wants. Outside of the three situations listed here, the Authenticode signatures are not automatically checked. Why Authenticode-sign an application or component if the Authenticode signature is not automatically verified for the deployment technique you’ve chosen?
If a customer, after downloading your application or component from the Internet, were to encounter an unusual problem involving your Windows Forms application or component, you could have the customer perform a manual check of the Authenticode signature and view your certificate. The customer could run a command-line tool such as ChkTrust.Exe to verify the digital signature of the application or component. If the digital signature check fails or the digital signature is missing, this would be an indication that the application has been spoofed or tampered with. In such a case, you could ask your customer to download a new copy of the installation package (perhaps from a different, more secure location) and have the customer check the Authenticode signature before installing it.
Incorporate Authenticode Signing in Your Build Process
If Authenticode signing makes sense for your particular application or component, create a build process that always Authenticode-signs your built applications as part of the process. This will ensure not only that your final release is secure for distribution, but also that all interim releases—which might be released as Beta software—are secured. Authenticode signing prerelease versions of your product also gives you a chance to discover and correct any problems that might be encountered from the process of Authenticode signing the application to using the application itself. You don’t want to wait until the last minute, for example, to find that you are applying an expired X.509 certificate.
Strong-Name Signing
Strong-name signing is the process of creating a unique name for your application that is composed of the assembly name, encrypted hash digest value, version number, and culture value. A strong name is a globally unique name for your application or component that can’t be duplicated by anyone else. A strong name prevents your application from being spoofed by another application or component. A key part of the strong name is the hash digest signature. The signature is quite similar to the hash code signature applied to an Authenticode-signed application, with one critical distinction—a strong name ensures only application integrity, not publisher identity. If you recall from the discussion earlier in this chapter, an Authenticode signature provides both application integrity and publisher identity.
A strong-name signature is composed of two parts, which are embedded in the application:
-
A hash digest that uniquely identifies the application and is encrypted with a private key. A hash digest, in this case, works like a checksum; a unique number computed from all the bytes in the file.
-
The public-key portion of the public/private key pair that will be used to decrypt the hash when the application is loaded.
When a strong-named application is loaded by Visual Basic .NET, the public key is used to decrypt the hash value and a hash value for the application is recalculated and compared to the decrypted hash value. If the values match, the application has not been tampered with; if even one byte is corrupt relative to the hash, the application has been tampered with or has become corrupt. If the application has become corrupt, a security exception will occur and the application won’t run. By validating the strong-name signature, Visual Basic .NET ensures the integrity of a strong-named application. Likewise, when a Visual Basic .NET application that is Authenticode-signed with an X.509 certificate is loaded by Internet Explorer, the Authenticode signature of the application is verified before the application is loaded.
Strong naming an application provides the following benefits:
-
Unique identity Guarantees that no other application or component has the same strong name.
-
Application integrity Gives assurance that an application has not been tampered with after it has been compiled.
-
Version integrity Makes sure the application’s strong name, as represented by the hash-digest value, is reserved across all versions of the application. For example, no one else can use your unique private key to sign an application with the same strong name as your application—even if the other person’s application has the same assembly name, culture value, and version number.
-
Spoof protection Strong naming gives assurance that no one can spoof your application or component by creating an application or component with the same strong name. Even if two assemblies from two different vendors share the same weak name, version, and culture, the PublicKeyToken is guaranteed to be unique because each vendor will be using a unique key to sign a strong-named assembly. The only way both vendors (or a vendor and the spoofing attacker) could use the same strong name is if one vendor (or attacker) were to somehow obtain the private key the other vendor used.
Strong Names vs. Weak Names
In Visual Basic .NET, the simple name of an application is considered to be the weak name. For example, in the case of the Visual Basic .NET runtime implemented by Microsoft.VisualBasic.Dll, the weak name is Microsoft.VisualBasic. It’s considered to be a weak name because anyone could create a .Dll named Microsoft.VisualBasic.Dll and Visual Basic .NET would not be able to distinguish between the two assemblies. Although weak-named assemblies also have a version number and culture associated with them, this information isn’t used to identify the assembly. In fact, if the assembly is not strong-name-signed, the assembly version and culture attributes are not used to identify the assembly, nor is this information used by the .NET runtime for any other purpose.
A strong name includes a combination of the weak name (assembly name), version number, culture value, and public key, which is used to validate the private key that was initially used to sign the application. The strong name can be represented in a string to identify the assembly, as the following code demonstrates:
Microsoft.VisualBasic, Version=7.0.3300.0, Culture=neutral, PublicKeyToken=b03f5f7f11d50a3a
| Note | The PublicKeyToken is a hash digest of the full public key. The combination of weak name, version, culture, and PublicKeyToken ensures a unique name. |
Strong-Named Visual Basic .NET .DLLs and Partial Trust
If you apply a strong name to a Visual Basic .NET .DLL, the .DLL must be installed on a local computer and called from an application installed on the local computer because only the local computer is given full trust. If the .DLL is loaded or called in any of the following situations, it is considered to be a partially trusted .DLL:
-
The .DLL is installed along with the calling application .EXE on a network share. The .DLL is given the permissions associated with the Local Intranet zone.
-
The .DLL and calling application .EXE are made available on the Internet as no-touch download installable components. Although the .EXE and .DLL are downloaded and run on your local computer, they are downloaded and run from a special place on your computer known as the Internet download cache. Any application executed from the Internet download cache is given the permissions associated with the Internet zone, which are very few.
-
The .DLL is installed on the local computer and given full trust, but it’s called from an application run from the Internet or network.
In the first two situations, because the .DLL itself is installed and run in an environment that is not given full trust, the .DLL is not granted any permissions (not even any permissions otherwise granted to the partially trusted environment where it is run, such as the Internet zone). In the third situation, the .DLL is given full trust when installed on the local computer, but the application calling into the .DLL might be calling from somewhere else, such as a local network share, which is not given full trust. In the cases described here, the application or caller is considered to be partially trusted. To support partially trusted callers, your Visual Basic .NET .DLL needs to support the AllowPartiallyTrustedCallers attribute. Otherwise, if the attribute is not applied, no permissions are granted to the .DLL, even if it’s loaded in a partially trusted environment, such as from a network share in the Local Intranet zone—a zone where the .DLL should otherwise be granted the respective permissions for that zone. Only when you apply the AllowPartiallyTrustedCallers attribute do the expected code-access security permissions (as presented in Chapter 3) get applied to your .DLL.
| Tip | If your Visual Basic .DLL is meant to be called by a .NET application you’ve created and by no one else, package the .NET application and .DLL in a setup package and ask all users of your application to install the application on their local machine. You can skip having to apply the AllowPartiallyTrustedCallers attribute and rest assured that the .DLL will not be able to run in or be called from any other environment, such as the Internet. |
If you strong-name a Visual Basic .NET .DLL and the .DLL is intended to work in a partially trusted environment, it’s required that the .DLL include the AllowPartiallyTrustedCallers attribute to be granted any permissions. If the strong-named Visual Basic .NET .DLL is installed or called in any of the situations just listed, the .DLL will fail to load and generate a security-exception error. If the .DLL is intended to work only in a fully trusted environment (within the My Computer zone), you do not need to apply the AllowPartiallyTrustedCallers attribute as suggested in the preceding note.
To apply the AllowPartiallyTrustedCallers attribute, add the following declaration to the AssemblyInfo.Vb file contained within the Visual Basic .NET .DLL project, such as a class-library or user-control project.
<Assembly: System.Security.AllowPartiallyTrustedCallers()>
| Warning | Be extremely cautious about applying this attribute. By applying this attribute, you’re claiming that your component cannot be made to compromise the computer, compromise the network, or divulge any personal information by a calling application originating from an untrusted or partially trusted source, such as the Internet. If you’re using pure Visual Basic .NET code and .NET components, your code will be protected by the standard code-access security permissions described in Chapter 3. However, if you’re making calls to API functions, using ActiveX components, creating Public members to expose information a caller shouldn’t have access to, or your .DLL operates on user input, make sure your application is protected against all threats described in Chapter 6 and that all input is validated as described in Chapter 7. Finally, code-review and test your application as described in Chapter 9. |
Authenticode Signing vs. Strong Naming
As mentioned previously, Authenticode signing and strong naming are similar in that both provide application integrity. However, Authenticode signing provides features that are not provided by strong naming, and vice versa, as shown in Table 10-3.
| Feature | Authenticode Signing | Application Strong Naming |
|---|---|---|
| Integrity of application verified when loaded in Internet Explorer | X | X |
| Integrity of application verified when loaded in Windows | X | |
| Mechanism for trusting the application publisher is provided | X | |
| Can be applied to application executable files such as .EXE and .DLL files | X | X |
| Can be applied to installation packages such as Windows Installer (.MSI) and .CAB files | X | |
| Can be revoked or has limited lifespan | X | |
| Requires a regular enrollment fee | X |
Should You Authenticode-Sign and Strong-Name Your Application?
In general, if you’re distributing your Visual Basic .NET Windows Forms application via a nontrusted distribution channel such as the Internet, where an application could be tampered with en route from server to client, you should always strong-name-sign every component, .EXE, and .DLL that make up the application as well. In addition, you should Authenticode-sign where practical the Windows Installer (.MSI) or cabinet (.CAB) setup package used to bundle your application; keep in mind that Authenticode signatures are really only checked in Web-download scenarios involving .CAB files and that Authenticode X.509 certificates cost money and expire after a period of time.
The best way to understand strong naming, X.509 certificates, and Authenticode signing is to see them in action.
Strong Naming, Certificates, and Signing Exercise
This exercise demonstrates how to Authenticode-sign and strong-name-sign your Windows Forms application and components. Although you can use the same techniques to Authenticode-sign and strong-name-sign ASP.NET Web server and Web services components, it really doesn’t make sense to do so because the components are typically deployed to a Web server as opposed to the customer’s computer. However, if you are distributing via the Internet an ASP.NET Web server application for a customer to use, you should package and deploy the application in much the same way you package and deploy a Windows Forms application, as outlined in the following steps:
-
Strong-name-sign a Visual Basic .NET application.
-
Obtain an X.509 certificate from a certificate provider such as VeriSign or Thawte, formally referred to as a certificate authority (CA).
-
Create a test X.509 certificate.
-
Authenticode-sign your application with the X.509 certificate.
-
Authenticode-sign your setup package with the X.509 certificate.
Step 1: Create a Visual Basic .NET test application
For the purpose of demonstrating how to apply an X.509 certificate to a Visual Basic .NET application, you need a built application to start with. You can either use the practice application available in the CH10_Deployment\MyTestApplication\Start directory as a starting point or perform the following steps to create a simple test application:
-
Run Visual Basic .NET, and create a Windows Form application named MyTestApplication.
-
Select Build Solution from the Build menu to build it, and create the MyTestApplication.exe application.
Step 2: Strong-name sign the application
The steps to create a strong-named application are as follows:
-
Launch a Visual Studio .NET command window.
-
Change the current directory to the Application directory. For example, change the current directory to CH10_Deployment\MyTestApplication\Start.
-
Run the strong-naming tool SN.EXE with the –k option as follows to generate a public/private key pair to a file named StrongNameKey.Pvk:
SN –k StrongNameKey.Pvk
The StrongNameKey.Pvk file is a private key that you need to protect. See the discussion earlier regarding techniques for storing private keys.
You can apply this same public/private key pair in more than one application or component you plan on shipping. See the “Delay Signing—An Alternate Build Strategy” sidebar later in this chapter for more information.
-
Open AssemblyInfo.vb for the application, and add the following attribute declaration to the file:
<Assembly: AssemblyKeyFile("..\..\StrongNameKey.pvk")> -
Rebuild MyTestApplication from within Visual Studio .NET by selecting Build Solution from the Build menu. The new MyTestApplication.exe that is built will be strong-name signed.
Step 3: Create a test X.509 certificate and SPC file
While you are patiently waiting to receive your X.509 certificate from a certificate authority such as VeriSign or Thawte (which can take a couple weeks while they perform an extensive background check), you can create a test certificate. You can use the test certificate to practice Authenticode signing your application with the X.509 certificate.
-
Open a Visual Studio .NET Command Prompt.
-
Change the current directory to the Application directory of the Visual Basic .NET test application you created earlier. For example, if you created the application in the C:\MyTestApplication directory, change to the C:\MyTestApplication directory. This will conveniently place the generated X.509 certificate in the same directory as your application.
-
Run the MakeCert.Exe utility to create an X.509 certificate named MyCompany.Cer along with a private key named MyPrivateKey.pvk.
MakeCert -n "CN=My Certificate" -sv MyPrivateKey.pvk MyCompany.cer
The –n option specifies the name of the company the certificate is issued to; this is formally known as the subject’s certificate name and must conform to the X.500 standard. The name is always expressed in the format of “CN=” followed by the friendly name of the certificate.
Note MakeCert is used to create a test certificate. You should never deploy an application signed with this certificate because it doesn’t bear your name and isn’t issued by a trusted authority such as VeriSign.
-
You will be presented with a Create Private Key Password dialog box as shown in the following illustration. Enter a password of your choice. This password is associated with the private key MyPrivateKey.pvk, created by MakeCert.
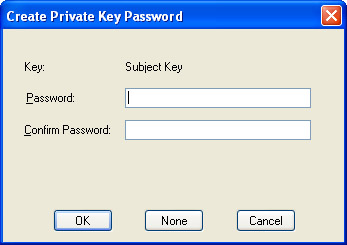
-
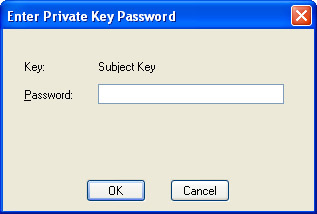
You will be prompted again with the Enter Private Key Password dialog box. The –sv option extracts the private key, and the password is needed to gain access to this key. This can be surprising at first, but enter the same password that you entered previously. If you run the MakeCert command again, specifying the same private key parameter with –sv, this is the only dialog box you will see.
-
Run the Cert2Spc.exe utility to package the X.509 certificate created in the previous step in a Software Publisher Certificate (SPC) file as follows:
cert2spc MyCompany.cer MyCompanyCerts.Spc
If you’re in an organization where more than one person builds the product or has access to the build machine, you should think about delay signing your application. Delay signing involves reserving space in the application for the strong-name signature without applying the strong- name signature at the time the application is built. Instead, you apply the strong-name signature later in the build process or immediately before the binaries are built in the setup package. Applying the strong-name signature later in the process means that a person who builds the application for his own purposes, such as debugging, does not require the private key.
Because the strong-name signature relies on a private key, you should not make that private key widely available. In fact, you should make the private key available to as few people as possible and store it in a safe location. This is the strategy adopted by the Visual Basic .NET team to apply the strong-name signature to all .NET built components that make up the Visual Basic .NET.
The following steps demonstrate how to delay-sign an application:
-
Run the SN.EXE command-line tool shown previously to extract the public key from the public/private key pair in the file StrongNameKey.Pvk (located at CH10_Deployment\MyTestApplication\Start)as follows:
SN -p StrongNameKey.pvk StrongNamePublicKey.pvk
Note The –p option extracts the public-key portion from the public/private key combination contained within StrongNameKey.Pvk to the file StrongNamePublicKey.Pvk.
-
Change the AssemblyKeyFile attribute declaration in the file AssemblyInfo.vb to:
<Assembly: AssemblyKeyFile("..\..\StrongNamePublicKey.pvk")> -
Add the following AssemblyDelaySign attribute declaration to AssemblyInfo.vb immediately after the AssemblyKeyFile declaration.
<Assembly: AssemblyDelaySign(True)>
-
Rebuild the application.
-
At a later point in time, you can apply the strong-name signature by SN.EXE from the command-line as follows using the original file containing the public/private key pair:
SN –R MyTestApplication.exe StrongNameKey.pvk
Note The –R option re-signs an assembly with a given key.
To restrict access of the private key to as few people as possible, you could store the private key on a computer accessible only by individuals authorized to use the private key. One of the individuals who has access to the key could be responsible for creating the original public/private key pair. Keep the key pair on the restricted computer, and distribute the public key to everyone else in the organization to build against using delay signing.
As part of your build process, the built components could be copied to the restricted computer by an individual having access to the computer or by an automated process running on that computer, strong-name signed on the computer using the private key file, and dropped back to the public build computer to a special directory (such as a directory named signed) where the strong-name signed files are built into the setup package. This is essentially the process used by the Visual Basic .NET team as part of the daily build process to sign all .NET built components.
Step 4: Authenticode-sign your application with the X.509 certificate
To Authenticode-sign an application, you need to run the SignCode.exe utility. The process of Authenticode signing your application with SignCode.exe requires the following ingredients:
-
An X.509 certificate.
-
A friendly name, which is a description of the content of the file that shows up in the X.509 certificate.
-
The signing authority of the certificate, which can either be individual or commercial. Specify individual when using SignCode. Specify commercial when using a certificate provided by a commercial certificate provider such as VeriSign. SignCode.exe by default will always pick the highest permission from the certificate.
-
A private key used to encrypt a hash digest, which uniquely represents your built application. The hash digest is automatically generated by SignCode.exe, encrypted, and stored in your built application alongside the X.509 certificate.
-
The location of a timestamp service. This is a feature that a certificate authority such as VeriSign offers to ensure that an Authenticode-signed application can be trusted after the X.509 certificate expires. Certificates usually expire after one year, but applications signed with X.509 certificates last much longer. The timestamp gives an absolute reference point in time when the X.509 was applied. An application that contains a timestamp is considered trusted even after the certificate it was signed with expires. An application that is not timestamped is not considered to be trusted when the timestamp expires. For this reason it’s recommended that you timestamp your application as part of the signing process.
-
Run SignCode.exe to Authenticode-sign your application as follows:
SignCode -spc MyCompanyCerts.Spc -v MyPrivateKey.pvk
 -n "My Signed App" -$ individual
 -t http://timestamp.verisign.com/scripts/timstamp.dll
MyTestApplication.Exe -
Once again, you’ll be prompted for the private-key password as shown previously. Enter the password you used at the time you created the test X.509 certificate.
Note NoteIf you’re using an X.509 certificate provided by a commercial vendor such as VeriSign or Thawte, specify the names of the .SPC and .PVK files you received from VeriSign (or Thawte) in place of the MyCompanyCerts.Spc and MyPrivateKey.pvk shown previously.
Take a look at the certificate attached to your application
To verify that the certificate has been correctly applied to your application and to view details of the certificate itself, perform the following steps:
-
Launch the Windows Explorer by selecting Run from the Start menu and entering Explorer as the application to run as shown here:

-
Navigate to the MyTestApplication.Exe built and signed application you created by performing the previous steps. For example, navigate to the CH10_Deployment\MyTestApplication\Start\Bin directory.
-
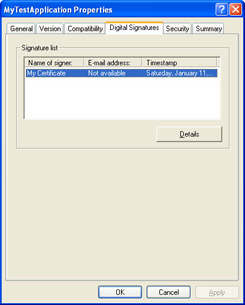
Right-click MyTestApplication, and select Properties.
-
Select the Digital Signatures Tab, and then select the lone “My Certificate” entry as shown here:
-
Click the Details button and you’ll be presented with summary information for your application’s digital signature as shown here:
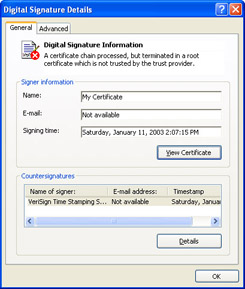
-
Click the View Certificate button to view details about the X.509 signature used to Authenticode-sign the application.
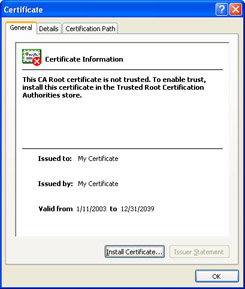
Warning As you can see by the red X displayed on the certificate symbol, the certificate is not trusted because it is a test certificate. Information in the dialog box tells you that you can trust the certificate by clicking the Install Certificate button and installing the certificate in the Trusted Root Certification Authorities folder. It’s highly recommended that you do not do this for any type of certificate—a test certificate or a seemingly legitimate certificate attached to an application you just downloaded from the Internet; you should accept (run) only applications bearing certificates that are already trusted.
-
Click the Details tab to see all the detailed information that makes up the certificate, such as the hashing algorithm used to sign the certificate, the public key taken from the certificate itself, and the date of expiration.
Step 5: Authenticode-sign your setup package with the X.509 certificate
The following steps demonstrate how to add a deployment project for your application and select the options for Visual Basic .NET to automatically Authenticode-sign the installation package:
-
Run Visual Basic .NET, and select New Project from the File menu.
-
Select Setup And Deployment Projects from the Project Types list.
-
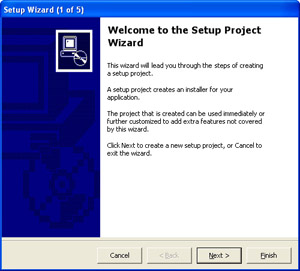
Select a Setup Wizard project, name it MyTestApplicationSetup, and click OK.
-
You will be greeted by the Setup Project Wizard as shown in the following illustration. Click Next.
-
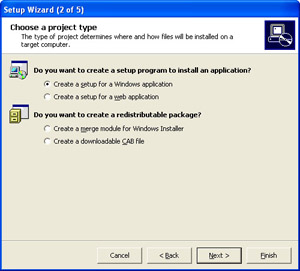
Select Create A Setup For A Windows Application, the default setting, as shown in the following illustration. Click Next.
-
You will be presented with the Choose Files To Include dialog box. Click the Add button, and add the strong-named signed MyTestApplication.exe located in the Bin directory where you strong-name signed this application in the section “Step 2: Strong-name sign the application.” Click Next.
-
Click Finish on the Create Project dialog box, and the MyTestApplicationSetup project will be added to the MyTestApplication solution.
-
Right-click the MyTestApplicationSetup project in the Solution Explorer, select Properties, and you will be presented with the Build Settings dialog box.
-
Change the Configuration to Release because you should ship a release build of your product, not a debug build, which is not optimized and might contain additional (unnecessary) debug code not found in a release build of the application.
-
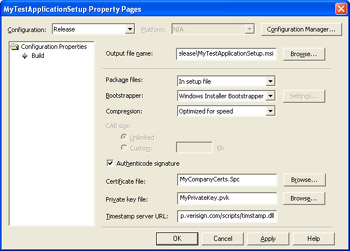
Check the Authenticode Signature check box, and fill in the Certificate File and Private Key File fields using the MyCompanyCerts.Spc and MyPrivateKey.Pvk files created previously. Set the Timestamp Server URL field to http://timestamp.verisign.com/scripts/timstamp.dll as shown here:
Congratulations! You’ve completed the five-step strong-naming, certificates, and signing exercise. You now have an Authenticode-signed .MSI setup package containing a strong-named, Authenticode-signed Windows Forms application ready for release (assuming you used an X.509 certificate provided by a certificate authority such as VeriSign or Thawte).
|