Securing What s Most at Risk: A Checklist
|
Securing What’s Most at Risk: A Checklist
Once you have an effective system in place for promptly installing security fixes (and doing so shouldn’t take long), you’ll benefit from plugging the biggest potential holes in your network and server configuration. The checklist in this section is intended to bring your machines to a reasonably secure default state that gives you protection against the biggest threats. Depending on the results of your risk assessment (see Chapter 4 and Chapter 5), it might be necessary for you to take additional steps to bolster your network’s security.
Step 1: Patch
Getting the right patches onto your machines is critical. Without them, your servers and workstations are vulnerable; with them, they’re better protected. (Of course, patches can’t compensate for weak policies or lack of auditing.) Here’s what you need to do:
-
Install the most current operating system service pack. Service packs are cumulative collections of security and bug fixes up to a certain point in time. You should always have the most recent service pack installed on your Windows servers. For example, Windows 2000 Service Pack 3 contains literally hundreds of fixes to vulnerabilities that were identified during the Windows security push, many of which have no otherwise available hotfixes. (The only exception to this rule: if you’re using third-party applications like virus scanners or fax connectors, make sure that they’re compatible with the service pack before you install them!) Once you have a solid service pack foundation, you can fill in hotfixes that were released after the service pack code was finalized. Note that this recommendation is not an excuse to slap a service pack on your machines without testing it on a staging or lab server first.
-
Install the most current application service pack. Whether you’re using Exchange or some other application, you’ll find that applications have specific service packs, too. Just like the Windows service packs, these application service packs are tested collections of fixes. By not installing them, you’re cheating yourself.
-
Decide how you’re going to distribute patches. Whether you do it manually or with the assistance of an automated tool like SUS or SMS, you must have a systematic way to get new patches onto your machines. The road to administrative hell is paved not with good intentions, but with ad hoc patch distribution schemes. A consistent, repeatable process ensures that as new patches are released, you get them installed in a timely way.
-
Make sure all your servers start from the same baseline. At a minimum, all your servers need to have the same service packs installed. I know of one large Exchange site with 70 Exchange servers that had no less than 42 different software configurations on those servers, making patch management a nightmare.
-
Patch what needs to be patched, right now! HFNetChk –b is your friend because it gives you an immediate report of the baseline patches required to bring machines to the minimum suggested MSRC configuration. You can also use MBSA or the commercial HFNetChk Pro tool—whatever works best for your environment. The key here is to find out what patches you’re missing so that you can get them in place right away. For the long term, the best way to implement this step is through a scheduled task that uses MBSA (without the –b switch, because you’ll want your ongoing scans to look for all missing patches, not just the baseline ones) to scan your systems for needed patches, combined with a SUS or SMS setup that deploys patches for you.
-
Go back to step 2. Patch management is a process, not a destination. Once you have your systems to a consistent baseline, you’ll find that the baseline is moving upward as new patches are released. Don’t slack off on this; the one patch you fail to install might be all that stands between you and an attack that exploits the unpatched flaw. Remember Law #5: eternal vigilance is the price of security.
Step 2: Set Strong Policies
Once your systems are correctly patched, you should consider the impact that policies have on your overall security. The easiest way for an attacker to break in is to steal legitimate credentials. Accounts with weak, short, or nonexpiring passwords gives the attacker a big advantage. (Be sure to tell your users not to use incremental or sequential passwords, like password0, password01, password02, and so on. Those are no harder to crack than ordinary dictionary words.)
The Group Policy engine introduced in Windows 2000 is a fascinating beast. It greatly eases the process of defining and distributing settings for all sorts of things, from security-critical items such as account lockout periods to trivial settings such as what desktop background is used as the default. If you don’t understand everything about Group Policy objects (GPOs), don’t fret. This sidebar teaches you the three critical things you need to know.
-
You edit GPOs with the Group Policy editor Microsoft Management Console (MMC) snap-in, Gpedit.msc. Policy settings are grouped according to the objects they affect. The interesting security settings are either in Computer Configuration | Windows Settings | Security Settings or User Configuration | Windows Settings | Security Settings. For our purposes in this book, almost all of what we do is focused on the items in the Computer Configuration tree.
-
GPOs can be applied to individual machines or to machines in an Active Directory site, domain, or OU. For local machines, you create policy settings by using the Local Computer Policy object. For Active Directory objects, you use the appropriate snap-in (for example, Users and Computers for OU-targeted policies) to open the object’s Properties dialog box, where you’ll find the Group Policy tab.
-
There’s a complex set of rules that determines what the resultant set of policies (RSoP) is for a particular computer or user. That’s because a single security principal might have policies from parent domains, Active Directory sites, and OUs all applied. The local GPO is applied first, followed by policies specified by (in order) the site, the domain, the parent OU, and the OU the object is in. If there are multiple policies, their settings accumulate. When settings conflict, the last one applied takes precedence. You can use the Gpresult tool (part of the Windows 2000 Resource Kit, and available for download from http:// www.microsoft.com/windows2000/techinfo/reskit/tools/existing/gpresult-o.asp) to identify which GPOs are in effect on a particular machine.
Once you understand these three basic facts, you’ll be well-equipped to set GPOs to apply the policies discussed in the following sections. For more information on how to work with GPOs to their fullest, see the “Additional Reading” section at the end of the chapter.
Setting Auditing Policies
Maintaining a good security audit log is a key part of proper security practice. A solid audit process helps you know when someone’s attacking and what they’re doing. It can also provide valuable advance warning of break-ins, assuming that you’re monitoring the logs to see what’s in them. In the Security Operations Guide for Windows 2000 Server, Microsoft recommends that you enable auditing at a high level in your Active Directory tree, not on lower level constructs like OUs. The precise auditing settings you use might vary somewhat, depending on how you choose to handle analyzing and retaining audit log data. However, there are three basic steps that give you a solid set of basic auditing data (as described in Chapter 6 of the Security Operations Guide for Windows 2000 Server).
First, set an event log policy on your Exchange 2000 servers. The event log policy, available in Computer Configuration | Windows Settings | Security Settings | Event Log | Settings for Event Logs, allows you to control the maximum sizes of the event logs and what happens when the security event log fills up. The most important setting here is to disable the Shut Down The Computer When The Security Audit Log Is Full setting. Exchange 2000 can generate a large volume of logon and logoff events, so it’s possible to fill up the security log and unexpectedly take down your Exchange server. Note that this is a tradeoff: if you leave this setting on, an attacker can DoS your machine by filling up the event log. If you turn it off, an attacker can flood the log with bogus events and cover his tracks. You’ll have to evaluate the relative risks of these two scenarios and decide which lowers your risk the most. You can adjust other settings, such as event log sizes, according to your environment’s requirements.
Second, decide which events you’re going to log. Windows 2000 supports logging nine categories of events (described in more detail in Chapter 17, “Security Auditing”). Some events are more useful than others. For Exchange servers, the most interesting events are those that tell us when someone tried and failed to access a resource. Accordingly, your audit policy should, at a minimum, log failures for account lockout and logon events. Use the recommendations in Chapter 17 to figure out what other log events you’re interested in. You should probably plan on auditing policy change events, system events, and privilege use events as a baseline. Table 6-2 shows some suggested events you should probably log.
| Event Type | What to Log | Why |
|---|---|---|
| Account logon | Failure | Exchange servers generate many of these events as users log on and off. You’re interested in failed logon attempts more than successful ones. |
| Account management | Success, Failure | These events are logged when accounts are created or destroyed, so it’s useful to be able to track when account actions occur. |
| Directory service access | Nothing | These events are generated every time any service or user requests data from Active Directory. The volume of events generated is unmanageably large. |
| Logon | Failure, Success | These events are generated when services or computers log on with their service accounts; You’ll want to know when those attempts fail. If you see success events when there’s no corresponding service activity, that’s a warning sign. |
| Object access | Failure | These events are logged any time a principal for whom auditing is enabled requests access to an audited object. You control what gets logged by controlling what you audit, but you’ll definitely want to see failed access attempts for audited objects. |
| Policy change | Failure, Success | Policy change events are logged when someone tries to change a system or group policy, including the settings that control auditing and logging. Watch for these events—if you see unexplained policy changes, that’s a warning flag. |
| Privilege use | Failure | These events are logged when a user tries to use specific privileges (including “Act as part of the operating system” and “Debug programs”). Any time you see a failed privilege use event, someone is trying to escalate their privileges. This is a significant warning. |
| Process tracking | Nothing | These events reflect when processes are created, paused, stopped, or terminated. They’ll fill the event log if you let them. |
| System events | Failure, Success | System events are logged when the system shuts down (unexpectedly or not). |
Finally, put procedures in place to regularly review your event logs. An automated tool like Microsoft EventComb (available as part of the Security Operations Guide for Windows 2000), Microsoft Operations Manager, or Rippletech’s LogCaster can make this much easier. Even without a fancy tool, though, you should regularly be looking for the critical event types described in Chapter 17.
Setting Strong Password and Account Policies
People generally prefer convenience over security, so if you give them a way to bypass security measures, they usually will. (See Appendix A, Law #2: Security works only if the secure way happens to also be the easy way.) Your best defense against this natural human tendency (remember, administrators are people, too) is to apply and enforce policies that require the use of complex passwords, force passwords to expire periodically, and control what happens to accounts with too many failed logon attempts. You set account and password policies in the Account Lockout Policy and Password Policy nodes in the Computer Configuration | Windows Settings | Security Settings | Account Policies object section of a GPO. The default settings for these policies are unnecessarily lax, so you’ll want to tighten them up. Be forewarned, however, that if you set overly restrictive password policies, your users will probably just start writing their passwords down, which is not a good idea! Try to find a middle ground between extra-strong passwords and sloppy habits so that those yellow sticky notes with passwords on them disappear from your organization.
| Tip | Although you can apply these policies to individual computers, OUs, or sites, you should always apply them to the entire domain. Applying account or password policies at the OU or site level makes them apply to accounts on the local computer only. See Knowledge Base article Q255550 for more details. |
The six settings in the Password Policy group control what happens when users try to change their passwords. The settings are as follows:
-
Enforce Password History controls whether or not Windows remembers previously used passwords (actually, their hashes). Setting this policy keeps users from using one or two passwords (say, their dog’s name and their mother-in-law’s name) and toggling between them at each password change.
-
Maximum Password Age and Minimum Password Age control when users can and must change passwords. When a password reaches the maximum age, it expires and users must change it before they can log in. After changing the password, a user cannot change it again until the interval specified by the minimum password age has passed. (This prevents users from changing an expired password to a temporary password and then changing right back to the just-expired version.)
-
Minimum Password Length controls how short a password is acceptable. The default, 0 characters, allows blank passwords, which are unadvisable.
-
Password Must Meet Complexity Requirements regulates whether users must choose complex passwords. For our purposes, a complex password is at least six characters long and contains at least one upper-case English letter, at least one lower-case English letter, at least one number, and at least one nonalphanumeric character. Note that this is a low degree of complexity—l0phtcrack and other hacker tools can power through this level of complexity pretty easily. To be safer, make sure you teach users to use 8-character or longer passwords, and to intermix numbers, letters, punctuation, and special characters (like the infamous Euro symbol). The bigger the range of characters used, the larger the search space.
-
Store Password Using Reversible Encryption For All Users In The Domain controls whether or not Windows stores password hashes that can be reversed. Remember our discussion of hash functions in Chapter 2, “Security Protocols and Algorithms”? They’re not reversible. Storing reversible passwords is sometimes required for remote-access systems, but Exchange itself doesn’t require them, and you shouldn’t turn them on if you can avoid it.
Table 6-3 shows the applicable settings, their default values, and the values recommended for acceptable security.
| Policy | Default | Microsoft’s Recommendation |
|---|---|---|
| Enforce Password History | Remember 1 password | Remember 24 passwords |
| Maximum Password Age | 42 days | 42 days |
| Minimum Password Age | 0 days | 2 days |
| Minimum Password Length | 0 characters | 8 characters |
| Passwords Must Meet Complexity Requirements | Disabled | Enabled |
| Store Password Using Reversible Encryption For All Users | Disabled | Disabled |
The account lockout policy settings govern what happens when a preset number of failed logon attempts occur. You need lockout policies because without them an attacker can repetitively try passwords until he or she finds one that works (or until he or she finds some easier target to attack). The policy encompasses three separate settings:
-
Account Lockout Duration is the period in which failed logon attempts count toward the threshold. For example, let’s say you set the duration to 30 minutes. If any account gets more than the threshold number of failed logon attempts during any 30-minute period, the account is locked out.
-
Account Lockout Threshold controls how many failed logon attempts are required to trigger a lockout. The default setting of zero means that accounts will never be locked out. At a minimum, set this policy to allow five failed attempts before locking out the account. A value of three failed attempts is even more secure.
-
Reset Account Lockout After specifies how long a locked-out account will remains locked out. During the lockout period, the account cannot be used to log on, even with the correct password, unless an administrator resets the account. By default, no lockout duration is defined. You should set a duration of at least 30 minutes.
Step 3: Lock Down IIS
The IIS Lockdown tool configures IIS 5 for better security than the default installation. Almost everything it does can be done manually, but it’s much easier to apply security settings all at once than piecemeal. IIS Lockdown works in concert with the URLscan filter, which screens out URLs that don’t match patterns you specify. By properly installing and configuring these tools, you can significantly increase the security of your Exchange servers.
| Note | You should run IIS Lockdown on all your Windows 2000 servers, not just your Microsoft Outlook Web Access or IIS servers. Remember, in Windows 2000, IIS is always installed and enabled by default, so be sure to secure all your servers—even if they’re only visible on the intranet. |
The first step is to download the IIS Lockdown package, available from http://www.microsoft.com/downloads/release.asp?releaseid=43955. The package is ready to run as is; execute Iislockd.exe and you’ll be in business. The wizard is extremely simple to use. Here’s how it works:
-
You’ll see a Welcome page, followed by the ubiquitous EULA page. Click I Agree and then click Next to proceed.
-
The Select Server Template page (see Figure 6-5) lists about a dozen templates you can apply. The original versions of IIS Lockdown required special manual configuration on Exchange servers; version 2.1 (and later) allow you to select the Exchange Server 2000 template to secure the server, without requiring any additional tweaking on your part. Select the appropriate template and click Next.
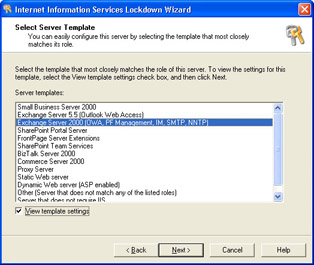
Figure 6-5: Be sure you select the appropriate template, or Exchange will abruptly stop working properly. -
The Internet Services page allows you to specify which services you want to run: the IIS HTTP, SMTP, FTP, and NNTP servers each have checkboxes. The Exchange template automatically turns off the NNTP and FTP servers, leaving you with check boxes available for HTTP and SMTP. Note that NNTP is required for public folder management. It’s generally acceptable to shut it off on front-end servers as long as you don’t want to manage public folders using the front end. Make sure both check boxes are selected, and then click Next.
-
The Script Maps page lets you selectively turn off script mapping for specified extensions. By default, IIS Lockdown turns off all the mapped script types except .asp. This causes a problem if you’re using the Outlook Web Access Change Password feature (see Chapter 14, "Securing Outlook Web Access"), which requires a set of .htr files. This feature is turned off by default. If you’re allowing Outlook Web Access password changes, make sure the .HTR Scripting (.htr) check box is cleared before you click Next.
-
On the Additional Security page (Figure 6-6) you turn off individual IIS directories, such as the notorious IIS Samples and MSADC directories. The only directories you can choose to enable are IISAdmin and Scripts. You can also choose whether you want to restrict file permissions to keep anonymous users from launching system utilities or writing to Web directories. IIS Lockdown sensibly sets these bits for you—leave them selected to get the best possible protection. The biggest danger on this page for Exchange administrators is in accidentally selecting the Disable Web Distributed Authoring And Versioning (WebDAV) check box. WebDAV is the primary access method used by Outlook Web Access and Exchange Instant Messaging, so if you turn it off you’ll find that these components don’t work very well.
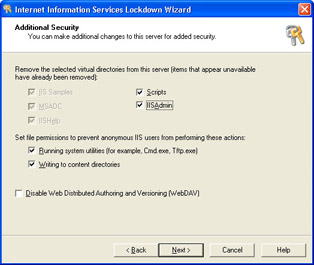
Figure 6-6: The Additional Security page. Make sure the Disable Web Distributed Authoring And Versioning check box is cleared. -
The URLScan page prompts you to install the URLScan filter. URLScan is an Internet Server Application Programming Interface (ISAPI) filter extension that filters incoming requests against a set of criteria you specify. For example, it can block any URL request for a verb you don’t want to allow (say, POST or HEAD requests). It can also block URLs over a certain length or contain patterns of data, both of which are commonly found in attempts to exploit IIS vulnerabilities. Note carefully the caveat on this page: Microsoft recommends that you read the URLScan documentation (or Knowledge Base article Q309508) to gain a better understanding of what URLScan changes and what effects that might have on your Exchange configuration.
-
The final wizard page is a summary that tells you what changes IIS Lockdown is going to make. This is your last chance to back out before making the changes.
Note Don’t select the Remove Services check box. If you do, they’ll be removed, but when you apply patches the missing services won’t be patched. If you ever add the removed services back to the machine, they’ll be unpatched.
When you lock down the server, a file called Oblt-log.log is created in the System32\Inetsrv directory. As long as you don’t edit or remove this file, if you run IIS Lockdown again, it asks you whether you want to undo the lockdown by using the log file to reverse the changes made. If you’ve uninstalled or removed services, reversing the lockdown won’t put them back; you’ll have to do it manually.
|
EAN: N/A
Pages: 169