Using SMIME
|
Using S/MIME
S/MIME can be a little daunting for end users, because it relies heavily on algorithms and protocols that can charitably be described as complex. Microsoft has done its best to simplify the interface and behavior in Outlook while still giving power users lots of knobs to adjust.
Managing Certificates
Before you can do much of anything with S/MIME, you’ll need an X.509v3 certificate that is flagged for use with e-mail (either as a signing certificate, an encryption certificate, or a dual-use certificate). Accordingly, certificate management is the logical place to start.
Getting a New Certificate
Outlook happily uses any properly constructed X.509v3 certificate for which you have the private key, provided you can get the certificate into your local machine’s certificate store. Depending on whether you’re setting up a complete (or outsourced) public-key infrastructure (PKI) or whether individual users want certificates, you can either enroll users through Key Management Service (KMS) or request individual certificates from your own or third-party CAs.
In either case, you tell Outlook to request your new certificate by launching Outlook, choosing the Tools | Options command, clicking the Security tab, and clicking Get A Digital ID. What happens next depends on whether you’re requesting a certificate through the Exchange KMS or from an external CA.
Getting a Certificate from the KMS The most common way for enterprise users to get a certificate is through the Exchange KMS, which you read about in Chapter 12, “E-Mail Encryption.” In that scenario, you use the KMS to enroll your users; when they’re ready to complete their enrollment, they use Outlook to contact the KMS and retrieve their certificate. From the Outlook side, this process is simple; it begins when you use the KMS to generate a temporary key. This key is used to protect the initial client-to-KMS exchange. You can provide the token in an e-mail message or using another (presumably more secure) offline channel; either way, the user must have the token before proceeding.
-
After you click Get A Digital ID, you’ll see the dialog box shown in Figure 13-4. This dialog box only appears for accounts that have been enrolled in Advanced Security; if you don’t see it, that means the logged-in profile’s account needs to be enrolled before proceeding. Because you want a KMS- issued certificate, choose the Set Up Security For Me On The Exchange Server option and click OK.
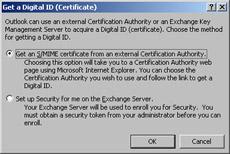
Figure 13-4: Pick the certificate source you want to use for your request. -
Outlook asks you to pick a name for this digital ID and enter your token.
-
Next you are asked to assign a password. Note that this password is completely separate from your Windows account password—and it should be different, so that compromising one doesn’t affect the other.
-
Your request is sent to the KMS, which approves or rejects it (usually fairly quickly). First, though, you have to close the Outlook Options dialog box; you will eventually receive a signed status message from the KMS indicating either that your enrollment was rejected or accepted. For requests that are accepted, you’ll be prompted to enter your password so that Outlook can publish your certificate in the Global Address List (GAL) for you (you can do so manually, too, as you’ll see later).
Using an External CA Individual users can always request their own certificates from an external CA and install them in Outlook. Presuming that you choose a widely known CA, this might be an attractive alternative to setting up your own PKI, particularly for small numbers of users.
-
Certificates are available from various sources. For example, Thawte offers a free end-user certificate that’s adequate for many individuals’ uses; various professional, social, and government organizations either are or will soon be issuing certificates to their members.
-
If you click Get An S/MIME Certificate From An External Certification Authority, Outlook takes you to a page at Microsoft’s Office Assistance Center (http:/ /office.microsoft.com/assistance/2000/certpage.aspx) that lists Microsoft CA partners. The CAs listed there offer personal certificates; each one has slightly different enrollment and certification procedures.
Once you’ve enrolled with the remote CA and received your certificate, you’ll need to import it, as discussed in the section “Importing and Exporting Certificates” later in the chapter.
Publishing Your Certificate in the GAL
If you’re using an enterprise CA, newly issued certificates are published in the GAL. However, users who go out and get their own certificates will find that their certificates aren’t in the GAL. If Alice and Bob want to exchange encrypted messages, and neither has a certificate in the GAL, Alice must first send Bob a signed message. When Bob opens it, his Outlook client adds Alice’s certificate to the local store, at which point he can use it to send her an encrypted reply. This requirement is a hassle, so Outlook provides a way for you to publish arbitrary certificates that you control as attributes for your user account; this, in turn, makes them visible in the GAL. The steps required to publish your certificate are simple:
-
Launch Outlook while logged in with the account you want the certificate associated with. (Of course, you have to have access to the desired certificate in some form, either in the local machine certificate store or on a smart card or other portable token.)
-
Use the Tools | Options command to open the Options dialog box, then click the Security tab.
-
Click Publish To GAL. Outlook warns you that it’s about to publish your default certificate (the one identified in the Default Setting field of the Secure E-Mail command group, which is described in the next section) to the GAL; click OK if you want it to do so.
Importing and Exporting Certificates
Once you have a certificate, it’s not necessarily tied to a single machine. CryptoAPI allows whoever generates the key to specify whether a key can be exported or not; by default, most certificates generated by the Windows Certificate Service or third- party CAs come from private keys that are marked as exportable. As long as the private key is exportable, you can use Outlook to export the key pair and associated certificate to a file, which can then be imported on another machine. For example, I can receive a certificate on my desktop machine, then export it and import it on my laptop so I have access to encrypted mail (and other resources) from both machines.
You export and import certificates from Outlook using the Import/Export button in the Security tab of Outlook’s Options dialog box. Clicking that button produces the Import/Export Digital ID dialog box shown in Figure 13-5. Use the two options to select whether you want to import or export; the associated controls in each group let you specify where the file containing the certificate is located and what the associated password is. The Delete Digital ID From System check box is worth special mention: when selected, after exporting your private key to the file Outlook removes it. Use this option when you want to migrate a certificate from one machine to another; leave it cleared if you want to copy the key material.
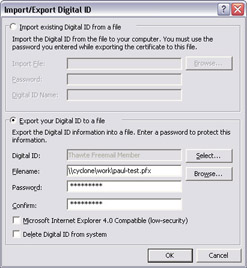
Figure 13-5: You can use Outlook’s import/export feature to move or copy your certificates between machines, but be careful not to unnecessarily expose them to compromise.
| Note | You can also import an existing certificate from your own or a third-party CA; as long as it has the flags indicating that it’s usable for e-mail encryption and signatures, you’ll be able to use it with Outlook. |
Setting S/MIME Options
Figure 13-6 shows the Security tab of Outlook’s Options dialog box. The Secure E-Mail control group in this tab allows you to set the defaults you want Outlook to use for S/MIME traffic. You can choose to sign, encrypt, or sign and encrypt outbound messages by selecting the appropriate check boxes. In addition, you can choose whether signed messages should be clear-signed or opaque-signed and whether or not you want your messages to include requests for signed return receipts.
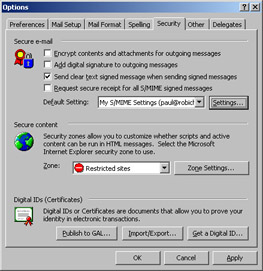
Figure 13-6: Use the Secure E-Mail control group in the Options dialog box Security tab to control Outlook’s S/MIME behavior.
The most interesting control in this group is the Default Setting drop-down list and the associated Settings button; that’s because these settings control the algorithms and message format you use when sending secure mail. When you click Settings, the Change Security Settings dialog box, shown in Figure 13-7, opens. Each security settings object contains your preferences for the certificate you want to use for signing and encrypting messages and the algorithms you prefer for each use. The controls in the dialog box are self-explanatory, so instead of reiterating what they do, it’s more useful for me to explain why they’re there in the first place.
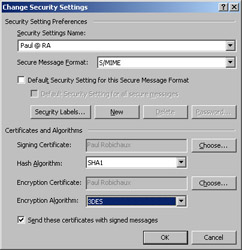
Figure 13-7: Create groups of security settings for use with different certificates or recipients.
Remember that a certificate is just a credential. We all carry around multiple credentials: my driver’s license isn’t useful at the video store, and my bank card isn’t useful when I want to board an airplane—each credential has its own purpose and set of attributes. Likewise, it’s increasingly common for organizations that deploy PKIs to issue separate certificates for different purposes: every user might get one for signing e-mail, but only the legal and merger departments might need one for encryption, and only the IT department gets certificates that can be used to sign macros or Office objects. This partitioning means that it might be useful to specify different algorithms or certificates for signatures and encryption, or even to maintain different “work” and “home” settings for users with business and personal certificates.
Signing or Encrypting a Message
Actually signing or encrypting messages is easy with Outlook. You can always sign or encrypt individual messages, either using the Outlook toolbar or by opening the message properties; you can also tell Outlook to sign or encrypt all messages by default.
Encrypting or Signing a Single Message
To secure a message as you’re composing it, open the message’s Properties dialog box and click the Security tab, shown in Figure 13-8. The Encrypt Message Contents And Attachments and Add Digital Signature To This Message check boxes do just what you’d expect; you can select either or both of them to add protection to your message when it’s sent. When signing a message, you have two additional options: you can clear-sign the message (so that non-S/MIME-aware mail software can display the message contents), and you can request a signed return receipt—this proves that the recipient opened the message at a particular date and time, because it’s signed with the recipient’s private key.
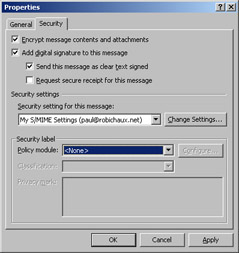
Figure 13-8: To sign or encrypt a message, just select the check boxes that correspond to the desired security features.
| Caution | When you’re connected to your Exchange server, as soon as you add an attachment to a message in Outlook, it begins uploading the attachment in the background to the server. That conversation isn’t encrypted (unless you’ve turned on Remote Procedure Call [RPC] encryption, discussed later in the chapter), so be aware that an adversary might see some of your attachment if he or she can sniff traffic on the network. |
You can also use this dialog box to choose a set of S/MIME parameters for the message; your choices are taken from the sets of S/MIME settings you defined in the Security tab of the Options dialog box, as discussed in the preceding section. You can also set a security label from this dialog box, but you won’t be able to do so unless you’re using a policy module, and there aren’t any widely available ones except those used with DMS.
| Tip | If you want to use security labeling, you can implement your own policy module; see http://msdn.microsoft.com/library/en-us/dnout2k2/html/odc_olseclabelapi.asp for details. |
Updating the Outlook Toolbar
Outlook’s Standard toolbar includes toolbar buttons for encrypting and signing the current message, but they’re not visible by default. Fortunately, you can customize the toolbar to include the icons—just use the Tools | Customize command, which displays the Customize dialog box. Here’s what to do:
-
Open a message (new or old, it doesn’t matter). If the toolbar you want to put the buttons on isn’t visible, make it visible with the View | Toolbar submenu.
-
Choose the Tools | Customize command. When the Customize dialog box opens, click the Commands tab.
-
Select Standard in the Categories list. The Commands pane lists the available toolbar buttons. Near the bottom of the Commands list, you’ll see two icons: Encrypt Message Contents And Attachments and Digitally Sign Message.
-
Drag the icons to the desired positions on the toolbar.
-
Click Close.
|
EAN: N/A
Pages: 169