Visual Studio Add-Ins
| Macros are excellent for those smaller, isolated tasks, but if you have more advanced UI or input needs or you want to protect your source code, you're going to have to turn to writing add-ins. Although writing a macro is much easier, add-ins allow you to handle the following tasks, which you can't handle in macros:
As you'll see in a moment, developing and debugging is more difficult with add-ins than it is with macros, so I'd highly recommend trying to do all you can in macros if possible before tackling an add-in. Basically, add-ins are COM objects that plug into the IDE. If you were worried about losing all that COM knowledge you've learned over the last few years, don't beyou'll still need some of it in the add-in world. What's interesting is that because managed languages support COM, you can write your add-ins using Visual Basic or C#. Although I like C++ as much as the next developer, I like the productivity enhancement of .NET even more, so in this chapter I'll concentrate on those issues related to writing add-ins in managed languages. As usual, you should start your add-in journey by reading the documentation. Second, you need to visit http://go.microsoft.com/fwlink/?linkid=57538, which is the page that contains the Visual Studio 2005 Automation Samples download. There are many excellent examples to show you how to accomplish many common add-in and wizard tasks. For those of us who have paid our dues writing add-ins with previous versions of Visual Studio, there are some very welcome changes to the Visual Studio 2005 model. The best change in my opinion is the wonderful new registration model. We no longer have to deal with the registry to let Visual Studio know about your add-in. You simply drop the registration file, which ends in .AddIn, in the appropriate directory, and Visual Studio is ready to use your add-in. For the current user, the .AddIn file goes into C:\Documents and Settings\user_name\My Documents\Visual Studio 2005\Addins. For all users, the location is C:\Documents and Settings\All Users\Application Data\Microsoft\MSEnvShared\Addins. The second best change is that Option pages can be created directly from .NET and no longer require a custom shim COM component. Another area that no longer requires shim COM components is .NET tool windows, which allow you to add your own windows to the IDE. In fact, creating tool windows is so trivial that I'll refer you to the Visual Studio documentation at http://msdn2.microsoft.com/en-us/library/envdte80.windows2.createtoolwindow2.aspx. Other improvements include better internationalization support and slightly better toolbars. Tricks of Add-In DevelopmentAs with any development, the documentation covers the basics but does not show you the trials and tribulations you'll run into during your own add-in development battles. Instead of having you overloading Google's servers with search queries trying to find the real tricks to add-in development, I wanted to give you the answers to obstacles that I ran into developing the add-ins that are in the book's source code. In this section, I'm assuming that you've already read the documentation on add-ins at http://msdn2.microsoft.com/en-us/library/5abkeks7.aspx. To focus on the add-in development process, I'll introduce the first add-in I developed: WhoAmI. As I discussed extensively in the "Why must you always develop as a non-admin?" section in Chapter 4, "Common .NET Debugging Questions," there's absolutely no reason you should ever log in with administrator rights to develop software. The only time you need administrator rights is when you are debugging across user accounts. In those cases, you'll start only the debugger with administrator rights while you're logged in as a member of the Users group. Because you'll be running multiple instances of Visual Studio, it can get a bit confusing as to which instance is running in which account. The WhoAmI add-in does nothing more than create a toolbar with a button that displays both a graphic and the user account for the instance of the IDE. The only interesting detail in the WhoAmI add-in is that the one command added to the IDE, WhoAmI.Rights, is re-created each time the IDE is started because the IDE does not handle dynamic buttons on toolbars. If I didn't handle my own dynamic button updating, the WhoAmI add-in could display the wrong graphic if you changed the rights granted to the account. You might not be moving your account in and out of the Administrator's group manually, but it's perfectly reasonable to assume that you might be using Aaron Margosis's fantastic MakeMeAdmin command file to temporarily boost your User-level account to Administrator rights. For more information on MakeMeAdmin, see Aaron's blog at http://blogs.msdn.com/aaron_margosis/archive/2004/07/24/193721.aspx. Even though WhoAmI isn't that interesting from the standpoint of other add-ins, it does suffice to show nearly all the pieces of add-ins you'll implement in yours. It does the work to create a toolbar and supports full internationalization. It's also small enough to completely understand at a glance. As you work your way through the hints in this section, you should open the .\WhoAmI\WhoAmI.sln file so you can follow along. After you've gone through the Add-In Wizard to create the skeleton for your masterpiece, you may want to change the name of your add-in main class. The wizard-generated code treats the name you specified as the namespace name for everything in the add-in. It also names the class that implements the IDTExtensibility2 and the optional IDTCommandTarget interfaces, Connect. The only problem is that the IDE needs the complete name of the class to load it out of your add-in assembly. Thus, any commands you add have the full name MyAddIn.Connect.MyCommand. Personally, I don't like seeing that "Connect" in the middle of all of my commands. I want any commands my add-in supports to be the add-in name and the command. To me it looks more professional and makes it much easier to access them from the Command window. As my coworkers can tell you, I can sometimes be a perfectionist. Fixing this little oversight is relatively easy. The trick is to name the class that implements the IDTExtensibility2 and the optional IDTCommandTarget interfaces the name of your add-in and put it outside of any namespaces. Because a type outside of a namespace will trigger a Code Analysis Design warning, "Declare types in namespaces," you'll need to suppress that error in your code. If you look at .\WhoAmI\Connect.cs, you'll see an example of how I used the SuppressMessage attribute to solve it. For add-ins that are more complicated and for which you'll be creating numerous code files, you'll want to change the default namespace for the add-in to something other than the default, which is the add-in name, and thus it will conflict with the class now exposed outside namespaces. For the SettingsMaster add-in, I renamed the default namespace to SettingsMasterWorker. Although it's your decision as to what you name your commands, everyone will want to fix how your commands and toolbars are registered and created, respectively, from the wizard-generated code. The registration is in the IDTExtensibility.OnConnectionderived method, and you'll want to engage in the good refactoring practice to pull all command registration and toolbar creation out into its own methods. This makes it much easier when you need to add commands to your add-in because they are handled in one place in the code. The debates have raged back and forth about whether you should attempt to delete your commands before you add them when the add-in's IDTExtensibility.OnConnectionderived method is called with ext_ConnectMode.ext_cm_UISetup value. I always delete and re-create my commands to ensure that I know the exact state of the commands when they are added. When it comes to toolbars, they can be added only once, so you'll want your initialization code to first look for the toolbar in the CommandBars collection, and if that generates an ArgumentException, you'll need to create the toolbar. You can see an example of how I do that in the AddButtonToCommandBar method in Book_Code_Install_Directory \WhoAmI\Connect.cs. Because internationalization is an area of major improvement in the add-ins in Visual Studio 2005, I was quite surprised that the documentation for handling satellite assemblies, described in the "Walkthrough: Creating Managed Satellite DLLs" section of the documentation, has you start a command prompt and manually run Resgen.exe to compile a .resx file to .resources and use the Assembly Linker, AL.exe, to create the satellite. Although you might be able to finagle those steps into build events, it's definitely a major pain and certainly not scalable. My guess is that the extensibility team wasn't talking to other parts of the IDE team because if you want internationalized satellite assemblies in any other .NET project, you simply have to add a new resources file to your project and specify the culture as part of the name. For example, if you want to add French Canadian resources, you'd add a resources file named Resources.fr-ca.resx to your project. The IDE will build the culture resources and automatically put them in the appropriate directory where the main assembly is built. Ignore the add-in discussion of internationalization in the add-in documentation, and use the standard .NET internationalization support in the IDE to internationalize your add-ins. You can read about the IDE support at http://msdn.microsoft.com/library/default.asp?url=/library/en-us/vbcon/html/vbwlkwalkthroughlocalizingwindowsforms.asp. In developing WhoAmI, I wanted to show full internationalization and ran across three bugs. The first is that any bitmaps you want to use on a toolbar can have only integer values as the name when passed to Commands2.AddNamedCommand2, the method that sets your toolbar bitmap. However, the resources editor in Visual Studio will report that all bitmaps with integer names you add to the .resx file have invalid names. Fortunately, the .resx file still compiles. The second problem I found with internationalization is related to how your add-in appears in the IDE About Box and the Add-In Manager dialog box. The add-in documentation discusses how to internationalize items in the .AddIn file, which is the add-in registration file, by specifying the string resource file prefixed with the @ symbol. What's not clear from the documentation is that the <Assembly> element in the .AddIn file must have the full path to the assembly specified or none of your strings or icons will be loaded correctly in the About box. Oddly, the Add-In Manager dialog box does correctly display your internationalized data even if you do not specify the full path in the <Assembly> node. While developing add-ins, specifying the full path to the assembly in the .AddIn file is easy, but it is a little more complicated in installations. Because I'm using the excellent Windows Installer XML (WiX) Toolset, the solution turned out to be relatively easy. Since the .AddIn file is an XML file, I could use the built-in WiX XML custom actions to write the full path as part of the install. You can see how I included the updating in the Book_Code_Install_Directory \Install\WintellectTools\AddIns.wxs file. The last internationalization bug I found isn't shown in the WhoAmI add-in, but you'll see it in the next add-in, HiddenSettings. In a major improvement, the IDE now reads your add-in's option pages out of the .AddIn file. You list the top-level category, which appears in the root of the Options dialog box tree, and any subcategories, which appear as child nodes in the tree that shows your add-in option pages. Unfortunately, there's no way to specify the internationalized name of the category and subcategory values. Your installation will have to either install a different .AddIn file based on the user interface language or write the appropriate values as part of the installation. I hope that Microsoft will fix this bug in the next version of Visual Studio. The last part of this list of tricks involves the toolbars. As with previous version of Visual Studio, the toolbars are a problematic area of add-in development. You would think that after fifteen years of Visual C++ and Visual Studio, we would have a toolbar solution that would not have so many rough edges. We're still limited to basic buttons and combo boxes on toolbars from add-ins, thus forcing you to design around the limitations instead of thinking about the best user interface for solving your particular problem. Although Microsoft has finally made it easier to remove an add-in with Devenv.exe's /ResetAddin command-line switch, none of the toolbars created by the add-in are removed. Therefore, the users will be left with empty toolbars littering up their IDE, which can be deleted only by using a Visual Studio macro or a JavaScript/VBScript script file that accesses the IDE programmatically. Since littering is bad, my first attempt to solve this problem was to use an interesting feature called temporary toolbars. My hope was that the IDE saved off the temporary toolbar location in order to restore it to the same location. After coding up temporary toolbar support in the WhoAmI add-in, I found that there was no location saving, and even worse, the temporary toolbar appeared in random places. Because having toolbars randomly bouncing around is not a preferred user interface practice, I used the permanent toolbar solution. That put the onus on my installation code to remove the toolbar on the uninstall. If you're doing per-user installations of your add-in into the C:\Documents and Settings\user_name\My Documents\Visual Studio 2005\Addins directory, you can use a JavaScript file that uses the Visual Studio automation model to do the work. However, an add-in such as WhoAmI is one that should be installed into the global add-in location (C:\Documents and Settings\All Users\Application Data\Microsoft\MSEnvShared\Addins) because it's one you'll want in all instances of Visual Studio. When I changed my installation to install into the global location, I realized that having the install do the custom action to remove the toolbar was going to work only for the user account doing the uninstall. The issue is that toolbar locations are stored on a per-user basis. As it turns out, I have found no good solutions to this bug. My add-ins that create toolbars install JavaScript files that are left behind after uninstalling that you'll need to run in each user account to remove the toolbar. You can see these files in the .\Install\WintellectTools directory. Option Pages and the HiddenSettings Add-InAs I mentioned in the introduction to this section, the Visual Studio team has greatly improved the option page support in Visual Studio 2005. We no longer have to create a separate native C++ DLL for pages we want to display in the Options dialog box. Now option pages are nearly as simple as a standard Windows Forms control. You don't even need to write code; everything happens in the .AddIn file. For each option page, you simply add a <ToolsOptionsPage> element containing a Category and SubCategory element to describe where the page should appear in the Option dialog box. From the SubCategory element, Visual Studio knows what type to load for creating the option page by using its FullClassName element. Last but not least, the Assembly element specifies where this type can be found. The following snippet of a .AddIn file shows setting an option page: <ToolsOptionsPage> <Category Name="HiddenSettings"> <SubCategory Name="Debugger"> <Assembly>.\HiddenSettings\HiddenSettings.dll</Assembly> <FullClassName>HiddenSettings.DebuggerOptionsPage</FullClassName> </SubCategory> </Category> </ToolsOptionsPage> To show an example of option pages, I created a whole add-in, HiddenSettings, that does nothing more than provide two option pages in the Options dialog box under the HiddenSettings node called Debugger and Text Editor Guidelines, as shown in Figures 7-4 and 7-5, respectively. Figure 7-4. HiddenSettings Debugger option page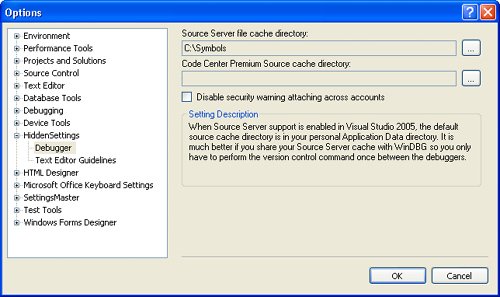 Figure 7-5. HiddenSettings Text Editor Guidelines option page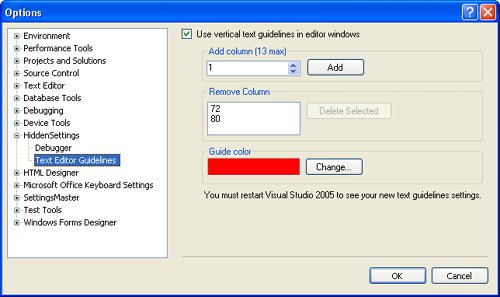 As you can probably guess, the Debugger option page exposes hidden settings used by the debugger. The first allows you to set the cache directory for source files extracted through the debugger's Source Server support. For more information about Source Servers, see the "Set Up a Source Store" section in Chapter 2. The second setting on the page allows you to set the download directory for Code Center Premium (CCP) source code if you have access to the Windows source code. See http://www.microsoft.com/resources/sharedsource/ccp/premium.mspx for more information about CCP. The final option on the Debugger option page disables the security warning that pops up every time you attach to a process running in another user account. The Text Editor Guidelines option page exposes a wonderful undocumented feature in the Visual Studio editor windows. Many programming editors, such as SlickEdit's outstanding Visual SlickEdit, have a simple bit of functionality that's a huge godsend: a vertical line down specific columns. If you're restricted to a line limit, as I am in any code shown in the book, it's great to know at a glance when you're getting close to that limit. Sara Ford, one of the developers on Visual Studio, blogged about this at http://blogs.msdn.com/saraford/archive/2004/11/15/257953.aspx, and I immediately had to write a UI to make the key easier to use. The values in the key are a little tricky to set, and now you don't have to worry about it. As I mentioned in the previous section, there's the internationalization bug that forces you to hard-code the option page category and sub-category values of the corresponding Name attribute of the <ToolsOptionsPage> <Category and SubCategory> sub-elements in the .AddIn file. Another bug with option pages is that you won't receive proper notifications when the user moves to another control. That makes it rather difficult to perform data validation, so you'll have to find other ways to ensure that the data the user has entered is valid. For example, in the Debugger option page, I don't allow you to enter the Source Server file cache directory into the edit control because it is read-only. To ensure that the directory is a valid directory, I use a FolderBrowserDialog. SettingsMasterAt this point, you've been reading about quite simple add-ins, and it's time to turn to a more involved add-in that I think you'll find quite useful: SettingsMaster. As I discussed in the introduction, SettingsMaster's purpose is making it trivial to update your build settings across projects and solutions. Now if you need to change items, such as the output directory or add a new define to the compilation, you can do it with a single button click instead of driving yourself insane manually updating 37 different projects. If you purchased the previous edition of this book, you have a version of SettingsMaster that worked with Visual Studio .NET 2003. SettingsMaster proved quite popular, and the most common request I got about this version when I was asking for feedback was that SettingsMaster absolutely had to be updated for Visual Studio 2005. What I originally thought was going to be a basic port of the code turned out to be a complete rewrite from scratch because of changes in the Visual Studio project models and to make the implementation drastically simpler. One major change with the new version is that SettingsMaster works only with Visual Basic and C# projects. The previous edition also worked with native C++ projects, but with the excellent new Visual C++ property inheritance through .vsprops property sheets, there was no need for me to reproduce a feature of the IDE. Using SettingsMasterAfter you've installed SettingsMaster with the WintellectToolsInstall.MSI file, you'll see that it adds a toolbar with two buttons to the IDE. Although the user interface is simple, there's a lot that happens behind the scenes when you click one of those buttons. No matter if you're working with a normal .NET project or one of those slightly odd Microsoft ASP.NET 2.0 projects, you can change at will any settings exposed through the automation model. All settings are stored in .SettingsMaster files, which are just XML files. The first button on the SettingsMaster toolbar maps to the SettingsMaster.CorrectCurrentSolution command. This command applies the default settings file to all the updatable projects in the solution. Updatable projects are those that are .NET projects and are not read-only. If the project is read only from the version control system, SettingsMaster does not check it out because I felt it would be too easy to accidentally change the build settings and cause havoc with your master build. You can change the .SettingsMaster file that this button will apply in the SettingsMaster section of the Options dialog box. The initial default is, appropriately enough, SettingsMasterDefaults.SettingsMaster, which the install put beside the SettingsMaster add-in and sets all your build settings for all projects and configurations to those I recommended in Chapter 2. The second button maps to the SettingsMaster.CustomProjectUpdate command, which allows you to multiple-select the projects you want to update and prompts you for the .SettingsMaster file to apply to those projects. As with the SettingsMaster.CorrectCurrentSolution, you can update only .NET and read-only projects. In case you were not aware, you can select multiple projects in Solution Explorer by holding the Ctrl key and clicking each project you want to change. One additional feature of SettingsMaster.CustomProjectUpdate is if you execute it from the Command window, you can pass in the full path to the configuration file after the command. That allows you to more quickly execute custom settings. In fact, you could write a micro command for all the custom .SettingsMaster files you would like. The following macro shows just how simple that is: Public Sub ApplyFavorites() DTE.ExecuteCommand("SettingsMaster.CustomProjectUpdate", _ "C:\Settings\Favorites.SettingsMaster") End SubFor your custom project-updating enjoyment, the WintellectToolsInstall.msi installation includes three other .SettingsMaster files. The CodeAnalysisOnAndAllErrors.SettingsMaster and CodeAnalysisOff.SettingsMaster files turn on and off Code Analysis for all configurations. The EnableDocComments.SettingsMaster file turns on the XML documentation file creation for all configurations. In the source code for SettingsMaster are a few other .SettingsMaster files I used to help with project setup for the book's source code and debugging add-ins. Creating your own .SettingsMaster files is quite easy. When you create a new .SettingsMaster file, set the schema property to SettingsMaster.xsd from either the installation directory or the .\SettingsMaster code directory. The SettingsMaster.xsd has <xs:documentation> tags all through it, so you should have no trouble understanding which element goes where. Listing 7-3 shows an example .SettingsMaster file. The main trick to remember with .SettingsMaster files is that all the individual setting elements for a project or a configuration map directly to a project or configuration automation name. In the "Implementation Highlights" section later in this chapter, I'll discuss more about the decisions I made in setting up the .SettingsMaster files. You'll want to read Listing 7-3 because it discusses some of the special processing I do on particular nodes to make things a bit easier for you when creating your own custom .SettingsMaster files.
Initial ExplorationsWhen I first looked at porting over the Visual Studio .NET 2003 version of SettingsMaster, I almost immediately realized that it wasn't simply going to be a recompile. I'd designed the system around setting properties in configurations, which was perfectly reasonable at the time. That way I could have a collection of XML nodes that specified "Debug," and I'd know what configuration it applied. Now configurations also include the CPU type because .NET 2.0 can specify Itanium, x64, x86, and the platform-independent Any CPU. Although I couldn't have anticipated how Microsoft would have implemented the CPU scheme, one thing I should have handled in the previous edition was setting properties on the projects themselves. Those properties are like those in the <CommonProjectProperties> and <VBProjectProperties> elements shown in Listing 7-3. Finally, one consistent problem with the previous version was that I didn't include a schema file to perform validation and to assist users in creating their own files. By implementing a good schema file, I could let the magic of XML do the main work of verifying that the data in the file was good instead of trying to do it manually in my code. Because the default ASP.NET 2.0 projects are not really projects at all, I had to look at how those would impact the SettingsMaster design. As I suspected, ASP.NET projects are radically different compared to "normal" .NET projects. I don't mean to imply that ASP.NET is "abnormal," but the only thing that ASP.NET projects have in common with class library projects is that they allow editing in a code window. In exploring the different project types, I whipped up numerous macros to dump all the properties on projects and configurations. Although normal projects and configurations showed all the values you can change from their property pages, ASP.NET projects showed only a few. I was disappointed because I was hoping that values in the MSBuild Options, available in the Web Site Properties dialog box, would be exposed so you could set items, such as the strong name key and fixed named assemblies. Basically, the only items you can set are the types of debugging (.NET, SQL, or native) and if you want Code Analysis to run. That's better than nothing, but it limits the usefulness of the SettingsMaster for ASP.NET projects. In doing the research on ASP.NET projects, I noticed that the various settings are saved in both the solution and in the hidden .suo file. Turning to normal .NET projects, my first worry was that there was going to be a major difference between a Smart Device project and a Windows project. The good news is that the only real differences are in the language-specific properties, not the platform type. The differences based on the languages are not that major, so it wasn't a big deal to handle. In the previous version of SettingsMaster, a major part of the work was handling the huge differences between .NET and C++ projects. As I've mentioned, there's been a major addition to the C++ system in the form of property sheets. The idea is that you'll put common macros and build definitions in a .vsprops file and add that file to your project so you can inherit its values. There's a UI for controlling property sheets in your C++ projectsthe Property Manager window. In a C++ project, to open this window, in the View menu, select Property Manager. Now you can set up common build settings, add those files in the Property Manager window, and change your C++ project settings without wading through hundreds of property pages. Peter Huene has an excellent discussion on using the Property Manager window at http://blogs.msdn.com/peterhu/archive/2004/06/07/150488.aspx. Since Visual Studio already had a feature to provide project settings for C++ projects, I wasn't going to reimplement the feature in SettingsMaster. Implementation HighlightsAfter establishing the research, my major task was to come up with the .SettingsMaster file format. Because property setting for a project or configuration is easy, I knew I wanted the actual property elements to be the property names. That way I could have, for example, a line like the following to set any configuration property: configuration.Properties.Item ( currProperty.Name ).Value = value; The Value property is an object, so it turns out that I simply treat the value of the element as a string, and .NET will take care of the conversion for me. By going with this mapping of element names to property names, the .SettingsMaster file is defining the individual items, and combined with some careful schema work I could add properties without changing the code. It turned out that I spent one-third of the development time working on SettingsMaster.xsd to ensure that I got it right. There was obviously going to have to be some a priori knowledge about the schema in the SettingsMaster source code, and Table 7-1 lists the main nodes for a normal project that appear under the <NormalProject> elements. Because there are so few properties to set for ASP.NET projects, Table 7-2 lists all the actual settable property values under the <AspNetProjectProperties> elements.
Once I had the core logic for the .SettingsMaster files and their processing, I turned to handling the enable state for the commands. My main concern was having the commands enable and disable appropriately, so I didn't allow the user to change the settings on read-only projects or while debugging. The SettingsMaster.CorrectCurrentSolution command logic was simple in that the button would be enabled only if a solution was open, it contained at least one Visual Basic or C# project, and that project was not read-only. For the SettingsMaster.CustomProjectUpdate command, at least one of the selected projects must be writable. During development, I ran into only two problems worth mentioning. All of my initial development took place with SettingsMaster.dll loading from the C:\Documents and Settings\user_name\My Documents\Visual Studio 2005\Addins local directory. Life was going along great when it was time to do testing with SettingsMaster.dll loading from the C:\Documents and Settings\All Users\Application Data\Microsoft\MSEnvShared\Addins, which is the global add-in location. SettingsMaster has two persisted options, a Boolean to indicate if you want any changed projects automatically saved and a string that is the complete path to the default .SettingsMaster file used when SettingsMaster.CorrectCurrentSolution executes. My first runs from the global location were causing serialization exceptions as soon as I tried to read the data out of the settings file stored in the C:\Documents and Settings\user_name\Local Settings\Application Data\Wintellect\SettingsMaster directory. The exception information was saying that the code in SettingsMaster.dll could not load SettingsMaster.dll. That one had me scratching my head for a few seconds until it dawned on me that Visual Studio is probably not checking the global location when it's resolving assemblies. Fortunately, it's a very easy fix because all you need to do is handle the CurrentDomain.AssemblyResolve event handler and return the right SettingsMaster.dll assembly when requested. The second small issue I ran into was when I wanted to do some tweaking on SettingsMaster and moved the assembly loading from the global location back to the C:\Documents and Settings\user_name\My Documents\Visual Studio 2005\Addins. No matter what I tweaked, I could not get the IDTExtensibility.OnConnection derived method called with ext_ConnectMode.ext_cm_UISetup value so I could reset the toolbars and commands. It turns out that when you use Devenv.exe's excellent /ResetAddIn switch, there's one more thing besides the toolbar that the IDE forgets to delete. In the HKEY_CURRENT_USER\Software\Microsoft\VisualStudio\8.0\PreloadAddinStateManaged registry key, Visual Studio stores a key name made up of the add-in name and the path to the .AddIn file. If that value is set to 0x2, Visual Studio assumes that it's already initialized the UI and won't pass the ext_ConnectMode.ext_cm_UISetup value again. If you delete the key or set its value to 0x1, you'll get the chance to reinitialize your add-in. Possible Future EnhancementsSettingsMaster is very useful as is, but if you're looking for a project, there are plenty of enhancements you could add to SettingsMaster to make it even better:
|
EAN: 2147483647
Pages: 99