Using SWS
|
Using SWS is a three-stage process. The first stage involves recompiling your application to get SWS hooked in so that you can collect the function execution data. The second stage involves running the most common user scenarios using the special compiled version of your application. To use SWS correctly, you must spend some time determining exactly what those user scenarios are so that you can duplicate them precisely. Just running your application randomly under SWS won't help reduce your working set much at all. The third stage involves generating the order file for the linker (which is very simple to do), and integrating that order file into your final build.
Setting Up the SWS Compiles
The reason you're required to do a separate recompile to use SWS is that I based SWS on the same concepts the WST program was based on. Although I could've written a hugely complicated and error-prone tool to patch all the functions in your application on the fly, it's so much easier to use the compiler to do the hooking. The /Gh switch (Enable _penter Hook Function) tells the compiler to insert a call to a function named _penter at the beginning of all generated function prologs. SWS provides the _penter implementation that you'll link against so that it can do all it's magic.
Getting your application compiled for SWS is generally straightforward; you simply follow these steps:
-
Before you do anything, you should ensure your project's release build settings are exactly what you want because you'll use that configuration to clone your settings. If you've applied the switches to the compiler and linker I recommended in Chapter 2 by using the SettingsMaster add-in from Chapter 9, you'll be all set.
-
Clone the configuration you want to tune. Right-click on the solution in Solution Explorer and select Configuration Manager from the menu to bring up the Configuration Manager dialog box. The new configuration option is hidden in the Active Solution Configuration drop-down list. Figure 19-4 shows accessing the <New…> field. (It took me a while to find it.) In general, you'll want to clone your release builds. In the New Solution Configuration dialog box, make doubly sure you set the Copy Settings From drop-down list because you'll inherit from <Default> and your build settings won't get moved over. When naming the new project, I like to use the build type immediately followed by "-SWS" so that the full name is Release-SWS. Figure 19-5 shows the New Solution Configuration dialog box with these settings. Keep in mind that when creating new solutions, the output and intermediate directories will change.
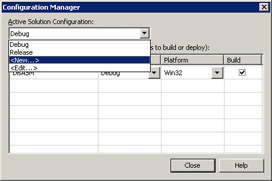
Figure 19-4: Initiating a new configuration from the Configuration Manager dialog box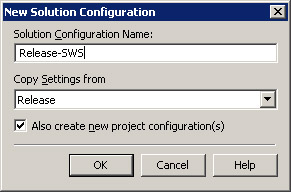
Figure 19-5: Creating a new Release.SWS configuration -
If you're using SettingsMaster (and you should be), setting the compiler and linker switches is trivial. Click the SettingsMaster Custom Project Update button and, when prompted, choose the
 Release-SWS.XML file. This will take care of ensuring the minimal settings are all set up. If you want to run SWS on a Debug build, choose the Debug-SWS.XML file. (Both files are in the SettingsMaster\SettingsMaster directory.)
 -
If you aren't using SettingsMaster (shame on you!), you'll need to add the following settings to the compiler (CL.EXE) for your Release-SWS project. Please see Chapter 2 for information on how to set these.
-
/Zi (Debug Information Format)
-
/Gy (Enable Function-Level Linking)
-
/Gh (Enable _penter Hook Function) There's no standard setting for this switch, so you'll have to select the Command Line node under the C/C++ folder and enter it manually.
The following settings must be added to the linker (LINK.EXE) for your Release-SWS project:
-
/DEBUG (Generate Debug Info).
-
/OPT:REF (Optimization, eliminate unreferenced functions).
-
-
Add
SWSDLL.LIB to the dependencies.For doing a Debug-SWS configuration, you'll just need to add the /Gh switch to CL.EXE and the dependency on
SWSDLL.LIB.
Running Applications Using SWS
After your application is set up and compiled, you encounter the hardest step in using SWS: running your application. You need to sit down and think long and hard about what the most common usage scenarios are for your application. If you have an existing application, you should probably schedule some customer visits to see which common usage applies to all. If you have a new application, you should sit down with the marketing or customer representative folks to plan the actions. After you've got the scenarios down, you'll need to run your application through each of them on various machines under various loads. You'll probably want to invest in making those scenarios repeatable with an automation tool such as Tester from Chapter 16.
When you first run your application with SWS, you'll notice two new files created in the directory in which each SWS compiled binary resides: <filename>.SWS and <filename>.1.SWS. The SWS file without the number in it is the base file that contains the addresses and sizes of each function for the module as well as room for the execution counts. This file is copied over to a new file on each live run so that the symbol lookup doesn't have to take place on each run. The files with the number in them indicate a live run and contain execution counts. Each time you run your special compiled binary, a new <filename>.#.SWS file is created for each run.
Part of SWS is an executable with the imaginative name ![]() SWS.EXE. This is the program that allows you to view individual SWS files, generate new ones, and do the final tuning. If you run
SWS.EXE. This is the program that allows you to view individual SWS files, generate new ones, and do the final tuning. If you run ![]() SWS.EXE without any parameters or with -?, the output is as follows:
SWS.EXE without any parameters or with -?, the output is as follows:
SWS (Smooth Working Set) 2.0 John Robbins - Debugging Applications for Microsoft .NET and Microsoft Windows Usage: SWS [-t <module>]|[-d <module>]|[-g <module>]|[-?] [-nologo] -t <module> - Tune the module's working set (run from directory with .SWS file) -d <module> - Dump the raw data for the module or #.SWS file -g <module> - Generate the initial SWS file for the module -? - Show this help screen -nologo - Do not display the program information
You can dump out any of the resulting .SWS files so that you can see exactly which functions are being called, which ensures you're executing the functions you think you're executing. The output of a dumped run file (<filename>.#.SWS) looks like the following:
Link time : 0x3E13849C Entry count : 12 Image base : 0x00400000 Image size : 0x00007000 Module name : SimpleSWSTest.exe Address Count Size Name ---------- -------- ----- ---- 0x00401050 2 22 ?Bar@@YAXXZ 0x00401066 2 22 ?Baz@@YAXXZ 0x0040107C 2 22 ?Bop@@YAXXZ 0x00401092 4 10 ?Foo@@YAXXZ 0x0040109C 1 49 _wmain 0x004010CD 2 10 _YeOlCFunc 0x004011E0 0 422 _wmainCRTStartup 0x00401C50 0 63 __onexit 0x00401C90 0 24 _atexit 0x00401DC0 0 23 __setdefaultprecision 0x00401DE0 0 7 __matherr 0x00401DF0 0 7 __wsetargv
While an application is compiled and using the SWS _penter function, the initial .SWS file is automatically generated. However, generating the file requires a considerable amount of work with the ![]() DBGHELP.DLL symbol engine, so you can save some startup time by pre-generating the module .SWS files with the -g option to
DBGHELP.DLL symbol engine, so you can save some startup time by pre-generating the module .SWS files with the -g option to ![]() SWS.EXE.
SWS.EXE.
Producing and Using the Order File
After you've completed all the runs, it's time to tune your application and generate the order file you'll pass to the linker. ![]() SWS.EXE provides the front end to the tuning with the -t command-line option followed by just the module name of the binary to tune. Tuning produces the actual order file with a .PRF extension, mainly because that's what the old Working Set Tuner tool produced. If you'd like to see the work going on when generating the order file, that is, how it's packing and building the order, pass -v on the SWS command line. An example of the verbose output is fairly easy to understand:
SWS.EXE provides the front end to the tuning with the -t command-line option followed by just the module name of the binary to tune. Tuning produces the actual order file with a .PRF extension, mainly because that's what the old Working Set Tuner tool produced. If you'd like to see the work going on when generating the order file, that is, how it's packing and building the order, pass -v on the SWS command line. An example of the verbose output is fairly easy to understand:
Verbose output turned on Action -> Tuning for : SimpleSWSTest Initializing the symbol engine. Loading the symbols Processing : SimpleSWSTest.1.SWS Processing : SimpleSWSTest.2.SWS Processing : SimpleSWSTest.3.SWS Processing : SimpleSWSTest.4.SWS Processing : SimpleSWSTest.5.SWS Order file output: SimpleSWSTest.PRF Page Remaining (4086) (0010) : ( 20) ?Foo@@YAXXZ Page Remaining (4064) (0022) : ( 10) ?Bop@@YAXXZ Page Remaining (4042) (0022) : ( 10) ?Baz@@YAXXZ Page Remaining (4032) (0010) : ( 10) _YeOlCFunc Page Remaining (4010) (0022) : ( 10) ?Bar@@YAXXZ Page Remaining (3961) (0049) : ( 5) _wmain
The numbers after the "Page Remaining" text are the page size remaining, the size of the function, and the number of executions for the particular function.
When building the .PRF file, SWS doesn't just produce a text file listing of those functions in most called order because that doesn't take into account the page size of the operating system. If a function happens to cross a page boundary, two pages will have to be in memory for that one function. SWS ensures that the functions appear on a single page and also tries to ensure that every page is filled as completely as possible. To ensure every page is filled, you might see functions that are rarely called in the resulting order file. By avoiding unnecessary page padding, you'll reduce the amount of RAM your program needs.
After you've produced the order file, you just need to specify it to the linker /ORDER switch so that the file is used. You should always store the order file in the same directory as the project file and sources. Here's one confusing issue to note about the /ORDER option: the filename must be preceded by the @ character. If you're not using SettingsMaster, you can specify the order file for the binary in the project Property Pages dialog box, Linker folder, Optimization node, Function Order field for your release build, as shown in Figure 19-6. When using SettingsMaster, simply choose the ![]() ReleaseOrderFile.XML file after clicking the SettingsMaster Custom Project Update button.
ReleaseOrderFile.XML file after clicking the SettingsMaster Custom Project Update button.
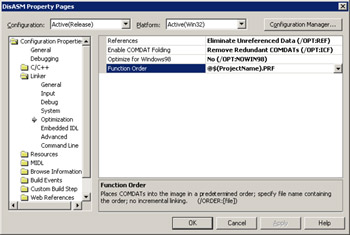
Figure 19-6: Specifying the /ORDER file to a release build
|
EAN: 2147483647
Pages: 177