Using Tester
|
Using Tester is relatively simple. I'll start out by discussing the actual Tester object and its use in scripts before I move on to discussing how to use the ![]() TESTREC.EXE program to record scripts. By understanding the object Tester presents for your scripts, you'll be able to record them more effectively.
TESTREC.EXE program to record scripts. By understanding the object Tester presents for your scripts, you'll be able to record them more effectively.
Tester Scripts
In your scripts, the basic idea is to just create a couple of Tester objects, either start or find your application's main window, play some keystrokes to your application, check the results, and end. Listing 16-1 shows a sample VBScript test that starts NOTEPAD.EXE, enters a few lines of text, and closes Notepad. (All the example scripts shown in this chapter are included with the sample files for this book.)
Listing 16-1: MINIMAL.VBS showing how to use common Tester objects
' A minimal VBScript Tester example. It just starts Notepad, enters a ' few lines of text, and closes Notepad. ' Get the system and input objects. Dim tSystem Dim tInput Dim tWin Set tSystem = WScript.CreateObject ( "Tester.TSystem" ) Set tInput = WScript.CreateObject ( "Tester.TInput" ) ' Start Notepad. tSystem.Execute "NOTEPAD.EXE" ' Wait a few seconds. tSystem.Sleep 3.0 ' Try to find Notepad's main window. Set tWin = tSystem.FindTopTWindowByTitle ( "Untitled - Notepad" ) If ( tWin Is Nothing ) Then MsgBox "Unable to find Notepad!" WScript.Quit End If ' Ensure that Notepad is in the foreground. tWin.SetForegroundTWindow ' Type something. tInput.PlayInput "Be all you can be!~~~" ' Play it again, Sam. tInput.PlayInput "Put on your boots and parachutes....~~~" ' Third time's the charm. tInput.PlayInput "Silver wings upon their chests.....~~~" ' Wait 3 seconds. tSystem.Sleep 3.0 ' End Notepad. tInput.PlayInput "%FX" tSystem.Sleep 2.0 tInput.PlayInput "{TAB}~" ' Script is done! Listing 16-1 shows the three objects Tester uses most often. The TSystem object allows you to find top-level windows, start applications, and pause the testing. The TWindow object, which is returned by FindTopTWindowByTitle in Listing 16-1, is the main workhorse. It is a wrapper around an HWND and has all sorts of properties that tell you everything about the window. Additionally, TWindow allows you to enumerate all the child windows that belong to a particular parent. The last object in Listing 16-1 is the TInput object, which supports the single method PlayInput to funnel keystrokes to the window that has the focus.
Listing 16-2 shows the TNotify object used in a VBScript test. When developing automation scripts, one of the most difficult cases you'll need to handle is when an unexpected window, such as an ASSERT message box, pops up. The TNotify object makes it a snap to provide an emergency handler for such events. The simple script in Listing 16-2 just watches for any windows with "Notepad" in their captions. Although you might not use the TNotify class much, when you do need it, you really need it.
Listing 16-2: HANDLERS.VBS showing how to use the TNotify object
' A VBScript test to show the window notification handlers ' Constants for the TNotify.AddNotification routine. Const antDestroyWindow = 1 Const antCreateWindow = 2 Const antCreateAndDestroy = 3 Const ansExactMatch = 0 Const ansBeginMatch = 1 Const ansAnyLocMatch = 2 ' Get the system and input objects. Dim tSystem Dim tInput Set tSystem = WScript.CreateObject ( "Tester.TSystem" ) Set tInput = WScript.CreateObject ( "Tester.TInput" ) ' The TNotify object variable Dim Notifier ' Create the TNotify object. Set Notifier = _ WScript.CreateObject ( "Tester.TNotify" , _ "NotepadNotification" ) ' Add the notifications that I want. For this demonstration, I want both ' window destroy and window create notifications. See the TNotify source ' code for all the possible notification combinations. Notifier.AddNotification antCreateAndDestroy , _ ansAnyLocMatch , _ "Notepad" ' Start Notepad. tSystem.Execute "NOTEPAD.EXE" ' Pause for one seconds. tSystem.Sleep 1.0 ' Because the apartment model isn't thread-safe, I set up the ' notification scheme to use a timer. However, the message can get ' blocked because all the processing is forced to a single thread. This ' function lets you manually check the window create and window destroy ' conditions. Notifier.CheckNotification ' The message box in the NotepadNotification_CreateWindow event ' procedure blocks, so the code to end Notepad won't execute until the ' message box is cleared. tInput.PlayInput "%FX" tSystem.Sleep 1.0 ' Again, check notifications. Notifier.CheckNotification ' Give TNotify a chance to intercept the window destroy message. tSystem.Sleep 1.0 ' Disconnect the notifications. If you don't do this in WSH, the class ' terminate never gets called so the notification is still active in the ' notification table. WScript.DisconnectObject Notifier Set Notifier = Nothing WScript.Quit Sub NotepadNotificationCreateWindow ( tWin ) MsgBox ( "Notepad was created!!" ) End Sub Sub NotepadNotificationDestroyWindow ( ) MsgBox ( "Notepad has gone away...." ) End Sub
You need to call the TNotify CheckNotification method every once in a while. (I'll explain the reasons you need to call this method in the section "Implementing Tester" later in the chapter.) Periodically calling the CheckNotification method ensures that the notification messages can get through even though you might not have a message loop in your language of choice. The code in Listing 16-2 shows how to use a message box in the notification event procedures, though you probably don't want to use message boxes in your real scripts because they can cause problems by unexpectedly changing the window with the focus.
Also keep in mind that I allow you to set only a limited number of notifications—five—so you shouldn't use TNotify for general scripting tasks such as waiting for the File Save dialog box to appear. TNotify should be used only for unexpected windows. Depending on how you set up your notification handlers and how they search for the specified text in the window caption, you can easily receive notifications for windows that you might not be interested in. You're most likely to receive unwanted notifications when you use a generic string such as "Notepad" and you specify that the string can appear anywhere in the window caption. To avoid notifications you don't want, you should be as specific as possible with your notifications when calling the TNotify AddNotification method. Your CreateWindow event procedures should also look at the TWindow passed in so that you can verify that it's the window you're interested in. For DestroyWindow event procedures that handle generic notifications, you should search the open windows to ensure that the window you're interested in no longer exists.
Included with the source code that accompanies this book are other samples that you might want to look at to see how you can use Tester. ![]() NPAD_TEST.VBS is a more complete VBScript test and has some reusable routines.
NPAD_TEST.VBS is a more complete VBScript test and has some reusable routines. ![]() PAINTBRUSH.JS shows using the mouse playback capabilities in a resolution-independent manner. It takes a bit to run, but the outcome is worth it. TesterTester is the main unit test for the Tester COM object. TesterTester a C# application in the Tester\Tester\Tests\TesterTester directory, should give you an idea of how to use Tester with .NET. Additionally, the sample TesterTester shows the TWindows object, which is a collection that contains TWindow objects.
PAINTBRUSH.JS shows using the mouse playback capabilities in a resolution-independent manner. It takes a bit to run, but the outcome is worth it. TesterTester is the main unit test for the Tester COM object. TesterTester a C# application in the Tester\Tester\Tests\TesterTester directory, should give you an idea of how to use Tester with .NET. Additionally, the sample TesterTester shows the TWindows object, which is a collection that contains TWindow objects.
Although I'm partial to using JScript and VBScript for my unit tests, I realize that getting them to work correctly can be a challenge. Scripting variables are untyped and there's no magic IntelliSense editor, such as the C# editor in Visual Studio .NET, so you're back to the old run-and-crash style of debugging. The main reason I like using scripting languages is that I don't need to rely on compiling my tests. If you have a flexible build environment—one in which you can easily build other binaries in addition to your main application—you might want to consider using .NET so that you can build your tests as you build your application. Of course, Tester doesn't limit you to the easiest-to-use testing languages. If you're more comfortable using C or the Microsoft Macro Assembler (MASM), you're welcome to use those languages instead.
Although using the objects in Tester is fairly simple, the real work is planning your tests. You should keep your tests as focused and simple as possible. When I first started automating my unit tests in my early development days, I tried to force my tests to do too much. Now I write each script to test just a single operation. A good example of a single-operation test is to limit the script just to sending the keystrokes to open a file. You can chain the scripts together in various ways to maximize script reuse. Once you have the script to open a file, you can use it in three different tests: a test to see whether you can open a valid file, a test to open an invalid file, and a test to open a corrupt file. As in normal development, you should avoid any hard-coded strings if possible. Not only will this make internationalizing your script a piece of cake, but it will also help when you change your menu system and accelerators for the hundredth time.
Another detail to consider when you're designing your Tester scripts is how to verify that the script actually worked. If you're bored and have the time, I guess you could just sit there and watch the scripts run to see whether you get the same results on each run. Probably a better idea is to log states and key points in your script so that you can compare the output to previous runs automatically. If you use the CSCRIPT.EXE WSH executable, you can use WScript.Echo and redirect the output to a file. After the script finishes, you can run a difference utility (such as WinDiff) on the output; if the utility turns up any differences, you can check to see that the script executed correctly. Keep in mind that you'll want to normalize the information you log and keep the information free of run-specific details. For example, if you're writing an application that downloads stock quotes, you won't want to include the last price-update time in the logging output.
What about debugging your Tester scripts? Tester doesn't have its own integrated debugger, so you'll need to use whatever debugging tools are available for the language that the Tester script is written in. If you're using a debugger, you need to be careful that you don't stop on a TInput PlayInput method call. If the debugger does stop there, the keystrokes will obviously go to the wrong window. To work around this potential problem, I generally force the window to which I'm sending keystrokes to the top of the z-order by calling the TWindow SetForegroundTWindow method before each PlayInput call. This way, I can break on the SetForegroundTWindow call, check the state of the application, and still get the keystrokes to the correct window.
Recording Scripts
Now that you're armed with an understanding of the Tester objects and how to call them from your own scripts, I can turn to the ![]() TESTREC.EXE program that you'll use to record the interaction with your applications. When you first fire up
TESTREC.EXE program that you'll use to record the interaction with your applications. When you first fire up ![]() TESTREC.EXE, you'll notice that it's a text editor that has a little bit of code already written for you. By default, the language is JScript, but I'll show you how to change the default to VBScript in a moment. Starting the recording is as simple as pressing the Record button on the toolbar or pressing Ctrl+R.
TESTREC.EXE, you'll notice that it's a text editor that has a little bit of code already written for you. By default, the language is JScript, but I'll show you how to change the default to VBScript in a moment. Starting the recording is as simple as pressing the Record button on the toolbar or pressing Ctrl+R.
When recording, ![]() TESTREC.EXE automatically minimizes itself and changes its caption to "RECORDING!," so you'll know what it's doing. You can stop recording in several different ways. The easiest is to set focus to
TESTREC.EXE automatically minimizes itself and changes its caption to "RECORDING!," so you'll know what it's doing. You can stop recording in several different ways. The easiest is to set focus to ![]() TESTREC.EXE by either pressing Alt+Tab or clicking on the application. Recording will also stop if you press Ctrl+Break or Ctrl+Alt+Delete; the former is suggested in the hook documentation, and the latter is appropriate when you want the system to forcibly cancel any active journaling hooks (which is how
TESTREC.EXE by either pressing Alt+Tab or clicking on the application. Recording will also stop if you press Ctrl+Break or Ctrl+Alt+Delete; the former is suggested in the hook documentation, and the latter is appropriate when you want the system to forcibly cancel any active journaling hooks (which is how ![]() TESTREC.EXE does its magic).
TESTREC.EXE does its magic).
Before you go off and start recording a million scripts, you'll need to do a little planning to take complete advantage of Tester. Although Tester handles mouse recording and playback, your scripts will be much more robust if you can do as much work as possible with keystrokes. One nice feature is that when recording, Tester works hard to keep track of the window with the focus. By default, for single mouse clicks and double-clicks, Tester will generate code to set the focus to the top-level window before processing the click or clicks. In addition, when recoding with keystrokes, Tester monitors Alt+Tab combinations to set the focus when you finish shifting focus.
Since mouse recording can generate a million statements in a script, ![]() TESTREC.EXE, by default, records only single mouse clicks, double-clicks, and drag actions every 50 pixels. Of course, I did the right thing and allowed you to specify exactly how you want your scripts recorded. Figure 16-1 shows
TESTREC.EXE, by default, records only single mouse clicks, double-clicks, and drag actions every 50 pixels. Of course, I did the right thing and allowed you to specify exactly how you want your scripts recorded. Figure 16-1 shows ![]() TESTREC.EXE's Script Recording Options dialog box, which is accessible by pressing Ctrl+T or selecting Script Options from the Scripts menu. All items shown are the default values.
TESTREC.EXE's Script Recording Options dialog box, which is accessible by pressing Ctrl+T or selecting Script Options from the Scripts menu. All items shown are the default values.
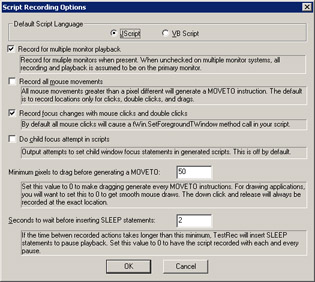
Figure 16-1: Script recording options for Tester
The first thing you'll notice at the top of the Script Recording Options dialog box is the option to choose JScript or VBScript for new scripts. The Record For Multiple Monitor Playback check box, which is checked by default, will insert calls to TSystem.CheckVirtualResolution to ensure the screen size for the rest of the recording. If you uncheck this option, any point that falls outside the primary monitor for mouse clicks or windows locations will abort recording. You might want to turn off multiple monitor recording if you plan to use recorded scripts on different machines. However, if you're recording scripts that only you will be running, leave the multiple monitor recording turned on so that you can take advantage of multiple monitors.
For scripts in which you will be doing a lot of click-and-drags and you want to record all the mouse movements between the mouse down and release actions, set the Minimum Pixels To Drag Before Generating A MOVETO value to 0. If your recording will be doing a lot of clicks in the application without shifting focus to other applications, you'll want to uncheck Record Focus Changes With Mouse Clicks And Double Clicks. That will keep ![]() TESTREC.EXE from generating the code to force the focus each time the mouse is clicked and will make your script much smaller.
TESTREC.EXE from generating the code to force the focus each time the mouse is clicked and will make your script much smaller.
The Do Child Focus Attempt In Scripts option will add code that attempts to set the focus to a specific control or child window you click on. I left this option off by default because I was already generating the statements to set the focus to the top-level window. Although applications like Notepad have only a single child window, other applications have deeply nested window hierarchies, and it can be difficult to track down child windows when all the parents don't have titles and unique classes. For an example, use Spy++ to look at the Visual Studio .NET editor window hierarchy. I found that setting the top window–level focus before generating the click code usually worked perfectly fine.
Finally, the Seconds To Wait Before Inserting SLEEP Statements option automatically inserts pauses in the script longer than a specific value in seconds. Most of the time, you'll want to let your scripts run as quickly as possible, but to help keep scripts coordinated, the extra pause time can help.
The recording and playback for Tester support the same format as the .NET System.Windows.Forms.SendKeys class, except for the repeating keys option. To handle the mouse, I extended the format to allow for it as well as the format modifiers necessary to allow Ctrl, Alt, and Shift key utilization in conjunction with it. Table 16-1 shows the format of the mouse commands to TInput.PlayInput.
| Command | Usage |
|---|---|
| MOVETO | {MOVETO x , y} |
| BTNDOWN | {BTNDOWN btn , x , y} |
| BTNUP | {BTNUP btn , x , y} |
| CLICK | {CLICK btn , x , y} |
| DBLCLICK | {DBLCLICK btn , x , y} |
| SHIFT DOWN | {SHIFT DOWN} |
| SHIFT UP | {SHIFT UP} |
| CTRL DOWN | {CTRL DOWN} |
| CTRL UP | {CTRL UP} |
| ALT DOWN | {ALT DOWN} |
| ALT UP | {ALT UP} btn: LEFT, RIGHT, MIDDLE x: X screen coordinate value y: Y screen coordinate value |
There were a few items I wasn't able to add to the mouse recording. The first was mouse wheel processing. I used a journal hook to capture keystrokes and mouse operations, and the mouse wheel message came through. Unfortunately, a bug in the journal hook reporting doesn't pass the mouse wheel direction, so there's no way to know whether you're scrolling up or down. The second item I couldn't process was the new X1 and X2 buttons found on the newer Microsoft Explorer mouse. These WM_XBUTTON* messages pass which button was pressed in the high order word of the wParam. Since the WM_MOUSEWHEEL message does the same thing with the direction, but the journal record hook doesn't receive it, I doubt the X button would come through either.
|
EAN: 2147483647
Pages: 177