Section 29.5. Minimizing GIF File Sizes
29.5. Minimizing GIF File SizesWhen you are designing and producing graphics for the Web, it is of utmost importance to keep your file sizes as small as possible. The standard "lowest common denominator" guideline for estimating download time over a modem is one second per kilobyte. Of course, actual download times will vary widely, but this gives you a ballpark number to use for comparisons. Following are a few simple strategies you can follow to minimize the size of your GIF files while keeping an eye on image quality. 29.5.1. Design StrategicallyYou can help keep file size under control by the design decisions you make. After a while, designing graphics for the Web becomes second nature. Figure 29-8. The Matte color tool (shown in Photoshop CS)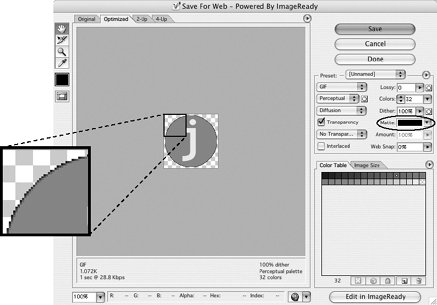 29.5.1.1. Limit dimensionsThough it may seem obvious, the easiest way to keep file size down is to limit the dimensions of your graphic. There aren't any numerical guidelines here; just don't make graphics larger than they need to be.
29.5.1.2. Design with flat colorIf you design your graphics with flat color from the beginning, you are basically giving the LZW compression the kind of file it likesrows of repetitive pixel colors.
29.5.2. Use Optimization ToolsPhotoshop/ImageReady and Fireworks provide a similar arsenal of tools for fine-tuning the optimization of GIF files. Most of these methods work to make the LZW compression as efficient as it can be. 29.5.2.1. Reduce the number of colors (bit depth)Although GIF format can support 8-bit color information with a maximum of 256 colors, you don't necessarily have to use all of them. In fact, you can reduce the size of a file considerably by saving it at a lower bit depth, which corresponds to fewer colors. Photoshop and Fireworks allow you to select the number of colors you'd like in the image. Other tools may ask you to choose from a list of bit depths. The effect is the same; it's just useful to know how bit depth translates into numbers of colors for the latter (see Table 29-1 for translations).
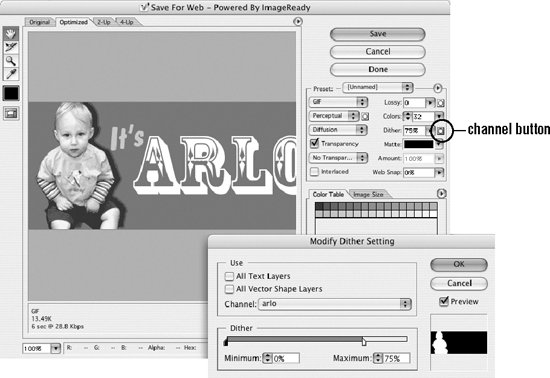
The goal is to find the minimum number of colors (smallest bit depth) that still maintains the integrity and overall character of the image. You may be surprised to find how many images survive a reduction to just 32 colors. Of course, the bit depth at which the image quality becomes unacceptable depends on the specific image and your personal preferences. I personally look at most images at 32 colors first, and add colors from there if I can't live with the results. Reducing the number of colors decreases the file size in two ways. First, lower bit depths include less data in the file. In addition, clusters of similarly colored pixels become the same color, creating more pockets of repeating pixels for LZW compression to work on. For that reason, fewer image colors take better advantage of GIF's compression scheme, resulting in smaller files. The real file size savings kicks in when there are large areas of flat color. Even if an image has only eight pixel colors, if it has a lot of blends and gradients, you won't see the kind of file size savings you might expect with that kind of severe color reduction. 29.5.2.2. Limit ditheringDithering is the random dot pattern that results when colors are approximated by mixing similar colors from a limited palette. Dithering is relevant to GIF file size because it interrupts the clean areas of flat color that are conducive to efficient LZW compression, and can make the file size larger than it needs to be. Nearly all image editing tools allow you to turn dithering on and off. Current web graphics tools (Fireworks and Photoshop/ImageReady) go one step further by allowing the amount of dithering to be selected on a sliding scale from 0 to 100. You can preview the results of various settings, making it easy to select the best balance of file size and image quality. Bear in mind, however, that dithering is usually beneficial to image quality in photographic or continuous tone areas, as it prevents "banding" of colors in the image. Dithering may even permit the image to be saved at a lower bit depth, which generally results in smaller file sizes, so it is not appropriate to simply set dithering to zero. The optimal setting will depend on the image. 29.5.2.3. Play with the "Loss" settingAs explained earlier in this chapter, GIF compression is "lossless," meaning every pixel in the image is preserved during compression. The current web graphics tools allow you to force some pixels out during the conversion process using the "Loss" or "Lossy" setting. Throwing out stray pixels is all in the name of maximizing repeated strings of pixel colors, thus allowing the LZW compression to work more efficiently. Depending on the image, a loss value of 5 to 30% will maintain the integrity of the image while reducing file sizes significantly. This technique works best on images with areas of continuous tone (blended colors) and photographic content. 29.5.2.4. Weighted optimization (Photoshop/ImageReady)Photoshop and ImageReady offer yet another advance in graphic optimization. Their weighted optimization feature allows you to apply varying amounts of optimization to different parts of the image. This preserves the integrity of the most important areas while maximizing file size savings for the remainder. Weighted optimization uses an alpha channel (called a mask) to select areas of the image for various optimization levels. The white areas of the mask correspond to the highest level of image quality, while black areas describe the lowest (gray areas are on a linear scale in between). Channels can be used to control color reduction, dithering, and lossiness in a GIF image. To access the Modify dialog box (Figure 29-9), click the Channel button next to each of these controls on the Optimization palette. In the dialog box, use the sliders to set the maximum (white tab on the left) and minimum (black tab on the right) levels of optimization. In Photoshop, create the alpha channel by saving a selection and giving the channel a name (the channel can then be accessed from the Modify dialog boxes). In ImageReady, you can create a new channel based on a selected image area on the fly when you click the Channel button.
29.5.2.5. Optimize to a File Size function (Photoshop/ImageReady)In some cases, you may know ahead of time what you'd like the file size of your GIF file to be, for example, when designing an ad banner with a specific file size limitation. Photoshop offers an Optimize to File Size function that automatically optimizes an image to meet a target file size. This enables you to achieve your desired file size without having to test a variety of file size settings. The Optimize to File Size function is accessible from the Save for Web dialog box as shown in Figure 29-10. Figure 29-10. Optimize to File Size shown in Photoshop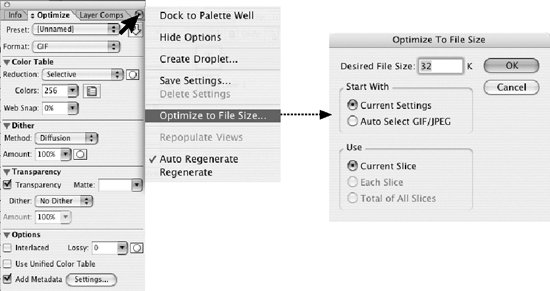 |
EAN: 2147483647
Pages: 325