Building a Digital Dashboard
In addition to the Digital Dashboard samples, the Digital Dashboard Starter Kit contains two COM add-ins that extend Outlook and Microsoft FrontPage and that you'll undoubtedly find useful. The first of these add-ins allows you to easily change the Outlook Today URL without having to hack the registry. When you load this add-in, you'll find a new option in the Tools menu called Set Outlook Today Page. When you click on this menu option, you'll see the dialog box shown in Figure 11-9, in which you can set the URL you want to use for your custom Outlook Today page. However, this add-in is no way to deploy your Digital Dashboard to hundreds of users if you plan to change the default Outlook Today page for everyone. Rather, you need to use System Management Server (SMS), a setup program, or a logon script to modify the registry setting for Outlook Today programmatically.

Figure 11-9. The Set Outlook Today Page dialog box.
The second COM add-in extends FrontPage, making it easier to insert Outlook information into your Web pages using either the Outlook View control or the Outlook Databinding control. Go to the Insert menu and select Outlook Controls, as shown in Figure 11-10. From the drop-down menu, you can select Outlook elements for insertion.

Figure 11-10. Using the FrontPage COM add-in from the Digital Dashboard Starter Kit.
Digital Dashboard Architecture
The Digital Dashboard examples included in the starter kit on the companion CD are predominantly composed of information nuggets that are exposed using DHTML nugget windows, or uniform graphical interfaces in the form of small windows. You can think of nuggets as self-contained applications or information. Client-side scripts either expose or hide these nuggets, depending on whether the user maximizes or minimizes the nugget window. Information nuggets usually consist of DHTML script and possibly an <OBJECT> tag for ActiveX control nuggets.
Every nugget has a unique name. It's a good idea to use some sort of convention to name your nuggets, such as nug_nuggetname_X. For example, if your nugget displays information from the user's Inbox, you might want to name it nug_inboxmessages_1.
Building Information Nuggets into the Dashboard
To better understand what a nugget is, let's look at some code. The following HTML code shows the Inbox nugget from the Finance Digital Dashboard. Notice the <DIV> tag that uniquely identifies the nugget as nug_messages_1. Also notice that the nugget uses the Outlook View control to display its information.
<div class="wholeNugget" ID="nug_messages_1" href="http://www.microsoft.com"> <table CELLPADDING="1" CELLSPACING="0" BORDER="0" WIDTH="100%"> <tbody> <tr TITLE="Messages" STYLE="height:17px; font:bold 10pt arial" WIDTH="100%"> <td NOWRAP ID="title" CLASS="NuggetBar" STYLE="padding-left:5px;border-left-style:solid; border-left-width:1px; border-top-style:solid; border-top-width:1px; border-bottom-style:solid; border-bottom-width:1px; text-decoration:underline"> <span ID="text"><A href="outlook:inbox">Messages</A> </span></td> <td NOWRAP ID="drag" CLASS="NuggetBar" STYLE="border-top-style:solid; border-top-width:1px; border-bottom-style:solid; border-bottom-width:1px"> </td> <td NOWRAP ID="disp" TITLE="Hide" CLASS="NuggetBar" onclick="displayNugget(nug_messages_1)" STYLE="border-top-style:solid; border-top-width:1px; border-bottom-style:solid; border-bottom-width:1px; border-right-style:solid; border-right-width:2px; border-left-style:solid; border-left-width:2px;width:16px"> <img SRC="images/close.gif" width="17" height="13"></td> </tr> </tbody> </table> <div ID="content" CLASS="Nugget" STYLE="display:block; padding:0px; position:relative; top:-2; width: 100%; overflow-x:auto; margin:1px; border-top-width:0px"> <table id="tblTopNavBar" border="0" cellpadding="0" cellspacing="0" style="width:100%;"> <tr> <td valign="top" nowrap id="tdNavBar"> <span class="topBarSpan"><span id="spanMessages4" onclick="HighPriorityMessages.view='Messages'; changeMessagesTab(this);" xonblur="LoseFocus" xonFocus="changeFocus" id="FolderBtn2" class="btnFolder" style="font-weight:bold">Messages</span> <span id="spanMessages3" onclick="HighPriorityMessages.view='By Follow-up Flag'; changeMessagesTab(this);" xonblur="LoseFocus" xonFocus="changeFocus" id="FolderBtnHome" class="btnFolder" style="width:0px; ">By Follow-up Flag</span> <span id="spanMessages5" onclick="HighPriorityMessages.view='Unread Messages'; changeMessagesTab(this);" xonblur="LoseFocus" xonFocus="changeFocus" id="FolderBtn5" class="btnFolder">Unread</span> <span id="spanMessages2" onclick="HighPriorityMessages.view='By Sender'; changeMessagesTab(this);" xonblur="LoseFocus" xonFocus="changeFocus" id="FolderBtn3" class="btnFolder">Sender</span> </span><!--End Folder Button Bar--> </td> </tr> </table> <div style="HEIGHT:200px;MARGIN-BOTTOM:0px;MARGIN-LEFT:0px"> <object ID="HighPriorityMessages" CLASSID="CLSID:0006F063-0000-0000-C000-000000000046" style="width:100%;height:100%" codebase="../outlctlx.CAB#ver=9,0,3024" width="192" height="250"> <param NAME="View" VALUE> <param NAME="Folder" VALUE="Inbox"> <param NAME="Namespace" VALUE="MAPI"> <param NAME="Restriction" VALUE> <param NAME="DeferUpdate" VALUE="0"> </object> </div> </div> </div> |
You should take note of another <DIV> tag in this code: the <Content> tag. You can use this <DIV> tag in conjunction with some client-side JavaScript to hide or display the content of the nugget when the user clicks the Minimize or Maximize button. Here is the JavaScript code:
//----------------------------------------------------------------- // Function: displayNugget // // Description: Alternately displays and hides the content // of the nugget // // Arguments: none // // Returns: nothing //----------------------------------------------------------------- function displayNugget(oNug) { var e = oNug.all("disp"); var f = oNug.all("content"); ContentRegKey = "DD_CONTENT_" + document.title + "_" + oNug.id; // If contents are hidden, show them if (f.style.display == "none") { e.title = "Hide"; e.children(0).src = "images/close.gif"; f.style.display = "block"; display = "0"; // If the page is not run in the correct security context, try { window.external.SetPref(ContentRegKey,"display");} catch (exception) {} } // If contents are showing, hide them else { e.title = "Show"; e.children(0).src = "images/open.gif"; f.style.display = "none"; display = "1"; try { window.external.SetPref(ContentRegKey,"hide");} catch (exception) {} } } |
This code changes the image to reflect whether the content is visible or hidden. Also, the code updates the style for the HTML, indicating whether to display the nugget. Furthermore, the SetPref method, which is provided by Outlook so that you can easily write preferences to the registry, is called on window.external. SetPref takes two parameters: a string that specifies the key to which you want to write and a string that specifies the value for that key. The Digital Dashboard uses the registry to store the state of the nuggets as users open and close them. Figure 11-11 shows the registry location where these keys are stored. We'll discuss customizing the Digital Dashboard in more detail later in this chapter.
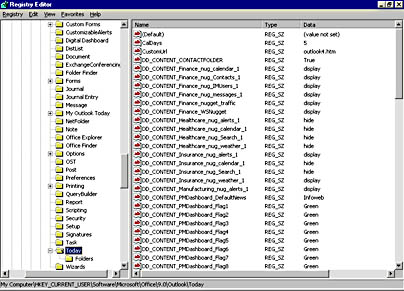
Figure 11-11. Registry location for preferences stored using Outlook's SetPref method.
As you can see, the dashboard is basically a wrapper for information nuggets. Your goal should be to create useful nuggets to plug into your Digital Dashboard. You can even create nuggets using <IFRAME> HTML tags rather than <DIV> tags.
WARNING
Each <IFRAME> tag you use will open a new instance of Microsoft Internet Explorer. If resources are limited on your client computers, use the <DIV> tag instead.
As I mentioned earlier, the dashboards described in this chapter are only examples to help you get started. You could scrap the entire idea of information nuggets and implement your Digital Dashboard using DCOM rather than HTML and JavaScript. With that said, let's take a look at how to build some new nuggets and add them to an existing dashboard.
Creating New Nuggets
Creating new nuggets is as simple as creating new HTML sections in your dashboard code. All you need to do to add your new nuggets of information is plug into the existing nugget framework that we looked at earlier. In this section, we'll look at adding two types of nuggets. The first is an ActiveX control provided in Windows 2000 that you can embed in your dashboard to view the information generated by the performance monitor in a Web application. The second nugget type is the MSN Messenger client for Microsoft Instant Messaging. The MSN Messenger client will illustrate how we can take advantage of real-time collaboration as part of our dashboard.
The System Monitor Nugget
We're going to add the system monitor nugget to the Finance dashboard; you've already seen the Finance dashboard, so the process will be easier for you to follow. The techniques illustrated in our example can be used to add the nugget to any of the dashboards. Figure 11-12 shows the System Monitor control integrated into the Finance dashboard. The nugget has its own top-level button on the dashboard banner so that users can quickly get to system information. The great thing about the System Monitor ActiveX control is that you can display your own system information or a remote server's system information. This makes it a helpful addition to a dashboard used by an administrator who has to monitor Windows 2000 servers, Exchange servers, or any other Microsoft Windows NT-based services that expose performance monitor counters. You will need Windows 2000 to use the System Monitor control since it ships as part of that operating system.
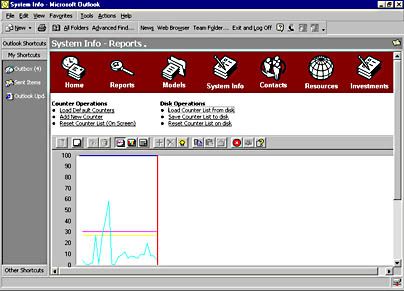
Figure 11-12. The System Monitor ActiveX control integrated into the Finance dashboard.
Creating the nugget for the System Monitor control is very straightforward. The nugget is a full-screen nugget, so we don't have to create a <DIV> tag because users will not be hiding or showing the nugget. (You'll learn how to enable hiding or showing of nuggets with the Instant Messaging nugget.) The System Monitor nugget does, however, use VBScript client-side code to load, save, and reset information in the registry by using the GetPref and SetPref methods. These methods allow you to set up the control the way you want to and then reload those settings every time you revisit the page that displays the nugget.
You set up of the System Monitor ActiveX control by using its object model, which is quite extensive. The System Monitor control supports methods and properties that allow you to lock down the control, add new counters, and retrieve the pathnames of the existing counters, as well as change the colors used throughout the control. Rather than review all features of the System Monitor control, I will point you to the Platform SDK to learn more about them.
Take a look at the following code for the nugget to quickly learn how to use the System Monitor ActiveX control in your dashboards:
<HTML> <HEAD> <TITLE>Reports</TITLE> <link rel="stylesheet" type="text/css" href="../common/DigitalDashboard.css"> <meta name="Microsoft Border" content="t"> </HEAD> <BODY><table border="0" cellpadding="0" cellspacing="0" width="100%"><tr><!--msnavigation--><td valign="top"> <table border="0" width="100%" height="77"> <tr> <TD width=31% align=left height="77"> <B>Counter Operations</B> <li><A href="" onclick="LoadDefaultCounters()"> Load Default Counters</A> <LI><A href="" onclick="AddNewCounter()">Add New Counter</A> <li><A href="" onclick="Reset()"> Reset Counter List (On Screen)</A> </TD> <TD width=69% align=left height="77"> <B>Disk Operations</B> <li><A href="" onclick="LoadCounterListDisk()"> Load Counter List from disk</A> <li><A href="" onclick="SaveCounterListDisk()"> Save Counter List to disk</A> <li><A href="" onclick="ResetCounterListDisk()"> Reset Counter List on disk</A> </TD> </tr> </table> <table width=100%> <tr> <td width="50%" height="100%"> <object classid="CLSID:C4D2D8E0-D1DD-11CE-940F-008029004347" name=SystemMonitor id=SystemMonitor1 v:shapes="_x0000_s1026" class=shape width=687 height=405> <param name="_Version" value="196611"> <param name="_ExtentX" value="18177"> <param name="_ExtentY" value="10716"> <param name="DisplayType" value="1"> <param name="ReportValueType" value="1"> <param name="MaximumScale" value="100"> <param name="MinimumScale" value="0"> <param name="ShowLegend" value="-1"> <param name="ShowToolbar" value="-1"> <param name="ShowScaleLabels" value="-1"> <param name="ShowHorizontalGrid" value="0"> <param name="ShowVerticalGrid" value="0"> <param name="ShowValueBar" value="-1"> <param name="ManualUpdate" value="0"> <param name="Highlight" value="0"> <param name="ReadOnly" value="1"> <param name="MonitorDuplicateInstances" value="-1"> <param name="UpdateInterval" value="1"> <param name="BackColorCtl" value="-2147483633"> <param name="ForeColor" value="-1"> <param name="BackColor" value="-1"> <param name="GridColor" value="8421504"> <param name="TimeBarColor" value="255"> <param name="Appearance" value="-1"> <param name="BorderStyle" value="0"> <param name="GraphTitle" value> <param name="YAxisLabel" value> <param name="LogFileName" value> <param name="AmbientFont" value="-1"> <param name="LegendColumnWidths" value="6.63650075414781E-02 7.08898944193062E-02 0.085972850678733 9.20060331825038E-02 7.69230769230769E-02 7.69230769230769E-02 9.80392156862745E-02"> <param name="LegendSortDirection" value="0"> <param name="LegendSortColumn" value="0"> <param name="CounterCount" value="0"> <param name="MaximumSamples" value="100"> <param name="SampleCount" value="0"> </object> </td> </tr> </table> <p> <!--msnavigation--></td></tr> <!--msnavigation--></table></BODY> <Script Language=VBScript> Sub LoadCounterListDisk() on error resume next 'Load from the registry 'Could also store this in the AD 'or in a hidden message CounterCount = 0 CounterCount = _ window.external.getpref("DD_SYSMON_COUNTERCOUNT") if CounterCount = 0 then msgbox "There are no counters saved!" else 'Clear the control SystemMonitor1.Reset for i = 1 to CounterCount 'Retrieve the registry path for each counter, 'and add it to the control CounterPath = window.external.getpref( _ "DD_SYSMON_COUNTER_" & i & "_PATH") SystemMonitor1.Counters.Add CounterPath next end if window.event.Returnvalue = False End Sub Sub SaveCounterListDisk() on error resume next 'Scroll through each counter in the control and save it out 'First get the total and write it out iCount = SystemMonitor1.Counters.Count window.external.SetPref "DD_SYSMON_COUNTERCOUNT", CStr(iCount) 'Scroll through each counter, and write it out if iCount = 0 then msgbox "No counters to save!" else i = 1 for each oCounter in SystemMonitor1.Counters window.external.setpref "DD_SYSMON_COUNTER_" & _ i & "_PATH", oCounter.Path i=i+1 next end if window.event.Returnvalue = False End Sub Sub ResetCounterListDisk() on error resume next 'Reset the counter list 'First get the total and see if we need to reset anything iCount = window.external.getpref("DD_SYSMON_COUNTERCOUNT") if iCount <> 0 then 'Let's clear it out! for i = 1 to iCount window.external.setpref "DD_SYSMON_COUNTER_" & _ i & "_PATH", "" next end if window.external.setpref "DD_SYSMON_COUNTERCOUNT", 0 window.event.Returnvalue = False End Sub Sub Reset() SystemMonitor1.Reset window.event.Returnvalue = False End Sub Sub AddNewCounter() SystemMonitor1.BrowseCounters window.event.Returnvalue = False End Sub Sub LoadDefaultCounters() 'You could pull the defaults from a network location 'or hidden message if you want SystemMonitor1.Counters.Add "\Processor(_Total)\% Processor Time" SystemMonitor1.Counters.Add "\LogicalDisk(_Total)\Free Megabytes" SystemMonitor1.Counters.Add "\Objects\Processes" SystemMonitor1.Counters.Add "\Objects\Threads" window.event.Returnvalue = False End Sub </Script> </HTML> |
Instant Messaging Nugget
One interesting nugget that you can add to your dashboard provides instant messaging capabilities. The MSN Messenger client includes an ActiveX control as well as an object model that you can use so that you can automate the client to log on, check who is currently online, and send and receive messages from other online users. By integrating this functionality into your dashboard, your users can monitor when other team members come online and communicate with them. Figure 11-13 shows the Instant Messaging nugget integrated into the Finance dashboard.
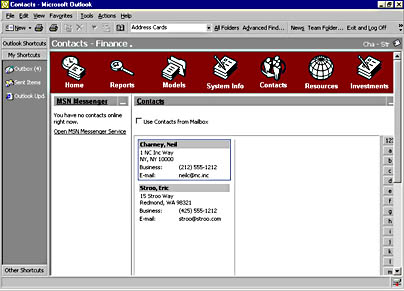
Figure 11-13. The Instant Messaging nugget integrated into the Finance dashboard.
Creating the instant messaging nugget involves creating an HTML <DIV> tag that will contain the contents of the nugget. The reason we use a <DIV> tag is so that we can hide and show the nugget according to the user's preferences. This nugget has some helper files written in both VBscript and JavaScript that manipulate the MSN Messenger object model. Note that Exchange 2000 will support Instant Messaging and Presence technology, so you can use this nugget for both the internal and external tracking of buddies. Instant Messaging is a great tool for corporations that want to use instant communications.
In addition to showing the Instant Messaging nugget, the page in Figure 11-13 shows the Contacts nugget. The Contacts nugget shows either the contacts in the current folder or the contacts from your default Contact folder by using the Outlook View control. These two nuggets are used together, so if you have Instant Messaging buddies who are in your Contact folders, you can quickly retrieve information about them as well as see if they are available online. The Contacts nugget is also implemented as a <DIV> tag, so the user can hide the nugget on the screen. The following listing shows the code for both the Instant Messaging nuggets and the Contacts nugget. Note that I've left out the MSN Messenger code. You can find this code on the companion CD.
<TABLE BORDER=1 WIDTH=102% CELLPADDING=4 CELLSPACING=0 BGCOLOR='#ffffff' height=650> <!------------------------ BEGIN HORIZONTAL PANE ------------------> <TR> <!------------------------ BEGIN LEFT PANE ------------------------> <TD width=15% id=LeftColumn vAlign=top height=87%> <font face='verdana,arial,helvetica' size=1> <div class="wholeNugget" ID="nug_IMUsers_1" href="http://www.microsoft.com"> <table CELLPADDING="1" CELLSPACING="0" BORDER="0" WIDTH="100%"> <tbody> <tr TITLE="Messages" STYLE="height:17px; font:bold 10pt arial" WIDTH="100%"> <td NOWRAP ID="title" CLASS="NuggetBar" STYLE="padding-left:5px;border-left-style:solid; border-left-width:1px; border-top-style:solid; border-top-width:1px; border-bottom-style:solid; border-bottom-width:1px; text-decoration:underline"> <span ID="text"><A href="http://www.microsoft.com">MSN Messenger</A></span></td> <td NOWRAP ID="drag" CLASS="NuggetBar" STYLE="border-top-style:solid; border-top-width:1px; border-bottom-style:solid; border-bottom-width:1px"> </td> <td NOWRAP ID="disp" TITLE="Hide" CLASS="NuggetBar" onclick="displayNugget(nug_IMUsers_1)" STYLE="border-top-style:solid; border-top-width:1px; border-bottom-style:solid; border-bottom-width:1px; border-right-style:solid; border-right-width:2px; border-left-style:solid; border-left-width:2px;width:16px"> <img SRC="../images/close.gif" width="17" height="13"></td> </tr> </tbody> </table> <div ID="content" CLASS="Nugget" STYLE="display:block; padding:0px; position:relative; top:-2; width: 100%; overflow-x:auto; margin:1px; border-top-width:0px"> <div style="HEIGHT:200px;MARGIN-BOTTOM:0px;MARGIN-LEFT:0px"> <br> <script language="javascript"> var s s=''; s+=prepare_messenger() document.write(s); </script> </div> </div> </div> <!--End Nugget--> </font> </TD> <!------------------------ END LEFT PANE ---------------------------> <!------------------------ BEGIN RIGHT PANE ------------------------> <TD id=RightColumn VALIGN=top width=97% height=100%> <div class="wholeNugget" ID="nug_Contacts_1"> <table CELLPADDING="1" CELLSPACING="0" BORDER="0" WIDTH="100%"> <tbody> <tr TITLE="Contacts" STYLE="height:17px; font:bold 10pt arial" WIDTH="100%"> <td NOWRAP ID="title" CLASS="NuggetBar" STYLE="padding-left:5px;border-left-style:solid; border-left-width:1px; border-top-style:solid; border-top-width:1px; border-bottom-style:solid; border-bottom-width:1px "><span ID="text" STYLE="overflow:hidden"> <A ID=ContactLink href="" target="_blank"> <span style="overflow: hidden">Contacts</span></A></span></td> <td NOWRAP ID="drag" CLASS="NuggetBar" STYLE="border-top-style:solid; border-top-width:1px; border-bottom-style:solid; border-bottom-width:1px"> </td> <td NOWRAP ID="disp" TITLE="Hide" CLASS="NuggetBar" onclick="displayNugget(nug_Contacts_1)" STYLE="border-top-style:solid; border-top-width:1px; border-bottom-style:solid; border-bottom-width:1px; border-right-style:solid; border-right-width:2px; border-left-style:solid; border-left-width:2px;width:16px"> <img SRC="../images/close.gif" width="17" height="13"></td> </tr> </tbody> </table> <div id="content"> <form method="POST" action=""> <p><input type="checkbox" name="C1" value="ON" onclick="LoadContacts()">Use Contacts from Mailbox</p> </form> <p> <object classid="clsid:0006F063-0000-0000-C000-000000000046" id="OVCtl1" width=100% height=500> <param name="View" value> <param name="Folder" value="Contacts"> <param name="Namespace" value="MAPI"> <param name="Restriction" value> <param name="DeferUpdate" value="1"> </object> </div> </div> <!--End Nugget--> </td> <!------------------------ END RIGHT PANE ------------------------> </TR> </table> <!--msnavigation--></td></tr><!--msnavigation--> </table></BODY> <script language="vbscript"> 'on error resume next Dim ContactContentValue ApplyNuggetsStates ApplyContactFolder SetCheckBoxValue Sub SetCheckBoxValue document.all.C1.checked = ContactContentValue End Sub Sub LoadContacts strChecked = document.all.C1.checked 'Set the registry, and apply the changes Window.external.SetPref "DD_CONTENT_CONTACTFOLDER",strChecked ApplyContactFolder End Sub Sub ApplyContactFolder Dim strFolder 'Check to see if they want the standard contact folder 'or this one ContactContentValue = _ Window.external.GetPref("DD_CONTENT_CONTACTFOLDER") if ContactContentValue = "" then 'First time set it to False Window.external.SetPref "DD_CONTENT_CONTACTFOLDER",False end if if ContactContentValue = "True" then 'Show the default one oVCTL1.Folder = "contacts" strFolder = "outlook:contacts" else oVCTL1.Folder = "\\Digital Dashboard (Enhanced)\Finance\Contacts" strFolder = "outlook://Digital Dashboard " & _ "(Enhanced)/Finance/Contacts" end if oVCTl1.DeferUpdate = 0 'Set the hyperlink path document.all.ContactLink.href = strFolder End Sub Sub ApplyNuggetsStates() Dim MyElement for each MyElement in document.all if MyElement.tagname="DIV" then if MyElement.classname="wholeNugget" then ContentRegKey = "DD_CONTENT_" & document.title & _ "_" & MyElement.id ContentValue=Window.external.GetPref(ContentRegKey) select case ContentValue case "display" MyElement.all("content").style.display="block" MyElement.all("disp").children(0).src = _ "../images/close.gif" MyElement.all("disp").title = "Hide" case "hide" MyElement.all("content").style.display="none" MyElement.all("disp").children(0).src = _ "../images/open.gif" MyElement.all("disp").title = "Show" end select end if end if next End sub </script> |
EAN: 2147483647
Pages: 184