The Outlook HTML Form Converter
In previous chapters, you learned how to develop Outlook solutions using the features of Outlook, such as forms. These forms, however, work only with Outlook on machines running Microsoft Windows 95 or later versions, or Microsoft Windows NT 4.0 or Windows 2000 Server. There are still many 16-bit, UNIX, and Macintosh clients for whom developers need to design collaborative solutions. To provide cross-platform support for forms, Microsoft offers the Outlook HTML Form Converter. This converter allows you to take your Outlook solutions and turn them into HTML, ASP, and CDO-based applications that can be viewed by any standard browser such as Internet Explorer and Netscape Navigator. Once you convert your application to HTML, you can use any standard Web development tool—for example, FrontPage—to edit the HTML output of the converter. Once you convert the form, your users can work with either the Outlook version of the application or the HTML version of the application.
While this technology is a great step forward for cross-platform collaborative solutions, the HTML environment has some limitations and does not provide the same level of functionality as Outlook. This section describes what the Outlook HTML Form Converter is, how the converter works, and what the Web forms library for Outlook Web Access is. I also provide tips for developing Outlook solutions that can be more easily converted to Web solutions.
Software Requirements of the Converter
Before you attempt to convert your forms, you must meet a few software requirements. First, you must have Outlook Web Access installed on one of your servers running Internet Information Services. Installing Outlook Web Access was discussed in the previous section. Second, you must have either Outlook 97 (version 8.03 or later), Outlook 98, or Outlook 2000 installed on the machine on which you are going to convert the forms. Make sure that you install the converter after you install one of these versions of Outlook. Third, you need to have Exchange 2000 or Exchange Server 5.5 with Service Pack 3. The service pack includes the Outlook HTML Form Converter as well as some improvements to Outlook Web Access that allow you to view Outlook contacts from any standard Web browser. To install the Outlook HTML Form Converter, run Fcsetup.exe in the Formscnv folder of the Service Pack 3 CD for Exchange 5.5. Finally, on the client, users of converted forms can use any version of Outlook or no version of Outlook—that is, they don't even need to have Outlook. They need only a Web browser to use the forms.
Components of the Converter
The Outlook HTML Form Converter's architecture consists of a number of components:
- Conversion wizard.This is the user interface that walks you through converting the form.
- OFT-HTML COM object.This reads the layout and data-binding information from the Outlook form and writes the corresponding HTML code to one or more files on the Web server.
- Form Converter templates.These templates are used as base templates for the converted file.
- Template processor object.This object customizes the base templates to create the converted form.
Features of the Converter
Before stepping through the actual Outlook HTML Form Converter, you should know about its features. The Form Converter does provide a large feature set that you can take advantage of, but it also has some limitations.
Form Locations
The Form Converter allows you to convert forms from multiple forms libraries as well as forms from the file system that are saved as .oft files. The types of forms libraries that the Form Converter supports are the Personal Forms Library, the Organizational Forms Library, and the Folder Forms Library. Using the Form Converter wizard, you can specify either the forms library or the specific .oft files you want to use. The Form Converter also supports selecting multiple forms for simultaneous conversion.
Form Types
The Form Converter currently supports forms based on the following types:
- IPM.Note. Mail message
- IPM.Post. Post form
- IPM.Contact. Contact form
IPM.Task, IPM.Appointment, and IPM.Activity (journal entry) are not supported by the Form Converter, but if you need to convert the user interface for any of them, you can copy their controls to a supported form type. You can then convert the supported form type with the copied controls and customize the converted form using an HTML development tool. If you try to convert an unsupported form type, the Form Converter will display an error message.
Convertible Features
The Form Converter can convert many of the Outlook controls with their corresponding layouts. Following is a list of features that the Form Converter can convert to HTML. Limitations are described.
- Label control.
- TextBox control.
- ComboBox control. If the Outlook form contains an editable ComboBox control, the Form Converter changes it to a noneditable ComboBox.
- ListBox control.
- CheckBox control.
- OptionButton control.
- Frame control.
- CommandButton control. Any images placed on the CommandButton control are lost since HTML does not support images on buttons.
- MultiPage control.
- Image control. Images that are bitmaps are converted to GIF files automatically by the Form Converter. In addition, any images that are clipped in Outlook by the Image control are shrunk automatically by the Form Converter for the HTML version of the form.
- Background images on a form.
- ActiveX controls. The Form Converter adds a commented out Object tag to the HTML form for the ActiveX control. However, the Form Converter does not package the ActiveX control as a CAB file nor does it add a CodeBase statement to the Object tag to point to the control's CAB file. To make the control appear on the form, you can package the control, add the CodeBase statement, and then remove the comments generated by the Form Converter.
- Initial values.
- Required fields. If a user attempts to change a tab in the HTML version of the form, the form will display a warning message that one of the fields is required on the form and also display the identifier text of the field. This text might appear in a format like SUBJECT_41_0_G, which might not be meaningful to your users. You can modify the error code to make it display the friendly name of the control rather than the identifier text.
- Type checking and formatting.
- Read and compose layout.
- Hidden controls. In most cases, the initial values of hidden controls are not maintained.
- Built-in and custom actions. If your actions call a custom form, be sure to also convert these forms, or the HTML version will return an error when the user invokes the custom action. The HTML version of the form can use only two rows of buttons to invoke custom actions. Since the width of the button is based on the amount of text on the button, and you're allowed only two rows of buttons, keep the length of the names of custom actions to a minimum.
- Limited support for non-English forms. The Form Converter provides limited support for non-English forms. It generates the ASP files and places them on the client machine in the correct subfolder for the language. For example, the output of a German form will be placed under the GER folder in Outlook Web Access, not under the USA folder. The Form Converter also places in the Form.ini file the appropriate code page for the language in which the form must be rendered. You must have installed on Outlook Web Access the language pack for the character set of the form you want to convert before running the Form Converter wizard. If you do not, you will not get the international options in the wizard.
Unconvertible Features
Following is a list of features that are not supported by the Form Converter. Details are provided for a few of these.
- ScrollBar control.
- SpinButton control.
- TabStrip control.
- ToggleButton control.
- Formulas. Even though the Form Converter does not convert formulas, it places the code for the formulas in commented out text in the HTML file. You can then uncomment and modify the formulas according to the needs of your application.
- Script code. The VBScript behind an Outlook form is not converted. Instead, it is placed in a text file, named Script.txt, which is in the folder that contains the ASP files for the converted form. The reason VBScript is not included in the HTML form is to accommodate cross-browser support. Since Netscape browsers do not support VBScript, you can either change the script in your form to server-side VBScript or rewrite the script as client-side JavaScript code.
- Overlapped controls. Since HTML does a poor job of supporting overlapped controls and layouts, the Form Converter does not convert overlapped controls. Instead, it places the controls as close as possible to one another on the form.
- Calculated fields. In a Contact form in Outlook, there are calculated fields such as FullName whose values are derived from other fields, such as FirstName and LastName. The Form Converter will convert forms that contain calculated fields, but these fields will become static fields. For example, the FullName field will not automatically change in an HTML form when either the FirstName or LastName field is changed.
Stepping Through a Conversion
Before you attempt to convert a form, you must first share the Webdata folder on your Outlook Web Access Web server. For a default installation of Outlook Web Access, this folder is located at C:\exchsrvr\Webdata. You must give yourself and other developers in your organization who will use the Form Converter at least Read and Write access to the share. Also, be sure to name the share Webdata. If you do not share this folder, the Form Converter will not allow you to finish the wizard.
To start the Form Converter, click the Start button, point to Programs, and select Microsoft Outlook HTML Form Converter. This will display a starting screen for the Form Converter. Click Next to begin the conversion process.
Selecting a Form Location
On the second screen of the Form Converter, shown in Figure 7-9, you can select the type of form you want to convert. As mentioned earlier, you can select forms from the Personal Forms Library, the Organizational Forms Library, and the Folder Forms Library or Outlook templates from the file system. On the second screen, you also specify the name of the Outlook Web Access Server where the ASP file will be placed after the conversion.
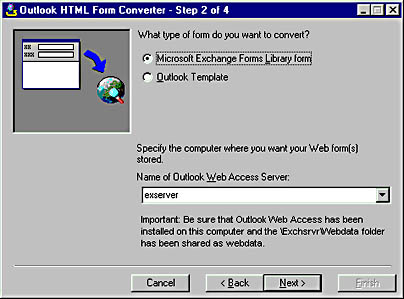
Figure 7-9. Selecting the type of form and specifying the Outlook Web Access server in the Form Converter wizard.
Selecting Specific Forms
Clicking Next might display a Choose Profile dialog box. If so, choose a profile or create a new profile, and click OK. Depending on the type of form you selected in the second screen, the Form Converter wizard will present you with a forms library view, shown in Figure 7-10, or the Open Outlook Template dialog box, shown in Figure 7-11. You can select multiple forms from either of these interfaces. The forms library view enables you to display form categories rather than form names in the Outlook Forms list box. For forms in which these category properties were specified, this can make finding forms easier.
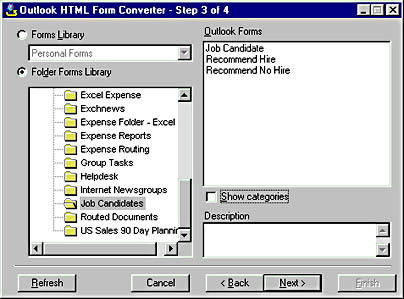
Figure 7-10. The Forms Library view of the Form Converter wizard. You can view your forms by category or by display name.
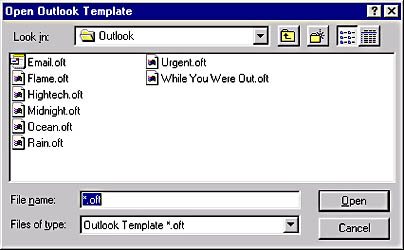
Figure 7-11. The Open Outlook Template dialog box presented by the Form Converter wizard. You can select multiple forms to convert from the dialog box by using the Ctrl key.
Choosing Conversion Options
In the final step of the conversion process, shown in Figure 7-12, you can choose how you want the forms converted. If there are international language packs installed on the Outlook Web Access server, this screen also provides a drop-down list from which you can select the language for the converted form. This final step of the wizard also gives you the option of always overwriting your existing form. If you do not check this option, the Form Converter will prompt you during the conversion about overwriting the existing form. Checking the Layout Debug Mode check box enables debug mode on the converted form. If debug mode is enabled, the table borders for the HTML version of the form will be made visible so that you can easily see where and how the tables are laid out. You can use the borders to adjust the size and placement of controls on the converted form.
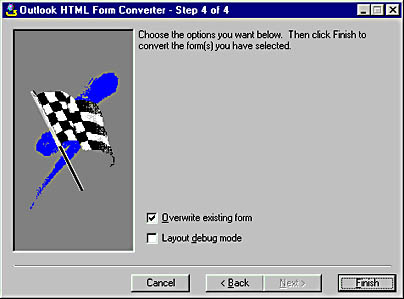
Figure 7-12. On the last page of the conversion process, you choose options for conversion: you can overwrite your existing forms or enable the debug mode for your converted forms.
Results of the Conversion Process
When you click the Finish button, the wizard converts your form. At the end of the conversion, the wizard displays its results. There can be three results:
- Successful conversion. This result means that the form was converted and the Form Converter has no suggestions for improving the layout and functionality of the form through post-conversion edits. A successful conversion is shown in Figure 7-13.
- Successful conversion with To-Do list. This result means that although the form was converted successfully overall, the Form Converter describes some post-conversion enhancements that you can make or some functionality on the form that did not get converted. The Form Converter creates a text version of the To-Do list it displays, named ToDo.txt, and copies it into the same folder it places the ASP files for the converted form. Figure 7-14 shows a successful conversion with a To-Do list.
- No conversion. This result means that the Form Converter could not convert the specified form. This unsuccessful conversion could be due to a number of issues, the most common being that the form you are trying to convert does not fall into one of the three supported form types. Figure 7-15 shows an example of an unsuccessful attempt to convert a Task form from an .oft file.

Figure 7-13. The Form Converter lets you know when you've converted a form successfully.

Figure 7-14. A successful conversion with a To-Do list offers suggestions.
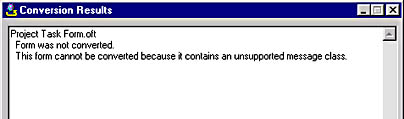
Figure 7-15. Attempting to convert a task form results in the Form Converter returning a No Conversion result.
Viewing the Results
The most common way to view the results of your conversion is to launch your Web browser and type http://OWAServer/exchange/ for the URL, replacing OWAServer with your Outlook Web Access server name. When the Outlook Web Access Log On page is displayed, log on. Select Custom Form from the Compose New drop-down list as shown in Figure 7-16, and click the Compose New link.
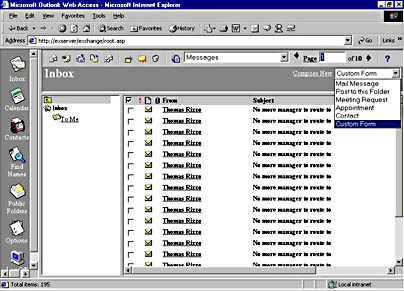
Figure 7-16. Selecting Custom Form from the Compose New drop-down list in Outlook Web Access to view forms converted with the HTML Form Converter.
After you select Custom Form and click the Compose New link, the Launch Custom Forms window is displayed, as shown in Figure 7-17. This window lists the custom forms in your Web forms library; the forms you converted using the Form Converter will be listed here. Click the link of the custom form that you want to test.
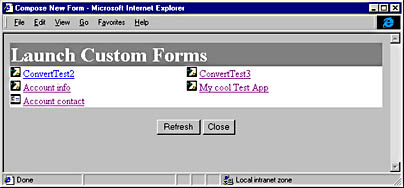
Figure 7-17. The Launch Custom Forms window lists the forms in your Web forms library.
Examples of Conversions
Now let's take a look at a few figures showing Outlook forms before and after being run through the Form Converter. Some of the figures illustrate the limitations mentioned earlier.
Figure 7-18 shows the converted Compose form for the Account Tracking application discussed in Chapter 6. The Account Tracking application was not designed with conversion to the Web in mind; therefore, a large amount of dynamic user-interface script was generated for the form. Typically, when forms use a lot of script to change user interface elements (for example, when you dynamically disable controls on your form based on the values a user types in another control), you will need to manually code many of the changes on the converted HTML form.
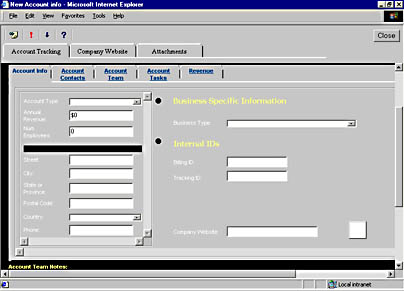
Figure 7-18. The Compose form for the Account Tracking application. Notice how the picture does not come across on the CommandButton control.
Figure 7-19 shows the Read form for the Account Tracking application. The form's custom actions display as buttons in the HTML version. Also notice that the Form Converter automatically converts the Read form for your Outlook application. The CDO rendering library, which you will learn about in Chapter 12, also automatically recognizes that the user is reading information for an application and thus launches the Read form when that user clicks on data in your application. All the binding of data in the form is generated by the Form Converter. You should be aware, however, that the HTML version of this form does not have the full functionality of the Outlook version. For example, the HTML version cannot display the embedded Tasks or Contacts for the account because these are populated by using VBScript code in the Outlook form.
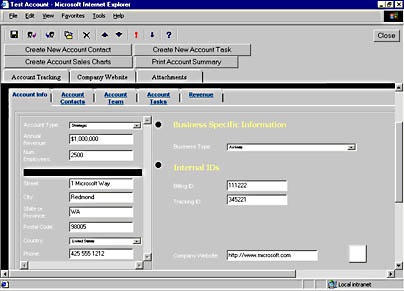
Figure 7-19. The Read form for the Account Tracking application. Notice that the custom actions come across as buttons on the converted form.
Figure 7-20 shows a helpdesk application before conversion to HTML, and Figure 7-21 shows the application after conversion. Notice the Opened By text box is automatically filled for the Outlook version but not filled for the Web version. However, the Web version does have text boxes where the default values are specified.
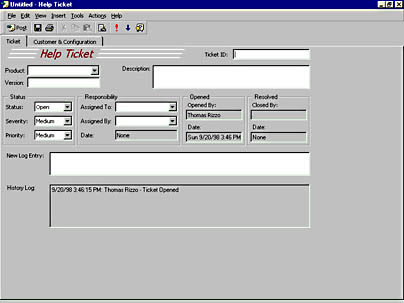
Figure 7-20. The Outlook version of a helpdesk application.
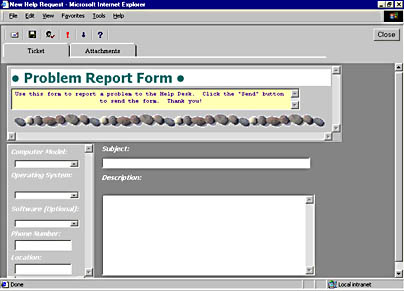
Figure 7-21. The Web version of a helpdesk application.
Files Created for Converted Forms
Forms converted by the Outlook HTML Form Converter consist of a number of files that you can customize. These files are placed in the Web forms library, which we will discuss in the next section. Let's look at the set of HTML and ASP files that comprise the core architecture of the Form Converter.
FrmRoot.asp
This file is the entry point of the converted or custom form. For the Form Converter, this file includes script and an HTML frameset that displays the other components of the form. This file is discussed more in the next section on the Web forms library.
Posttitl.asp
This file is the frame of the form, located near the top of the screen. This frame contains the toolbar and the tab strip. The main purpose of this file is to handle form commands generated by clicking the toolbar buttons and the tab strip.
Page_N.asp and Page_N-Read.asp
Every page in a converted form is represented by a separate .asp file. Certain pages of a form have predefined names—for example, the Options tab is named Options.asp. Custom pages of a form are assigned system-generated names, such as Page_3.asp. These custom form pages are generated by the Form Converter. If you created a separate compose and read layout for a particular form page, its file will have two different versions: Page_N.asp for composing the custom form, and Page_N-Read.asp for reading the custom form.
Commands.asp
Commands.asp is used to implement utility functions and event handlers for the converted form. Commands.asp is never seen by the user but rather is a hidden .asp file that is called to handle functions such as standard actions (On_Send, On_Reply, and so on) and also custom action event handlers.
Form.ini
The Form Converter automatically creates and publishes a Form.ini file for your application. This file contains the form's display name and code page, and indicates whether the form should be hidden in the Launch Custom Forms window. This file is discussed more in the next section on the Web forms library.
Web Forms Library
After the Outlook HTML Form Converter wizard is run and the necessary files are created, the files are copied to the Web forms library in Outlook Web Access. You might be wondering what the Web forms library is—well, it's nothing more than a folder, named Webdata, on the server where Outlook Web Access and some associated files were installed. CDO uses the Webdata folder to allow developers to publish custom forms for the Outlook Web Access client. By default, the Webdata folder is located at C:\exchsrvr\Webdata. Within the Webdata folder are additional subfolders that contain converted forms and other files.
If you browse the Webdata folder, you will see a folder structure similar to that shown in Figure 7-22. In the Webdata folder is a subfolder named for the language pack you installed for Outlook Web Access. Open it to find the Forms subfolder. This is where all the default forms for this particular Web server are stored.
All folders under the Forms subfolder correspond to custom message classes in Outlook. For example, if you have a custom form in Outlook with the message class IPM.Post.Project, the Form Converter creates a subfolder under the IPM\Post folder named Project, and copies all ASP and related files for that converted form into the Project subfolder. When a user views the custom forms in Outlook Web Access, she will see a new form named Project. A user can refresh the custom forms listing in the Launch Custom Forms window because the CDO object library allows this. Once the user clicks on the Project link in the Launch Custom Forms window, the converted Outlook form appears in her browser.
The Web forms library does not have to include converted Outlook forms only. You can place your own Web-based applications there. The applications you place in the library do not even have to be Exchange Server applications. You can add any application that can be used on a Web server. For example, you can place a SQL-based Web application in the Web forms library. This can make it easier for users because they can find the Web-based enterprise applications they need in a single location. Furthermore, since Outlook Web Access can authenticate users in your ASP session, you can use this authentication in other Web-based applications stored in the Web forms library.
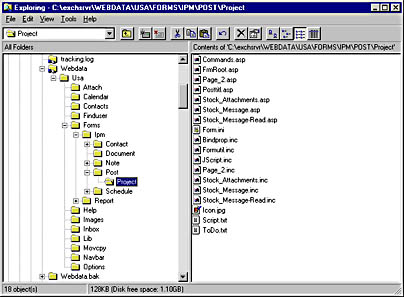
Figure 7-22. The folder structure of the Web forms library. This structure is used by Outlook Web Access to show available Web applications to users.
Adding Web-Based Applications to the Web Forms Library
To add a Web-based application to the Web forms library, you first need to create a subfolder for your application under the Forms folder. Then you need to specify certain names for your ASP files so that Outlook Web Access can recognize your application. You need to place three files in the form's subfolder: Form.ini, FrmRoot.asp, and Icon.jpg.
Form.iniForm.ini includes the following three values:
- The friendly display name of a form, which avoids display of the message class name, such as IPM.Post.Project.
- The language code page of the form.
- Whether the form should be hidden in the Launch Custom Forms window. (Hide it if you want to make it available only as a response form.)
This is an example of a Form.ini file:
[Description] DisplayName=My Custom Exchange and SQL Application CodePage=1252 Hidden=0 |
Setting the Hidden variable to 0 makes a hyperlink to this application available in the Launch Custom Forms window. Setting Hidden to 1 hides the hyperlink. If your form is going to appear correctly when a user clicks on its name in the Launch Custom Forms window, you need to create a file named FrmRoot.asp in the form's subfolder. When the CDO Rendering Objects trace the Webdata folder tree, they recognize the Form.ini file and automatically add a hyperlink in the Launch Custom Forms window to the file FrmRoot.asp. If you do not create this file, your application name will appear as a hyperlink, but the link will be broken. In your FrmRoot.asp, you can redirect users to the Web server that contains your application or place your application code directly in the file. Include any necessary files in the subfolder you created for the application. If you place your application code in the same subfolder as Outlook Web Access, you can take advantage of the authentication and Exchange Server ASP Session objects that Outlook Web Access creates for you. If your application requires authentication and you redirect the browser to a separate Web location, you will have to create your own authentication code and CDO session for the Exchange server.
Icon.jpgTo make an icon appear to the left of the hyperlink for your Web-based application in the Launch Custom Forms window, you must create a JPEG file containing the image you want displayed, name it Icon.jpg, and place it in the form's subfolder. If you do not do this, the image will be displayed as missing.
Making HTML Forms Available in Outlook
You might want to make your converted forms and Web applications in the Web forms library available to users who are running Outlook 97, Outlook 98, Outlook 2000, Outlook for the Macintosh, or Outlook for Windows 3.1. To do this, you need to set some options in the Outlook client by following these steps:
- In Outlook, from the Tools menu, select Options.
- For Outlook 98 and Outlook 2000, click on the Other tab, click the Advanced Options button, click the Custom Forms button, and then click the Web Services button. This displays the Web Services dialog box. A configured Web Services dialog box for Outlook 2000 is displayed in Figure 7-23.
NOTE
The version of Outlook that your users have determines the location of the Web Services button. Users can always find it, however, by clicking the Custom Forms button.
- Check the Use Outlook Web Access To Open Messages Not Understood By The Outlook Client check box.
- In the Web Services Location text box, type the following URL, replacing OWAServer with the name of your Outlook Web Access server:
- If you want to prompt the user before Outlook opens the Web form, check the Prompt User Before Opening Each Form check box. If you enable this option, users will see a message similar to Figure 7-24.
- Check the Activate Web Forms Link On Actions Menu check box.
- In the Directory Page Location text box, type the following URL, replacing OWAServer with the name of your Outlook Web Access server:
- Click OK four times.
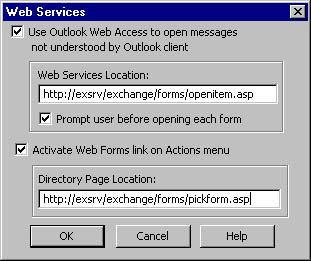
Figure 7-23. A fully configured Web Services dialog box in Outlook 2000.
http://OWAServer/exchange/forms/openitem.asp
This option causes Outlook to search the Web forms library if it receives an item with a message class that does not have a corresponding Outlook form. Outlook looks in the Web forms library for a Web-based form that matches the message class.
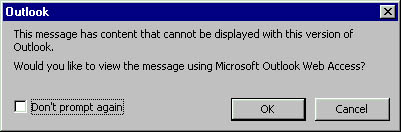
Figure 7-24. A prompt telling the user that Outlook is going to look for the custom form in the Web forms library.
http://OWAServer/exchange/forms/pickform.asp
This adds the Web Form option under Actions menu to the Outlook client. If a user selects this option from the menu, Outlook will automatically launch the user's Web browser and display the Launch Custom Forms window. Users can then pick the desired Web-based form.
You should now have an option named Web Form on the Actions menu. If you select this option, the Launch Custom Forms window should appear when you log on.
Tips for Developing HTML-Ready Outlook Applications
This section discusses a few techniques that will simplify the process of converting your Outlook applications to HTML.
Align Your Controls on the Form
The Outlook HTML Form Converter uses HTML tables to position controls, so always use the layout capabilities of the Outlook design environment to line up your controls when you can. HTML tables are not as sophisticated as Outlook's layout tools, so relying on them for composition is risky. Using the layout tools helps the Form Converter figure out the best layout for your form in HTML, such as where the controls on your form should be relative to one another.
Avoid Calling the Outlook Object Library Interface Objects
The Outlook object library can be divided into an interface library with objects like the Explorer and the Inspector and a data access library with objects like MAPIFolder or Items. If you want to enable the cleanest conversion for your application, avoid dynamically changing the user interface using the Outlook object library because that code cannot be ported directly to HTML. If you require this, keep the changes to a minimum so that you can manually code them easily in the Web version of the application.
Avoid Overlapping Controls
Standard HTML today does not support overlapping controls on a Web page. If any of the controls overlap, the Form Converter will automatically move one of the controls in the HTML version. If your controls completely overlap, the Form Converter will probably skip converting one of the controls altogether because it won't be able to resolve which should be converted.
Avoid Using Images on CommandButtons
Since HTML does not support placing images on buttons, your images on CommandButtons will not be converted to HTML.
Do Not Customize the First Page of a Contact Form
The Form Converter works with Outlook 97, Outlook 98, and Outlook 2000 forms. Because Outlook 97 did not support first-page customization for a Contact form, the Form Converter will not convert a modified first page of a Contact form to HTML. The Form Converter ignores your modifications.
Do Not Save the Form Definition with the Item
For your form to retain its correct message class, do not save the form definition with the item. If you do save the form definition with the item and convert it, Web browser users will see only the form that corresponds to the default message class for the item, such as IPM.Note.
Avoid Using Unsupported Controls
If you can, avoid using the unsupported controls listed in the section "Features of the Converter," which appears earlier in the chapter. If you find that you do need to use them, you can instantiate them as ActiveX controls on an HTML form. You would then have to write the script to enable interaction between the ActiveX controls and the ASP application.
Set AutoSize to True with Image Controls
When working with Image controls, always set the AutoSize property to True under the Advanced Properties for the control. This will force the control to change size based on the size of the image and help avoid unintended sizing when the converter converts the form to HTML.
EAN: 2147483647
Pages: 184