Exchange Server Events
Exchange Server 2000 allows you to build applications that model and automate business processes. While you could hard-code a workflow process by using server events and Visual Basic, the built-in workflow engine, Workflow Designer, and CDO workflow objects of Exchange Server 2000 simplify this development task by providing specialized workflow tools.
With these tools, you can build both database workflows and e-mail workflows on Exchange Server 2000. You can also enable the user to connect directly to the data, or to an application that directly touches the data to update state information in the workflow. The Training application is a database workflow. When a manager approves a user to take a course, an ASP page updates a property on the pending approval message to the student, which in turn triggers the workflow engine to change the state of the pending approval message to Approved. This change of state causes the application to register the student for the course and then notify the student. Database workflows are great if your users have direct access to the process instances of the workflow, and, in effect, to the items undergoing the workflow process, so that they can update the state.
In e-mail workflows, instead of having the user directly interact with the data, notifications and data copies are sent to the user via e-mail. The user can then perform an action, such as approve or edit the data, and return it to the application via e-mail. The Exchange Server workflow engine directs the e-mail to the correct process instance in your workflow folder, and you can update your process instance accordingly. This style of workflow is useful if you can't guarantee that your users have direct access to your data, or if you want to provide an easy transmission method for data and approval. Since most users can access some form of e-mail, this solution works well for business processes that extend beyond a corporation and over the Internet. Please note that to use e-mail–style workflow, you must be running Microsoft Outlook on your client.
How Is Workflow Implemented in Exchange Server?
Exchange Server 2000 uses four main components to implement workflow: CDO for Workflow (CDOWF), server event sinks (handlers), action tables, and script files. The workflow engine in Exchange Server 2000 is stored in CDOWF. This engine works in conjunction with the other components to evaluate and maintain the workflow state, such as Approved or Rejected. Plus, CDOWF provides the object model you can use to interact with the engine to change states or validate workflow properties.
The workflow engine works in conjunction with the action table, which is basically a finite state machine that describes transitions between states in the workflow. Table 19-9 shows an example of an action table based on the Training application. In this action table, a request for approval of user's enrollment is e-mailed to the user's manager, and the workflow engine waits 15 minutes for a response. If a response isn't received from the manager within 15 minutes, the engine e-mails the user that the request was not processed. If the manager approves the course request, the engine registers the user and sends an e-mail that tells the user of the approval.
Table 19-9. A simple action table based on the Training application.
| State | New State | Event Type | Condition | Action | Expiration Interval |
|---|---|---|---|---|---|
| Created | OnCreate | CheckValidity | SendMailtoManager | ||
| Created | OnEnter | True | 15 | ||
| Created | Approved | OnChange | ApprovalStateofItem | RegisterUser SendMailtoUser | |
| Created | NoResponse | OnExpiry | True | SendNoResponsetoUser |
To determine what changes are made to workflow items and evaluate whether they are valid according to the action table, the workflow engine implements both synchronous and OnTimer event handlers. When you drop a new document into a folder where a workflow process is enabled, the Workflow event handler in that folder fires before the item is committed to Exchange Server database. If workflow is enabled, the event handler creates the process instance for your item in the folder and determines the initial state of the item. If a user changes that item, the event handler checks the change against the valid state changes in the action table. If the state change is not valid, it is not committed to Exchange Server. If the time expires for a specific state and there is a state transition for that event in the action table, the OnTimer event will move the workflow item to the next state. Figure 19-10 shows the Workflow event handler that's installed by default as a COM+ application.
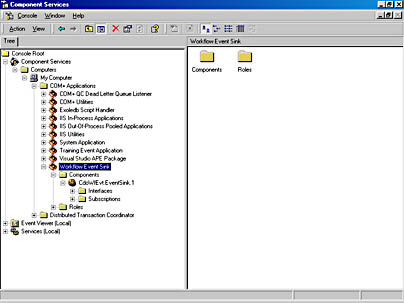
Figure 19-10. The Workflow event handler installed as a COM+ application.
The script file is used in conjunction with CDOWF, the server event handlers, and the action tables. Your script implements the conditions for the state transitions and the actions that occur at the time those transitions. For example, to check the validity of an item before posting it in the workflow folder, you write script to check the necessary properties and return a Boolean to the workflow engine that indicates whether the item is valid. You must use condition functions in your script. If a condition is valid, for example, you might want to send an e-mail to the user who needs to approve the item. You would have to write script for the action portion of your workflow in order to send the e-mail.
Developing Workflow Applications
Enough talking about what workflow is—let's take a look at how to write a workflow application with Exchange Server 2000. In this section, I'll concentrate on the Workflow Designer for Exchange Server 2000 because it makes creating workflow applications easier. Everything we'll discuss in this section can be performed programmatically using CDOWF.
Setting Up the Workflow Environment
To start writing workflow applications, you first need to set up the workflow environment for Exchange Server 2000. I won't go into the gory details of how to set up all the accounts and infrastructure. You can find all this information in the Exchange Server 2000 SDK, in a section called "Adding the Workflow System Account." Essentially, you need to create an account and make it your default workflow system account.
Next, you need to add yourself to the Can Register Workflow role for the Workflow Event Sink COM+ application. This role lists all the users or groups that can actually register for the event handlers we discussed earlier. Figure 19-11 shows this COM+ application with the roles populated.
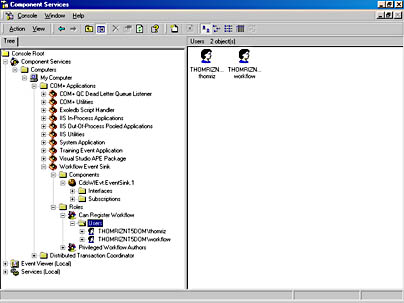
Figure 19-11. The Can Register Workflow role populated with users and groups.
If necessary, you also should add yourself to the Privileged Workflow Authors role. If you are not in this role, your workflow scripts will be sandboxed. In other words, they will only be able to modify the item undergoing workflow, send notification mail, or write to the workflow audit trail. They will not be able create objects at all. If you add yourself to the Privileged Workflow Authors role, you'll be able to create objects and access other items you have permissions for in Exchange Server 2000.
NOTE
If you are a privileged workflow author, you will be running under the workflow system account you initially specified. Also, Exchange 2000 supports ad-hoc workflows. This means that items coming into the folder where workflow is enabled must already have a workflow definition on them. Only restricted mode workflows can be run as ad-hoc. You cannot allow ad-hoc workflows and enable privileged mode.
Using the Workflow Designer
As mentioned, the Workflow Designer for Exchange Server 2000 makes building and deploying your workflow applications easier. The graphical user interface (GUI), shown earlier in Figure 19-10, simplifies the process of visualizing your workflow while automating the process of creating the event handler registrations and action tables in your workflow-enabled folders.
I won't cover all the GUI elements of the Workflow Designer; you can find that information easily in the Exchange Server 2000 documentation or just read the Workflow Designer screen. However, I will cover three important elements that make up your workflow in the designer: states, actions, and script. The states are the boxes in the GUI that indicate whether your workflow is pending, approved, rejected, or expired. The actions provide the transitions between the states. These actions, which I'll detail momentarily, can be found in your action table and include OnEnter, OnExit, OnCreate, among others. The script implements the condition checking and the actions.
The states in the Workflow Designer are not very interesting because they don't perform any task; they only serve as a destination for the workflow item to move to during the workflow process. Therefore, your only concern with states should be that your scripts allow you to check which state the workflow item is in, to see whether it's being approved or rejected or any other state you specify.
Actions are one of the most important aspects of the Workflow Designer since they are associated with the transitions between states. These transitions define how the work in your workflow is performed. Figure 19-12 shows how to creates actions in the Workflow Designer.
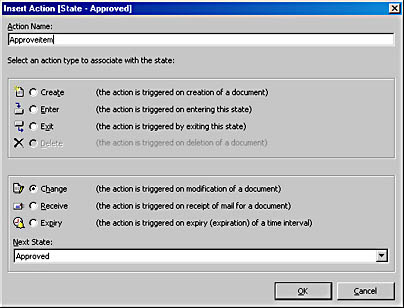
Figure 19-12. Creating actions in the Workflow Designer.
Table 19-10 presents the actions in the Workflow Designer and their uses. Be aware that some actions, such as the OnChange action, can appear multiple times on a state. But each time it appears for the same state, it must have different conditions that make the action valid for a workflow item—for example, a property changes value.
Table 19-10. Actions of the Workflow Designer.
| Workflow Designer Name | Action Table Name | Description |
|---|---|---|
| Create | OnCreate | An item was created. You must have at least one Create action in your workflow; otherwise, no items can be created in the folder. |
| Enter | OnEnter | This action manages the time used by the Expiry action. As soon as the state is entered using this action, the timer is started for the expiration interval you set. Entry into states is implicitly allowed, so you don't have to add this action to every state. You will normally use this action for timer-based workflow requirements only. |
| Exit | OnExit | The state is transitioning to a new state. |
| Delete | OnDelete | The document is deleted. If you do not have a Delete action, workflow items cannot be deleted. If that's the case, Exchange Server will return an error if an application or user attempts to delete an item. |
| Change | OnChange | The document is modified. You can have multiple Change actions on a single state. If you have no Change actions, documents cannot be modified. |
| Receive | OnReceive | The workflow has received an e-mail message that correlates to a workflow item. This action allows your workflow to respond to e-mail. |
| Expiry | OnExpiry | The document has passed its time limit for the current state. This action is useful for time-based tasks, such as reminder notifications to managers to approve workflow items. |
The following code is the XML representation of a real action table generated by the Workflow Designer. Notice the action and state names in the XML code. You'll see how to use XML action tables to simplify deploying workflow processes in the "Deploying Workflow Solutions" section.
<xml xmlns:s='uuid:BDC6E3F0-6DA3-11d1-A2A3-00AA00C14882' xmlns:dt='uuid:C2F41010-65B3-11d1-A29F-00AA00C14882' xmlns:rs='urn:schemas-microsoft-com:rowset' xmlns:z='#RowsetSchema'> <s:Schema id='RowsetSchema'> <s:ElementType name='row' content='eltOnly' rs:updatable='true'> <s:AttributeType name='ID' rs:number='1' rs:write='true'> <s:datatype dt:type='string' dt:maxLength='4294967295' rs:precision='0' rs:long='true' rs:maybenull='false'/> </s:AttributeType> <s:AttributeType name='Caption' rs:number='2' rs:write='true'> <s:datatype dt:type='string' dt:maxLength='4294967295' rs:precision='0' rs:long='true' rs:maybenull='false'/> </s:AttributeType> <s:AttributeType name='State' rs:number='3' rs:write='true'> <s:datatype dt:type='string' dt:maxLength='4294967295' rs:precision='0' rs:long='true' rs:maybenull='false'/> </s:AttributeType> <s:AttributeType name='NewState' rs:number='4' rs:write='true'> <s:datatype dt:type='string' dt:maxLength='4294967295' rs:precision='0' rs:long='true' rs:maybenull='false'/> </s:AttributeType> <s:AttributeType name='EventType' rs:number='5' rs:write='true'> <s:datatype dt:type='string' dt:maxLength='4294967295' rs:precision='0' rs:long='true' rs:maybenull='false'/> </s:AttributeType> <s:AttributeType name='Condition' rs:number='6' rs:write='true'> <s:datatype dt:type='string' dt:maxLength='4294967295' rs:precision='0' rs:long='true' rs:maybenull='false'/> </s:AttributeType> <s:AttributeType name='Action' rs:number='7' rs:write='true'> <s:datatype dt:type='string' dt:maxLength='4294967295' rs:precision='0' rs:long='true' rs:maybenull='false'/> </s:AttributeType> <s:AttributeType name='ExpiryInterval' rs:number='8' rs:write='true'> <s:datatype dt:type='string' dt:maxLength='4294967295' rs:precision='0' rs:long='true' rs:maybenull='false'/> </s:AttributeType> <s:AttributeType name='RowACL' rs:number='9' rs:write='true'> <s:datatype dt:type='string' dt:maxLength='4294967295' rs:precision='0' rs:long='true' rs:maybenull='false'/> </s:AttributeType> <s:AttributeType name='TransitionACL' rs:number='10' rs:write='true'> <s:datatype dt:type='string' dt:maxLength='4294967295' rs:precision='0' rs:long='true' rs:maybenull='false'/> </s:AttributeType> <s:AttributeType name='DesignToolFields' rs:number='11' rs:write='true'> <s:datatype dt:type='string' dt:maxLength='4294967295' rs:precision='0' rs:long='true' rs:maybenull='false'/> </s:AttributeType> <s:AttributeType name='CompensatingAction' rs:number='12' rs:write='true'> <s:datatype dt:type='string' dt:maxLength='4294967295' rs:precision='0' rs:long='true' rs:maybenull='false'/> </s:AttributeType> <s:AttributeType name='Flags' rs:number='13' rs:write='true'> <s:datatype dt:type='string' dt:maxLength='4294967295' rs:precision='0' rs:long='true' rs:maybenull='false'/> </s:AttributeType> <s:AttributeType name='EvaluationOrder' rs:number='14' rs:write='true'> <s:datatype dt:type='string' dt:maxLength='4294967295' rs:precision='0' rs:long='true' rs:maybenull='false'/> </s:AttributeType> <s:extends type='rs:rowbase'/> </s:ElementType> </s:Schema> <rs:data> <rs:insert> <z:row ID='1' Caption='Create' State='' NewState='Pending' EventType='OnCreate' Condition='TRUE' Action='' ExpiryInterval='0' RowACL='' TransitionACL='' DesignToolFields='-1:1:' CompensatingAction='' Flags='0' EvaluationOrder='1000'/> <z:row ID='2' Caption='Delete' State='Pending' NewState='' EventType='OnDelete' Condition='true' Action='' ExpiryInterval='0' RowACL='' TransitionACL='' DesignToolFields='1:-2:' CompensatingAction='' Flags='0' EvaluationOrder='7000'/> <z:row ID='3' Caption='StartTimer' State='' NewState='Pending' EventType='OnEnter' Condition='TRUE' Action='sendMailToManager' ExpiryInterval='15' RowACL='' TransitionACL='' DesignToolFields='0:1:' CompensatingAction='' Flags='0' EvaluationOrder=''/> <z:row ID='5' Caption='ManagerApproved' State='Pending' NewState='Approved' EventType='OnChange' Condition='workflowsession.fields ("http://thomriz.com/schema/approvalstatus").value = "Approved"' Action='strCourseName = GetCourseName strStudentEmail = GetStudentEmail strManagerEmail = GetManagerEmail strBody = "Your manager approved you for the course: " & strCourseName sendMail strBody,strStudentEmail & "," & strManagerEmail,"Approved for course: " & strCourseName addregistration sendcalendarmessage' ExpiryInterval='0' RowACL='' TransitionACL='' DesignToolFields= '1:3:' CompensatingAction='' Flags='0' EvaluationOrder='3001'/> <z:row ID='6' Caption='ManagerRejected' State='Pending' NewState='Rejected' EventType='OnChange' Condition='workflowsession.fields ("http://thomriz.com/schema/approvalstatus").value = "Rejected"' Action='strCourseName = GetCourseName strStudentEmail = GetStudentEmail strManagerEmail = GetManagerEmail strBody = "Your manager rejected you for the course: " & strCourseName sendMail strBody,strStudentEmail & "," & strManagerEmail,"Rejected for course: " & strCourseName ' ExpiryInterval='0' RowACL='' TransitionACL='' DesignToolFields= '1:2:' CompensatingAction='' Flags='0' EvaluationOrder='3000'/> <z:row ID='7' Caption='NoResponse' State='Pending' NewState='Expired' EventType='OnExpiry' Condition='TRUE' Action='strCourseName = GetCourseName strStudentEmail = GetStudentEmail strManagerEmail = GetManagerEmail strBody = "Your manager did not approve your attending of the course: " & strCourseName & " in enough time. You will not be registered for this course." sendMail strBody, strStudentEmail & "," & strManagerEmail, "Approval not received for course: " & strCourseName ' ExpiryInterval='0' RowACL='' TransitionACL='' DesignToolFields= '1:4:' CompensatingAction='' Flags='0' EvaluationOrder='5000'/> <z:row ID='8' Caption='' State='Rejected' NewState='' EventType='OnDelete' Condition='TRUE' Action='' ExpiryInterval='' RowACL='' TransitionACL='' DesignToolFields='2:-2:' CompensatingAction='' Flags='0' EvaluationOrder='7001'/> <z:row ID='10' Caption='' State='Approved' NewState='' EventType='OnDelete' Condition='TRUE' Action='' ExpiryInterval='' RowACL='' TransitionACL='' DesignToolFields='3:-2:' CompensatingAction='' Flags='0' EvaluationOrder='7002'/> <z:row ID='11' Caption='' State='Expired' NewState='' EventType='OnDelete' Condition='TRUE' Action='' ExpiryInterval='' RowACL='' TransitionACL='' DesignToolFields='4:-2:' CompensatingAction='' Flags='0' EvaluationOrder='7003'/> </rs:insert> </rs:data> </xml> |
Instead of using the Workflow Designer to create your workflow process, you could programmatically create your action table by using just ADO and CDOWF. However, in most cases, you'll want to take advantage of the Workflow Designer and generate your action tables to XML, as shown in the preceding example. You can then import the XML action table into ADO and use that data to programmatically generate your workflow process.
Creating Event Scripts
You have a workflow engine, event handlers, and an action table, but you don't have a true workflow application yet. The real foundation of the workflow application is the script you write for the actions in your action table. Whether you want to send a message, change a property, or update an item, you need to implement this action in your script. Writing your workflow script is pretty straightforward; you'll probably call ADO or CDO to perform functions in Exchange Server. The Workflow Designer includes a script editor, shown in Figure 19-13.
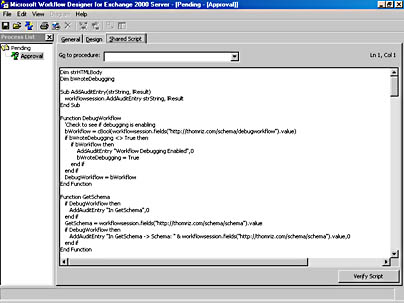
Figure 19-13. The script editor built into the Workflow Designer.
You don't have to use the Workflow Designer script editor to write your scripts. You instead can use another editor, such as Visual InterDev, and save the scripts to a common location or even write the handlers for your actions using COM components. You can then point the Workflow Designer, or a workflow process you programmatically create, to this common script file. The following script file is used in the Training application to implement the workflow process:
Dim strHTMLBody Dim bWroteDebugging Sub AddAuditEntry(strString, lResult) workflowsession.AddAuditEntry strString, lResult End Sub Function DebugWorkflow 'Check to see whether debugging is enabled bWorkflow = cBool(workflowsession.fields _ & ("http://thomriz.com/schema/debugworkflow").value) if bWroteDebugging <> True then if bWorkflow then AddAuditEntry "Workflow Debugging Enabled",0 bWroteDebugging = True end if end if DebugWorkflow = bWorkflow End Function Function GetSchema if DebugWorkflow then AddAuditEntry "In GetSchema",0 end if GetSchema = _ workflowsession.fields("http://thomriz.com/schema/schema").value if DebugWorkflow then AddAuditEntry "In GetSchema -> Schema: " & _ workflowsession.fields("http://thomriz.com/schema/schema").value,0 end if End Function Function GetWorkflowSessionField(strField) if DebugWorkflow then AddAuditEntry "In GetWorkflowSessionField -> Value: " & strField,0 end if GetWorkflowSessionField = _ workflowsession.fields("http://thomriz.com/schema/" & strField).value End Function Function GetCourse(bReadOnly) if DebugWorkflow then AddAuditEntry "In GetCourse",0 end if set oRec = CreateObject("ADODB.Record") if DebugWorkflow then AddAuditEntry "Course URL: " & workflowsession.fields _ & ("http://thomriz.com/schema/fullcourseurl").value,0 end if if bReadOnly then iAccess = 1 else iAccess = 3 end if oRec.Open workflowsession.fields("http://thomriz.com/sche" & _ " ma/fullcourseurl").value,workflowsession.ActiveConnection,iAccess if DebugWorkflow then AddAuditEntry "In GetCourse -> CourseName: " & _ oRec.Fields("urn:schemas:httpmail:subject").value,0 end if Set GetCourse = oRec End Function Function GetCourseName 'Returns the name of the course set oRec = GetCourse(True) if DebugWorkflow then AddAuditEntry "In GetCourseName -> CourseName = " & _ oRec.Fields("urn:schemas:httpmail:subject").value,0 end if GetCourseName = oRec.Fields("urn:schemas:httpmail:subject").value End Function Sub ReplaceString(strToken, strReplacement) 'Take the token and replace it in the global strHTMLBody strHTMLBody = Replace(strHTMLBody, strToken, strReplacement) End Sub Function GenerateHTMLBody() 'Generates the HTML to send in the message. 'Retrieve the message containing the HTML. 'The HTML template must always be called WorkflowMessage. if DebugWorkflow then AddAuditEntry "In GenerateHTMLBody",0 end if strHTMLBody = "" 'Build the SQL statement. 'Query for the e-mail message. strEmailsFolderPath = GetWorkflowSessionField("stremailsfolderpath") strSQL = "Select ""urn:schemas:httpmail:textdescription"" From " & _ "scope('shallow traversal of """ & strEmailsFolderPath & _ """') Where ""DAV:iscollection"" = false AND ""DAV:ishidden"" = " & _ "false AND ""urn:schemas:httpmail:subject"" LIKE '%WorkflowMessage%'" 'Create a new Recordset object Set rst = CreateObject("ADODB.Recordset") With rst 'Open Recordset based on the SQL string .Open strSQL, workflowsession.ActiveConnection End With If rst.BOF And rst.EOF Then GenerateHTMLBody = "" Exit Function End If 'On Error Resume Next rst.MoveFirst strHTMLBody = rst.Fields("urn:schemas:httpmail:textdescription").Value 'Get the course set oCourse = GetCourse(True) 'Load it into CDO Appointment set iAppt = CreateObject("CDO.Appointment") iAppt.DataSource.Open _ oCourse.Fields("DAV:href").value,workflowsession.ActiveConnection,1 strSchema = GetSchema 'Replace the tokens with real values ReplaceString "%StudentName%", _ GetWorkflowSessionField("strstudentfullname") ReplaceString "%Name%", _ iAppt.Fields("urn:schemas:httpmail:subject").Value ReplaceString "%Category%", iAppt.Fields(strSchema & "category").Value strDate = Month(iAppt.StartTime) & "/" & Day(iAppt.StartTime) & "/" & _ Year(iAppt.StartTime) ReplaceString "%Date%", strDate ReplaceString "%StartTime%", TimeValue(iAppt.StartTime) ReplaceString "%EndTime%", TimeValue(iAppt.EndTime) ReplaceString "%Location%", iAppt.Location ReplaceString "%Description%", iAppt.TextBody strHTTPURL = GetWorkflowSessionField("strrootdirectory") & _ "workflow.asp?CourseID=" & iAppt.Fields("DAV:href") & _ "&student=" & GetWorkflowSessionField("fullstudenturl") ReplaceString "%URLLink%", strHTTPURL If strHTMLBody <> "" Then GenerateHTMLBody = strHTMLBody Else GenerateHTMLBody = "" End If rst.Close Set rst = Nothing End Function Sub sendMail(strMsg , strAddress, strSubject) set msg = createobject("CDO.message") msg.To = strAddress msg.From = GetWorkflowSessionField("notificationaddress") msg.subject = strSubject msg.textbody = strMsg if DebugWorkflow then AddAuditEntry "In SendMail: Address -> " & strAddress & vblf & _ "Subject -> " & strSubject & vblf & "Message: " & strMsg,0 end if msg.send End sub Function GetStudentEmail if DebugWorkflow then AddAuditEntry "In GetStudentEmail",0 end if GetStudentEmail = GetWorkflowSessionField("studentemail") End Function Function GetManagerEmail if DebugWorkflow then AddAuditEntry "In GetManagerEmail",0 end if GetManagerEmail = GetWorkflowSessionField("manageremail") End Function Sub SendMailToManager 'Get the manager's e-mail strManagerEmail = GetWorkflowSessionField("manageremail") if DebugWorkflow then AddAuditEntry "In SendMailToManager -> Manager: " & strManagerEmail,0 end if set oMsg = createobject("CDO.message") set oRecord = GetCourse(True) oMsg.To = strManagerEmail oMsg.From = GetWorkflowSessionField("notificationaddress") oMsg.Subject = "Approval Required for course: " & _ oRecord.Fields("urn:schemas:httpmail:subject").value oMsg.AutoGenerateTextBody = True oMsg.MimeFormatted = True oMsg.HTMLBody = GenerateHTMLBody oMsg.Send End Sub Function GetStudent(bReadOnly) if DebugWorkflow then AddAuditEntry "In GetStudent",0 end if set oRec = CreateObject("ADODB.Record") if DebugWorkflow then AddAuditEntry "Student URL: " & workflowsession.fields _ ("http://thomriz.com/schema/fullstudenturl").value,0 end if if bReadOnly then iAccess = 1 else iAccess = 3 end if oRec.Open workflowsession.fields("http://thomriz.com/sche" & _ "ma/fullstudenturl").value,workflowsession.ActiveConnection,iAccess if DebugWorkflow then AddAuditEntry "In GetStudent -> StudentName: " & _ oRec.Fields("urn:schemas:httpmail:subject").value,0 end if Set GetStudent = oRec End Function Sub addregistration set oRecord = GetStudent(False) strSchema = GetSchema strCourseURL = GetWorkflowSessionField("shortcourseurl") oRecord.Fields(strSchema & "registrations") = _ oRecord.Fields(strSchema & "registrations") & strCourseURL & "," oRecord.Fields.Update oRecord.Close set oRecord = Nothing End Sub Sub sendcalendarmessage if DebugWorkflow then AddAuditEntry "In SendCalendarMessage",0 end if 'Get the original appointment set oOriginalAppt = CreateObject("CDO.Appointment") oOriginalAppt.Datasource.Open _ GetWorkflowSessionField("fullcourseurl"),_ workflowsession.ActiveConnection,1 'Create a throwaway appointment set oAppt = CreateObject("CDO.Appointment") set oConfig = CreateObject("CDO.Configuration") strNotificationAddress = GetWorkflowSessionField("notificationaddress") oConfig.Fields("http://schemas.microsoft.com/cdo/config" & _ "uration/sendemailaddress") = strNotificationAddress oConfig.Fields.Update oAppt.Configuration = oConfig oAppt.StartTime = oOriginalAppt.StartTime oAppt.EndTime = oOriginalAppt.EndTime oAppt.Subject = "Course: " & oOriginalAppt.Subject oAppt.Location = oOriginalAppt.Location strSchema = GetSchema oAppt.TextBody = "The Instructor is " & _ oOriginalAppt.Fields(strSchema & "instructoremail").Value 'Don't ask for a response since we don't care if they accept or decline oAppt.ResponseRequested = False Set oAttendee = oAppt.Attendees.Add strEmail = GetStudentEmail oAttendee.Address = strEmail oAttendee.Role = 0 Set oMtg = oAppt.CreateRequest oMtg.Message.Send end sub |
This script uses ADO and CDO to perform its functions. However, another object is at work in the script: WorkflowSession. This intrinsic object (which you don't have to create) is passed to your script by the workflow engine. It allows you to access properties on the process instance as well as the audit trail specified for the workflow. Table 19-11 shows the most important properties and methods of this object. For more information on the properties and methods, refer to the Exchange 2000 Platform SDK.
Table 19-11. Properties and methods of the workflowsession object.
| Property or Method Name | Description |
|---|---|
| ActiveConnection | This property returns an ADO Connection object. You should use this Connection object in your script's ADO and CDO functions, especially if you want them to take part in transactions. |
| AddAuditEntry | This method allows you to add an audit entry to the selected audit entry provider of the workflow process. You pass a string and a Long value to specify what the entry should say and the custom result you want for the value. By default, Exchange Server ships with one audit trail provider which writes to the Windows 2000 Event Log. You can create custom audit trail providers by creating COM components that implement the IAuditTrail interface. |
| DeleteReceivedMessage | This method deletes the received e-mail, if one exist, for the workflow item. You will usually call it in the Receive action. |
| DeleteWorkflowItem | This method deletes the workflow item. |
| Domain | This property returns the domain of the server. This property works in conjunction with Server property to make it easier for you to generate file:// or http:// URLs. |
| ErrorDescription | This property is used in conjunction with the ErrorNumber property. ErrorDescription contains a description of the error to report to the audit trail provider. |
| ErrorNumber | This property holds the number of the errors to report to the client and the audit trail provider. |
| Fields | This property returns the ADO Fields collection for the workflow item. Using Fields, you can access built-in and custom schema on the workflow item. |
| GetNewWorkflowMessage | This method creates and returns a new WorkflowMessage object. The WorkflowMessage object allows you to send e-mail messages from restricted workflows, since you cannot create a CDO Message object in a restricted workflow. |
| GetUserProperty | This method gets an Active Directory attribute off an Active Directory object. |
| IsUserInRole | This method checks to see whether a user is in a folder role. You pass to this method the user's e-mail address and the name of the role. The method will return a Boolean indicating whether that user is in that particular folder role. A folder role is a grouping of users who perform a particular function that you define for the folder. The roles are stored on the folder, so to implement roles-based workflow, you do not need permissions to modify or add properties to the Active Directory. |
| ItemAuthors | Since Exchange Server 2000 supports item-level permissions, you might want to set such permissions on workflow items. This property contains a collection contains a list of all users with authoring ability on the workflow item. |
| ItemReaders | This property contains a collection of users who should have Reader permissions on the workflow item. |
| Properties | This property returns an ISessionProps interface to you so that you can add properties you need persisted for a single session that lasts for one ProcessInstance transition. Here's a good example of using this property: Suppose you have multiple actions that need to be evaluated to make a state transition. You do not want each action to check whether a certain property on the item already exists as part of the evaluation criteria multiple times. So use this property to cache the value and share the value between multiple condition scripts. |
| ReceivedMessage | This property returns the e-mail message that was received in correlation to a workflow item. |
| Sender | This property contains the SMTP address of the person who initiated the state transition. |
| Server | This property contains the name of the server. Used in conjunction with the Domain property. |
| StateFrom | This property contains the name of the state before the current process transition. |
| StateTo | This property holds the name of the state after the current transition. |
| TrackingTable | Used with e-mail workflows, this property contains a Recordset object that has a number of properties relating to the current workflow item. Refer to the Exchange 2000 Platform SDK for more information on this property. |
I want to offer more explanation for some of the properties and methods in Table 19-11. One method that will be very useful for you in your development is the GetUserProperty method. This method takes three parameters. The first is the distinguished name of the object in the Active Directory, which can be either the Active Directory path to the object or the unique e-mail address of the object. The second parameter is the Active Directory attribute you want to get off the object. The third parameter works in conjunction with the first and tells CDO whether the first parameter is an Active Directory path (1) or an e-mail address (0). Probably the most common use for this method is to retrieve the manager of the owner of the item that is undergoing the workflow to get approval. You would retrieve the manager by getting the manager property off the current user's Active Directory object. You can get the email address of the current user by using the WorkflowSession.Sender property. You can then retrieve the mail property from the manager's Active Directory object. The manager property will return to you the Active Directory path to the manager. The following example illustrates this scenario:
with WorkflowSession strUserAddress = "username@company.com" mgrDN = .GetUserProperty(strUserAddress,"manager",0) strUserMgrEmail = .GetUserProperty(mgrDN, "mail", 1) end with |
Two properties in Table 19-11, ItemAuthors and ItemReaders, also demand more explanation. ItemAuthors is a collection used to specify per-item modify and delete permissions. If you add any users to this collection, only those users can modify or delete the item as well as read it. If you remove all users from this collection, the default permissions on the folder apply.
With ItemReaders, you can specify per-item read access. If you add users to this collection, only those users can read or view the item, but they cannot necessarily modify the item. This means that even when other users query, know the URL of the item, or try to retrieve a specific property on the item, they will not be able to modify the item unless they are in the ItemReaders collection. When you clear the collection, default folder permissions will apply.
Both ItemAuthors and ItemReaders return an IMembers interface. This interface supports one property and three methods: the Count property, and the Add, Clear, and Delete methods. Count returns the number of members in the collection. Add adds a new member by taking two parameters, Name and Type. Name must be a string that either specifies the e-mail address of the user or a role. Exchange supports the string literals <;$QD>Role 1<;$QD> through <;$QD>Role 16<;$QD> for adding roles. The Type parameter is an integer that specifies the type of user you are adding, whether it is an e-mail address (0) or a role (1). The Clear method clears all members from the collection. Finally, the Delete method deletes a member from the collection. You need to pass either a numbered index into the collection or a string that uniquely identifies a member of the collection. This string can be a role name such as "Role 1" or the e-mail address of the user you want to remove from the collection. The following example shows you how to add two different users to the ItemAuthors and ItemReaders collections on a workflow item.
strAddress = "user@domain.com" WorkflowSession.ItemAuthors.Add strAddress, 0 'cdowfEmailAddress strAddress = "user2@domain.com" WorkflowSession.ItemReaders.Add strAddress, 0 'cdowfEmailAddress |
Debugging Your Workflow SolutionsYou can debug your workflow solutions either by using the audit trail provider included with Exchange 2000 or by using script debugging. To enable script debugging, you need to either select the script debugging option in the Workflow Designer or set to True the property on your workflow's event handler registration called http://schemas.microsoft.com/cdo/workflow/enabledebug . In order for the debugger to work, you must make sure that just-in-time (JIT) debugging is enabled in Windows 2000. You can do this by modifying a key in the registry under HKCU/Software/Microsoft/Windows Script/Settings/JITDebug and setting it to 1.
Deploying Workflow Solutions
Once you've drawn out your process, implemented your conditions and actions, and written your script, the next step is to deploy your workflow process to a folder. The Workflow Designer makes this step is easy because you can save the workflow process into any folder in which you have permissions to create a workflow. Figure 19-14 shows how to Save Workflow Process To Folder in the Workflow Designer.
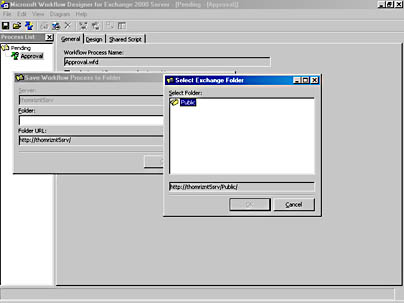
Figure 19-14. The Save Workflow Process To Folder tool makes it easy to deploy workflow solutions.
In some cases, you might need to programmatically deploy your solutions. Unfortunately, the Workflow Designer doesn't have an object model that you can automate to use the Save Workflow Process To Folder tool. Instead, you'll need to write some code to deploy your workflow process. If so, you should first use the Workflow Designer to export to XML the action table for your workflow process.
The following code, taken from the Training application setup program, shows how to deploy your workflow application programmatically. You'll notice the following steps in the code:
- Create your common script file (if necessary).
- Create a workflow ProcessDefinition object.
- In the ProcessDefinition object, add your action table. To do so, create a new Recordset object, and use the XML features of ADO to load the XML version of the action table that the Workflow Designer saved for you.
- As part of creating your ProcessDefinition object, select your audit trail provider, set the location of your common script file, and set the mode that the workflow process should run under (restricted or privileged).
- Save the ProcessDefinition object into the folder.
- Create the event registration items for the OnSyncSave, OnSyncDelete, and OnTimer events. On the server events registration item for OnSyncSave and OnSyncDelete, set the properties in the http://schemas.microsoft.com/cdo/workflow/ name space—for example, the pointer to the default process definition for the folder, whether ad hoc workflows are allowed in the folder, whether to enable script debugging, and whether to log to the audit trail provider successful state transitions.
Private Sub AddWorkflowProcess() Dim oRS As New ADODB.Recordset Dim oPD As New CDOWF.ProcessDefinition On Error GoTo errHandler 'Add the common script file Dim oScriptRec As New ADODB.Record Dim oStream As New ADODB.Stream 'Load the script file Dim fso As New Scripting.FileSystemObject Dim ofile As TextStream Set ofile = fso.OpenTextFile(App.Path & "\commonscript.txt") strCommonScript = ofile.ReadAll oScriptRec.Open strPath & "/Pending/commonscript", oConnection, _ adModeReadWrite, adCreateNonCollection oStream.Open oScriptRec, adModeReadWrite, adOpenStreamFromRecord With oStream .Charset = "unicode" .Type = adTypeText .Position = 0 .SetEOS .WriteText strCommonScript .Position = 0 .Flush .Close End With strScriptURL = oScriptRec.Fields("DAV:href").Value 'Load the action table oRS.Open App.Path & "\actiontable.xml" With oPD .ActionTable = oRS .AuditTrailProvider = "CDOWF.AuditTrailEventLog" .CommonScriptURL = strScriptURL .Mode = cdowfPrivilegedMode .Fields("DAV:ishidden") = True End With oPD.DataSource.SaveTo strPath & "/Pending/WFDEF", oConnection, _ adModeReadWrite, adCreateNonCollection strPDHREF = oPD.Fields("DAV:href").Value 'Create the event registrations 'First create the timer event arrRequired = GenerateRequiredEventArray("", "ontimer", _ "CdoWfEvt.EventSink.1", "", "") strNow = Now arrOptional = GenerateOptionalEventArray("", "", "", "", 15, _ strNow, "") CreateEvtRegistration oConnection, strPath & "Pending/timer", _ arrRequired, arrOptional, True 'Create the OnSyncSave and onSyncDelete registration arrRequired = GenerateRequiredEventArray("WHERE ""DAV:ishidden"" = _ false AND ""DAV:isfolder"" = false", "onsyncsave;onsyncdelete", _ "CdoWfEvt.EventSink.1", "", "") 'Create a new array and add some further properties for workflow Dim arrWorkflowRequired(6, 1) For i = LBound(arrRequired) To UBound(arrRequired) arrWorkflowRequired(i, 0) = arrRequired(i, 0) arrWorkflowRequired(i, 1) = arrRequired(i, 1) Next 'Add workflow properties arrWorkflowRequired(3, 0) = _ "http://schemas.microsoft.com/cdo/workflow/defaultprocdefinition" arrWorkflowRequired(3, 1) = strPDHREF arrWorkflowRequired(4, 0) = _ "http://schemas.microsoft.com/cdo/workflow/adhocflows" arrWorkflowRequired(4, 1) = 0 arrWorkflowRequired(5, 0) = _ "http://schemas.microsoft.com/cdo/workflow/enabledebug" arrWorkflowRequired(5, 1) = False arrWorkflowRequired(6, 0) = _ "http://schemas.microsoft.com/cdo/workflow/disablesuccessentries" arrWorkflowRequired(6, 1) = False 'Enable success entries CreateEvtRegistration oConnection, strPath & "Pending/workflowreg", _ arrWorkflowRequired, arrWorkflowOptional, True Exit Sub errHandler: MsgBox "Error in AddWorkflowProcess. Error " & Err.Number & " " & _ Err.Description End End Sub |
Workflow Security and Deployment Gotchas
I want to point out one gotcha you should be aware of when deploying workflow solutions. It's a feature that can trip you up if you don't understand it. The workflow event handlers have two COM+ roles that they implement, which we saw earlier: CanRegisterWorkflow and PrivilegedWorkflowAuthors. If you don't understand what these roles are used for and how the workflow engine leverages them, you might run into some issues. This section outlines how these two roles and the workflow engine work together.
The CanRegisterWorkflow role is used when someone attempts to register for the Workflow event handler. The Workflow event handler implements ICreateRegistration, so when someone attempts to register for the Workflow event handler, the event handler is called to verify whether it wants to allow the registration to go through. The Workflow event handler calls the COM+ method IsUserInRole(CanRegisterWorkflow) to determine whether the user attempting the registration is authorized to do so. If this call returns True, the Workflow event handler allows the registration to go through.
The PrivilegedWorkflowAuthors role is used to ensure that any executable workflow code to be run in Privileged mode was not tampered with by an unauthorized person. Here's the scenario: User A has privileged permissions and registers a new workflow that contains a script to run in privileged mode. User B is allowed to write only sandboxed workflows, but he does have write access to user A's script file. User B later inserts malicious script into these workflow files, knowing it will be run in Privileged mode since User A has privileged workflow permissions.
To prevent this, at run time, the Workflow event sink checks to see which user last modified the process definition, the script, and the event handler registration item. For each of these SIDs, the event sink calls COM+ IsUserInRole(PrivilegedWorkflowAuthors). If any of these documents were last modified by a non-privileged person, the Workflow engine knows the files have been tampered with. The Workflow engine immediately stops execution and logs a security error.
So if you want to run privileged mode workflows, you must make sure that the account used to save all the critical documents, such as the process definition, scripts, and event registrations, must be members of the PrivilegedWorkflowAuthors role.
EAN: 2147483647
Pages: 184