Extending Outlook with Site Server
You can leverage Site Server from your Outlook 2000 applications in a number of ways. These methods range from simply hosting the Web Browser control in an Outlook form to perform your queries, to writing a full-blown COM add-in that leverages the Site Server object model to create a rich search application.
In this section, we'll examine four methods for integrating Site Server into Outlook. First, you'll see how you can host your ASP search application as a folder home page. Next, you'll discover how to easily host the Web Browser control in order to host a customized version of an ASP search page. Then, you'll learn how to add controls to an Outlook form in conjunction with the Web Browser control to make your Outlook application more powerful. We will also take a close look at add-ins and their features. Finally you'll see a custom COM add-in that performs a total search solution for Outlook users by using Site Server catalogs.
Hosting the ASP Search Application as a Folder Home Page
One option for integrating your Web-based Site Server search applications into Outlook 2000 is to host your search application as a folder home page. While this is the easiest way to quickly provide search capabilities in Outlook, it leaves a lot to be desired from the standpoint of Outlook integration. Users would have to navigate to the folder hosting the Web page to use the search capabilities.
Hosting the ASP Search Application in an Outlook Form
Another option for integrating Site Server into your Outlook environment is to host the Web Browser control in an Outlook form. This makes it easy for users to initiate a search; rather than going to a folder, they can simply bring up a form. Figure 17-9 shows an Outlook form that implements this solution.

Figure 17-9. The Web Browser control hosted inside an Outlook form to provide search capabilities.
Notice in the figure how all the command bars that are usually available in the form have been disabled. You can use some VBScript code behind the Outlook form to disable the command bars, as the following code shows. This code also grabs the Web Browser control on the form and forces it to navigate to the ASP search application.
Function Item_Open() 'Disable the command bars for each commandbar in Item.GetInspector.CommandBars commandbar.enabled = False next set oBrowser = _ Item.GetInspector.ModifiedFormPages("Search").Controls("WebBrowser1") oBrowser.Navigate "http://airliftone/search/search.asp" End Function |
Extending the ASP Search Application Using Outlook Controls
While the previous example is better than a folder home page, you can take the integration a bit further by adding some custom controls to the form with the Web Browser control. For example, instead of a user having to guess the display name of the person who sent or posted the message, why not use the Global Address List (GAL) of Exchange Server and allow your users to select the person? Figure 17-10 shows a version of the Outlook form that uses Collaboration Data Objects (CDO), a tool that helps you implement a better user interface that's more integrated with Exchange Server and Outlook functionality.
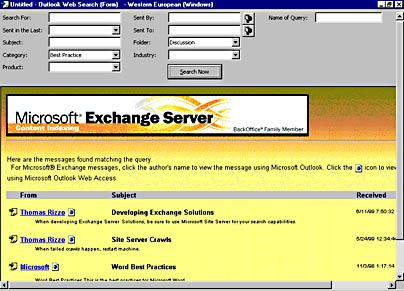
Figure 17-10. An enhanced version of the Outlook form that provides controls for selecting users and search criteria.
Once the user selects her criteria, she can click the Search Now button and the form will generate a query string using Site Server's conventional query string variables. The form will then automate the Web Browser control to navigate to a modified version of the ASP search application that has only the Web-based version of selecting criteria for the search removed. One nice thing about using this Outlook form is that the user can type in a name for the query and save the query into the folder for later use. Here is the code behind this Outlook form:
Dim oBrowser Dim strURL strURL = "" strServerName = "airliftone" Function Item_Open() 'Disable the command bars for each commandbar in Item.GetInspector.CommandBars commandbar.enabled = False next set oBrowser = _ Item.GetInspector.ModifiedFormPages("Search").Controls("WebBrowser1") oBrowser.Navigate "http://" & strServerName & "/search/olsearch.asp" End Function Sub AddtoURL(strString) strURL = strURL & strString End Sub Sub cmdSearchNow_Click() 'Initiate the search 'Build the URL 'Grab each component and pop it into the URL AddtoURL "c1=@All&q1=" & Item.UserProperties("SearchFor").Value AddtoURL "&c2=@DocAuthor&q2=" & Item.UserProperties("Sent By").Value 'Figure out what time frame the user selected strTime = Item.UserProperties("Sent in the Last").Value if strTime = "" then q3 = "" elseif strTime = "day" then q3 = "-1d" elseif strTime = "week" then q3 = "-1w" elseif strTime = "month" then q3 = "-1m" elseif strTime = "year" then q3 = "-1y" end if AddtoURL "&c3=@FileWrite&o3=>=&q3=" & q3 AddtoURL "&o4=@DocTitle&q4=" & Item.UserProperties("strSubject").Value AddtoURL "&c5=@MessageFolderName&q5=" & _ Item.UserProperties("Sent To").Value AddtoURL "&c6=@MessageFolderName&q6=&ct=" & _ Item.UserProperties("Folder").Value AddtoURL "&c7=@META_Type&q7=" & Item.UserProperties("strCategory").Value AddtoURL "&c8=@META_Industry&q8=" & _ Item.UserProperties("Industry").Value AddtoURL "&c9=@META_Product&q9=" & Item.UserProperties("Product").Value oBrowser.Navigate "http://" & strServerName & "/search " & _ "olsearch.asp?" & strURL End Sub Sub cmdSentByAddress_Click() FindAddress "Sent By", "Search for Sent By", "Sent By" End Sub Sub cmdSentToAddress_Click() FindAddress "Sent To", "Search for Sent To", "Sent To" End Sub Sub FindAddress(FieldName, Caption, ButtonText) On Error Resume Next Set oCDOSession = application.CreateObject("MAPI.Session") oCDOSession.Logon "", "", False, False, 0 txtCaption = Caption if not err then set orecip = oCDOSession.addressbook ( _ Nothing, txtCaption, True, True, 1, ButtonText, "", "", 0) end if if not err then item.userproperties.find(FieldName).value = orecip(1).Name end if oCDOSession.logoff oCDOSession = Nothing End Sub |
Building an Outlook 2000 COM Add-in for Site Server
The final and best option in my opinion is to leverage the COM add-in capabilities of Outlook 2000 to create a well-integrated search solution. Before discussing the code for the COM add-in, let me first describe the features of the add-in because we won't look at all the code.
The add-in extends the menus and toolbars of Outlook to provide users with quick access to its interface. The add-in also provides a rich set of querying capabilities. Users can create AND or OR clauses in their searches. Once the criteria are set, the add-in uses the Flexgrid control to display the results, as shown in Figure 17-11.
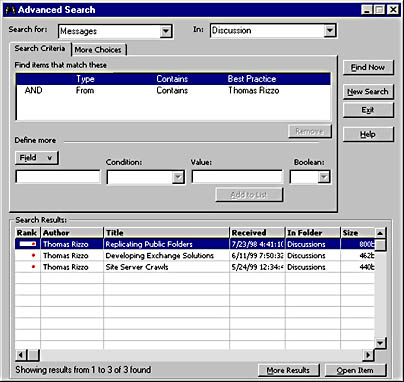
Figure 17-11. The COM add-in with multiple AND clauses and the results of the query in the Flexgrid control.
The add-in displays the most common search fields for Site Server information, but it also allows you to automatically detect custom fields contained in the folders being cataloged by Site Server. This feature makes it easier for users to determine all the custom fields that they can search on in the Site Server catalog. Figure 17-12 illustrates this feature.
In addition to detecting custom fields, the add-in automatically detects all your Site Server catalogs. This allows the user to quickly decide which catalog to search, while giving you the ability to add new catalogs without modifying the form. This capability uses an object model for Site Server that we haven't discussed yet. In a moment, you'll learn how to leverage the Site Server SearchAdmin object model to add some great features to your search add-in.
When viewing the results of the query, the add-in supports showing the ranking as both graphics and numbers. It also supports autopreviewing messages using the Description property you learned about earlier. The add-in also provides sorting on the column headings in the Flexgrid control. Figure 17-13 shows the autopreview feature.
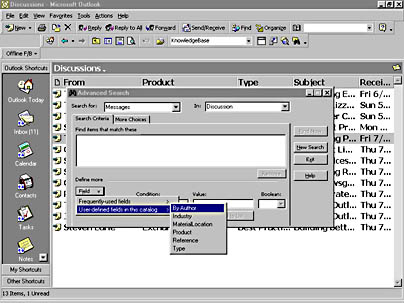
Figure 17-12. Automatically detecting custom fields in the COM add-in.
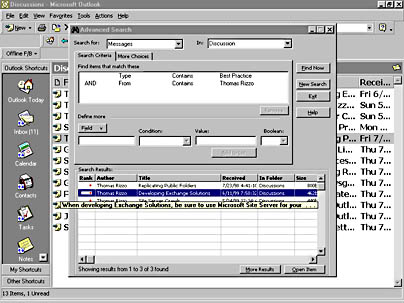
Figure 17-13. Autopreviewing an item in the search results.
Another feature this add-in provides is a customizable interface that lets you try different configurations in Site Server, such as choosing different optimization settings, allowing enumeration, and printing the query string variables before sending them to Site Server for debugging purposes. Figure 17-14 shows the configuration page of the add-in.
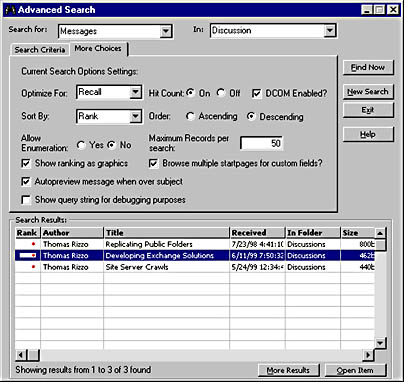
Figure 17-14. The configuration page of the add-in, where you can set different options to test your queries.
Finally, this add-in can easily be enabled for DCOM. The only way you can run this add-in without DCOM support is to install Outlook 2000 on a computer running Site Server and perform all your queries there. It's unlikely that your users will want to walk to the server machine to perform their queries. Enabling the add-in for DCOM allows your users to take advantage of the power of Site Server from their own computers.
I want to point out one thing before you look at the code for the add-in. Everything you'll see in the following section you can leverage from ASP, COM add-ins, or event-scripting agent applications. For example, you could add a timer-based event-scripting agent to a top-level folder, and as subfolders are added beneath that top-level folder, you could create new catalogs that index the contents of those folders. Note that you can have a maximum of 32 catalogs on a search server, and each catalog can have a maximum of 5 million documents.
Enabling the Add-in for DCOM
Let's first look at the code that will enable the add-in for DCOM. Building the code to enable the add-in for DCOM actually is straightforward in Microsoft Visual Basic 6. Since the CreateObject method in Visual Basic 6 takes an optional string value that specifies the server on which you want to create the object, the add-in simply leverages that capability and passes in the name of the computer running Site Server. This name is a global constant set in the Visual Basic project. The code to create the MSQuery object in the add-in looks like the following, with strDCOMServer holding the string that specifies the computer running Site Server on which to create the object:
Set q = CreateObject("MSSearch.query.1", strDCOMServer) |
You might think this is easy and wonder why I mentioned it. The reason I did is that simply putting this code in your add-in won't magically create the component on the computer running Site Server. You need to make sure that the client machine attempting to create the remote component has information in its registry about this remote component; otherwise, the add-in can't create the remote component.
The easiest way to get this information into the client computer's registry and host the remote component is to leverage Microsoft Transaction Server (MTS). By adding a new package to MTS that contains both the MSSearch object and the SearchAdmin object, you can have MTS create a client setup program that will install the correct information about the remote components into the registry. To do this, click on the package in the MTS administration console and choose the Export package option. (See Figure 17-15.)
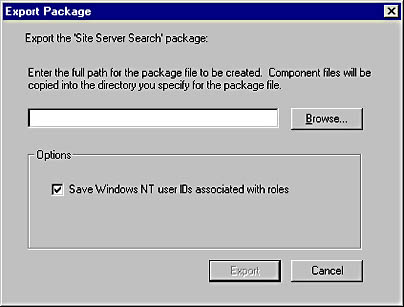
Figure 17-15. Exporting a package from Microsoft Transaction Server.
As part of the exported package, you'll find the Clients subdirectory. In the subdirectory, you'll find an executable that you can run on your client computers. This executable will install the necessary information into the registry to allow the client to remotely create the component on another server. Unfortunately, I could not include an exported package for you on the companion CD. Since MTS puts some server-specific information into the client setup program, you don't want my server name as the remote server you're creating the objects on.
When you add the objects to MTS, keep a couple of issues in mind. First, the MMC administration console of Site Server might tell you that search services are not correctly installed. This means you'll have to use the Web-based administration for Site Server to configure your catalogs. Second, you might want to change the identity that the components run under. By default, they'll run under the interactive user on your Windows NT server. If you keep your computers in a data center or reboot them without logging on, it might be difficult to have an interactive user always logged on to the server. Most likely, you wouldn't be able to create the components until someone logs in to the server as an interactive user. Instead, you might simply want to specify a Windows NT or Windows 2000 Server account that has the correct permissions for both components.
Automatically Detecting the Site Server Catalogs
The ASP search application does not provide the ability to automatically detect Site Server catalogs, meaning that as new catalogs get created, the application must be modified to reflect them. The add-in automatically detects all catalogs by using the SearchAdmin object model in Site Server. You'll see some information about the SearchAdmin object model here, but if you want the full documentation of the object model, see the Site Server SDK in the Platform SDK. The SearchAdmin object model can do much more than you'll see here.
Figure 17-16 displays the SearchAdmin object model. As the figure shows, you can reach the build and search servers for Site Server. Under those servers, you can access the properties for those catalogs, the catalog start pages, and other information that might be useful to your application.
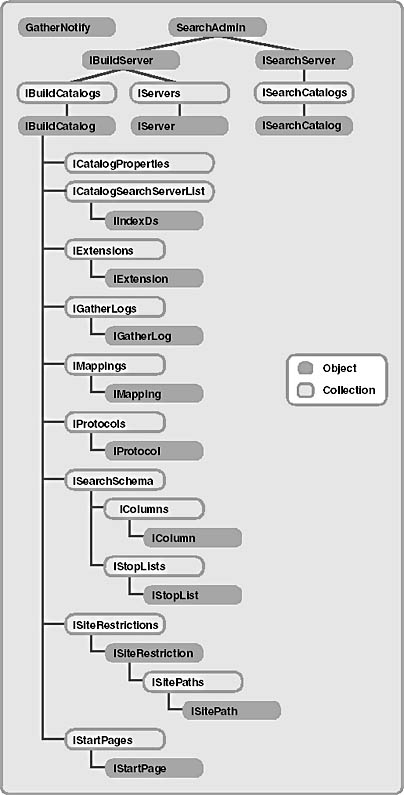
Figure 17-16. The SearchAdmin object hierarchy. Every subordinate object must be created under the SearchAdmin object.
The catalog names are retrieved by using the SearchServer object under the SearchAdmin object. From the SearchServer object, the SearchCatalogs object is used. The SearchCatalogs object contains SearchCatalog objects that identify each catalog on the server. In the SearchCatalog object, the name property is retrieved and added to the drop-down list in the add-in. Here is the code for retrieving catalog numbers:
If objHost Is Nothing Then If checkDCOMEnabled = vbChecked Then Set objHost = CreateObject("Search.SearchAdmin.1", strDCOMServer) Else Set objHost = CreateObject("Search.SearchAdmin.1") End If End If For Each cat In objHost.SearchServer.SearchCatalogs Cataloglist.AddItem cat.Name Next |
You'll see how to leverage more of the SearchAdmin object model when we discuss retrieving the custom fields for a catalog later in this section. However, you could create catalogs, delete them, or even query their current properties using the SearchAdmin object model. If you plan to build search solutions with Site Server, I recommend you become very familiar with this object model.
Working with Message Types
By using the MessageClass column, the add-in allows a user to pinpoint the exact type of item that she's looking for in the catalog. Through this capability, the user can specify only Outlook items of a certain type—such as mail, post, or contact items—or she can specify any type of item—including Web pages, files, or database information contained in the catalog.
Note that when you're testing the add-in, it defaults to messages only. If you have any free documents, HTML pages, or other nonmessage items contained in the catalog, those items will not appear. For a long time, I thought the add-in wasn't working before realizing my mistake; I then changed the item type to allow all types of items in the Search For drop-down list.
Speaking of item types, Site Server will crawl contacts, appointments, and other Outlook item types stored in Exchange Server public folders. The only catch is that Site Server won't index all the properties on these types of items; Site Server will index only the properties in the Exchange Server property set, and it will map other properties into the corresponding Site Server property set. Therefore, you can search only on Outlook properties that map to well-known Site Server properties. For example, the full name for a contact maps to the subject field in Outlook, so you can search by that full name using Site Server. However, you cannot search by the address or company name of the contact because these do not map to any of the properties that Site Server indexes for Exchange Server.
If you were to implement all the contact properties as custom properties, instead of using the built-in Outlook properties, you could search those contact and custom properties using the HTML META property set. Another option would be to create a "shadow form"—a hidden copy of the data from your contact form in another folder, which contains the contact fields as custom properties. Then you could have Site Server index and search the shadow forms. With the shadow forms, you need to implement code to redirect Outlook to the real contact form.
Working with Dates
One of the things you need to watch out for when specifying the Site Server search parameters is using dates in your application. As mentioned earlier, you need to put dates into a recognized format, such as yyyy/mm/dd. Since most users probably won't enter their dates in this format when performing their searches, the add-in automatically detects dates and formats them. The following code shows how the add-in formats the dates:
boolIsDate = False boolIsDate = IsDate(conditionlist.Column(3, i)) If boolIsDate = True Then 'Start flipping; first convert to date dDate = CDate(conditionlist.Column(3, i)) dNewDate = Year(dDate) & "/" & Month(dDate) & "/" & Day(dDate) End If 'Check to see whether IsDate and operand is = 'Need to set for On (or =) < Day after and > Date before 'because Site Server will try to match the hour and minute 'as well! If boolIsDate And operand = "=" Then boolNeedAdditionalOperand = True 'Change to a new operand strNewoperand = "<" strNewoperand2 = ">" querystring = querystring & "&o" + CStr(argnum) & "=" & strNewoperand Else querystring = querystring & "&o" + CStr(argnum) & "=" & operand End If If boolIsDate = False Then querystring = querystring & "&q" + CStr(argnum) & _ "=" & conditionlist.Column(3, i) ElseIf operand <> "=" Then querystring = querystring & "&q" + CStr(argnum) & "=" & dNewDate ElseIf operand = "=" Then 'Add a day to the date dDatetoLookFor = DateAdd("d", 1, dNewDate) 'Flip the date dDatetoLookFor = Year(dDatetoLookFor) & "/" & Month(dDatetoLookFor) _ & "/" & Day(dDatetoLookFor) querystring = querystring & "&q" + CStr(argnum) & "=" & dDatetoLookFor 'Get the field name so we remember it later strGlobalFieldName = fieldname End If |
As mentioned earlier in the chapter, dates in Site Server are stored according to UTC. Most users will not enter UTC dates but instead will enter dates corresponding to their own time zone. This can yield strange results; the returned values might not look correct to the user but in fact will be correct according to the UTC.
While the add-in doesn't solve this discrepancy for users, I have some suggestions for how you can remedy the problem. First, grab the local time zone information from the user's computer. You have two choices for doing this. You can go to the registry under the key C:\HKEY_Local_Machine\SYSTEM\CurrentControlSet\Control\TimeZoneInformation. The Bias value under this key specifies the current bias, in minutes, between the local time and UTC time. You can use this value to change the date the user entered into a UTC date.
The second way you can solve this problem is by using the Win32 API function GetTimeZoneInformation. Then you can retrieve the Bias value and figure out the UTC time. The UTC time will be local time + Bias.
Searching for Custom Fields
The COM add-in provides a nice feature of scrolling through the public folders contained in the catalog and displaying any custom fields contained in those folders. The add-in implements this feature by combining the SearchAdmin object model, a Site Server DCOM helper object, and CDO.
The Site Server DCOM helper object plays an important role in determining the custom fields in the folder. You might run into a situation in which the SearchAdmin object model doesn't allow you to enumerate certain properties or objects contained in the object model. This can happen for a number of reasons, but I've found the primary reason to be enabling authorization checking in MTS. To help circumvent this, I created the Site Server DCOM helper object. This object uses the SearchAdmin object model to retrieve all the Exchange Server start pages contained in the catalog. You need to do this to determine which Exchange Server public folders to search for the custom fields. This is the only way you can locate those folders with Site Server. Here is the code that performs this search:
Dim objHost Public Function GetStartPageURL(strCatalogName) As Variant On Error Resume Next Dim url() Dim boolFoundExchange ' Found an Exchange Server start page iCount = -1 ' Number of Exchange Server start pages boolFoundExchange = False If strCatalogName <> "" Then Set objHost = CreateObject("Search.SearchAdmin.1") Set objCatalogBuilder = objHost.BuildServer 'CatalogBuilder Set objCatalogs = objCatalogBuilder.BuildCatalogs Set objSelectedCat = objCatalogs.Item(strCatalogName) Set objStartPages = objSelectedCat.StartPages For Each startpage In objStartPages If InStr(startpage.url, "exch://") = 1 Then boolFoundExchange = True ' Redim the array iCount = iCount + 1 ReDim Preserve url(iCount) url(iCount) = startpage.url + "|" + _ CStr(startpage.enumerationdepth) End If Next If boolFoundExchange = False Then ReDim Preserve url(0) url(0) = "" End If Else ReDim Preserve url(0) url(0) = "" End If GetStartPageURL = url End Function |
The Site Server DCOM helper object provides one function, GetStartPageURL. This function takes the catalog name and then uses the SearchAdmin object model to find that catalog and enumerate its start pages, which are formatted for Exchange Server as exch:\\Public Folders\All Public Folders\FolderName. When enumerating the start pages, the component figures out whether Site Server is also crawling all the subfolders of the starting folder and appends a pipe character (|) and then the enumeration depth. If Site Server doesn't crawl the subfolders of the starting address, the enumeration depth will be -1. This value causes the helper object to place all the paths to the Exchange Server folders into an array; the object then passes that array back to the COM add-in.
The CDO code takes the array passed back by the helper object and parses the array to get the folder paths and enumeration depths for the public folders. CDO also allows you to use the Fields collection to query the items contained in a pubic folder to see whether the items contain custom properties. You want to add these custom properties to the user interface and then search on those custom properties using the HTML META property set format we discussed earlier in the chapter. I won't dig deeply into the CDO code here because Chapter 12 will cover CDO in great detail. However, you should look at the code in Chapter 12 because it shows you how to enumerate subfolders and scan for custom properties contained in a folder.
Working with Ranks
Site Server also provide a helpful feature that ranks returned search results. The Rank column, a column calculated by Site Server, contains a number from 0 through 1000 that specifies how well the returned value matches the search criteria. The larger the number ranking, the better the match.
To help users better interpret the ranks, the COM add-in can show the ranks as either numbers or graphics. The user can customize the rank display and can sort by ranking. The following code illustrates how to show the ranking in the Flexgrid control:
If checkShowRankPicture = vbUnchecked Then 'Set the column alignment to left, center Flex1.ColAlignment(1) = 1 'Unload any pictures Flex1.Col = 1 Flex1.Row = i Set Flex1.CellPicture = Nothing If rs("Rank") < 1000 Then Flex1.TextMatrix(i, 1) = Mid("0000", 1, _ 4 - Len(Trim(CStr(rs("Rank"))))) & Trim(CStr(rs("Rank"))) Else Flex1.TextMatrix(i, 1) = Trim(CStr(rs("Rank"))) End If ElseIf checkShowRankPicture = vbChecked Then 'Show pictures for the ranks Flex1.Col = 1 Flex1.Row = i 'Set the alignment for the column to center, center Flex1.CellPictureAlignment = 4 iRank = 0 iRank = CInt(rs("Rank")) 'Make sure we should even load the picture If iRank <> 0 Then If (iRank > 750) Then Set Flex1.CellPicture = imgRanks.ListImages(4).Picture ElseIf (iRank > 500) Then Set Flex1.CellPicture = imgRanks.ListImages(3).Picture ElseIf (iRank > 250) Then Set Flex1.CellPicture = imgRanks.ListImages(2).Picture Else Set Flex1.CellPicture = imgRanks.ListImages(1).Picture End If End If End If |
The code determines whether to display the graphic or number representation of the rank. If the user wants the graphic representation, the code uses an Imagelist control containing four images of bullets. The more bullets in the ranking, the better the match. You might want to modify the add-in to also allow users to filter by ranking. For example, you might want to allow users to show only items with a ranking of two bullets or higher.
Working with Non-Exchange Server Data in the Same Catalog
The final feature of the COM add-in that we'll discuss is working with non-Exchange Server data in the same catalog as Exchange Server data. You might want to provide a single catalog that spans Exchange Server, the file system, and the Web so that users can retrieve all that information with a single query. While you could provide this capability using multiple catalogs and Site Server, the add-in allows only a single catalog search. Therefore, the add-in must determine whether the user wants Exchange Server data or non-Exchange Server data.
To implement this, the add-in assesses whether the MessageFolderName column is empty for the record in the ADO recordset. If this column is empty, the item must be non-Exchange Server data. The following code implements this portion of the add-in:
If rs("MessageFolderName") = "" Then Flex1.TextMatrix(i, 5) = CStr(rs("DocAddress")) strType = "Not Exchange" Else strType = "Exchange" Flex1.TextMatrix(i, 5) = CStr(rs("MessageFolderName")) End If |
The add-in uses a hidden column in the Flexgrid control for each row to identify the type of data (Exchange Server or otherwise) by using the strType variable. This column is accessed when the user double-clicks on the item in the Flexgrid control or selects the row and clicks the item open. The COM add-in checks the type of item, and if the item is a non-Exchange Server item, the code prompts Microsoft Internet Explorer to open the item. If it's an Exchange Server item, the add-in uses the Outlook object model to open the item in Outlook. If you want to, you can use the Exciol.ocx control to open the item from the add-in. However, this probably isn't necessary because the add-in is running in Outlook, and users probably will prefer to view the item using Outlook rather than Outlook Web Access. The code for this functionality follows:
Private Sub flex1_DblClick() Dim wshell As IWshShell_Class 'See if it's an Exchange Server item If Flex1.TextMatrix(Flex1.Row, 8) = "Not Exchange" Then 'Not an Exchange Server item Screen.MousePointer = 11 If InStr(Flex1.TextMatrix(Flex1.Row, 0), "=") = 0 Then On Error Resume Next Set wshell = CreateObject("Wscript.Shell") If Err.Number <> 0 Then MsgBox "Can't Create Windows Scripting Host on this machine" Else wshell.Run "iexplore " & """" & _ Flex1.TextMatrix(Flex1.Row, 0) & """", 1, False End If Set wshell = Nothing End If Screen.MousePointer = 0 Else On Error Resume Next Set alpffolder = olns.Folders("Public Folders").Folders( _ "All Public Folders") Set citem = Nothing Set citem = _ olns.GetItemFromID(UCase(Mid(Flex1.TextMatrix(Flex1.Row, 0), _ InStr(Flex1.TextMatrix(Flex1.Row, 0), "=") + 1)), _ alpffolder.StoreID) Screen.MousePointer = 0 If citem Is Nothing Then MsgBox "The item could not be displayed. The EntryID is " _ & (UCase(Mid(Flex1.TextMatrix(Flex1.Row, 0), "="))) & _ " and the store ID is " & alpffolder.StoreID Else citem.Display End If End If End Sub |
EAN: 2147483647
Pages: 184