Project Application
To help you learn how to use the Rule and ACL components in a full application rather than in code snippets, I put together an application named Project. This application shows you the new COM components and ties together the CDO objects that we've learned about, such as the core messaging and rendering CDO objects. From this application, you can get an idea of how to build your own fully featured CDO applications. First, we'll examine what the application does and highlight some of the programming behind it. I won't go over the CDO portions of the code in great detail, so you should set up the application and browse through its sample code to get a better understanding of the CDO library.
The Project application allows users to collaborate in a virtual project workspace on the Web, where they can create new folders in which they post documents or messages. In these folders, users can discuss items and view information using different view types. Project owners can modify permissions for project members either at the project level or at the individual folder level, and they can set up autonotification for team members when new items are placed in the project folders.
Setting Up the Project Application
Before you can install the application, you must have a Windows NT 4.0 Server or Windows 2000 Server with certain software installed. Table 16-4 describes the installation requirements for the application.
Table 16-4. Installation requirements for the Project application.
| Minimum Software Requirements | Installation Notes |
|---|---|
| Exchange Server 5.5 Service Pack 1 with Outlook Web Access | Service Pack 3 is recommended. |
| Internet Information Server 3.0 or later with Active Server Pages | Internet Information Services 4.0 or later is recommended. |
| CDO library (cdo.dll), CDO Rendering library (cdohtml.dll) | Exchange Server 5.5 Service Pack 1 installs CDO library 1.21 and CDO Rendering library 1.21. Outlook installs CDO library 1.21. |
| Microsoft Posting Acceptor | Posting Acceptor 1.01 is available as a subcomponent of the Microsoft Site Server Express 2.0 component with the Windows NT 4.0 Option Pack. The Posting Acceptor DLL (Cpshost.dll) is also available with the Project files. If you do not have the Posting Acceptor properly installed, you will not be able to upload attachments to new messages. |
| For the client: | |
| Microsoft Internet Explorer 4.0, Outlook | You can run the client software on the same machine or on a separate machine. |
To install the Project application, first copy the Project folder from the companion CD to your Web server where you want to run the application. Start the IIS administration program. Create a virtual directory that points to the location where you copied the Project files, and name the virtual directory project. If you want to be able to attach files to messages, make sure you enable the Execute and Write permissions for the virtual directory. Execute permissions are necessary because the Posting Acceptor DLL (Cpshost.dll) in the Project folder is used for uploading files. Write permissions are necessary because attachments are uploaded by default to the Temp subfolder of Project. Since enabling both Execute and Write permissions for a directory is potentially dangerous, you will want to set up a completed application to avoid this configuration.
Included with the Project files is a file named Project.pst. Make sure the read-only flag for this file is unchecked. Launch Outlook, and from the File menu, point to Open and then choose Personal Folders File (.pst). In the Open Personal Folders dialog box, select the Project.pst file, and click OK. In the Outlook Folder List, expand the Project Application file folder. While holding the Ctrl key, copy the Projects folder to All Public Folders. Right-click on the Projects public folder and select Properties. On the Permissions tab of the Properties dialog box, set the permissions for users. For users who can create projects, assign at least Publishing Author permissions.
NOTE
You must copy the Projects folder to All Public Folders or the application will not work. If you cannot install the application there, you can modify the code contained in the Project application so that it looks for the folder in another location, or you can retrieve the folder by using its EntryID.
Included with the Project files is a Components folder, which contains the AcctCrt, Rules, and ACL components. Since AcctCrt is not used in this application, just register Rule.dll and ACL.dll using the Regsvr32 utility:
regsvr32 rule.dll regsvr32 acl.dll |
To start the Project application, enter the following URL in Internet Explorer: http://yourservername/project.
NOTE
When the Project application was tested on different configurations, some pages initially were not displayed. If this happens to you, try clicking the Refresh button or pressing F5.
Architecture of the Application
The architecture for the Project application is centered around Public Folders. The Projects public folder contains the main project folders, as shown in Figure 16-2. Under each main project folder are the folders that contain the project's content, such as a document database or a discussion group.
To create projects, the user must have permission to create subfolders under the Projects folder. If a user has this permission, a Create A New Project hyperlink (also referred to as a button) appears on the user's Projects page (informally known as the project workspace page). The Projects page is shown in Figure 16-3. This page shows all projects for which the user has top-level permission to view items.
When the user clicks on the Create A New Project button, an HTML wizard, which walks the user through creating a new project, appears. The steps in the wizard ask the user to name the project, write a project description, and set default permissions for both authenticated and anonymous users. The fourth page in the wizard is shown in Figure 16-4.
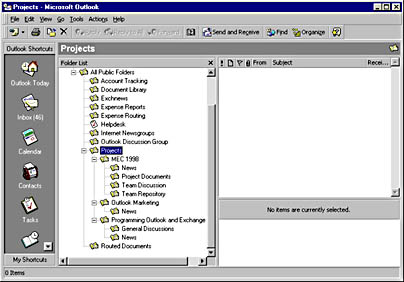
Figure 16-2. The folder structure for the Project application, shown in Microsoft Outlook.
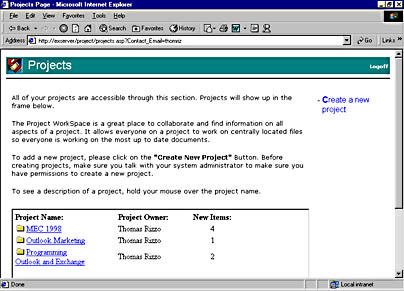
Figure 16-3. The Projects page, also known as the project workspace page, shows all projects for which the current user has permissions. Users who have proper permissions can create new projects.
When a user clicks on the hyperlink for a project for which they have permissions, the chosen project page appears. It contains folders for the current project, as shown in Figure 16-5. The options that appear are determined by the permissions set for the current user of the project. For example, if the user is the project owner, the user can modify the project permissions for the folder. Figure 16-6 shows the Assign Permissions page, where project owners can set permissions.
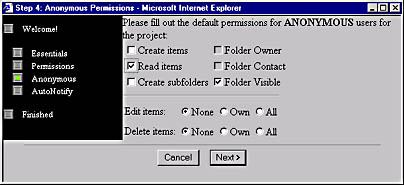
Figure 16-4. The Create New Project Wizard. On this page of the wizard, the project owner can set permissions for anonymous users who can browse through the project.
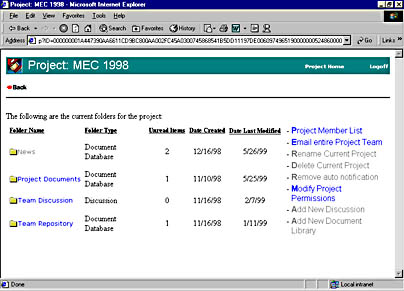
Figure 16-5. A selected project page. From this page, users can view the folders contained in a project.
Users who want to view project members for the current project can select the Project Member List link from the Project page. The project member list, shown in Figure 16-7, is created by querying the project permissions using the ACL object.
When a user clicks on a folder to view the project content, a Web interface that allows the user to see folder documents and discussions appears. By default, the folder contains a number of views from which the user can select. Figure 16-8 shows the threaded discussion view for a folder.
The project folders support autonotification. Autonotification is implemented by creating a rule in the Projects public folder that automatically forwards any new items to project members. This part of the application uses the Rules object, which we discussed earlier.
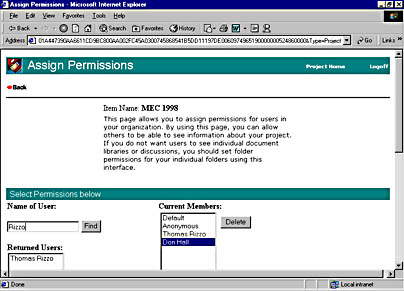
Figure 16-6. The Assign Permissions page for a project. From this page, owners can assign permissions for users.
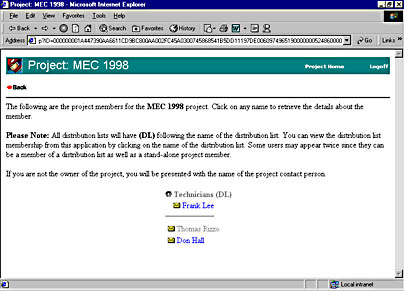
Figure 16-7. A project member list. If the user is not an owner of the project folder, the user will see only the main contacts for the project and not the actual project member list.
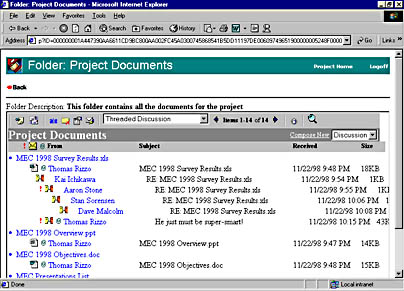
Figure 16-8. Viewing the information in a project folder using the threaded discussion view.
To post a new item or reply to an item in the folder, the user employs the composition form. In this form, users type information they want to post. The post form includes an option to upload file attachments to a Web server by using the Posting Acceptor. There's one caveat when using the Posting Acceptor: a bug in the component destroys a user's session variables the first time the user successfully uploads a file. To provide a workaround for this bug, the application tells the user that when she uploads a file for the first time, she will need to log on to the application again to reestablish the ASP session variables. Figure 16-9 shows the Reply To Group form.
Note that the application can be expanded to include support for searching all items in the folder or in the project. I've set up the application so that it can be integrated with Microsoft Site Server. Site Server provides full-text indexing and retrieval of both items in a Public Folder and the attachments in those items. Furthermore, Site Server automatically indexes custom properties on your messages so that you can create search pages that search by these custom properties.
In Chapter 17, we'll examine Site Server in detail. I've also included on the companion CD an example that demonstrates how to use Site Server and Exchange Server together to implement full-text indexing and search capabilities. (Figure 16-10 shows a custom search page to be used with Site Server.) Using this information, you should have a great start in creating custom search applications that use the collaborative technology of Exchange Server.
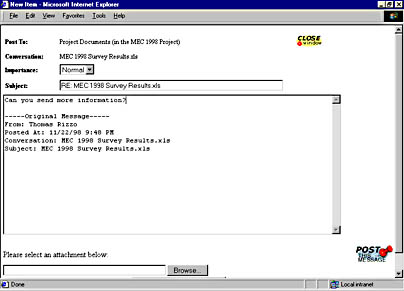
Figure 16-9. The Reply To Group form allows users to post their responses in a discussion format as well as upload files to the server as attachments.
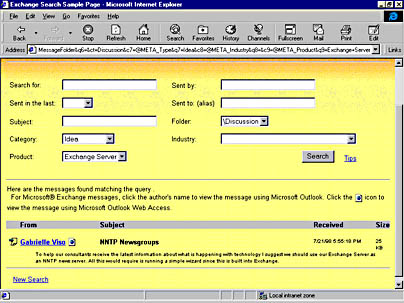
Figure 16-10. A custom search page built using Site Server. This search page, included on the CD, allows you to search across Public Folders using built-in and custom properties on items.
Implementing the Projects Application
Most of the Project application is CDO-based, so in the book I won't be covering the parts that deal with CDO. But take a look at the source code for the application on the companion CD because it illustrates well how to use different CDO components—it customizes the Rendering objects, uses CDO properties, and uses many core CDO messaging objects. I'll focus my discussion here on the implementation of the new COM components discussed in this chapter, ACL and Rules.
The best example of using the ACL component in the Project application is in the file permlist.asp. The permlist.asp file is used to update the permissions for a user on a folder based on the options selected by the project owner. Other files also use parts of the ACL component. For example, when a user first accesses the Web page where all the projects are listed, the ACL component retrieves the project owner from the list. The following code, from the permlist.asp file, highlights how to use the ACL component:
'Retrieve the ID for the current address entry strAEID = Request.QueryString("AEID") If Request.QueryString("Command") = "Update" then 'Check to see if user or built-in account. 'If not built-in, do the CompareIDs. boolSameID = False if Not(strAEID = "ID_ACL_ANONYMOUS" or _ strAEID = "ID_ACL_DEFAULT") then 'Check to make sure users are not trying to update 'permissions for themselves. 'If they are, do nothing. 'If you want to allow this, remove the comparison code. boolSameID = oSession.CompareIDs(strAEID, _ oSession.CurrentUser.ID) end if if boolSameID = False then set aclobject = server.createobject("MSExchange.aclobject") aclobject.cdoitem = oCurrentFolder set fldr_aces = aclobject.aces 'For users, convert the ID to a string for it to 'work correctly set ACE = fldr_aces.item(cstr(strAEID)) 'More of this code is discussed later in the chapter… End If End If |
The first task the code performs is to retrieve the AddressEntry ID of the user, whose ACL on the folder will be updated. This ID is used later to obtain the access control entry (ACE) for the user. Next, the code checks to see whether the update command is sent along with the query string. If it is, the code knows that it must update the ACL for the user of the folder.
Next, the code checks the AddressEntry ID to make sure it's not a built-in account such as Default or Anonymous. Checking the AddressEntry ID enables the code to stop any errors that would occur later when the CompareIDs method is called on the CDO Session object.
NOTE
Every folder has two built-in accounts, Default and Anonymous. Default is used to set permissions for any user accessing the folder who doesn't already have explicit permissions. Anonymous is used when users are accessing the folder anonymously through Outlook Web Access (OWA) or other anonymous CDO applications. You can set permissions on these two built-in accounts programmatically using the ACL component.
In the Project application, I added code to prevent the owner of a folder from changing his own permissions on the folder, ensuring that the creator of the folder remains the owner. If the owner wants to change his own permissions, he can change them through Outlook, or he can remove the code that checks whether the passed-in ID and the ID for the current user of the application are the same.
After the code checks the AddressEntry ID, the code creates an instance of the ACL object by calling the Server.CreateObject method in ASP with the ProgID MSExchange.ACLObject. Once the object is created, the code sets the CDOItem property of the ACLObject to be the current folder for which we want to modify permissions. The CDOItem property must be set before you try to retrieve the collection of user permissions on the folder.
The code then sets an object to the ACEs collection using the ACEs method on the ACLObject. The ACEs collection contains all permissions on the folder for all users. You can scroll through this collection to see who has permissions on the folder. The file members.asp allows you to do this.
The ACEs collection contains some methods and properties you will want to use in your code, such as the Item method, the Count property, the Add method, and the Delete method. In the preceding code, the Item method retrieves the specific ACE object for the user, whose ID is passed along the query string.
NOTE
The AddressEntry and Recipient objects in CDO return short-term EntryIDs, which are valid only for the current CDO session, whereas the ACL component uses long-term EntryIDs. You can pass a short-term EntryID to the component, and the ACL component will be able to find the correct ACE object for the user. However, when you ask for the ID property on the ACE object, the code will return the long-term EntryID for the user. Watch out for this functionality, especially if you store the short-term EntryID in a variable and then try to compare it to the long-term EntryID in your code.
The following code snippet, taken from the selectuser.asp file, shows you how to add a new user to the ACEs collection. The code creates a new ACE object and sets the object's properties, such as the desired rights and the ID of the user for whom the rights should apply. (Note that the ID property can also take the constants ID_ACL_ANONYMOUS and ID_ACL_DEFAULT to set the rights for the Anonymous and Default built-in accounts.) After the ACE object's properties are set, the code uses the Add method on the ACEs collection to add the new object to the collection. When it's done, it will call the Update method on the ACLObject.
elseif strCommand = "Add" then on error resume next 'Retrieve the ID for the new user. 'Remember address entry ID (AEID) is a short-term EntryID. strAEID = Request.QueryString("AEID") 'Get the user name strText = Request.QueryString("Text") 'Create the user in the ACE collection and don't give permissions set acls = server.createobject("MSExchange.aclobject") acls.cdoitem = oCurrentFolder set fldr_aces = acls.aces 'Create a new ACE and add member set newace = createobject("MSExchange.ACE") newace.ID = strAEID 'Since people can see only folder contacts, create all new users 'with the Folder contact permission. If you don't want this, 'use the line that gives no permissions. newace.Rights = &H0600 'Folder contact 'newace.rights = &H0400 ' no permissions fldr_aces.add newace acls.Update 'Update strAEID with the long-term EntryID strAEID = newace.ID 'Now write some client script to add to list box Response.write _ "<SCRIPT DEFER FOR=window EVENT=OnLoad LANGUAGE=vbscript>" & _ chr(10) Response.write "<!--" & chr(10) Response.write "set memberframe = _ window.Parent.frames.item(""members"")" & chr(10) Response.write _ "set oMemberList = memberframe.document.all.Members" & _ chr(10) Response.write "set newelement = _ document.createElement(""OPTION"")" & chr(10) Response.write "newelement.value = """ & strAEID & """" & chr(10) Response.write "newelement.text = """ & strText & """" & chr(10) Response.write "oMemberList.Add(newelement)" & chr(10) Response.write "//-->" & chr(10) Response.write "</SCRIPT>" end if |
You use the Delete method in much the same way you use the Update method. The following code, taken from the members.asp file, shows you how to use the Delete method. To delete a user's folder permissions, you pass the ID of the user for whom you want to delete permissions from the folder. Then you call the Update method on the ACLObject.
NOTE
If you granted the Default or Anonymous built-in accounts permission to access a particular folder, when you delete permissions on that folder, the user or distribution list might still be able to access it and its items.
if Request.QueryString("Command") = "Delete" then strAEID = Request.QueryString("AEID") 'Check that user is not trying to delete herself. 'If she is, do nothing. if not(oSession.CompareIDs(strAEID, oSession.CurrentUser.ID)) then set aclobject = server.createobject("MSExchange.aclobject") aclobject.cdoitem = oCurrentFolder set fldr_aces = aclobject.aces 'Must convert the ID to a string for it to work correctly fldr_aces.delete cstr(strAEID) aclobject.Update set aclobject = Nothing end if end if |
The last code snippet we'll examine, which follows, is taken from the permlist.asp file. It shows you how to use the ACE object and its properties. You actually set user permissions on the ACE object by using different Boolean properties, such as CreateItems and FolderVisible, and then committing the changes to the Exchange server by calling the Update command on the ACLObject. The one property that the next example does not show how to use is the Rights property, which returns a bitmask containing the user's rights on the folder. The include file, named acl.inc, contains the specific values for this bitmask.
'Scroll through the form and update the ACL if Request.Form("CreateItems") = "on" then ACE.CreateItems = True else ACE.CreateItems = False end if if Request.Form("ReadItems") = "on" then ACE.ReadItems = True else ACE.ReadItems = False end if if Request.Form("CreateSubFolders") = "on" then ACE.CreateSubFolders = True else ACE.CreateSubFolders = False end if if Request.Form("FolderOwner") = "on" then ACE.FolderOwner = True else ACE.FolderOwner = False end if if Request.Form("FolderVisible") = "on" then ACE.FolderVisible = True else ACE.FolderVisible = False end if if Request.Form("FolderContact") = "on" then ACE.FolderContact = True else ACE.FolderContact = False end if Select Case Request.Form("EditItems") Case "EditNone" ACE.EditOwn = False ACE.EditAll = False Case "EditOwn" ACE.EditOwn = True Case "EditAll" ACE.EditAll = True End Select Select Case Request.Form("DeleteItems") Case "DelItemsNone" ACE.DeleteOwn = False ACE.DeleteAll = False Case "DelItemsOwn" ACE.DeleteOwn = True Case "DelItemsAll" ACE.DeleteAll = True End Select 'Update the object aclobject.Update set aclobject = Nothing end if |
Using the Rules Component to Fire on All Incoming Messages
When we examined the Rules component earlier, we did not review one aspect of it—the ability to fire rules on all incoming messages, not just messages that meet certain criteria. The sample application uses this capability to autoforward any new items posted to the folders in the project to all the team members. The following code snippet, taken from ProjectMain.asp, shows you how to create a rule that fires on every incoming message:
elseif Request.QueryString("Command") = "AddNotify" then set oProjectFolder = Session("ProjectFolder") strProjectFolderID = oProjectFolder.ID 'On error resume next 'Need to scroll through each subfolder in the current project set oFolders = oProjectFolder.Folders for each oFolder in oFolders 'Create Rules object set oRules = Server.CreateObject("MSExchange.Rules") oRules.Folder = oFolder 'Check to make sure the rule doesn't already exist Dim intFoundit intFoundit = 0 'Just in case user is not the owner of the folder, 'on error resume next for each oRule in oRules if oRule.Name = "AutoNotify" then intFoundit = 1 end if next if intFoundit = 0 then 'Create the new rule IDCount = 0 'We can always assume there is at least one person in the 'ACLs for the folder who is the owner. 'If there is no one in the ACLs, a user probably 'wouldn't even get to this Web page. Redim strIDs(0) set acls = server.createobject("MSExchange.aclobject") acls.cdoitem = oFolder set fldr_aces = acls.aces if fldr_aces.count > 0 then 'On error resume next for each fldr_ace in fldr_aces strID = fldr_ace.ID if not(strID = "ID_ACL_ANONYMOUS" or _ strID = (ID_ACL_DEFAULT") then 'Get the AddressEntry object set oAE = oSession.GetAddressEntry(strID) if Not(oAE is Nothing) then 'Redim the array Redim Preserve strIDs(IDCount) strIDs(IDCount) = cstr(oAE.ID) 'Bump the count of the array IDCount = IDCount + 1 end if end if next end if 'Create new Action for Rule object set oAction = Server.CreateObject("MSExchange.Action") oAction.ActionType = 6 'Forward oAction.Arg = strIDs Set oExists = CreateObject("MSExchange.ExistsCondition") oExists.PropertyTag = ActMsgPR_MESSAGE_CLASS 'Create a new Rule object set oNewRule = Server.CreateObject("MSExchange.Rule") oNewRule.Name = "AutoNotify" oNewRule.Actions.Add 1,oAction oNewRule.Condition = oExists 'Add the new Rule object to the Rules collection oRules.Add , oNewRule oRules.Update Set oRules = Nothing end if next |
This code creates a new instance of the Rules component, and then scrolls through the collection of rules for the component to see whether the AutoNotify rule already exists. If the rule does exist, the code does not perform any action.
If the AutoNotify rule does not exist, the code uses the ACL component to retrieve all the users who have permissions on the folder. By using the ID property on the ACE object, which we discussed earlier, the code creates an array of EntryIDs for all the users. This array is used later as an argument to a method in the Rules object.
Once the array of EntryIDs is initialized, the code creates an Action object for the new rule we're creating. The action for the rule is to forward all new items to a group of users. To specify the users, the Arg property on the Action object is passed the array of EntryIDs that we created.
Once the Action object is created and initialized, the code creates an ExistsCondition object, which is used in the Rules object to determine whether a particular property exists on the incoming item. (Note that the component does not check whether the value in the property is valid, only that it exists.) To specify which property to look for, you must set the PropertyTag property on the ExistsCondition object. The code sets the PropertyTag property to be the message class of the item, because this property is always guaranteed to exist on an item. Then the code uses the methods we discussed earlier to create the actual rule and add it to the Rules collection on the component.
NOTE
This chapter gave you a brief introduction to the power of the three new COM components available for Exchange Server in the Microsoft Platform SDK. These components help round out the already extensive development environment of Exchange Server. For more information on any of these components as well as the other technologies included with Exchange Server, refer to the Exchserv.chm file on the companion CD, as well as the Platform SDK section of the MSDN Library.
EAN: 2147483647
Pages: 184