| When you create joints, the bones appear automatically between them. The order in which you create joints is important: The first joint that's created resides at the top of the hierarchy; the second joint is parented to the first (making it a child of that joint and forcing it to follow the parent's movement); the third is parented to the second; and so on down the line. A joint is like a pivot point in a hierarchy. You can't take a joint's pivot point away: The joint always remains with its pivot point. A joint's position in the hierarchy determines which joints transform with it: The joints below it transform with that joint; the joints above it aren't affected by that joint's movements. Don't confuse this hierarchy with joints that are above or below each other physically: One joint can be above another in the y direction but below it within the hierarchy. You can think of bones as a visual representation of your skeleton's joint hierarchy. When you parent one joint to another, a bone appears. If you unparent a joint, the bone disappears. Sometimes it's easier to create separate hierarchies and then piece them together, or to branch out from an existing hierarchy. For instance, a character's neck and arms branch out from its spine. It may be easier to make an arm and then parent it to the spine, while the simpler structure of the neck could just be added to the spine directly. To create joints: 1. | Choose Skeleton > Joint Tool.
| 2. | In the Side view, click to place the joint.
You should generally use an orthographic view when you create joints to avoid the imprecise placement of perspective views (Figure 10.4).
Figure 10.4. A joint is created in an orthographic view by selecting Skeleton > Joint Tool. 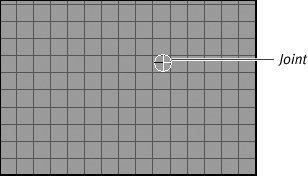
| | | 3. | Click where you want the next joint to be placed.
A bone appears between the two joints (Figure 10.5).
Figure 10.5. The second joint is created. A bone appears between the two joints, demonstrating that they are parented together. The bone is thicker at the parent joint than at the child joint. 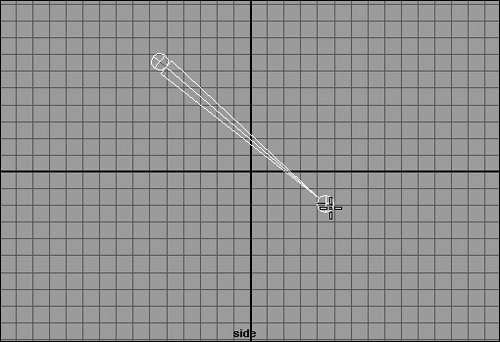
| 4. | Click and drag to place the third joint. When you release the mouse button, the joint is placed.
| 5. | Press  . .
The skeleton is complete, and you're no longer in the Joint tool. The top joint of the hierarchy is selected, which causes the whole skeleton to be highlighted.
|
 Tips Tips
It's often a good idea to build a skeleton with grid snap turned on so that all your joints are securely aligned. A convenient way to do this is by holding down  when you place joints. when you place joints. You can make the joints appear bigger or smaller by selecting Display > Joint Size and choosing a size from the list. To delete a joint, select the joint and then press  . That joint is deleted along with any joints below it in the hierarchy. . That joint is deleted along with any joints below it in the hierarchy.
To parent joints: 1. | Create the skeleton of a leg and foot out of five joints in the Side view (Figure 10.6).
Figure 10.6. This is a typical leg skeleton. Starting from the top, the joints are named hip, knee, ankle, ball, and toe. If the character is wearing shoes, you don't need bones for each toe; one bone is sufficient to rotate the front of the shoe. 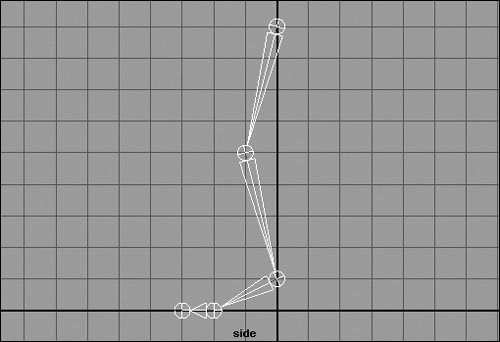
Press to complete the creation.
| 2. | As a separate hierarchy, create spine joints in the Side view, starting from the bottom and working your way up (Figure 10.7).
Figure 10.7. A spine is created from the bottom up. This makes the bottom joint the parent of the rest of the spine. The rest of the joints are beneath it in the hierarchy even though they're above it in space. 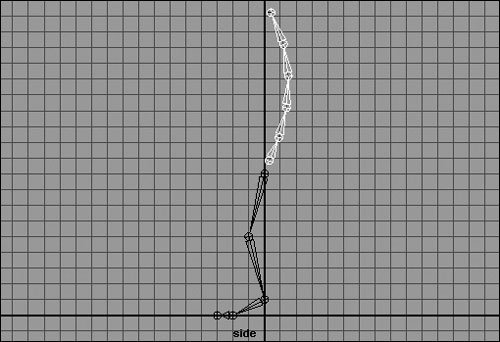
| | | 3. | In the Front view, move the leg to the side.
| 4. | Select the top joint of the leg,  -select the bottom joint of the spine, and press -select the bottom joint of the spine, and press  . .
A bone appears between the leg and the spine. It's now one hierarchy (Figure 10.8).
Figure 10.8. The leg has been parented to the spine. Now the bottom joint of the skeleton is the root joint for the whole character. When this joint is moved, the whole character moves. 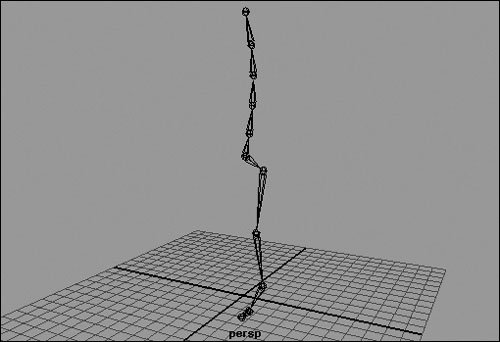
Save this skeleton; you'll use it shortly for another task.
|
Tips You can similarly unparent joints. Select the joint you want to unparent, and press  . The joint becomes unparented, and the bone disappears. . The joint becomes unparented, and the bone disappears. You can also parent and unparent joints in the Outliner: Drag the joints around by clicking them with the middle mouse button. If you drag one joint on top of another, you parent them together. To unparent, drag the joint to the base level of the scene.
To branch off from an existing skeleton: 1. | Using the skeleton from the task "To create joints," click the Joint tool icon  . .
| 2. | Click the joint from which you want to branch.
Doing so selects the joint rather than creating a new one.
| 3. | Click where you want the new joint to be placed.
A new joint appears, with the bone branched off from the original skeleton (Figure 10.9).
Figure 10.9. A new joint branches off from the existing joints. 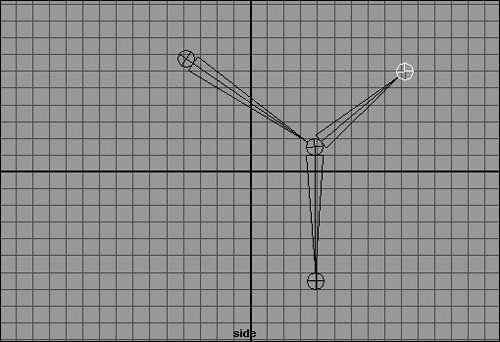
| 4. | Choose Window > Hypergraph to view the resulting hierarchy.
Note that two joints are at the same level in the hierarchy and both are parented under the same joint (Figure 10.10).
Figure 10.10. Joint3 and joint4 are both children of joint2. That means that if joint2 is rotated, joint3 and joint4 rotate with it. 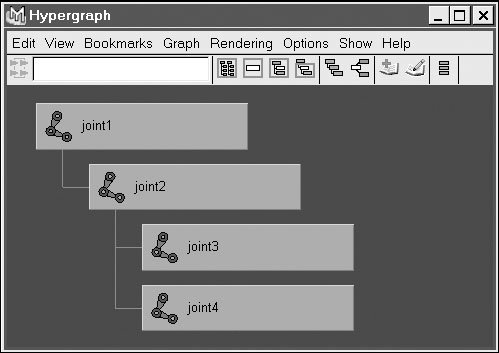
|
|