| Rendering is how you create an image or series of images from your 3D scene. Maya allows you to quickly render the current frame to view or save, or to set up a batch render to automatically render and save any number of frames. The output of both of these rendering methods will vary depending on the options you select in the Render Settings window. The Render Settings window includes a Common tab that allows you to set options common to all of Maya's renderers. It also includes a tab for the settings that are specific to the current renderer. At the top of the Render Settings window, you can switch to any of Maya's four renderers: Maya Hardware, Maya Software, Maya Vector, or Mental Ray. Before you render your scene, you should save it and set your project. Doing so ensures that the rendered images will be saved in the correct folder. For more information on setting the project, see Chapter 1, "Maya Basics". Maya's FCheck program allows you to view rendered images and image sequences. You can also use image-editing software like Photoshop to view and edit single images, or compositing software like After Effects for image sequences. To render the current frame: - Choose Render > Render Current Frame.
or
- In the Status Line, click the Render button
 . .
The current frame is rendered and displayed in the Render View (Figure 16.34).
Figure 16.34. The Render View window allows you to view and save a rendered frame. 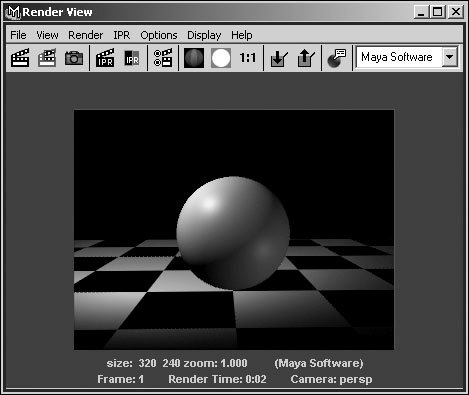
To batch render: - Choose Render > Batch Render.
The status of the render is displayed in the command feedback line (Figure 16.35).
Figure 16.35. You can see the status of a batch render in the command feedback line. 
When the render is completed, you can find the rendered image(s) or animation file in the project's images folder (Figure 16.36).
Figure 16.36. A batch render creates one or more files in the current project's images folder. 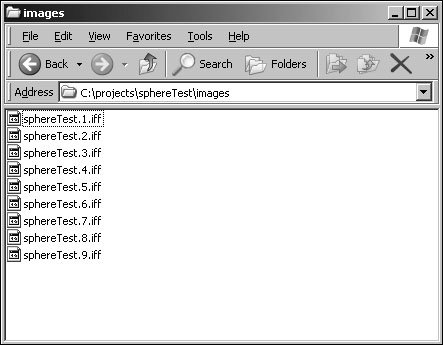
To view a rendered image in FCheck: 1. | Choose File > View Image (Figure 16.37).
Figure 16.37. You can access FCheck from Maya's File menu. 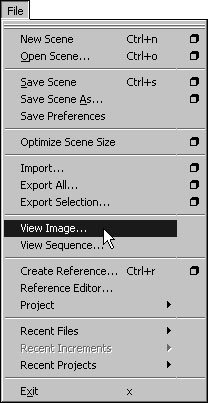
An Open File dialog is displayed.
| 2. | Navigate to the current project's images folder.
| 3. | Select the image file, and click Open.
FCheck opens to display the image (Figure 16.38).
Figure 16.38. FCheck allows you to view rendered images and image sequences. 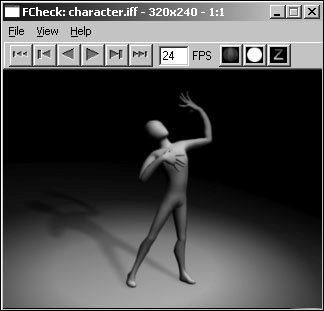
|
To view a rendered image sequence in FCheck: 1. | Choose File > View Sequence.
An Open dialog is displayed.
| 2. | Navigate to the current project's images folder.
| 3. | Select the first image in the sequence, and click Open (Figure 16.39).
Figure 16.39. When you select and open the first image in a sequence, FCheck automatically finds the other images based on their name. 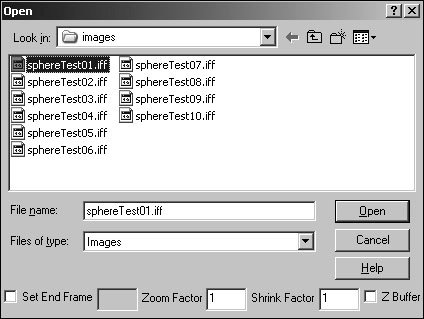
FCheck loads the animation and then attempts to play it back at the current frame rate (FPS). If your animation appears too slow or too fast, you may need to adjust FCheck's FPS to match the intended frame rate of your animation.
If the animation is still too slow, your computer's hardware may not be capable of displaying the animation at full speed. Try closing all other programs to free up memory, or press  . This will play the animation in real time by skipping frames that can't be displayed quickly enough. Your animation may appear jerky, but it will play at the correct speed. . This will play the animation in real time by skipping frames that can't be displayed quickly enough. Your animation may appear jerky, but it will play at the correct speed.
|
 Tips Tips
You can click and drag in the FCheck window from left to right to scroll through an animation. You can use FCheck to view a batch render in progress by choosing View Batch Render from Maya's Render menu.
Common render settings The Common tab of the Render Settings window allows you to view and set various render options (Figure 16.40). The upper portion of the tab displays the folder that files will be rendered to, the filename (and range, if rendering an image sequence), and the image size. Below this, you can adjust a number of render settings common to all renderers. For example, if you want to render from a camera you've created, you should select it from the Camera drop-down menu. To batch-render a sequence of frames, you need to set the first and last frames. Figure 16.40. The top portion of the Common tab displays information about the file(s) that will be rendered, and the lower portion allows you to change various settings. 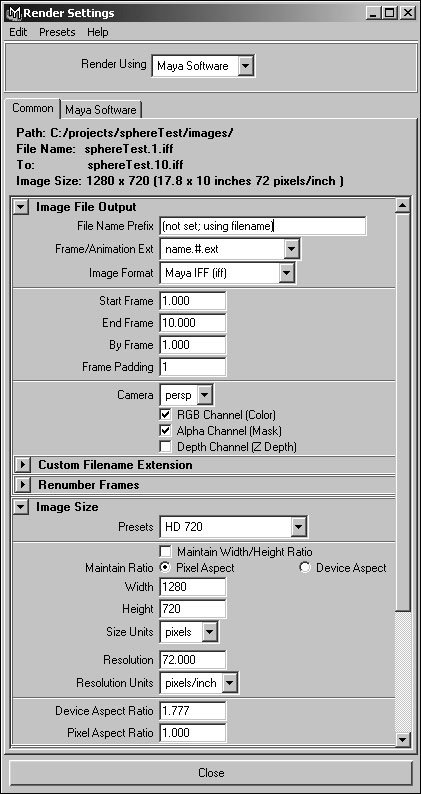
You can also use the Common settings to change the filename and file format that will be used for your rendered images. Image formats like Maya's IFF allow you to render single images or image sequences for compositing in another program, whereas animation formats like AVI let you create a single file that contains your entire animation. You'll also need to choose a resolution at which to render. The resolution of an image is its size in pixels, usually given in the format [width] x [height]: for example: 640x480, which is read as 640 by 480. The higher the resolution, the longer the image will take to render. The resolution you should choose for your images depends on their final medium. If you're creating a small image for a Web site, you might use the 320x240 preset. If you plan to put the images on NTSC video, you'll probably use 720 by 486. For printing, however, you're likely to need a much higher resolution. If you want to print an 8-by-10-inch image at 300 dpi (dots per inch), you'll need a resolution of 2,400 by 3,300 pixelswhich will take a long time to render. - To open the Render Settings window:
- Choose Window > Render Editors > Render Settings.
or
- In the Status Line or the Render View toolbar, click the Render Settings button
 . .
The Render Settings window opens.
To change the Common settings: 1. | Open the Render Settings window.
The Common tab is displayed by default.
| 2. | In the File Name Prefix field, type a file name to use for the rendered images.
| 3. | Click the Frame/Animation Ext drop-down menu, and select name.#.ext (Figure 16.41).
Figure 16.41. The pound sign (#) in the naming scheme you choose will be replaced by the frame number of each rendered image. 
This option allows you to render a sequence of images. The pound sign (#) will be replaced with the frame number of each image.
| 4. | Select a format from the Image Format drop-down menu.
Maya IFF is the default, but not all programs can read this format. You may want to choose something more common, like Tiff or Targa.
| 5. | Set the start and end frames, as determined by the duration of your animation.
| | | 6. | Change Frame Padding to 4.
This will put zeros in front of the number in each image name, so that each number is four digits long. Without frame padding, your images may be listed in the wrong order when sorted by name.
| 7. | Choose the camera view from which you want to render (Figure 16.42).
Figure 16.42. If you want to render your scene from a camera you've created, you need to select it from the Camera drop-down menu. 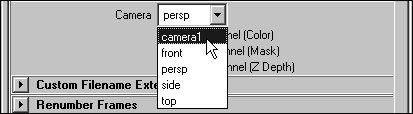
Even if you've created new cameras, perspective is still the default camera in the Render Settings window. It's a common mistake to overlook this option and render the wrong camera view.
| 8. | From the Presets menu in the Image Size section, choose CCIR 601/Quantel NTSC (Figure 16.43).
Figure 16.43. Maya provides a wide variety of Image Size presets. You can also adjust the image size settings manually. 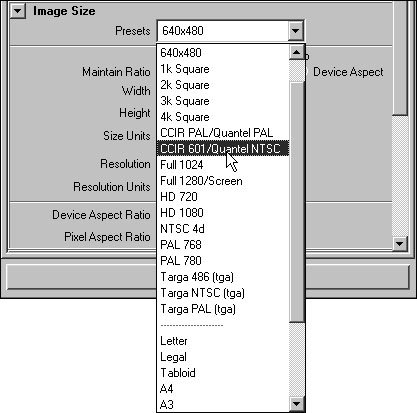
This is a good choice if your image is going to end up on NTSC video.
| 9. | Close the Render Settings window, and choose Batch Render from the Rendering menu to render with the new settings.
|
|