| Maya uses six light types: ambient, area, directional, point, spot, and volume. You can combine these light types to produce just about any lighting scenario. A Maya scene must include at least one light, or objects will be in complete darkness. Most scenes use many different kinds of lights, because each is suited to different uses. The following are the different light types and some of their common uses: Ambient Produces a uniform, non directional light throughout the scene (Figure 15.15). You should keep this type of light to a minimum, because the more you use it, the flatter and more devoid of contrast the scene will appear. Examples of ambient light include: Figure 15.15. The Ambient Light icon.  Area Two-dimensional, rectangular light source that emits light from the entire rectangle in the direction of the normal (Figure 15.16). Examples of area light include the following: Figure 15.16. The Area Light icon.  Directional Parallel light rays that illuminate the whole scene evenly from one specific direction (Figure 15.17). Examples of directional light include: Figure 15.17. The Directional Light icon.  Point Radiates light out from its center in all directions. The farther an object is from this light, the less it's illuminated (Figure 15.18). Examples of point light include: Figure 15.18. The Point Light icon.  Spot Lights an area within a variable cone shape. The light comes from the center point and travels in a specified direction (Figure 15.19). Examples of spot lights include: Figure 15.19. The Spot Light icon.  Flashlights Street lamps Headlights Spotlights
Volume Lights an area within a user-defined volume (Figure 15.20). Figure 15.20. The Volume Light icon.  Examples of volume light include:
All light types have the following common attributes. If you change the light type, only these attributes will be preserved (Figure 15.21): Figure 15.21. Common light attributes: Type, Color, Intensity, and Decay Rate. 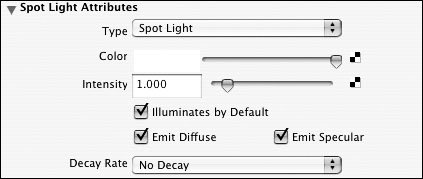
Type sets the kind of light: ambient, area, directional, point, spot, or volume. You can change this attribute at any timefor example, from a point to a spot. Color sets the color of the light and is usually very unsaturated. Low values make the light seem dimmer. Image maps may be added to vary the color of the light. Intensity sets the brightness of the light. If set to negative values, it sets the darkness of the light. For best results, start small and work your way up (Figure 15.22). Figure 15.22. The top scene is lit with a light at low intensity; the bottom scene is lit with the same light at a highintensity setting. 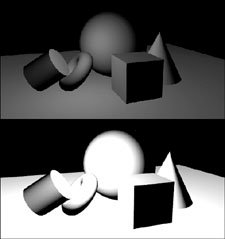 Decay Rate controls how quickly the light's intensity decreases over distance. When you change this setting, you must also raise or lower the intensity of the light to make up for the decay-rate change. This isn't an attribute of the ambient, directional, or volume lights (Figure 15.23). Possible values are as follows: Figure 15.23. After the wireframe of the scene, the decay rates are shown top to bottom: no decay, linear, quadratic, and cubic. 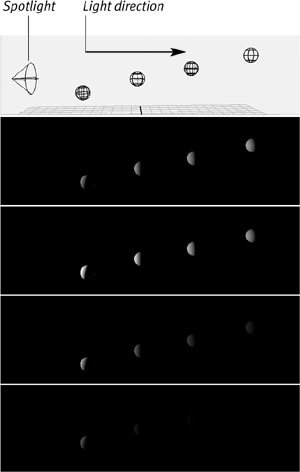 No Decay Light has the same intensity regardless of distance. Linear Decay The light's intensity diminishes with distance less abruptly than with Quadratic and Cubic decay. Quadratic Decay The light's intensity diminishes at a rate between that of Linear and Cubic decay. This setting is closest to real-world light decay. Cubic Decay The light's intensity diminishes most abruptly, substantially more abruptly than with Linear and Quadratic decay.
Ambient light Ambient light is indirect light that is present without having an obvious source. Because it has bounced off several objects since leaving its original source, ambient light is usually fairly dim. This type of light illuminates the dark sides of objects and lets you see on a cloudy day. In Maya, ambient lights illuminate all objects evenly, removing shadows. This behavior simulates the diffuse light in a room but also removes shadows and shading you may want. As such, you should use ambient light sparingly. To create an ambient light: 1. | Open the practice.mb file.
| 2. | Choose Create > Lights > Ambient Light (Figure 15.24).
Figure 15.24. Select the box next to Ambient Light. 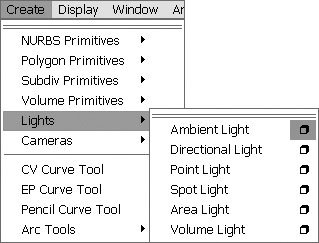
| 3. | Select your Camera view, and click the IPR Render button  . .
| 4. | In the Render view, select an area of your image to update.
| 5. | In the Attribute Editor, click the swatch beside the Color attribute (Figure 15.25).
Figure 15.25. Click the swatch beside the Color attribute. 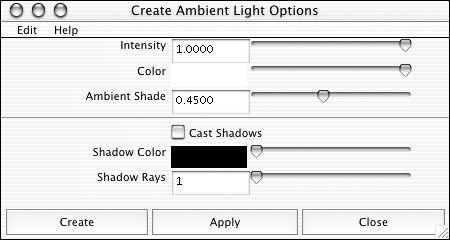
The color wheel opens.
| 6. | Click in the color wheel to select a color for the light (Figure 15.26).
Figure 15.26. Select a color from the color wheel, which in Maya looks more like a color block. 
Notice how much effect the light color has on the objects.
| 7. | Click Apply to lock in the color.
|
 Tips Tips
The Ambient Shade attribute of the ambient light affects the direction of the light source. If Ambient Shade is set to 0, light comes from all directions (Figure 15.27). If it's set to 1, light comes from the source itself, acting similarly to a point light (Figure 15.28). You must be careful when adjusting this attribute because the lower the number, the flatter the image appears. Figure 15.27. The Ambient Shade attribute is set to 0, flattening the scene. 
Figure 15.28. The Ambient Shade attribute is set to 1, making the light similar to a point light. 
To change an ambient light's Ambient Shade attribute: 1. | Start where the last task left off, with an ambient light selected and your IPR render refreshing a region.
| 2. | Set the Ambient Shade attribute to 0 (Figure 15.29).
Figure 15.29. Set the Ambient Shade attribute to 0. 
The 0 value sends light evenly over the entire scene. Notice that the objects blend together flatly (Figure 15.27).
| 3. | With the light still selected, go to the Attribute Editor and change the Ambient Shade attribute to .7.
This value makes the ambient light act similarly to a point light, so that its intensity fades slightly as the distance from the light source increases.
| 4. | In the Attribute Editor, set Intensity to .25 or less (Figure 15.30).
Figure 15.30. Set the intensity to .25. 
This brings down the intensity of the ambient light and keeps the flattening of the scene to a minimum.
The scene is very dark. Ambient lights are rarely used alone.
|
Area lights Area lights produce light evenly from a rectangle. They're best for situations that call for lighting that is evenly bright throughoutfor example, florescent lighting. Area lights can also be used for bounce lights. For instance, a very bright shaft of sunlight coming in through a window creates a hotspot on the wall. Setting up an area light on that wall simulates the reflection of the light from that specific spot. Area lights take longer to render than the other light types, and using them extensively in a scene can slow rendering. To create an area light: 1. | Open the practice.mb file.
| 2. | In the Hypershade, select Area Light in the Lights section of the Create bar (Figure 15.31).
Figure 15.31. Select Area Light in the Lights section of the Create bar. 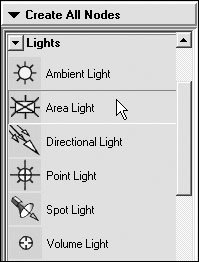
| 3. | Scale the light to the size you want the area light to be.
The position and direction of the area light indicate where it will illuminate.
| 4. | Move and rotate the light around the scene until the surface normal points at the object or area you want to light (Figure 15.32).
Figure 15.32. Point the surface normal at the area you want to light. 
| 5. | Click the IPR Render icon .
The scene is illuminated evenly in all areas directly under the light (Figure 15.33).
Figure 15.33. Objects under an area light are evenly illuminated. The brightness drops off after the edges of the light. 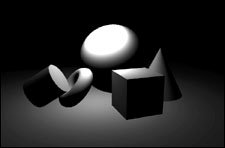
| 6. | Scale the light to a different size, such as a very narrow strip.
The light in the scene is reduced accordingly (Figure 15.34).
Figure 15.34. Scaling the area light to a strip produces a tube of light. 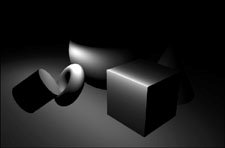
|
Directional lights Directional lights are a lot like area lights, but they're infinitely large. They produce a wall of light in one direction, evenly illuminating the entire scene with light from that direction. The position of a directional light doesn't matter, because the light it sheds is entirely uniform and isn't obscured by objects. Directional lights work great for representing sunlight and moonlight. They also work well when your objects are far from your light source. In these cases, the light rays coming from the source to your scene are nearly parallel. As a result, the characters aren't likely be struck by light from a different angle because they're moving. Directional lights also make good fill lights, because they evenly illuminate without the flattening effect of an ambient light. To create a directional light: 1. | Open the practice.mb file.
| 2. | Choose Create > Lights > Directional Light.
A directional light is created at the origin of the scene. The default direction points down the z axis in the negative direction (Figure 15.35). The perpendicular light rays follow a horizontal direction by default (Figure 15.36).
Figure 15.35. The default position of the directional light. 
Figure 15.36. The perpendicular light rays of the directional light follow a horizontal direction by default. 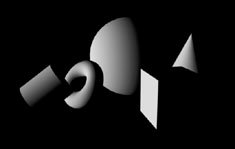
| 3. | Create an IPR render of your scene, and select a region for tuning.
| 4. | Select the directional light by clicking it. Rotate the light around the axes until the arrows point in the direction you want the light to follow (Figure 15.37).
Figure 15.37. Point the arrows in the direction you want the light to follow. 
Notice the light illuminates all objects from the same direction, even objects that are behind it.
| 5. | Position the light inside an object.
All the objects are still illuminated. Directional light rays aren't obscured by objects.
|
Tips
Point lights Point lights are great for bulbs and fires. They're also useful for adding a little light to a dark corner, removing light from an overlit area, or faking reflected light on an object. Point lights illuminate in all directions and can be reasonable alternatives to area lights if you want to save render time. The falloff on point lighting makes smooth blending easier than with other light types, such as spot lights. To create a point light: 1. | Open the practice.mb file.
| 2. | In the Hypershade, click the Point Light icon in the Lights section of the Create bar.
The point light appears in the Work Area of the Hypershade window (Figure 15.38).
Figure 15.38. Click the Point Light icon to create a new light to work with in the Hypershade's Work Area panel. 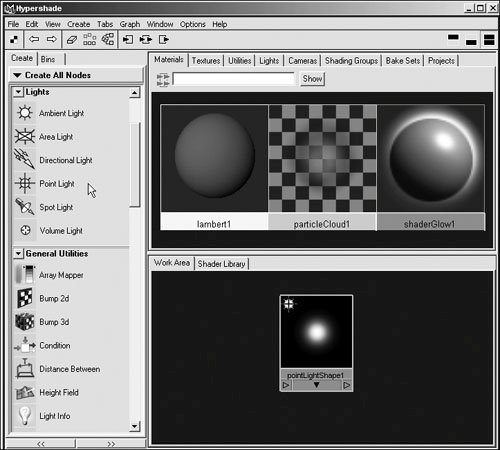
| 3. | Double-click the Point Light icon in the Work Area to open the Attribute Editor.
| 4. | Set the Color and Intensity attributes, and then close the Attribute Editor.
| 5. | Click the light to select it, and move it above the ground plane to keep it from being obstructed by the plane (Figure 15.39).
Figure 15.39. Move the light above the ground plane. 
| 6. | Create an IPR render of your scene, and select an area for updating.
| 7. | In the Attribute Editor, adjust the Decay Rate value to Quadratic (Figure 15.40).
Figure 15.40. Decay rates increase exponentially. Quadratic makes the light bright nearby and dim for quite some distance away. 
The light dims rapidly now. You can use the decay rate to limit the effect of a point light to a local area.
|
Tips
Spot lights Spot lights are great for areas where you want to focus light. You can use them as stage or theater spotlights, headlights, or any cone-shaped light source. Very wide-angle spot lights are good alternatives to point lights or directional lights due to the increased control you have over light direction and falloff. Spot lights generate light in a cone. You can adjust the angle of the cone as well as how focused it is. Most important, you can aim the light wherever you want. To create a spot light: 1. | Open the practice.mb file.
| 2. | Click the Spot Light icon  in the Rendering shelf to create a spot light at the origin of the scene. in the Rendering shelf to create a spot light at the origin of the scene.
| 3. | Set the Object Pick mask to Rendering objects only  , and swipe across the Spot Light icon at the origin to select it (Figure 15.41). , and swipe across the Spot Light icon at the origin to select it (Figure 15.41).
Figure 15.41. Set the Object Pick mask to select lights only. 
If the Object Pick mask is selected correctly, only the light will be selected.
| 4. | Select the Show Manipulator tool by pressing  or selecting its icon or selecting its icon  in the toolbar. in the toolbar.
| 5. | Pull up the y axis translation manipulator on the spot light to raise it above the ground (Figure 15.42).
Figure 15.42. Pull up the y-axis translation manipulator on the spotlight to raise it above ground. 
Notice when you're in the Show
Manipulator tool that the end of the spot light stays in its original position, forcing the light to point at it.
| 6. | Select the center square of the end manipulator, and move it to the position where you want the light to point (Figure 15.43).
Figure 15.43. Move the end manipulator into a new position. 
| 7. | Create an IPR render of your scene, and leave it open so you can adjust the light as you read about the attributes next.
|
A spot light has a number of attributes that you can change. Following are definitions of some of these attributes: Cone Angle The larger the number you input here, the wider the cone (and thus the illuminated area) will be (Figure 15.44). Figure 15.44. The default cone angle on top; the same light position but with a larger cone angle on the bottom. 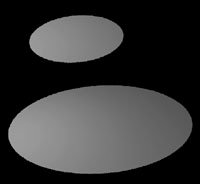 Penumbra Angle Adjusting the penumbra angle softens the edge of the spot light by blurring it. A negative number blurs inside the edge of the cone; a positive number blurs outside the edge of the cone (Figure 15.45). Figure 15.45. Adjusting the penumbra angle blurs the edge of the spotlight. The top light has a setting of 0; the bottom light has a setting of 7. 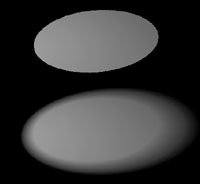 Dropoff This attribute adjusts the intensity of the light from its center out to its edge. Raising the value results in a soft gradation from the center to the edge (Figure 15.46). Figure 15.46. Dropoff adjusts the intensity of the light from its center out to its edge. The light at the top has a default setting of 0; the light at the bottom has a setting of 8. 
Volume light Volume lights fill an area with light. By default, they illuminate at full intensity at their center and fade off at the edge. Volume lights brighten areas with greater control than a point light, and they're also useful for creating shafts of light. To create a volume light: 1. | Open the practice.mb file.
| 2. | Choose Create > Lights > Volume Light (Figure 15.47).
Figure 15.47. Select Lights > Volume Light from the Create menu to create a volume light at the scene's origin. 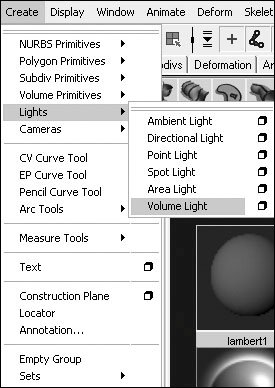
| 3. | Scale the volume light until it surrounds the objects you want to illuminate (Figure 15.48).
Figure 15.48. The volume light representation is similar to a sphere and should be placed around the objects you want to illuminate. 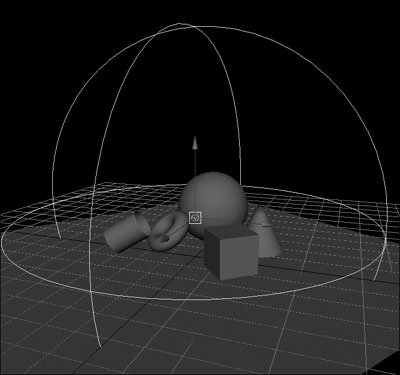
| 4. | Create an IPR render of your scene, and select an area for updating.
The area is illuminated as if it were lit by a point light.
| 5. | In the Attribute Editor, change the shape of the light to Box.
The light now sheds light in a square area (Figure 15.49).
Figure 15.49. Changing the shape of the volume light can be useful in limiting the objects it illuminates. 
| 6. | Scale the light down on one axis.
Now there is a plane of light such as you might expect to come from under a door.
|
|