| When you bind skin, you make the surfaces move with the bones. In the beginning the process may seem mysterious; however, it's really little more than a combination of actions you already know. We've learned that when you parent a surface to a joint, it rotates with that joint. We also know that a cluster is a set of points that have weight. Binding skin creates a cluster composed of the points nearest to a bone, and then parents that cluster to the bone. After this is done, you can adjust the weight to make the points rotate more or less with a specific joint (Figure 11.21). Figure 11.21. Adjusting a joint's cluster weights can modify the amount of influence a joint has on a CV. The less influence the joint has, the less movement the CV has, in turn lessening the crease around the joint area. 
As mentioned earlier, there are two kinds of bindingrigid and smooth. When you use rigid bind, each point can be a member of only one joint. When you use smooth bind, each point is a member of more than one joint. Its weight is spread out among two or more joints, but the total weight always adds up to 1 (Figure 11.22). Figure 11.22. The cylinder on the left has been smooth bound. The weights of the selected points show up in the Component Editor. Their weight is spread among the three joints; however, they are primarily influenced by joint2. 
To bind skin using rigid bind: 1. | From the Create menu, select NURBS Primitives > Cylinder.
| 2. | Increase Scale Y to 8 (Figure 11.23).
Figure 11.23. On the left is the cylinder with a Y Scale of 8; on the right is the Channel Box, which provides a convenient place to change the scale to a precise number. 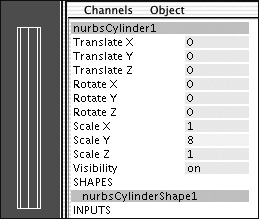
| 3. | In the Channel Box, select makeNurbCylinder1.
| 4. | Increase Spans to 8 (Figure 11.24).
Figure 11.24. On the left is a cylinder with eight spans; on the right is the Channel Box with attributes for this cylinder. 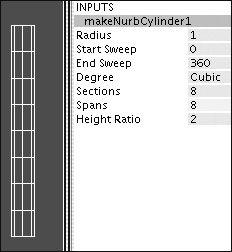
Bound surfaces require extra detail, particularly in the areas where they bend.
| 5. | Create three joints in the surface (Figure 11.25).
Figure 11.25. Three joints are placed inside the cylinder, which produces two bones. 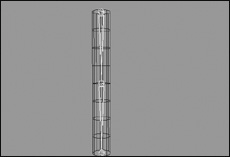
| 6. | Select the joints, and  -select the surface. -select the surface.
| 7. | From the Skin menu select the box next to Bind Skin > Rigid Bind.
The Rigid Bind Skin Options dialog box opens.
| 8. | Select Complete Skeleton in the "Bind to" menu, and check Color Joints next to Coloring (Figure 11.26).
Figure 11.26. The Rigid Bind Skin Options dialog box is set to Bind to Complete Skeleton and Color Joints. 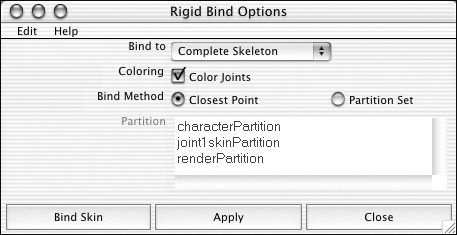
Complete Skeleton means that the skin will be bound to every joint in the hierarchy (as opposed to just the selected ones). Color Joints means that the joints and the points that become members of those joints will be color-coded the same once the skin is bound.
| 9. | Click the Bind Skin button.
| 10. | Select the middle joint and rotate it.
The lower half of the surface moves with the bone (Figure 11.27).
Figure 11.27. Only the lower half of the surface rotates with the middle joint. 
|
 Tips Tips
Any kind of surface can be bound to a skeletonNURBS, polygon, or subdivision. You can also bind a lattice, or just a selection of points. You can bind a whole character with multiple surfaces at once. To do this, select the root joint of the skeleton and all of the surfaces involved, then bind the skin.
A point becomes a member of a specific joint when you use rigid bind; however, sometimes it can become a member of the wrong joint. The Edit Membership tool allows you to change the joint that the point belongs to. To edit the membership of a point: 1. | Using the bound cylinder from the previous task, "To bind skin using rigid bind," select the middle joint.
| 2. | From the Deform menu, select Edit Membership Tool.
The cursor changes.
| 3. | Click the middle joint.
The points that are members of that joint are selected.
| 4. | -select the middle row of points (Figure 11.28).
Figure 11.28. The Edit Membership tool allows you to change which joint the points are members of. Here, some of the points that were not members of the middle joint are being added to that joint. 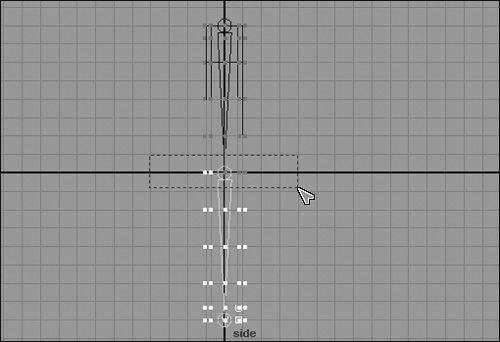
This adds points to the membership of the middle joint, and they, too, are selected. If you do not hold down , this will not work.
| 5. | Select and rotate the middle joint.
The points that were just added now rotate with the joint (Figure 11.29).
Figure 11.29. When a joint is rotated, all the points that are members of that joint rotate with it. Therefore, the points we just added rotate along with the joint as well. 
|
Tips If you  / / -select points while using the Edit Membership tool, they will be removed from the joint's membership. However, if they are not added to a joint, the points will be left behind when the character moves. -select points while using the Edit Membership tool, they will be removed from the joint's membership. However, if they are not added to a joint, the points will be left behind when the character moves. The Edit Membership tool can be used for any deformer, such as a lattice or a blend shape.
To edit the weights of rigid-bound points: 1. | Using the the bound cylinder from the previous tasks, select the row of points in the middle joint (Figure 11.30).
Figure 11.30. Some of the CVs of the surface are being selected so that their weight can be changed. Be sure you're in component mode when you try to select CVs. 
| 2. | From the Window menu, select General Editors > Component Editor.
| 3. | In the Component Editor, click the Rigid Skins tab.
| 4. | Click the top numeric field and drag down to highlight all of the weights.
In this case the column is labeled joint2Cluster1. The column is high-lighted (Figure 11.31).
Figure 11.31. In the Component Editor, click and drag to select all the weights in the column. This allows you to conveniently change all of their weights at once. 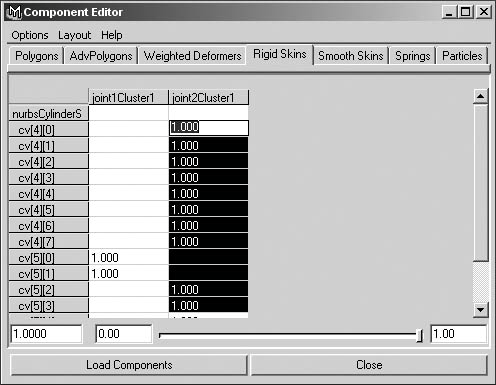
| 5. | Type .5 in the field.
All of the weights for the selected points become 0.5. The points now rotate half the distance of the joint, creating a smoother shape around the joint (Figure 11.32).
Figure 11.32. The selected points of the cylinder on top have not yet been changedthey still have a weight of 1. On the bottom cylinder, the selected points have a weight of 0.5. 
|
Sometimes the area where a surface bends will seem too rounded and you'll want it to be more angular, as with an elbow. A flexor provides an easy way to adjust the rounding and creasing that occurs on a surface near a joint. To create a flexor: 1. | Using the rigid-bound cylinder from the previous tasks, select the middle joint.
Make sure that the joint to which you want to add the flexor is straightthat is, its rotations are set to zero.
| 2. | From the Skin menu, select Edit Rigid Skin > Create Flexor.
| 3. | Click Create.
A lattice is created around the joint (Figure 11.33).
Figure 11.33. Create Flexor makes a lattice appear around the selected joint. It has special attributes that other lattices do not have, such as Creasing and Rounding used to form an elbow or knee. Be sure to add a flexor only when the joint is straight; otherwise, you'll get undesirable results. 
| 4. | Rotate the joint about 90 degrees (Figure 11.34).
Figure 11.34. A flexor has been put on the middle joint. As the joint is rotated, the flexor improves the shape of the surface where it is bent. 
When the joint is rotated, the flexor reshapes the surface automatically to prevent creasing.
| 5. | Select the lattice that appeared when the flexor was created.
| 6. | In the Channel Box, click Rounding.
| 7. | With the middle mouse button, drag from left to right in the panel until the bent area of the surface is more angular and elbow-shaped (Figure 11.35).
Figure 11.35. By adjusting the Rounding attribute, you can make the bent portion more angular. This is commonly used on things like elbows, knees, and finger joints. When the joint is rotated to straight again, the surface returns to its original shape. 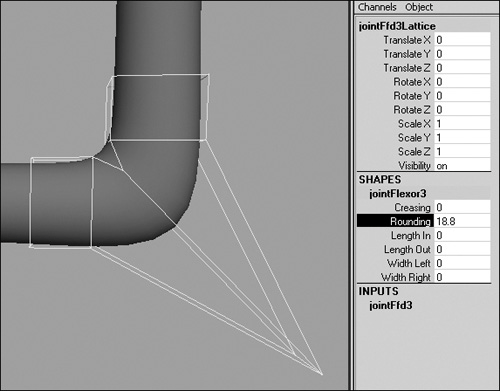
|
Tip If you check Position the Flexor in the Create Flexor Options window, it will select the group that the lattice and lattice base are in. This allows you to reshape the lattice by moving and scaling the group without having it affect the shape of the surface. Once you deselect this group, the lattice will go back to deforming the surface.
To bind skin using smooth bind: 1. | From the Create menu, select NURBS Primitives > Cylinder.
| 2. | In the Channel box, increase Scale Y to 8.
| 3. | Select makeNurbCylinder1.
| 4. | Increase Spans to 16.
Bound surfaces require extra detail, particularly in the area where they bend.
| 5. | Create five joints in the cylinder (Figure 11.36).
Figure 11.36. Five joints are placed inside the cylinder. Smooth bind lends itself to parts of characters that have many joints and need to bend smoothly. 
| 6. | Select the surface, and -select the root joint.
| 7. | From the Skin menu, select Bind Skin > Smooth Bind.
| 8. | Select the top joints, and then -select the rest of the joints one by one.
| 9. | Rotate all the joints simultaneously.
The surface moves with the joints and bends smoothly (Figure 11.37).
Figure 11.37. This is a smooth bound cylinder. 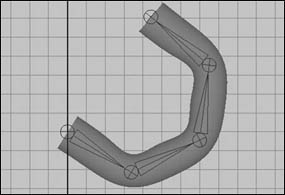
|
To paint skin weights on a smooth-bound surface: 1. | Create a polygon shape from a cubeby scaling it with Extrude Face, and then from the Polygon menu, select Smooth (Figure 11.38). (See Chapter 8, "Polygons.")
Figure 11.38. Here are four stages in creating the surface. First, create a polygon cube and scale it. Extrude the side face and scale, and move it to the start point of the arm. Extrude again and pull the arm out. Finally, smooth the surface with divisions set to 3 and continuity set to 0.35. 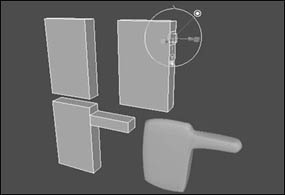
The shape roughly represents an arm extending from a torso.
| 2. | Create four joints in the surface (Figure 11.39).
Figure 11.39. Starting from the center of the chest, four joints are placed inside the surface. 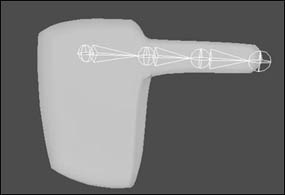
| 3. | Select the root joint, and -select the surface.
| 4. | From the Skin menu, select Bind Skin > Smooth Bind.
| 5. | Select and rotate the second joint.
It bends too much of the torso portion of the surface (Figure 11.40).
Figure 11.40. When the shoulder is rotated, it affects too much of the torso. Had there been more joints placed in the torso, this would not have been as much of a problem because the points would stick to the joints they were near. It's common practice to place rib joints in a character for this purpose. 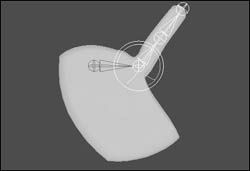
| 6. | Select the surface.
| 7. | Right-click the surface and select Paint > skinCluster > skinCluster1 - paintWeights from the Marking menu (Figure 11.41).
Figure 11.41. Right-click to open the Marking menu and select the Paint Skin Weights tool. 
The Paint Skin Weights Tool is activated.
| 8. | Double-click the Paint Skin Weights tool button in the toolbox  . .
This opens the Tool Settings window for Paint Skin Weights. Under Influence, joint1 should be selected. Under Paint Weights, Replace should be the Paint Operation and Value should be 1.0000 (Figure 11.42).
Figure 11.42. The options shown are the default settings for the Paint Skin Weights tool; they also happen to be what we need in this instance. 
| 9. | Adjust the brush size by holding down  and dragging from right to left with the middle mouse button. and dragging from right to left with the middle mouse button.
| 10. | Paint all over the surface of the torso (Figure 11.43).
Figure 11.43. When the surface is painted, the points get a weight of 1 with the first joint, so they do not move with the shoulder joint. Be sure to get all around the surface with the brush. 
The torso moves back to its original shape and turns white. This is because all of the weight is being placed on joint1 and taken away from joint2.
| 11. | Change Paint Operation to Smooth.
| 12. | Click Flood several times.
The area where the surface bends is smoothed (Figure 11.44).
Figure 11.44. Flooding with Smooth creates a smoother connection at the shoulder. 
|
To detach a surface from joints: 1. | Create a bound skeleton (see "To bind skin using rigid bind," earlier in this chapter).
| 2. | Select the geometry that you want to detach from the skeleton (Figure 11.45).
Figure 11.45. Select only the surface, not the joint, for the Detach Skin command to work correctly. 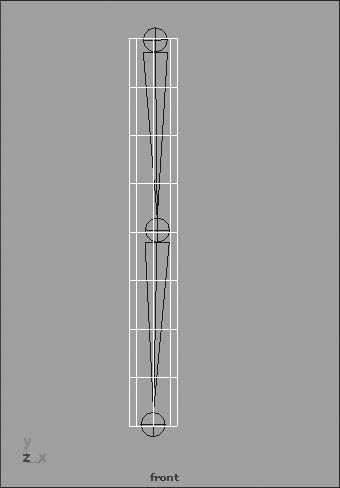
| 3. | From the Skin menu, select Detach Skin (Figure 11.46).
Figure 11.46. Select Detach Skin to separate the surfaces from the bones. 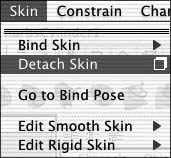
The geometry becomes detached from the skeleton.
| 4. | Select the middle joint and rotate it.
The joint moves but the surface remains in place (Figure 11.47).
Figure 11.47. Once detached from the surface, joints no longer affect the geometry. 
|
When you bind geometry to a skeleton, Maya remembers the joints' rotation at the time of binding: This rotation is referred to as the bind pose. When animating, there will be times when you want the joints to align with the original rotationthat is, the rotation that existed when you bound the geometry to the skeleton. You can reset joints back to this rotation by setting the joint(s) back to the bind pose. To set a rotated joint back to its bind pose: 1. | Select the joint you want to set to the bind pose (Figure 11.48).
Figure 11.48. Select the joint that you want to reset to its bind pose. 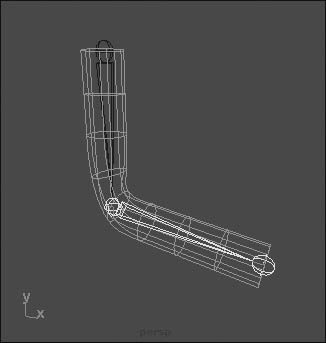
| 2. | From the Skin menu, select Go to Bind Pose.
The joint is set to the same rotation as it was when it was bound to the skeleton (Figure 11.49).
Figure 11.49. The selected joint returns to its original rotation amount. 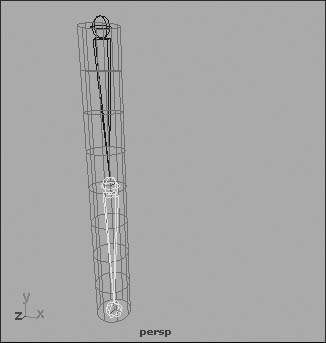
|
Parenting vs. Binding There are two ways to connect surfaces to geometry: parenting and binding. If you plan ahead when creating your character, you can save a lot of time by designing a segmented character, meaning a character that does not need to bend at the elbows or other major bending joints. A simple example would be a character wearing knee and elbow pads: You can individually parent each surface (the upper leg, bottom leg, and knee pad). Each of these objects can move individually without having to bend or deform, only rotate. By parenting geometry to a skeleton, you avoid having to create clusters and weigh individual points because the surfaces don't bend and deform with the character. If, however, your character requires realistic deformations in its joints, you must bind it to the skeleton to create that effect. And this poses all sorts of extra character-setup challenges. Take, for example, a character's armpit: Because the geometry near the outside of the breast and under the arm are so close to one another, Maya must guess which bone each point should be attached toand often its choice will differ from yours. This means you'll spend extra time separating the points that are moving with the wrong joint, and moving them onto the correct joints. |
|