| Each NURBS primitive has an associated set of attributes. Some attributes are common to all NURBS primitives, and others are specific to just one or two. By changing these attributes, you can alter a surface's appearance. You change all NURBS primitive attributes in the same way. In this section, we'll show you how to change the radius attribute of a NURBS primitive. You can follow the same steps to change other object attributes. The following section defines many of the NURBS primitives' attributes. The radius attribute is common to the NURBS primitive sphere, cone, cylinder, torus, and circle (Figure 3.21). Figure 3.21. The radius attribute, which is common to the objects shown above, makes the object larger. 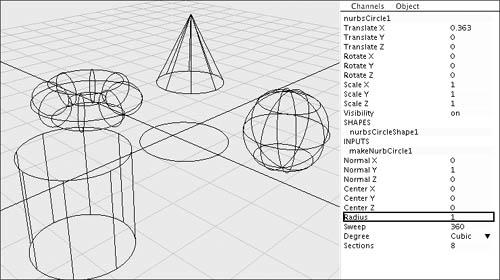
To set the radius of a NURBS primitive sphere, cone, cylinder, torus, or circle from the Create menu: 1. | From the Create menu, select the NURBS Primitives submenu.
| 2. | Select the box next to the name of the primitive for which you want to set the radiusin this case, the cylinder (Figure 3.22).
Figure 3.22. Select the box next to the name of the primitive for which you want to set the radius. 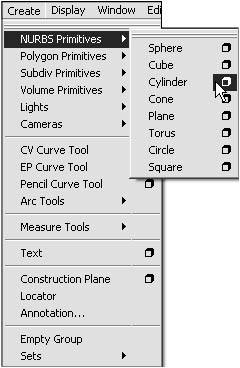
| 3. | In the selected primitive's Options dialog box, adjust the Radius slider to half the desired diameter of the primitive (Figure 3.23).
Figure 3.23. Adjust the Radius slider to half the diameter that you desire for the primitive. 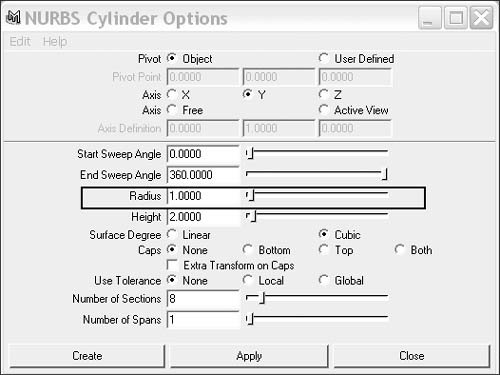
|
 Tip Tip
To change the radius of a NURBS primitive for an existing object: 1. | Select a primitive NURBS sphere, cone, cylinder, torus, or circle.
| 2. | Click the makeNurb title under the Inputs heading in the Channel Box to show the selected primitive's changeable attributes (Figure 3.24).
Figure 3.24. Select the makeNurb title under the INPUTS heading in the Channel Box (the cylinder is shown). 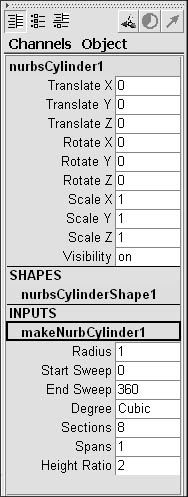
| 3. | Click once in the Radius field to select it (Figure 3.25).
Figure 3.25. Click the Radius field once to select it (Cylinder settings are shown). 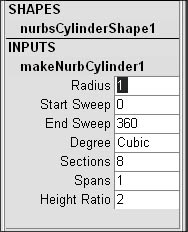
| 4. | Change the number to the size you want the radius to be.
| 5. | Press  to complete the radius change (Figure 3.26). to complete the radius change (Figure 3.26).
Figure 3.26. Before (left) and after (right) the radius change (the cylinder is shown). 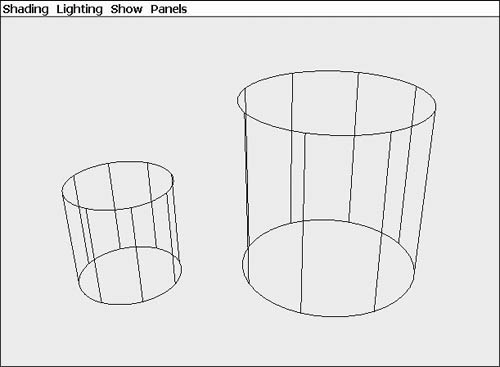
|
Tips You can also click the attribute's name (in our example, Radius) in the Channel Box, and then click and drag the middle mouse button left or right in the View window to interactively change the object's radius. If the construction history is turned off, the makeNurb node will not be available in the Channel Box. The makeNurb history will not be available on a duplicated object unless you go into the Edit > Duplicate options and check Duplicate Upstream Graph.
NURBS primitive attributes The following are some important NURBS primitive attributes, with their definitions. You set these in the Channel Box or in the object's Options dialog box. Radius The radius of an object is half of its diameter. Adjusting the radius scales the object proportionally on all three axes. Start Sweep Adjusting the start sweep causes the surface to separate from its end in a clockwise direction. The result is a slice of the surface, or a surface of less than 360 degrees (Figure 3.27). Figure 3.27. Adjusting the start sweep causes the beginning and end of the surface to be separated (the torus is shown). The picture on top shows the torus before the start sweep has been adjusted. The picture on the bottom shows the torus after the start sweep has been adjusted. 
End Sweep Adjusting the end sweep has a similar effect to adjusting the start sweep; however, instead of working clockwise from the end point, it works counterclockwise from the starting point to open the surface. The result is a slice of the surface, or a surface of less than 360 degrees. Minor Sweep Adjusting the Minor Sweep attribute, which is specific to the torus primitive, unfolds the surface along the U direction, creating (for a torus) a slice of the surface similar to a spool (rather than a full doughnut shape) (Figure 3.28). Figure 3.28. Adjusting the Minor Sweep attribute unfolds the surface along the U direction (the torus is shown). The picture on top represents the torus before minor sweep has been adjusted; the picture on the bottom shows the result of the adjustment. 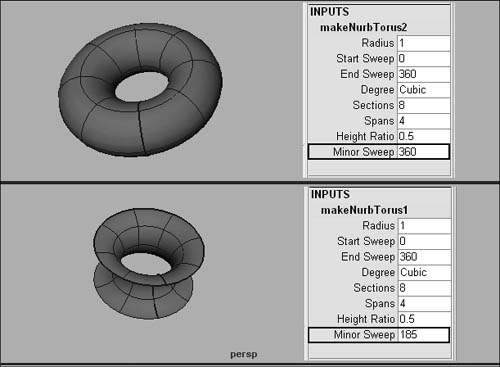
Degree A NURBS primitive can be linear or cubic. If the Degree attribute is set to Linear, the surface is planar and faceted. If the Degree attribute is set to Cubic (default), the surface is more curved and smooth (Figure 3.29). Figure 3.29. If the Degree attribute is set to Cubic (default), the surface will be curved (top). If the Degree attribute is set to Linear, the surface will be planar and faceted (bottom). 
Sections Adjusting the Sections attribute adds more detail to the surface in the U direction, which makes it easier to edit its shape (Figure 3.30). Figure 3.30. Adjusting the Sections attribute adds more detail to the surface in the U direction. 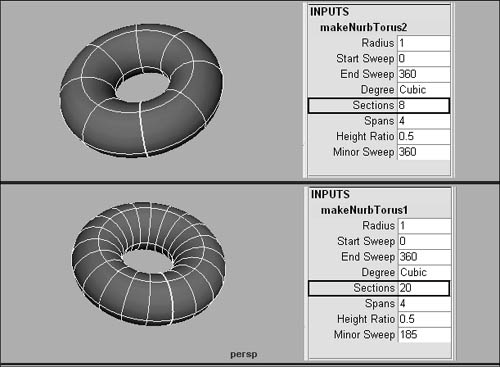
Spans Adjusting the Spans attribute adds detail to the surface in the V direction, which makes it easier to edit its shape (Figure 3.31). Figure 3.31. Adjusting the Spans attribute adds isoparms in the V direction. 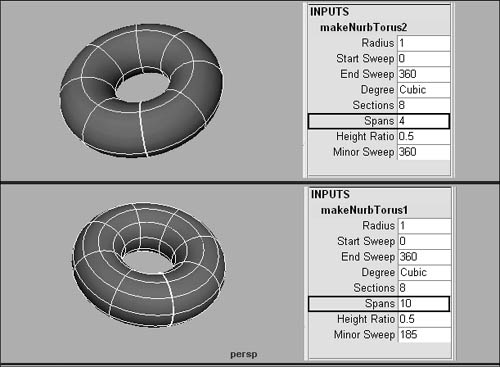
Height Ratio This is the ratio of the height in relation to the depth. If the height ratio is set to 2, the height will be twice the size of the depth. Length Ratio This is the ratio of the length in relation to the depth. If the length ratio is set to 2, the length will be twice the size of the depth. Patches U and Patches V Patches U and V are specific to the plane and cube primitives. Adjusting these attributes will increase the surface geometry in the U or V direction (Figure 3.32). Figure 3.32. Adjusting Patches U and Patches V attributes increases the surface geometry in the U or V direction. 
|