| Maya has two windows that are easily confused because their names are so similar, pane and panel. A pane is conceptually the same as a window pane. If you look inside a window with panes, you might see something different in each pane. The same is true here. A pane can hold a Front, Top, Side, or Perspective view, or a panel. A panel is a type of Maya window that helps with different Maya functions. For example, the Hypergraph and Outliner are panels that show all of the nodes in a scene, and the Graph Editor is a panel used to edit animation curves. Many of these panels can be opened in their own windows (Figure 2.6) or within a specific pane (Figure 2.7). One advantage to opening a panel inside a pane is the ability to then tap the  to minimize (Figure 2.8) or maximize (Figure 2.9) the pane. You can temporarily access the pane and then shrink it back down, gaining access to the other panes as well. to minimize (Figure 2.8) or maximize (Figure 2.9) the pane. You can temporarily access the pane and then shrink it back down, gaining access to the other panes as well. Figure 2.6. The Outliner is open in its own window. 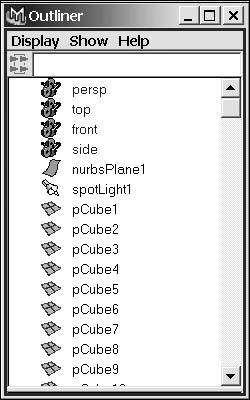
Figure 2.7. The Outliner is in one pane and can be enlarged and shrunk for convenience. 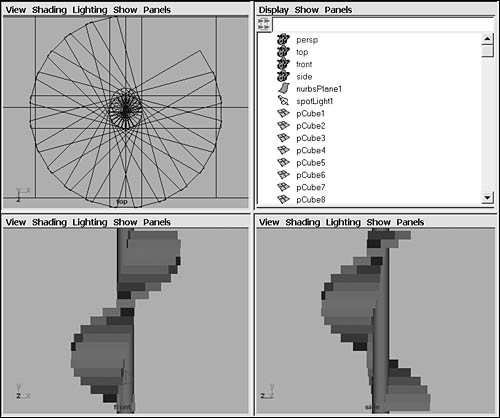
Figure 2.8. Minimizing a pane allows you to view multiple panes at once. 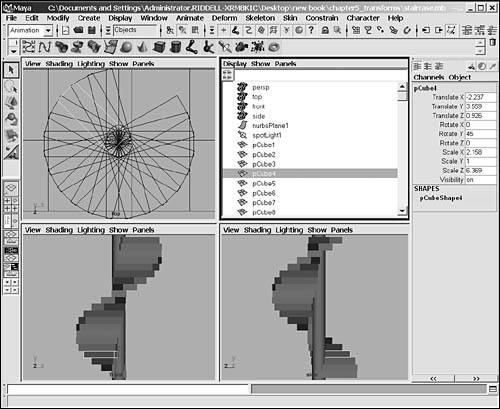
Figure 2.9. Maximizing a pane enlarges the view over any other panes, giving you more workspace within that pane. 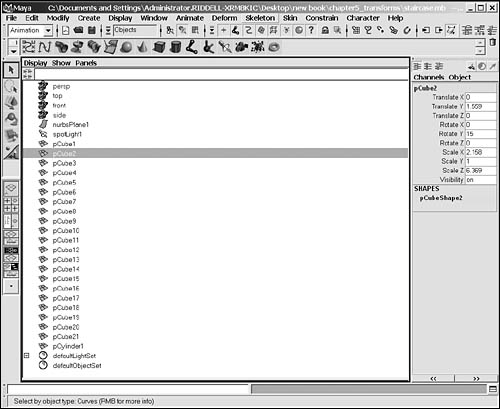
Maya's programmers understood that different users would want to work with Maya and its interface layout differently. With this in mind, they've provided many ways to change Maya's interface and layout. (When I talk about the layout, I'm referring to the number of panes the user is viewing and the specific panels and views that are placed within those panes, Figure 2.10). Figure 2.10. Layouts can be sized, saved, and changed to accommodate the user's current needs. The top image is a four-pane layout; the bottom image is a two-pane (side-by-side) layout. 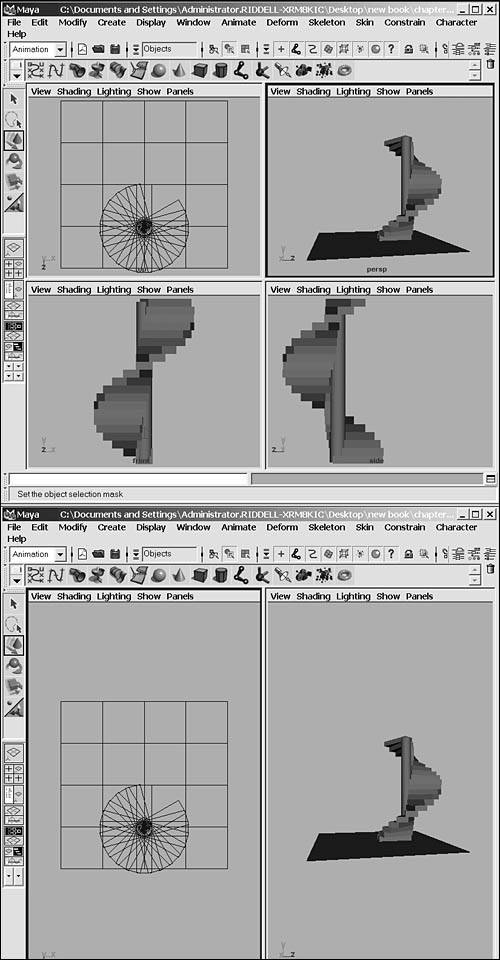
To switch from Maya's single view to its four-view layout, place your cursor over any one of the views and press the . The Front, Side, and Top views are orthographic, meaning they present a 2D view of the surfaces (Figure 2.11). This allows you to view the surfaces straight on from the selected view angle. Viewing the surfaces in this manner can be important for proper placement and alignment of objects. The three orthographic views combine to provide an accurate portrayal of the objects' placement relative to the rest of the scene. Users new to 3D often forget to check their objects in multiple views, which can cause placement problems for other objects. While the objects may look perfectly placed from the Front view, they could be completely off in the Side or Top view. The Perspective view gives you a full three-dimensional view of your scene (Figure 2.12). The combination of all of these views makes it possible for you to access your scene from virtually any angle. Figure 2.11. Orthographic views are the same as the views you would use when drafting with a pencil. You have three views that are from a straight-on camera, making editing and placement easier. 
Figure 2.12. The Perspective view is the only view that allows you to tumble around the scene, giving you the full 3D effect. 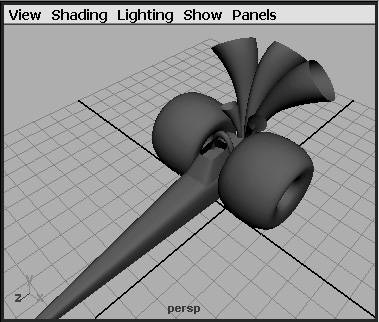
Maya allows you to change the layout of the panes, save a new layout, or change just one panel. In this chapter, we'll show you how to perform each of these layout changes. To change a pane into a Perspective view: - From the Panels menu inside the pane you want to change, select Perspective > persp (Figure 2.13).
Figure 2.13. Any pane can be changed into a Perspective view by selecting Perspective > persp. 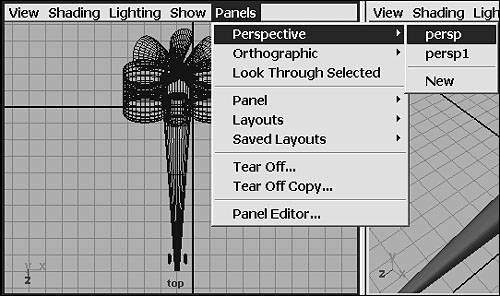
To change a pane into an orthographic view: - From the Panels menu inside the pane you want to change, select Orthographic > front, side, or top (Figure 2.14).
Figure 2.14. Any pane can be changed to any orthographic view (for example, Front or Top) by selecting the Orthographic menu. 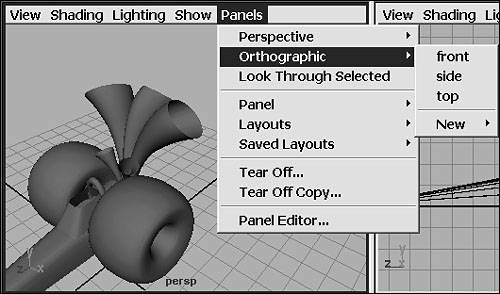
Panes don't always have to be view panes like Front or Perspective; they can also be panels that provide access to other areas and windows within Maya. These panels are often animation windows, like the Graph Editor (see Chapter 1, "Maya Basics") (Figure 2.15), or node representations of your scene, like the Hypergraph (see Chapter 1) (Figure 2.16) or even a Web browser. As you learn more about Maya, you will learn what each of these panels does to help your workflow. Figure 2.15. The Graph Editor holds all of the animation curves that can be edited. This panel can be embedded in a pane or opened in a window. 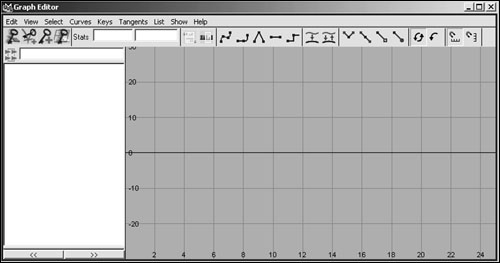
Figure 2.16. The Hypergraph holds visual representations of all the objects in the scene and can be embedded in a pane or opened in a window. 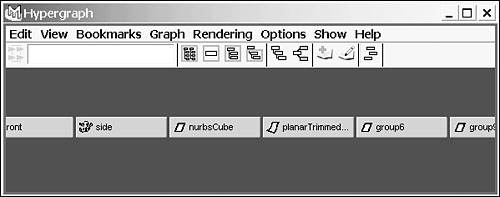
To change a pane into a nonview panel: - From the Panels menu inside any pane, select Panel and choose the panel name you wantOutliner, for exampleto change the pane into its respective view (Figure 2.17).
Figure 2.17. Many different panels can be embedded inside a pane. 
To change the pane layout: - From the Panels menu inside any pane, select Layouts and choose the preset layout name you wantTwo Panes Side by Side, for example (Figure 2.18).
Figure 2.18. Preset layouts give you quick access to the number of panes visible and the panel sets that will go in them. 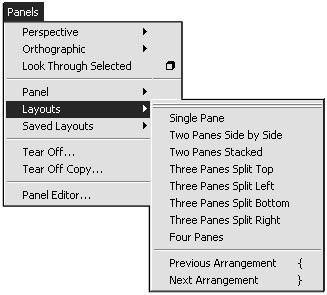
If you select Two Panes Side by Side, you will have only two panels to work with, and they will be laid out adjacent to one another.
or
- Select the icon of the layout you want from the toolbar on the left side of Maya's interface (Figure 2.19).
Figure 2.19. The layout icon shortcuts can be altered after being chosen by holding down the arrows at the bottom of the tool box. You could change a preset pane into a Perspective view with the arrows. The number of arrows varies with the layout selected. 
To save a layout: 1. | Set up the layout you would like to save and use later.
| 2. | From the Window menu, select Save Current Layout.
| 3. | Enter a name for the layout and click OK.
|
To change your current layout to a saved layout: - From the Panels menu inside any pane, select Saved Layouts and choose the name of the saved layout you would like to use.
To edit a layout: 1. | From the Panels menu inside any pane, select Saved Layouts > Edit Layouts.
| 2. | Under the Layouts tab select the name of the layout you would like to edit (Figure 2.20).
Figure 2.20. You can edit an existing layout or create a new layout under the Layouts tab. 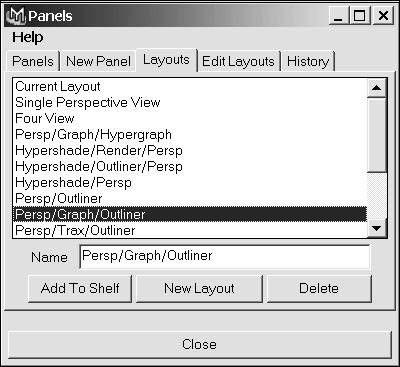
| 3. | Under the Edit Layouts tab, change the Configuration pop-up menu to the new configuration you would like to use (Figure 2.21).
Figure 2.21. You can change the number of panes the layout uses by selecting Edit Layouts tab > Configurations tab > Configuration menu. 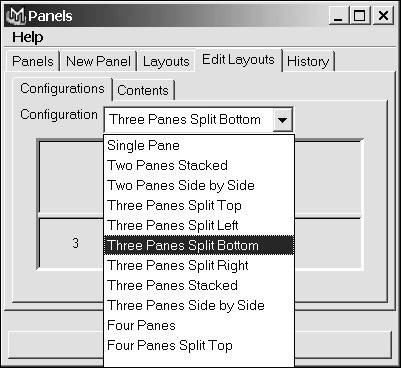
| 4. | Pull any of the center dividers for the numbered blocks to adjust the blocks' size relative to the size of the other blocks (Figure 2.22).
Figure 2.22. It can be helpful to resize the panes at this point to make the size of each one comparable to its use. For instance, you might want to make the Perspective pane larger so that you always have more working area in that view. 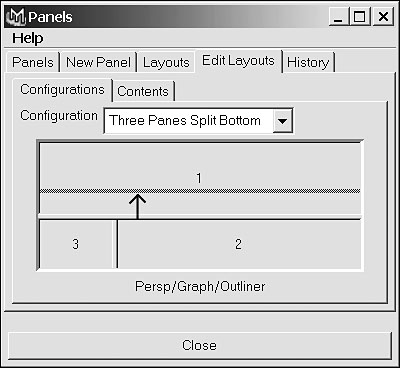
| 5. | Click the Close button to close the window.
You can now access the new layout from the Panels > Saved Layouts menu.
|
To hide or show a UI element: - From the Display menu, select UI Elements, and choose the UI elements you would like to hide or show (Figure 2.23).
Figure 2.23. Each interface element or related section can be turned on and off to save screen space when the element is not needed. 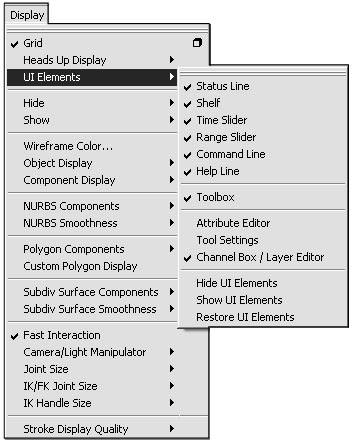
Each UI element name toggles between hidden and shown. If it is hidden, selecting it will show it, and vice versa.
To hide all UI elements: - From the Display menu, select UI Elements > Hide UI Elements.
All elements become hidden except the main and pane menu bars and your current pane layout (Figure 2.24).
Figure 2.24. A quick way to gain more working space is to use the Hide UI Elements command. 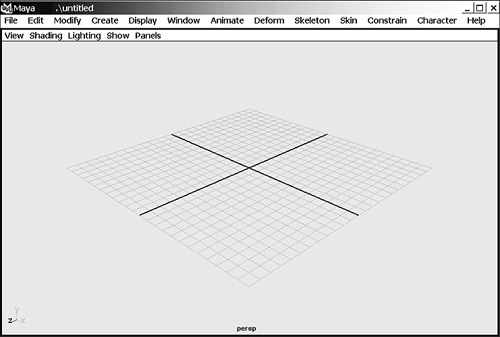
To show all UI elements: - From the Display menu, select UI Elements > Restore UI Elements (Figure 2.25).
Figure 2.25. You can quickly show all interface elements when needed by using the Restore UI Elements command. 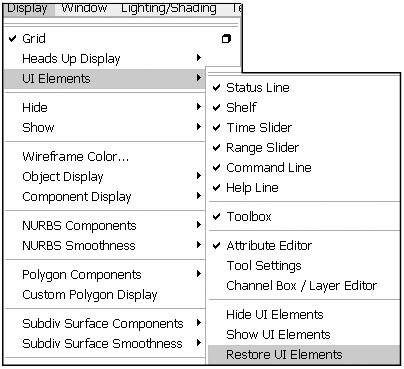
All UI elements are shown.
To hide or show the main and pane menu bars: - Hold down the anywhere in a pane, and select Hotbox Controls > Window Options > Show Main Menubar (Windows only) or Show Pane Menubars (Figure 2.26).
Figure 2.26. The main menu bar and the pane menus must be turned on and off individually. 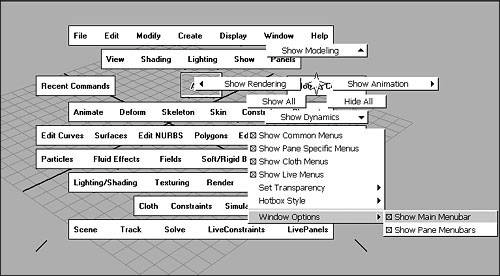
Show Main Menubar and Show Pane Menubars are toggled on and off. If they're on, selecting them will turn them off, and vice versa.
Using the Show menu The Show menu comes in handy when you want to isolate a particular type of object (and hide other types), such as curves or lights. It offers a convenient way to display only the object types you want, or to edit and hide all other object types. When animating, for example, you might want to show only the character's surface in one pane and only its bones in another (Figure 2.27). Figure 2.27. You can open two of the same panes, in this case Perspective views, and show different object types in each pane, making it easier to select and visualize objects. 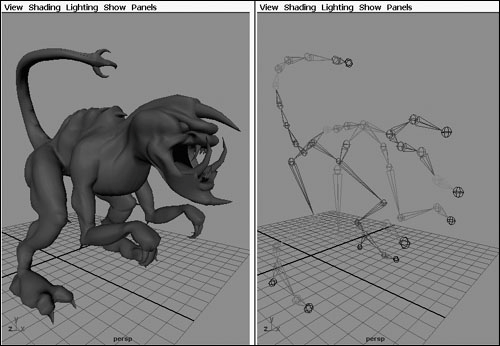
The Show menu allows you to turn all types of objects on and off at once. It also lets you turn objects on and off individually. You may want to turn off all objects first, then turn back on just the object type you want to isolate (Figure 2.28). Figure 2.28. Turning all objects off or on in the Show menu helps you to quickly turn on only the relevant object types in the pane. 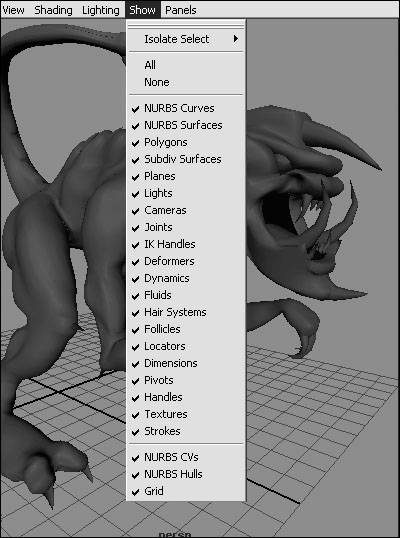
The Show menu only visually hides or shows object types; it does not delete the objects. Object types turned off in the Show menu will still appear in the final render. To hide object types with the Show menu: - From the Show menu inside any pane, select the object type you want to hide (Figure 2.29).
Figure 2.29. The Show menu hides and shows all objects of the chosen type. If you choose Lights, all lights in the view will be hidden. 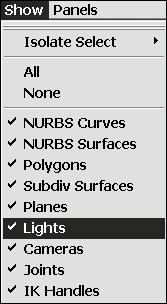
The object type selected is hidden from view (Figure 2.30).
Figure 2.30. There's no way to see or select an object type in a pane while it's hidden through the Show menu. In the right pane, Lights have been turned off in the Show menu. 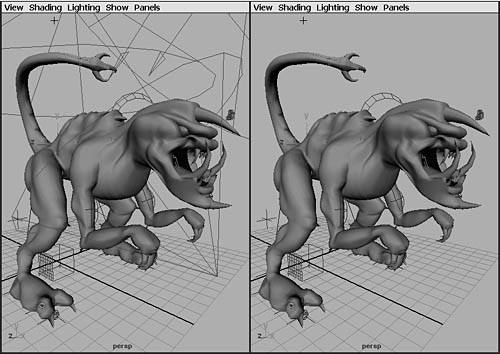
To show hidden object types with the Show menu: - From the Show menu inside any pane, select the object type you want to show in the pane (Figure 2.29).
The object type selected becomes visible in the view pane.
You can temporarily enlarge a pane to get a better view of its contents. To focus a pane to full screen: 1. | Move the mouse over the pane you would like to make larger (Figure 2.31).
Figure 2.31. The border of the pane turns blue to indicate that it's selected. 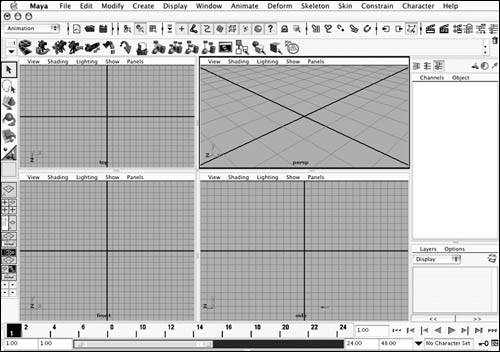
| 2. | Tap the once.
The pane expands to full view (covering any other panes) (Figure 2.32).
Figure 2.32. Tapping the zooms the pane; however, holding down the opens the Hotbox. Be careful to use the correctly. 
|
 Tip Tip
To frame a selected item in a view: 1. | Click the item you want the camera to zoom in on.
| 2. | Press  . .
The view zooms to the object (Figure 2.33).
Figure 2.33. Press to zoom in closer to a selected object. 
|
Tips
To frame all objects in a view: - Press
 . .
The view frames all of the objects in the scene (Figure 2.34).
Figure 2.34. When is pressed, the camera moves from the view on top to the view on the bottom. Now all of the objects in the scene are framed within the view. 
Tip
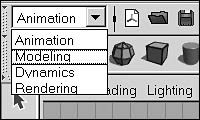
Maya has four main menu sets: Animation, Modeling, Dynamics, and Rendering. Each of these sets holds menus specific to its topic as well as the common menus File, Edit, Modify, Create, Display, Window, and Help. The common menus are always accessible from the main menuregardless of which menu set you're currently using. To change the menu set: Do any of the following: To show and hide the Hotbox: 1. | Show the Hotbox by holding down the (Figure 2.37).
Figure 2.37. You can quickly open and close the Hotbox by holding down the . 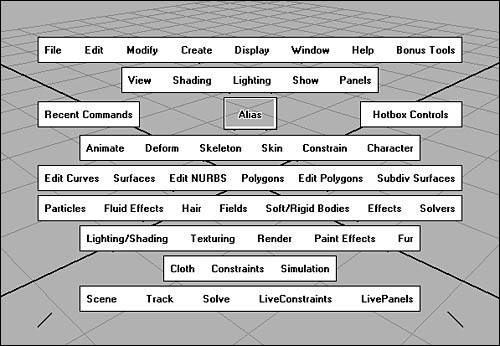
| 2. | Hide the Hotbox by releasing the .
|
To show and hide specific menu sets in the Hotbox: 1. | Show the Hotbox by holding down the in any pane.
| 2. | Hold down the left mouse button over the Hotbox Controls to show the Hotbox Controls Marking menu (Figure 2.38).
Figure 2.38. You can change the menus that are shown in the Hotbox by using the Marking menu in the Hotbox Controls. 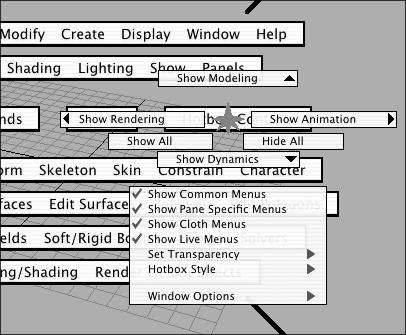
| 3. | Move the mouse over the menu set name you want to showShow Animation, in this example.
This opens an additional Marking menu.
| 4. | Select Show/Hide (menu set name) (Figure 2.39).
Figure 2.39. You can hide and show individual menus to control the size and accessibility of the Hotbox. 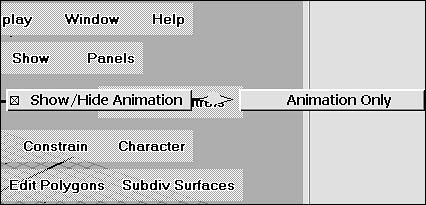
The menu set is shown if it was hidden, and vice versa.
|
To show all menu sets in the Hotbox: 1. | Show the Hotbox by holding down the in any pane.
| 2. | Hold down the left mouse button over the Hotbox controls to show the Hotbox Controls Marking menu.
| 3. | Select Show All to show all the menu sets in the Hotbox (Figure 2.40).
Figure 2.40. One advantage of using the Hotbox is that you can turn on all of the menu sets at once, or you can activate just one or two. 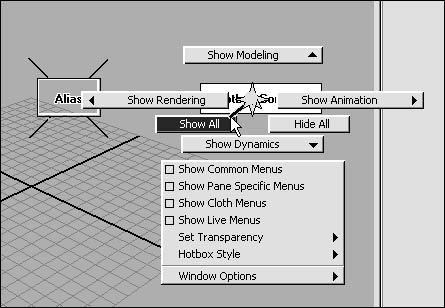
|
To hide all menu sets in the Hotbox: 1. | Show the Hotbox by holding down the in any pane.
| 2. | Hold down the left mouse button over the Hotbox Controls to show the Hotbox Controls Marking menu.
| 3. | Select Hide All to hide all the menu sets in the Hotbox (Figure 2.41).
Figure 2.41. You can hide all of the menus in the Hotbox. 
Hiding all of the menus in the Hotbox leaves only the Recent Commands and the Hotbox Controls menus available for selection. Along with these two menus, all of the Hotbox's Marking menus are still accessible.
|
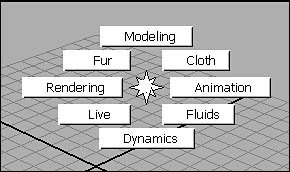
Most objects have a menu specific to their object type called a Marking menu. The Marking menu holds shortcuts to the selected object's most commonly used commands. If you're in the habit of using Marking menus, you'll save yourself a lot of time. To show an object's Marking menu: 1. | Move your pointer directly over an object.
| 2. | Click the object using the right mouse button to show its Marking menu (Figure 2.42).
Figure 2.42. Each object has an associated menu set, called a Marking menu, which you can access by Rightclicking the object. 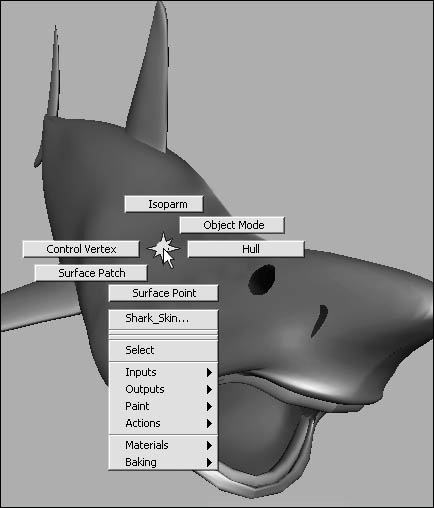
|
Tip
To show and hide the grid: - From the Display menu, select Grid to toggle the grid on and off.
Tip
The Channel Box provides an easy way to adjust many of a selected object's attributes. Located on the right side of the interface in the default layout (Figure 2.43), the Channel Box can also be retrieved after being hidden, or toggled on and off using the steps outlined below. Figure 2.43. The Channel Box can be hidden to save screen space or shown to give the user easy access to keyable object attributes. 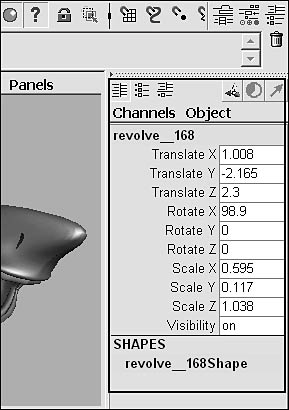
To show or hide the Channel Box: - Click the "Show or hide the Channel Box/Layer Editor" icon
 on the right side of the status line. (The status line sits directly below the main menu bar.) on the right side of the status line. (The status line sits directly below the main menu bar.)
or
- From the Display menu select UI Elements > Channel Box/Layer Editor (Figure 2.44).
Figure 2.44. The Channel Box and Layer Editor can be shown together to make better use of available screen space. 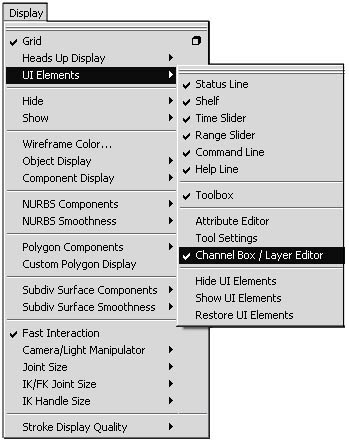
The Channel Box appears on the right side of the Maya interface.
By default, the Channel Box holds the keyable attributes of the selected object. You can add attributes to the Channel Box list by following the steps outlined below. To add preset attributes to the Channel Box: 1. | Create or select an object to which you want to add an attribute.
| 2. | From the Window menu, select General Editors > Channel Control (Figure 2.45).
Figure 2.45. Attributes can be removed from or added to the Channel Box via the Channel Control window. 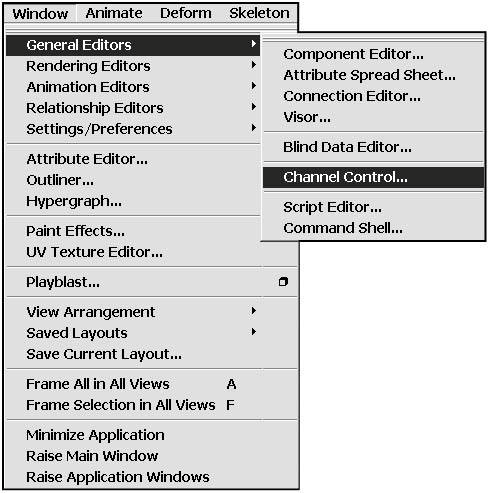
The Channel Control window opens.
| 3. | Under the Keyable tab select the attribute name in the Non Keyable area of the Channel Control window (Figure 2.46).
Figure 2.46. The Non Keyable area of the Channel Control window holds attributes that can be added to the Channel Box. 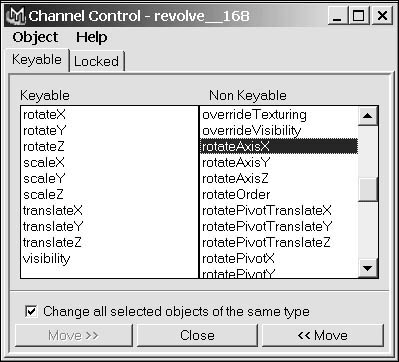
| 4. | Click the Move button  . .
| 5. | The attribute is added to the Keyable list of attributes (Figure 2.47).
Figure 2.47. You can move additional attributes to the Keyable area to add them to the Channel Box. 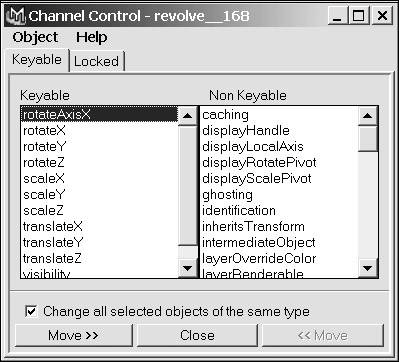
| 6. | Click the Close button to close the Channel Control window.
The new attribute is shown in the Channel Box (Figure 2.48).
Figure 2.48. The Channel Box displays the newly added attribute, ready for use. 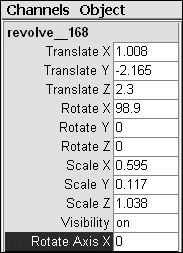
|
The Attribute Editor contains additional attributes not available in the Channel Box. The Channel Box is a great shortcut for accessing many of an object's attributes; however, it's too small to hold all of them. The Attribute Editor remains empty until an object is selected. To show or hide the Attribute Editor: Do any of the following: - Click the "Show or hide the Attribute Editor" icon
 on the right side of the status line. on the right side of the status line.
Make a selection to view its attributes.
- From the Display menu, select UI Elements > Attribute Editor (Figure 2.49).
Figure 2.49. The Attribute Editor can be opened from the Display > UI Elements menu. 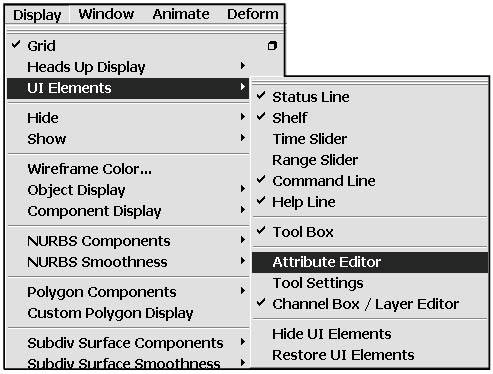
The Attribute Editor appears on the right side of the Maya interface.
- Press
 / / . .
The Attribute Editor opens (Figure 2.50).
Figure 2.50. When opened in a new window, the Attribute Editor can be moved around and minimized (to get it out of the way). 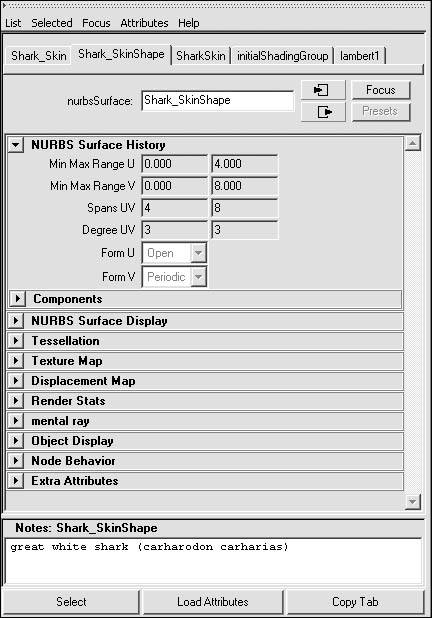
- From the Window menu, select Attribute Editor (Figure 2.51).
Figure 2.51. The Attribute Editor can be opened in a new window. 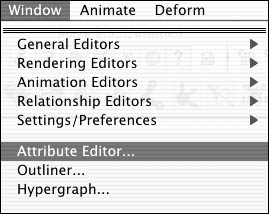
The Attribute Editor opens on the right side of the interface.
Tip
|