| The VersaMail application has a few additional settings that haven't been touched on yet. The first of these settings relates to how email messages are delivered to your device. Follow these steps to modify the VersaMail delivery options: 1. | Press the Menu button, navigate over to the Options menu, and scroll down to select the Preferences command. The Preferences screen appears, as shown earlier in Figure 8.9.
| 2. | Tap Delivery Options to open the Delivery Options screen (see Figure 8.23).
Figure 8.23. The Delivery Options screen includes a variety of options for controlling exactly how email messages are delivered to your device. 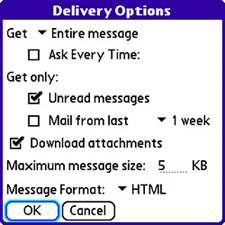
| 3. | The Get option is somewhat of an optimization to minimize the amount of data transferred when delivering messages. You can choose to get entire messages or just message subjects. The Ask Every Time check box is a manual override for the Get option; if selected, it causes a screen to be displayed each time you get mail that prompts you to get entire messages or subjects.
| 4. | The Get Only settings apply only to IMAP email accounts and allow you to indicate that you want to get only unread messages, as opposed to all messages on the server. You can also specify that you want to get mail only within a certain time frame, from as small as a day to as large as a month.
| 5. | The Download Attachments setting causes attachments to be downloaded automatically. However, the total message size (including attachments) must still fall below the maximum message size for the attachment to download automatically. Otherwise, you have to explicitly get the entire message. The maximum message size defaults to 5KB, but you can raise it up to nearly 5MB (5,000KB, to be exact). This size limits only the amount of email data that's retrieved automatically; you can always perform a "get" on a specific message to download it in its entirety, even if it's larger than the maximum size.
| 6. | The last setting in the Delivery Options screen relates to the format of email messages. More specifically, you can specify whether messages are retrieved as plain text or with HTML formatting supported. The default setting preserves HTML formatting for the display of messages in VersaMail. However, regardless of this setting, VersaMail always sends messages as plain text even if they were received with HTML formatting; the HTML formatting is stripped out of sent messages.
Note Although an entire message with attachments can be as large as 5,000KB, the actual text of a message can't be larger than 60KB. | 7. | When you're satisfied with any email delivery changes, tap the OK button to return to the VersaMail Preferences screen.
|
Before you return to the main VersaMail screen, there's another batch of preferences worth exploring. I'm referring to the server preferences, which are accessed by following these steps: 1. | Tap Server in the Preferences screen (under the Advanced heading) to open the Servers screen (see Figure 8.24).
Figure 8.24. Use the Servers screen to determine what happens to mail on the server after it has been delivered to your device. 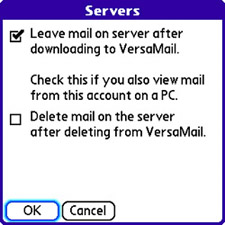
| 2. | The Servers screen is important in that it controls how email messages are treated upon being delivered from a mail server to your device. The first check box in Figure 8.24 applies only to POP accounts and, by default, leaves mail on the server after downloading it to your device. This setting is recommended if you're using a POP account on your device as well as a desktop computer because it allows your desktop computer to access the messages.
| 3. | The second check box determines whether deleting a message on your device also deletes it from the server. How you set this option depends entirely on how you use the email account. If the account is used solely by your device, you'll definitely want to enable the option. On the other hand, for shared accounts you might want to perform all deletions from the server via your desktop computer, in which case you might want to leave the option disabled.
| 4. | Tap the OK button to finish up with the email server preferences, and then tap OK again to exit the Preferences screen.
|
At this point, you've exhausted just about every setting possible for fine-tuning the VersaMail application so that it functions exactly as you want it to. One other group of preferences is associated with email connections, but it's unlikely that you'll need to change it. The connection preferences deal primarily with the timeout period for establishing an email connection and whether VersaMail should automatically disconnect after sending and receiving messages. If you'd like to take a look at these settings, they are located in the Connections section of the VersaMail Preferences screen. Note There are a few IMAP-specific settings that you'll see for IMAP accounts. For example, you can set the IMAP root folder, deleted mail folder, and sent mail folder.
|