| The Contacts application includes numerous data fields for providing lots of specific information for a contact. Even so, you will likely want to include additional information at some point that isn't reflected in the default fields. Although you could enter the information as an attached note, which might not be a bad idea depending on the information, you should consider creating a custom field. Custom fields are simple text fields that you can rename to anything you choose. For example, you could create a custom field called Spouse Name for entering the name of each contact's spouse. It's important to understand that custom fields apply to all your contacts. So if you create a custom field while editing a particular contact, the field changes in all of your contacts. This means you should be careful about changing custom fields that you have already created. For example, if you've been using a custom field called Spouse Name and you later change it to Pet Name, you run the risk of mistaking a contact's spouse with his or her petnot good! If you've already begun using a custom field, you're generally better off creating a new one instead of changing the old one. Note The Unfiled category is an automatic category designation that applies to contacts that have not been explicitly categorized.
Tip Other possibilities for custom fields include fields for a contact's anniversary, children's names, and hobbies, to name a few. If you manage a sales force, you might consider creating a custom sales quota field.
When I talk about "creating" a custom field, what I'm really talking about is renaming a custom field. Your Treo supports nine custom fields that are initially named Custom 1, Custom 2, and so on. To "create" a custom field of your own, you simply rename one of these fields to suit your needs. Following are the steps required to rename a custom field: 1. | Press the Option key followed by the Calendar button to launch the Contacts application. You can also navigate to the Contacts application on the application screen and launch it if you've changed the Option + Calendar application button combination.
| 2. | Press the Menu button and navigate over to the Options menu. Then scroll down to the Rename Custom Fields menu item and press the Center button on the five-way navigator (or simply tap Rename Custom Fields). The Rename Custom Fields screen opens (see Figure 5.6).
Figure 5.6. The Rename Custom Fields screen displays all the custom contact fields so that you can rename them. 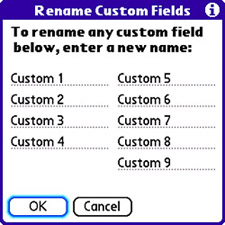
| 3. | As Figure 5.6 shows, there are nine custom contact fields that you can rename and use however you want. To rename a field, just navigate to it and change the text. Tap the OK button when you're finished to commit the changes opens (see Figure 5.6).
| 4. | To see the custom field changes, create a new contact and scroll down to the bottom of the information fields. Figure 5.7 shows where I renamed two custom fields to allow me to enter a contact's spouse name and pet name.
Figure 5.7. By renaming two custom fields, I can now specify the name of a contact's spouse and pet. 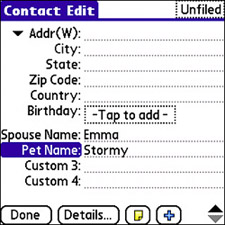
|
You can rename all nine custom contact fields if you want. The real trick to using custom fields is getting them to synchronize with your desktop computer. If you're using the Palm Desktop software, there's no problem because custom fields synchronize automatically. However, if you're synchronizing with a desktop PIM, such as Microsoft Outlook, you need to manually map each custom field on your device to a field in Outlook. Follow these steps to map a custom contact field for synchronization with Outlook on a Windows computer: 1. | If HotSync Manager isn't already running, launch it.
| 2. | Right-click the HotSync Manager icon in the taskbar, and click Custom on the menu that appears. The Custom dialog box opens to display a list of synchronization data types (conduits), as shown in Figure 5.8.
Figure 5.8. The Custom dialog box for HotSync Manager provides access to the different data types available for synchronization. 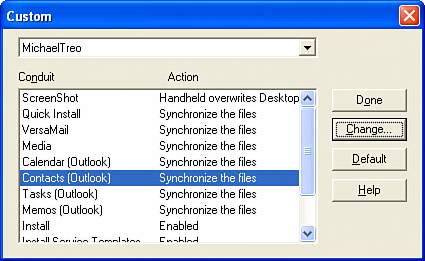
| 3. | Make sure your user name is selected in the pick list at the top of the window, and then click to select Contacts (Outlook) in the Conduit list. Click the Change button to edit the synchronization settings for contacts.
| 4. | In the Change HotSync Action dialog box that opens, click the Settings button to edit the Outlook synchronization settings for contacts.
| 5. | In the Outlook Contacts Settings dialog box that opens, click the Advanced button to access advanced contact settings. The Contact Advanced Settings dialog box opens, which is where you change the mapping of contact fields during synchronization (see Figure 5.9).
Figure 5.9. The Contact Advanced Settings dialog box for HotSync Manager provides access to custom field mappings for contact synchronization. 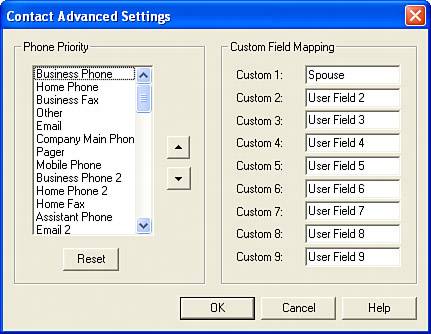
| 6. | The right side of the Contact Advanced Settings dialog box lists the custom fields on your device. The list is admittedly a little confusing because it doesn't show the correct names of the fields if you've changed them. For example, the first custom field shows up as Custom 1 even if you've renamed it to Spouse Name. To map a custom Treo field to a field in Outlook, just enter the name of the Outlook field next to the custom contact field. It just so happens that Outlook has a field called Spouse, so you can map the Spouse Name field (Custom 1) to Outlook's Spouse field by entering Spouse next to Custom 1. Click OK when you're finished mapping fields.
| 7. | Click OK in the Outlook Contacts Settings dialog box, followed by OK in the Change HotSync Action dialog box. Finally, click Done in the Custom dialog box to wrap up the mapping process.
| 8. | Now go into Outlook on your desktop computer and set the spouse name for a contact. Look under the Details tab for a field labeled Spouse's name. (The field labels don't always match the actual field names exactly.) Enter the name and save the contact.
| 9. | Synchronize your device with the desktop computer, and the custom field Spouse Name then takes on the name you entered in Outlook, meaning that the name from Outlook overwrites the name on your device.
|
Note The procedure for mapping custom contact fields for synchronization on a Macintosh computer are similar to the steps outlined here for Outlook on a Windows computer.
Custom contact fields give you a lot of flexibility in tweaking the Contacts application to work exactly the way you want it to. Being able to map those custom fields to your desktop PIM is the icing on the cake in terms of taking maximum control of your contact management. |