| One of the most useful features of any mobile communicator is contact management. Treo devices are no different, and you'll no doubt find yourself using the Contacts application extensively to enter new contacts. Fortunately, entering a new contact in the Contacts application is easy. To create a new contact, follow these steps: 1. | Press the Option key followed by the Calendar button to launch the Contacts application. You can also navigate to the Contacts application on the application screen and launch it if you've changed the Option + Calendar application button combination.
| 2. | Tap the New Contact button in the lower-left corner of the screen to begin creating a new contact. The Contact Edit screen opens, as shown in Figure 5.1.
Figure 5.1. The Contact Edit screen is where you enter all the details associated with a contact. 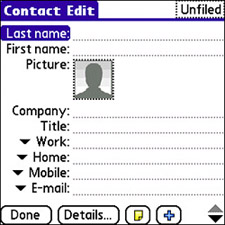
| 3. | You can enter lots of fields of data for a contact, but you can also enter as few fields as you want. Of course, you want to enter the name of every contact. However, beyond that, you're free to supply as much or as little detail as you'd like. I mention this because often it's useful to enter a new contact's name and phone number (or email address) first, and then go back and fill in more details later. The Contact Edit fields are larger than a single screen, so you have to use the five-way navigator or tap the scroll buttons in the lower-right corner to navigate through the fields.
| 4. | You can use the Picture field to specify a picture for the contact, which is displayed on the screen as a photo caller ID when that person calls you. To set the picture, tap the outline of the head. A menu appears that prompts you to select Camera or Photos. Choose Camera if you are with the person and want to take his or her picture, or go with Photos if you already have the person's picture stored as an image on your device.
Note If you synchronize with Microsoft Outlook on your desktop computer, note that the Picture field on your Treo is synchronized by storing the photo caller ID image as an attachment in the Outlook contact. | 5. | As you continue entering contact details, pay close attention to the fields that have a small down arrow next to them. They are similar fields in a group that can be mixed and matched. For example, you can tap the AIM field and change it to MSN if the contact uses MSN Messenger instead of AOL Instant Messenger (AIM). The phone number and email fields work in a similar fashion.
| 6. | Near the bottom of the contact information you'll see the Birthday field for specifying the contact's birthday. To set the birthday, tap where it says -Tap to Add-. The Select Birthday screen shown in Figure 5.2 opens. Tap the month and day of the birthday to set it; if the person's birthday is today, just tap the Today button.
Figure 5.2. Use the Select Birthday screen to set a contact's birthday by selecting a date on the calendar. 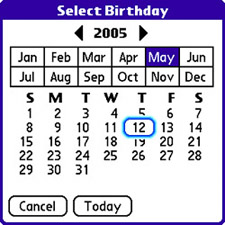
| 7. | After selecting the birthday, you're prompted to set a reminder for it. A reminder is optional, but it's a great idea if you find yourself forgetting birthdays of close friends, family members, and co-workers. Figure 5.3 shows the Birthday screen, which displays the selected birthday along with a Reminder check box and the number of days in advance that you'd like to be reminded. Tap the number 7 if you'd like to change the time frame for the reminder. When you're finished, tap the OK button to complete the birthday setting.
Figure 5.3. The Birthday screen gives you an opportunity to set a reminder for the birthday, including the number of days in advance for the reminder. 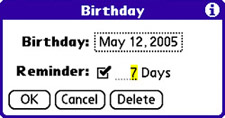
Note When a contact's birthday rolls around, the Calendar application shows the person's name in Day view with a little birthday cake icon next to it. | 8. | If you have additional text information you'd like to associate with a contact, you might want to include it as an attached note. Tap the Note button (small paper icon) at the bottom of the Contact Edit screen to add a text note as a contact attachment. A note entry screen appears where you can enter text for the contact (see Figure 5.4). After entering the note text, tap the Done button to save the note as an attachment for the contact.
Figure 5.4. The note entry screen consists of a large text edit field where you enter a text attachment for a contact. 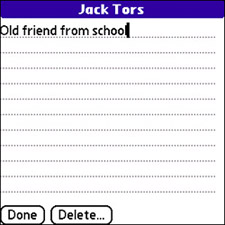
Tip You can delete the birthday for a contact by tapping the Delete button in the Birthday screen. The birthday is then removed from the contact, including the reminder if it was set. Note Just below the Birthday field you'll notice several custom fields. You can use these fields to enter any custom information you'd like to add to your contacts. I say "contacts" because any changes you make to custom fields apply to all your contacts. You learn how to rename custom fields later in this chapter in the "Customize Contact Data" section. | 9. | The last piece of business associated with creating a new contact is filing the contact. By default, all new contacts are automatically considered unfiled, so it's a good idea to file your contacts. Filing a contact simply involves assigning a category to it. To select the category for a contact, tap the Details button to open the Contact Details screen (see Figure 5.5).
Figure 5.5. The Contact Details screen enables you to specify the category for a contact and designate the contact as private. 
| 10. | In addition to specifying the category for the contact, the Contact Details screen also allows you to flag the contact as private. If you recall, private records on your Treo have limited access based on your security settings. For example, you can limit private records so that a password is required to view or edit the data. You can also configure the security settings to completely hide private data until the password is entered or just mask the data. For details on how to configure security settings for private records, see "Secure Your Treo with a Password" in Chapter 3, "Customizing and Personalizing Your Treo."
| 11. | When you're finished entering the new contact, tap the Done button to close the Contact Edit screen and save the contact. It's immediately added to the main contact list.
|
Tip You can delete the note for a contact by tapping the Delete button in the note entry screen. The note is then removed from the contact.
You can create as many contacts as your device's memory allows. Some Treo users have several hundred contacts stored on their devices, so it's unlikely that you'll run into serious problems when it comes to overloading the Contacts application. Also, it's worth pointing out that if you're synchronizing your device with your desktop computer, any new contacts you create on your device carry over to the desktop the next time you synchronize. Tip To add a field to a contact, tap the button with the plus icon at the bottom of the Contact Edit screen, and then choose the field you'd like to add.
|