SQL Server 2000: A .NET Enterprise Server
It is likely that any experience you have had on the mainframe platform with relational databases was associated with IBM's DB2 database product. DB2 has long been the dominant player in that arena. In the Windows /Web arena, Microsoft has joined the ranks of database software vendors with their SQL Server 2000 product.
| Note | If by chance you are using a competing database product (e.g., Oracle's Oracle9i database or IBM's DB2 Universal Database), the majority of this chapter will still be of value to you and your .NET retraining . The ADO.NET and Application Blocks for .NET discussions apply to any vendor's (Microsoft, Oracle, IBM, and others) database product. |
In Chapter 2, I referred to the Microsoft SQL Server 2000 (or just SQL Server) product when I listed the .NET Enterprise Servers. Then, as I discussed various views of data in Chapter 10, I mentioned Microsoft's database product again, this time as a data repository. [3] Now, this product will serve as a backdrop for this chapter's relational database programming discussion.
Getting Started
For simplicity, I'll assume that you downloaded the free, 120-day trial version of SQL Server 2000 and installed it (client tools and database) locally on your own workstation. A few very basic things are worthy of mention. You should choose to include Books Online (you are prompted about this during installation). Additionally, you should choose to include the SQL Server Service Manager, Query Analyzer, and Enterprise Manager (all installation choices).
| Note | If your company's software installation policy does not allow you to install a SQL Server database to your local workstation, ask your database administrator (DBA) for access to a remote development server. Mention to the DBA that you are only interested in accessing the SQL Server default sample databases for training purposes. This is typically not a problem. This type of configuration will require you to install just the client tools to your local workstation. Additionally, your DBA (or the documentation in SQL Server Books Online) can assist you in the server registration required to "connect" to the remote development server (the server registration is needed only if you wish to connect to a database other than one locally installed). |
SQL Server Books Online
When you install the SQL Server product, select the option to install Books Online. Once the installation is complete, you can access the online documentation by clicking the Start button and selecting Programs Microsoft SQL Server Books Online (see Figure 11-1). You will find this set of online documentation to be extremely informative.
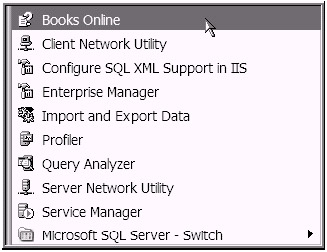
Figure 11-1: Accessing the SQL Server Books Online option
Starting the SQL Server Service
Along with the choice of whether or not to install the Service Manager comes the choice of whether or not to have the SQL Server service automatically started every time you reboot your computer. Some developers prefer to manually start the service each time they are ready to access the locally installed database. As shown in Figure 11-2, the Service Manager is easily accessed.
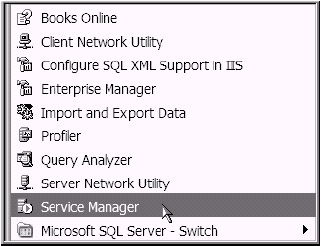
Figure 11-2: Accessing the SQL Server Service Manager
| Tip | You may notice the SQL Server Service Manager icon also appears in the area of the desktop taskbar referred to as the notification area. The notification area of the taskbar is where you typically see the time displayed (pre “Windows XP operating systems called this taskbar area the System Tray). By clicking ( optionally , right-clicking) the SQL Server Service Manager icon, you can start, stop, and pause the SQL Server service. Accessing the SQL Server Service Manager icon here may be more convenient than using the Start button/Programs menu approach, as shown in Figure 11-2. |
Optionally, [4] you could choose to access the SQL Server Service Manager from the Microsoft Management Console (MMC) snap-in interface: Computer Management. After you navigate to the Computer Management console and expand the tree view node for Microsoft SQL Server, you right-click the SQL Server Service icon (see Figure 11-3).
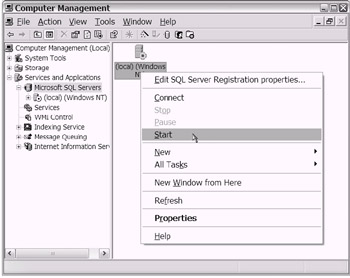
Figure 11-3: Starting the SQL Server Service Manager from the Computer Management console
| |
Not long after I began my own " reformation " ”my technology transition over to the "other side" ”I was introduced to the SQL Server product. I recall the feeling of being in shock after realizing that I was able to download and install my very own copy of an industrial-strength database product. With this local copy, I was able to start and stop an entire database service, create and delete databases, and create tables and views. I find that having that type of freedom and power is simply amazing. Can you imagine walking into the mainframe data center and telling the systems programmer or database administrator that you would like to spin up your very own copy of a mainframe DB2 service?
| |
Client-Side Tools
You could loosely divide the SQL Server product into two basic portions: the client-side tools and the server-side database software. To give you an idea of the general purpose of the client-side tools, you can compare them with the tools of IBM's mainframe DB2 database product. On the mainframe, you typically had the following tools to support your DB2 development:
-
Database 2 Interactive (DB2I)
-
Query Management Facility (QMF)
Traditionally, the QMF tool usage is sometimes reserved for special querying and reporting needs. On the other hand, the DB2I tool is used by practically all mainframe DB2 developers. As shown in Figure 11-4, the DB2I tool is supported as a mainframe ISPF option.
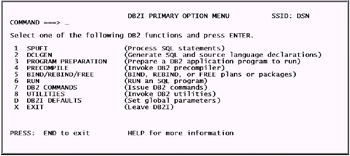
Figure 11-4: The main menu of IBM's DB2I tool
If you were to navigate to the SQL Server Programs list (by clicking the Start button and selecting Programs Microsoft SQL Server), you would notice about seven client-side utilities (not including Books Online and Service Manager). Of those seven SQL Server utility options, I discuss the following two in this chapter:
-
Enterprise Manager
-
Query Analyzer
Interestingly, you can almost draw a one-to-one comparison between the mainframe DB2 tools and the Win32 SQL Server tools. In other words, the mainframe DB2I tool is very similar to the SQL Server Enterprise Manager tool. Likewise, the mainframe QMF tool is similar to the SQL Server Query Analyzer tool. Generally, you used DB2I for administrative and development preparation tasks. Some of those types of tasks for SQL Server you will perform using the Enterprise Manager tool. You typically used the mainframe DB2's QMF tool for querying and ad hoc reporting capabilities. You guessed it: Now the Query Analyzer tool will serve your SQL Server querying and ad hoc needs.
Is It Fair to Compare?
In fairness, I should emphasize that these comparisons of legacy mainframe DB2 tools to modern Win32 SQL Server tools are loosely tied. As you will see, you can find features absent or present on one platform's toolset or the other. This is understandable given that there are some platform-specific requirements supported as needed on both sides (the mainframe DB2 side and the Win32 SQL Server side).
On one hand, you may read my statements as positioning the Win32 platform tools as more user - and developer-friendly (given the more graphic presentation of the SQL Server's toolset) than the mainframe tools. On the other hand, I must tell you that in more modern times, IBM has created newer versions of the DB2 client-side tools. For example, there is a new version of QMF called QMF for Windows. Additionally, there exist newer DB2 SQL client tools such as Operations Navigator, Interactive SQL, and Query Manager.
Understand that I am contrasting the traditional/legacy mainframe environment with the newer .NET Windows/Web environment. This is appropriate given that many mainframe installations continue to develop under the older legacy configurations. The bottom line is that if you have used the mainframe database support tools before, you immediately have a head start toward learning the Win32 SQL Server support tools. The contrasting presentation in this chapter simply seeks to help you leverage that advantage.
Enterprise Manager
Basically, Enterprise Manager [5] is a graphical user interface (GUI) tool you use to manage your SQL Server objects (databases and tables are examples of such objects). To access SQL Server's Enterprise Manager, click the Start button and select Programs Microsoft SQL Server Enterprise Manager. As shown in Figure 11-5, Enterprise Manager includes a total of seven groups of options.
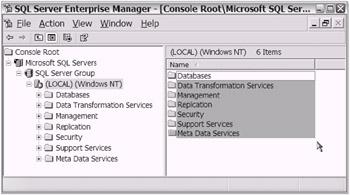
Figure 11-5: Enterprise Manager offers several administrative and non-database -specific features.
Each option grouping is presented as a folder in the left pane of the Enterprise Manager window. The option grouping that appears above the others (Databases) is used for database-specific tasks. The other six options (Data Transformation Services, Management, Replication, Security, Support Services, Meta Data Services) are available for non- database-specific needs.
To address your immediate concerns, you will narrow your focus to the options you can access via the Databases grouping. When time allows, please revisit the other Enterprise Manager options. The references provided at the end of this chapter in the "To Learn More" section, in addition to the Books Online documentation, will help with your continued learning.
Exploring the Databases Feature
A typical SQL Server installation includes two sample databases: the Northwind database and the Pubs database. You will use each of these Microsoft-provided sample databases to help illustrate several points (see Figure 11-6).
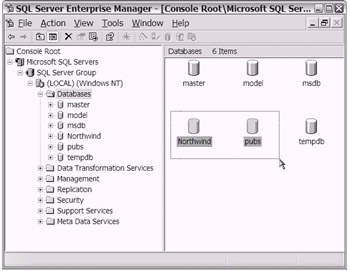
Figure 11-6: SQL Server's Enterprise Manager showing the default and sample databases
| |
The Northwind sample database provided by Microsoft represents sales data for a fictitious company. The fictitious company, Northwind Traders, is an importer and exporter of specialty foods . The Pubs sample database contains the type of fictitious data typical of a book publishing company.
| |
If you double-click the Tables icon (below the Northwind database folder), the list of User and System tables displays. Obviously, the User tables are for your querying needs (both input and output). The SQL Server service makes use of the System tables. On some occasions, you may find it useful to even query the System tables (typically, you would not update the System tables yourself). Figure 11-7 shows the User tables of the Northwind sample database.
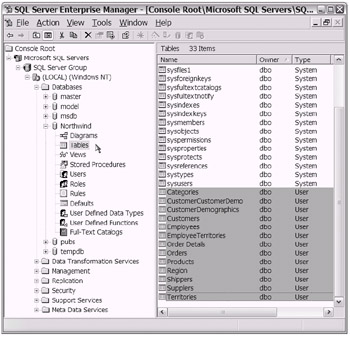
Figure 11-7: The User tables of the Northwind sample database
| Note | The default installation of the sample databases includes the two users guest and dbo (database owner). The tables will show dbo as the owner. It is not uncommon when you are doing a demonstration/ training setup that the login name of "sa" is used for dbo, using a blank password. You can leave the settings for Users and Roles as is for demonstration/training purposes. However, for actual development, you should change these security/access settings as per your particular organization's requirements. |
Let's use the Categories table (one of the User-type tables) of the Northwind database as an example to demonstrate how easy it is to perform a query. If you select the table by right-clicking it and then choosing Open Table Return all rows, you will dynamically build and execute a SELECT query. Figure 11-8 shows the menus you will see after you right-click the Categories table.
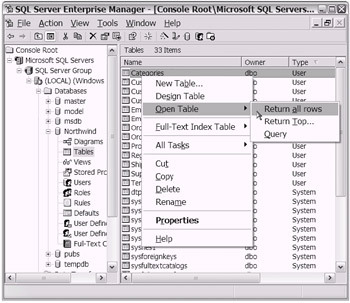
Figure 11-8: Performing a SELECT query on the Categories table
Your resulting display (in grid format) should list the eight existing rows of the Categories table. Optionally, you can click the Show/Hide SQL Pane icon. In Figure 11-9 you can see the selected rows of the Categories table with the SQL Pane shown.
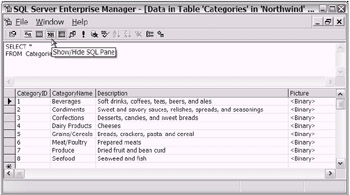
Figure 11-9: The selected rows of the Categories table
| Tip | You can toggle between this displayed grid-style window and the main Enterprise Manager window. On the menu bar, click Windows. You will then see a list of available windows to toggle to. |
Having seen this SELECT query capability, you now know at least one area where the feature set of the Enterprise Manager tool is similar to that of the mainframe DB2I tool. Specifically, you typically used DB2I's SQL Processor Using File Input (SPUFI) option to perform similar query execution tasks.
| Note | The SQL Server client tools fully support all types of queries; you are not limited to SELECT queries. Additionally, you can use either Enterprise Manager or Query Analyzer to create SQL stored procedures. |
Please continue to explore the other features of the Enterprise Manager tool. Keep in mind that your ultimate goal is to create Windows/Web applications that will use SQL Server tables. When you perform database programming, the tables (similar to those found in the Northwind and Pubs databases) will serve as your data source. Look to the various functions exposed in the Enterprise Manager tool to support your development activity.
| Tip | Through your retraining effort, you may end up wanting to restore the Northwind or Pubs sample database back to its original state. There is a SQL script available that will reinstall each sample database. Consult the SQL Server Help feature (or Books Online) for further details. |
SQL Server's Query Analyzer
The Query Analyzer tool is designed to support your needs to query the SQL Server tables. Although there is some overlap [6] between the Enterprise Manager tool and the Query Analyzer tool, each tool has its strengths. As you could use the mainframe QMF tools to support your query needs on the mainframe with the DB2 database, you can use SQL Server's Query Analyzer in much the same way. The way you work with Query Analyzer may remind you of the Query-by-Example (QBE) feature of QMF.
| Note | As you know, the mainframe tool QMF served two primary purposes: to quickly run queries on DB2 databases and to easily create formatted reports using the query results. The SQL Server Query Analyzer tool is comparable to the query functionality in QMF. Although you can create basic, ad hoc reports with Query Analyzer, most Windows/Web developers seek out other tools to address their need for formatted reports . |
You can launch the SQL Server Query Analyzer tool in two ways. From within the Enterprise Manager main window (as shown in Figure 11-10) on the menu bar, you can select Tools SQL Query Analyzer. Optionally, you can access the SQL Server Query Analyzer tool by clicking the Start button and selecting Programs Microsoft SQL Server Query Analyzer.
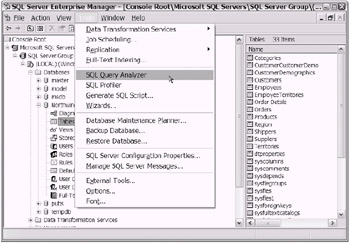
Figure 11-10: Launching Query Analyzer from within the Enterprise Manager window
| Tip | There is one advantage to accessing the Query Analyzer tool from within Enterprise Manager. The Query Analyzer window will open, showing that you are already connected to a specific SQL Server (WINDOWSXP in my case, user SA). Also, whichever database you happened to have selected in Enterprise Manager will be selected in the newly opened Query Analyzer window. |
Using Query Analyzer
Once you've launched the Query Analyzer tool (I chose the option of launching from within Enterprise Manager), you can navigate through the tree view shown in the Object Browser window by expanding and collapsing nodes. As shown in Figure 11-11, I have expanded the Northwind/User Tables node to locate the Categories table.
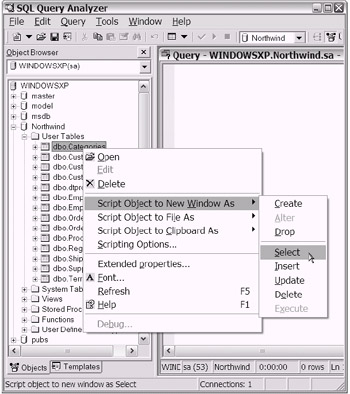
Figure 11-11: Preparing to query the Categories table using the Query Analyzer tool
As you can see in Figure 11-11, if you right-click a given table, you will be presented with many options. Naturally, these options include building a SELECT query (to do so, after right-clicking, navigate using Script Object to New Window As Select). After you build your query in the new window, simply press F5 to execute the query. The results will be displayed in a grid at the bottom of your Query window.
You can choose to change the grid output display. You can easily change the grid style output to text or a file (see Figure 11-12) by clicking the Execute Mode icon.
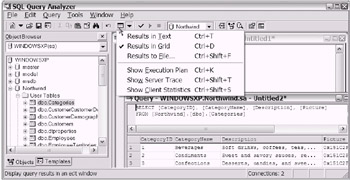
Figure 11-12: Preparing to click the Execute Mode icon to change the option from "Results in Grid" to either "Results in Text" or "Results to File"
For those of you who have used the mainframe DB2 EXPLAIN function and PLAN_TABLE when working to optimize [7] your queries, and perhaps the mainframe QMF tool to format your output, Query Analyzer offers a comparable feature. You can launch the Display Estimated Execution Plan feature via its toolbar icon or by pressing Ctrl-L. As shown in Figure 11-13, the Estimated Execution Plan is displayed (in the lower window) for the SELECT query (shown in the upper window).
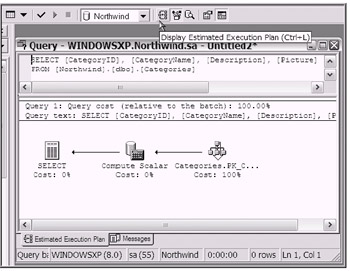
Figure 11-13: The Estimated Execution Plan for a given query. This feature will assist you in optimizing your query.
| Tip | The Object Browser window contains a Common Objects folder and a Templates tab. These two features offer significant development shortcuts. You will notice that the Common Objects folder will assist you in the use of built-in functions. The Templates tab gives you a "skeleton" of SQL code. In both cases, you can "drag" the object in question from the Object Browser window over to a target Query Analyzer window. |
Saving Queries and Data
Using the mainframe QMF tool, you regularly executed the SAVE command to save objects. Any objects that you saved went to your QMF database. Among the SAVE commands that you were able to execute were the following:
-
SAVE QUERY
-
SAVE DATA
-
SAVE PROC
With SQL Server's Query Analyzer tool, you can also save your queries and data. However, there are a few differences.
On QMF, you were limited to one SQL statement per saved query. In Query Analyzer, that limitation does not exist. You are able to include multiple SQL commands that will execute sequentially. Optionally, you can actually highlight a specific SQL command separately from the others. When you press F5, only the query that is highlighted will execute.
| Tip | In Query Analyzer, after you have created your query, executed it, and optimized it, you may wish to save the query for later execution. To do this, simply navigate to the regular menu bar. Then, select File Save or Save As. (Optionally, you can press Ctrl-S.) Your query will be saved in a file with .sql as the file extension. You can choose to save your queries in an appropriate folder for yourself or for others to share. |
As you know, on QMF you were able to save the results of your SELECT query using the SAVE DATA command. However, you needed the QMF FORM or QMF REPORT objects to actually SHOW the saved data. With Query Analyzer, you can save your SELECT query results (e.g., as a CSV file or comma-separated values) and easily use the saved file outside of Query Analyzer.
On QMF, the SAVE PROC feature was used to save QMF commands. You would use these QMF commands to process QMF objects in a batch mode (i.e., using the RUN command to execute multiple saved queries in succession). Query Analyzer does not have any intrinsic commands to support this type of a batch PROC. However, the support Query Analyzer provides for SQL stored procedures can easily surpass that of a QMF PROC.
| Tip | The next time that you are in the Visual Studio .NET (VS .NET) IDE preparing to create a new project (looking at the New Project dialog box), take a quick look at the Other Projects folder. One of the subfolders that you will see within the Other Projects folder is the Database Projects folder. Basically, this folder contains a template you can use to create a special type of project. If you use this project template, you will notice that an actual project will be created for you. However, the project will look more like a place to store multiple types of saved queries. In other words, it will remind you of the use of QMF when saving your queries. The Database Projects template VS .NET feature is certainly worthy of your time. |
In an abbreviated fashion, that concludes this chapter's overview of SQL Server's Enterprise Manager and Query Analyzer tools. Using these two tools, you can build and test your SQL queries. You can also use these tools to help familiarize yourself with the sample databases Northwind and Pubs. Now I'll move on to discuss the .NET technology that you'll use in your programming code to access the SQL Server databases.
| Tip | From the VS .NET IDE window, you can access the Server Explorer. The VS .NET Server Explorer offers functionality similar to that of the SQL Server client tools. The fact that it is integrated directly into the VS .NET IDE may make it more convenient to use (on some occasions). When time allows, be sure to take a look at it. To access the Server Explorer from the VS .NET menu bar, select View Server Explorer. (Optionally, you can press Ctrl-Alt-S.) |
[3] You'll find that some desktop and smaller applications use Microsoft Access (a member of the Microsoft Office family) and/or Microsoft Data Engine (MSDE) as a relational data source, although they aren't as powerful and feature rich as SQL Server. You may even find that for quick prototyping development, Microsoft Access or MSDE will suit your database needs.
[4] Depending on your installation choices, you may also have the option of accessing the SQL Server Service Manager from your Windows desktop taskbar notification area (next to the clock).
[5] Some of the functions you can access via Enterprise Manager's graphical interface are also available through the Computer Management console snap-in interface of Microsoft Management Console (MMC).
[6] The mainframe DB2 tools of DB2I and QMF also had a small amount of overlap. The SPUFI feature of DB2I and QMF supported query capabilities.
[7] Some of you may have also used the DB2 SQL Performance Analyzer (SQL PA).
EAN: 2147483647
Pages: 204
- Assessing Business-IT Alignment Maturity
- Linking the IT Balanced Scorecard to the Business Objectives at a Major Canadian Financial Group
- Measuring ROI in E-Commerce Applications: Analysis to Action
- Technical Issues Related to IT Governance Tactics: Product Metrics, Measurements and Process Control
- Governing Information Technology Through COBIT